User Guide
Page 3
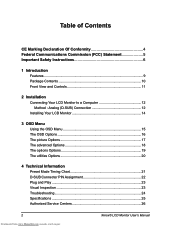
... Safety Instructions 6 1 Introduction Features ...9 Package Contents 10 Front View and Controls 11 2 Installation Connecting Your LCD Monitor to a Computer 12 Method : Analog (D-SUB) Connection 12 Installing Your LCD Monitor 14 3 OSD Menu Using the OSD Menu 15 The OSD Options 16 The picture Options 17 The advanced Options 18 The options Options 19 The utilities Options 20 4 Technical Information Preset Mode Timing Chart 21 D-SUB Connector PIN Assignment 22 Plug and Play...
... Safety Instructions 6 1 Introduction Features ...9 Package Contents 10 Front View and Controls 11 2 Installation Connecting Your LCD Monitor to a Computer 12 Method : Analog (D-SUB) Connection 12 Installing Your LCD Monitor 14 3 OSD Menu Using the OSD Menu 15 The OSD Options 16 The picture Options 17 The advanced Options 18 The options Options 19 The utilities Options 20 4 Technical Information Preset Mode Timing Chart 21 D-SUB Connector PIN Assignment 22 Plug and Play...

User Guide
Page 4
...Chang Tel: +86-755-2526-1512 Fax: +86-755-2526-1565 Email:[email protected] AMERICA When disposing of Proview products in America, please call the following location to make arrangements for recycling. Proview Technology, Inc. (U.S.A.) 7373 Hunt Avenue, Garden Grove, CA 92841 U.S.A. ENGLISH...-6290 Patrick Yen Email:[email protected] "THIS DISPLAY UNIT IS AN ELECTRIC DEVICE WHICH MAY CONTAIN HAZARDOUS MATERIALS AND COMPONENTS, AND WHICH MUST BE DISPOSED OF AT END OF LIFE ACCORDING TO THE PROPER PROCEDURE" Xerox© LCD Monitor User's Manual 3 Downloaded from www.Manualslib.com...
...Chang Tel: +86-755-2526-1512 Fax: +86-755-2526-1565 Email:[email protected] AMERICA When disposing of Proview products in America, please call the following location to make arrangements for recycling. Proview Technology, Inc. (U.S.A.) 7373 Hunt Avenue, Garden Grove, CA 92841 U.S.A. ENGLISH...-6290 Patrick Yen Email:[email protected] "THIS DISPLAY UNIT IS AN ELECTRIC DEVICE WHICH MAY CONTAIN HAZARDOUS MATERIALS AND COMPONENTS, AND WHICH MUST BE DISPOSED OF AT END OF LIFE ACCORDING TO THE PROPER PROCEDURE" Xerox© LCD Monitor User's Manual 3 Downloaded from www.Manualslib.com...

User Guide
Page 5
... areas, business and light industrial premises and small-scale enterprises, inside as well as outside of the EC Directive 89/336/EEC "EMC Directive" and 73/23/EEC "Low Voltage Directive" as amended by their connection to the public low voltage power supply system. 4 Downloaded from www.Manualslib.com manuals search engine Xerox© LCD Monitor User's Manual FCC/CE CE...
... areas, business and light industrial premises and small-scale enterprises, inside as well as outside of the EC Directive 89/336/EEC "EMC Directive" and 73/23/EEC "Low Voltage Directive" as amended by their connection to the public low voltage power supply system. 4 Downloaded from www.Manualslib.com manuals search engine Xerox© LCD Monitor User's Manual FCC/CE CE...
User Guide
Page 6
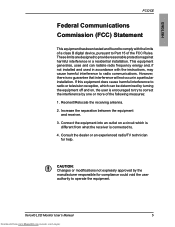
... can radiate radio frequency energy and, if not installed and used in accordance with the limits of a class B digital device, pursuant to correct the interference by the manufacturer responsible for help. Xerox© LCD Monitor User's Manual 5 Downloaded from what the receiver is different from www.Manualslib.com manuals search engine Increase the separation between the equipment and receiver. 3. Connect the equipment into...
... can radiate radio frequency energy and, if not installed and used in accordance with the limits of a class B digital device, pursuant to correct the interference by the manufacturer responsible for help. Xerox© LCD Monitor User's Manual 5 Downloaded from what the receiver is different from www.Manualslib.com manuals search engine Increase the separation between the equipment and receiver. 3. Connect the equipment into...
User Guide
Page 7
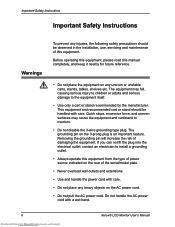
... the serial/model plate. • Never overload wall outlets and extensions. • Use and handle the power cord with care. • Do not place any heavy objects on any injuries, the following safety precautions should be observed in the installation, use, servicing and maintenance of this equipment. Removing the grounding pin will increase the risk of damaging the equipment. Quick stops...
... the serial/model plate. • Never overload wall outlets and extensions. • Use and handle the power cord with care. • Do not place any heavy objects on any injuries, the following safety precautions should be observed in the installation, use, servicing and maintenance of this equipment. Removing the grounding pin will increase the risk of damaging the equipment. Quick stops...
User Guide
Page 8
..., rain, or moisture. ENGLISH Important Safety Instructions • Do not touch the power cord and antenna cable during lightning. • Remove the plug from the wall outlet if the equipment will not be used for a long period of the above is spilled into the equipment. • Do not attempt to service the equipment yourself. • Opening and removing the covers may expose you to...
..., rain, or moisture. ENGLISH Important Safety Instructions • Do not touch the power cord and antenna cable during lightning. • Remove the plug from the wall outlet if the equipment will not be used for a long period of the above is spilled into the equipment. • Do not attempt to service the equipment yourself. • Opening and removing the covers may expose you to...
User Guide
Page 9
... recycling waste electrical and electronic equipment. The power cord or plug is your regular household waste. c. The product has been dropped or damaged. d. The recycling and separate collection of such products is damaged. The product's display is spilled into the product. a. Liquid...this product may not be disposed of with your responsibility. Important Safety Instructions • If any of the following conditions occur, unplug the power cord from the outlet and request service from www.Manualslib.com manuals search engine Xerox© LCD Monitor User's Manual
... recycling waste electrical and electronic equipment. The power cord or plug is your regular household waste. c. The product has been dropped or damaged. d. The recycling and separate collection of such products is damaged. The product's display is spilled into the product. a. Liquid...this product may not be disposed of with your responsibility. Important Safety Instructions • If any of the following conditions occur, unplug the power cord from the outlet and request service from www.Manualslib.com manuals search engine Xerox© LCD Monitor User's Manual
User Guide
Page 10
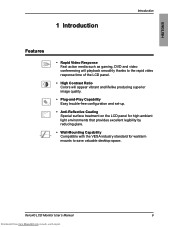
Xerox© LCD Monitor User's Manual 9 Downloaded from www.Manualslib.com manuals search engine ENGLISH 1 Introduction Introduction Features • Rapid Video Response Fast action media such as gaming, DVD and video conferencing will playback smoothly thanks to the rapid video response time of the LCD panel. • High Contrast Ratio Colors will appear vibrant and lifelike producing superior image quality. • Plug-and-Play Capability Easy trouble-free confi...
Xerox© LCD Monitor User's Manual 9 Downloaded from www.Manualslib.com manuals search engine ENGLISH 1 Introduction Introduction Features • Rapid Video Response Fast action media such as gaming, DVD and video conferencing will playback smoothly thanks to the rapid video response time of the LCD panel. • High Contrast Ratio Colors will appear vibrant and lifelike producing superior image quality. • Plug-and-Play Capability Easy trouble-free confi...
User Guide
Page 12
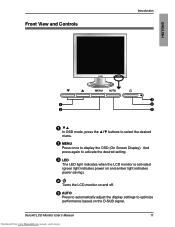
Xerox© LCD Monitor User's Manual 11 Downloaded from www.Manualslib.com manuals search engine Front View and Controls Introduction ENGLISH 3 1 4 2 5 1 ▼▲ In OSD mode, press the ▲/▼ buttons to select the desired menu. 2 MENU Press once to optimize performance based on and off. 5 AUTO Press to automatically adjust the display settings to display the OSD (On Screen Display). And press again to activate the desired setting. 3 LED The LED light indicates when the LCD monitor is activated (green light indicates power on...
Xerox© LCD Monitor User's Manual 11 Downloaded from www.Manualslib.com manuals search engine Front View and Controls Introduction ENGLISH 3 1 4 2 5 1 ▼▲ In OSD mode, press the ▲/▼ buttons to select the desired menu. 2 MENU Press once to optimize performance based on and off. 5 AUTO Press to automatically adjust the display settings to display the OSD (On Screen Display). And press again to activate the desired setting. 3 LED The LED light indicates when the LCD monitor is activated (green light indicates power on...

User Guide
Page 13
Installation 2 Installation Refer to the owner's manual of the computer. 3 Connect the power cord to the LCD monitor and wall outlet. 2 Connect to the D-SUB port 12 Downloaded from www.Manualslib.com manuals search engine 3 Connect to power source Xerox© LCD Monitor User's Manual Connecting Your LCD Monitor to a Computer Method : Analog (D-SUB) Connection 1 Turn off the computer and unplug the power cable. 2 Connect the signal cable to wall outlets until all other connections are completed. In the process of connecting external equipment, do not connect any...
Installation 2 Installation Refer to the owner's manual of the computer. 3 Connect the power cord to the LCD monitor and wall outlet. 2 Connect to the D-SUB port 12 Downloaded from www.Manualslib.com manuals search engine 3 Connect to power source Xerox© LCD Monitor User's Manual Connecting Your LCD Monitor to a Computer Method : Analog (D-SUB) Connection 1 Turn off the computer and unplug the power cable. 2 Connect the signal cable to wall outlets until all other connections are completed. In the process of connecting external equipment, do not connect any...

User Guide
Page 14
... voltage. To completely disconnect the main voltage, please remove the power plug from www.Manualslib.com manuals search engine If the monitor displays an image, the monitor is used for switching the LCD monitor on and off , the LED turns dark. Xerox© LCD Monitor User's Manual 13 Downloaded from the socket. NOTE: The button is successfully installed. If no image is displayed, check all connections. ENGLISH Installation 4 Press the button, located on the bottom side of the main...
... voltage. To completely disconnect the main voltage, please remove the power plug from www.Manualslib.com manuals search engine If the monitor displays an image, the monitor is used for switching the LCD monitor on and off , the LED turns dark. Xerox© LCD Monitor User's Manual 13 Downloaded from the socket. NOTE: The button is successfully installed. If no image is displayed, check all connections. ENGLISH Installation 4 Press the button, located on the bottom side of the main...
User Guide
Page 15
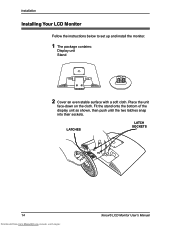
LATCHES LATCH SOCKETS 14 Downloaded from www.Manualslib.com manuals search engine Xerox© LCD Monitor User's Manual Fit the stand onto the bottom of the display unit as shown, then push until the two latches snap into their sockets. Installation Installing Your LCD Monitor Follow the instructions below to set up and install the monitor. 1 The package contains: Display unit Stand 2 Cover an even stable surface with a soft cloth. Place the unit face-down on the cloth.
LATCHES LATCH SOCKETS 14 Downloaded from www.Manualslib.com manuals search engine Xerox© LCD Monitor User's Manual Fit the stand onto the bottom of the display unit as shown, then push until the two latches snap into their sockets. Installation Installing Your LCD Monitor Follow the instructions below to set up and install the monitor. 1 The package contains: Display unit Stand 2 Cover an even stable surface with a soft cloth. Place the unit face-down on the cloth.
User Guide
Page 16
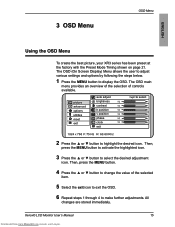
... adjustment icon. picture advanced options utilities reset exit auto adjust brightness contrast h position v position phase clock exit to select 2 Press the ▲ or ▼ button to display the OSD. The OSD (On Screen Display) Menu allows the user to adjust various settings and options by following the steps below. 1 Press the MENU button to highlight the desired icon. 3 OSD Menu OSD Menu ENGLISH Using the OSD Menu To create the best picture, your XR3 series has been preset at the factory with the Preset Mode...
... adjustment icon. picture advanced options utilities reset exit auto adjust brightness contrast h position v position phase clock exit to select 2 Press the ▲ or ▼ button to display the OSD. The OSD (On Screen Display) Menu allows the user to adjust various settings and options by following the steps below. 1 Press the MENU button to highlight the desired icon. 3 OSD Menu OSD Menu ENGLISH Using the OSD Menu To create the best picture, your XR3 series has been preset at the factory with the Preset Mode...
User Guide
Page 17
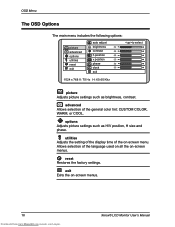
...on-screen menu. reset Restores the factory settings. utilities Adjusts the setting of the display time of the language used on all the on -screen menus. 16 Downloaded from www.Manualslib.com manuals search engine Xerox© LCD Monitor User's Manual exit Exits the on -screen menus. options Adjusts picture settings such as brightness, contrast. OSD Menu The OSD Options The main menu includes the following options: picture advanced options utilities reset exit auto adjust brightness contrast h position v position phase clock exit to select picture Adjusts picture settings such...
...on-screen menu. reset Restores the factory settings. utilities Adjusts the setting of the display time of the language used on all the on -screen menus. 16 Downloaded from www.Manualslib.com manuals search engine Xerox© LCD Monitor User's Manual exit Exits the on -screen menus. options Adjusts picture settings such as brightness, contrast. OSD Menu The OSD Options The main menu includes the following options: picture advanced options utilities reset exit auto adjust brightness contrast h position v position phase clock exit to select picture Adjusts picture settings such...
User Guide
Page 18
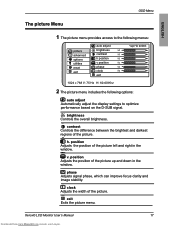
... brightness. v. position Adjusts the position of the picture left and right in the window. Xerox© LCD Monitor User's Manual 17 Downloaded from www.Manualslib.com manuals search engine h. ENGLISH OSD Menu The picture Menu 1 The picture menu provides access to the following menus: picture advanced options utilities reset exit auto adjust brightness contrast h position v position phase clock exit to select 2 The picture menu includes the following options: ON DESCRIPTION auto adjust Automatically adjust the display settings to optimize performance based on the D-SUB signal...
... brightness. v. position Adjusts the position of the picture left and right in the window. Xerox© LCD Monitor User's Manual 17 Downloaded from www.Manualslib.com manuals search engine h. ENGLISH OSD Menu The picture Menu 1 The picture menu provides access to the following menus: picture advanced options utilities reset exit auto adjust brightness contrast h position v position phase clock exit to select 2 The picture menu includes the following options: ON DESCRIPTION auto adjust Automatically adjust the display settings to optimize performance based on the D-SUB signal...

User Guide
Page 19
... spectrum. exit Exits the advanced menu. 18 Downloaded from www.Manualslib.com manuals search engine Xerox© LCD Monitor User's Manual OSD Menu The advanced Menu 1 The advanced menu provides access to the following menus: picture advanced options utilities reset exit sharpness 1 2 3 4 5 color cool natural warm user user red user green user blue exit 2 The advanced menu includes the following options: ON DESCRIPTION sharpness Increase this setting to adjust red, green and blue color component levels independently. decrease for...
... spectrum. exit Exits the advanced menu. 18 Downloaded from www.Manualslib.com manuals search engine Xerox© LCD Monitor User's Manual OSD Menu The advanced Menu 1 The advanced menu provides access to the following menus: picture advanced options utilities reset exit sharpness 1 2 3 4 5 color cool natural warm user user red user green user blue exit 2 The advanced menu includes the following options: ON DESCRIPTION sharpness Increase this setting to adjust red, green and blue color component levels independently. decrease for...

User Guide
Page 22
ENGLISH Technical Information 4 Technical Information Preset Mode Timing Chart The screen image has been optimized during manufacture for the display modes listed below. Xerox© LCD Monitor User's Manual 21 Downloaded from www.Manualslib.com manuals search engine Video signal: (IBM PC/AT) Dot X Line 720 x 400 Horizontal Frequency(kHz) 31.47 640 x 480 31.47 37.86 37.50 800 ... 48.36 56.48 60.02 1280 x 1024* 63.98 79.98 Vertical Frequency(Hz) 70.00 60.00 72.80 75.00 60.30 72.20 75.00 60.00 70.10 75.00 60 75 * 1280 x 1024 resolution is not available in 15" LCD monitor.
ENGLISH Technical Information 4 Technical Information Preset Mode Timing Chart The screen image has been optimized during manufacture for the display modes listed below. Xerox© LCD Monitor User's Manual 21 Downloaded from www.Manualslib.com manuals search engine Video signal: (IBM PC/AT) Dot X Line 720 x 400 Horizontal Frequency(kHz) 31.47 640 x 480 31.47 37.86 37.50 800 ... 48.36 56.48 60.02 1280 x 1024* 63.98 79.98 Vertical Frequency(Hz) 70.00 60.00 72.80 75.00 60.30 72.20 75.00 60.00 70.10 75.00 60 75 * 1280 x 1024 resolution is not available in 15" LCD monitor.

User Guide
Page 24
...-screen monitor with a DDC compatible video card, the monitor is stipulated in total. With VESA DDC 1/2B, when the monitor is turned on, it is used with a resolution of production techniques today cannot guarantee an absolutely fault free LCD display. Visual Inspection Permanently unlit or lit pixels The standard of 1280 x 1024 has 1280 x 1024 = 1310720 pixels. ENGLISH Technical Information Plug and Play This monitor conforms to the VESA DDC (Display...
...-screen monitor with a DDC compatible video card, the monitor is stipulated in total. With VESA DDC 1/2B, when the monitor is turned on, it is used with a resolution of production techniques today cannot guarantee an absolutely fault free LCD display. Visual Inspection Permanently unlit or lit pixels The standard of 1280 x 1024 has 1280 x 1024 = 1310720 pixels. ENGLISH Technical Information Plug and Play This monitor conforms to the VESA DDC (Display...
User Guide
Page 25
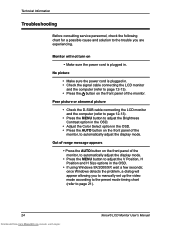
... AUTO button on the front panel of the monitor. No picture • Make sure the power cord is plugged in . • Check the signal cable connecting the LCD monitor and the computer (refer to page 12-13). • Press the button on the front panel of the monitor, to automatically adjust the display mode. Technical Information Troubleshooting Before consulting service personnel, check the following chart for a possible cause and solution to the trouble you to manually set...
... AUTO button on the front panel of the monitor. No picture • Make sure the power cord is plugged in . • Check the signal cable connecting the LCD monitor and the computer (refer to page 12-13). • Press the button on the front panel of the monitor, to automatically adjust the display mode. Technical Information Troubleshooting Before consulting service personnel, check the following chart for a possible cause and solution to the trouble you to manually set...
User Guide
Page 26
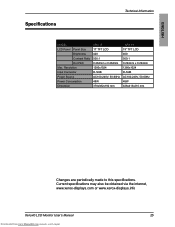
..." TFT LCD 400 500:1 0.294mm x 0.294mm 1280x1024 D-SUB AC100-240V, 50-60Hz 48W 426x413x210 mm Changes are periodically made to this specifications. Current specifications may also be obtained via the internet, www.xerox-displays.com or www.xerox-displays.info Xerox© LCD Monitor User's Manual 25 Downloaded from www.Manualslib.com manuals search engine ENGLISH Specifications Technical Information MODEL LCD Panel Panel Size Brightness Contrast...
..." TFT LCD 400 500:1 0.294mm x 0.294mm 1280x1024 D-SUB AC100-240V, 50-60Hz 48W 426x413x210 mm Changes are periodically made to this specifications. Current specifications may also be obtained via the internet, www.xerox-displays.com or www.xerox-displays.info Xerox© LCD Monitor User's Manual 25 Downloaded from www.Manualslib.com manuals search engine ENGLISH Specifications Technical Information MODEL LCD Panel Panel Size Brightness Contrast...

