User Guide
Page 9
... use a grounding adapter plug to connect the WorkCentre to the WorkCentre. Unplug this WorkCentre on or supplied with a 3-wire grounding type plug (e.g., a plug having a third grounding pin). Follow the instructions in this User Guide for this WorkCentre near water, wet locations, or outdoors. Never...than what they were intended. Safety Notes Your WorkCentre and supplies have been designed and tested to insert the plug into a grounding-type power outlet. Symbology: = High Voltage, = Heated Surface, ! = Warning = Laser Caution use supplies or cleaning materials for purposes ...
... use a grounding adapter plug to connect the WorkCentre to the WorkCentre. Unplug this WorkCentre on or supplied with a 3-wire grounding type plug (e.g., a plug having a third grounding pin). Follow the instructions in this User Guide for this WorkCentre near water, wet locations, or outdoors. Never...than what they were intended. Safety Notes Your WorkCentre and supplies have been designed and tested to insert the plug into a grounding-type power outlet. Symbology: = High Voltage, = Heated Surface, ! = Warning = Laser Caution use supplies or cleaning materials for purposes ...
User Guide
Page 17
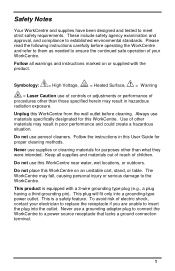
In approximately two seconds the ready indicator will assure maximum copies per cartridge. • Xerox has included a Starter Toner Cartridge. Note: Save the carton and packing materials. Installation (continued) 13.Remove the starter toner cartridge from the silver bag. ... for printing. 17.Plug the power cord into the WorkCentre and then into place. 16.Close the front cover and the side cover. 1 2 3 Skip to the Printer Driver Software Installation section in this User Guide to be used to repack the WorkCentre if it locks into a grounded outlet. 18.Turn on the power switch. ...
In approximately two seconds the ready indicator will assure maximum copies per cartridge. • Xerox has included a Starter Toner Cartridge. Note: Save the carton and packing materials. Installation (continued) 13.Remove the starter toner cartridge from the silver bag. ... for printing. 17.Plug the power cord into the WorkCentre and then into place. 16.Close the front cover and the side cover. 1 2 3 Skip to the Printer Driver Software Installation section in this User Guide to be used to repack the WorkCentre if it locks into a grounded outlet. 18.Turn on the power switch. ...

User Guide
Page 20
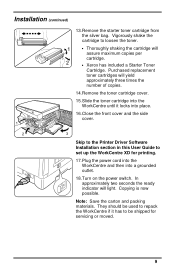
...modified to the Normal Copy Mode approximately one minute after a job is warming up, or to pause a print job to Customizing Your WorkCentre section of this User Guide for a set period of power reduction; Auto • Copy Lighter/Darker - Refer to enable copying. 1. Auto Copy Function This ... When the copy job is in process. 3. Power Reduction / Auto Clear Power Reduction Modes automatically reduce power consumed by the WorkCentre when the WorkCentre has not been used for information about changing these settings. To copy from the Power Save mode select the desired features and ...
...modified to the Normal Copy Mode approximately one minute after a job is warming up, or to pause a print job to Customizing Your WorkCentre section of this User Guide for a set period of power reduction; Auto • Copy Lighter/Darker - Refer to enable copying. 1. Auto Copy Function This ... When the copy job is in process. 3. Power Reduction / Auto Clear Power Reduction Modes automatically reduce power consumed by the WorkCentre when the WorkCentre has not been used for information about changing these settings. To copy from the Power Save mode select the desired features and ...
User Guide
Page 26
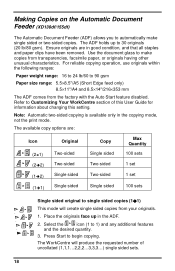
...100 sets 1 set 1 set 100 sets Single sided original to single sided copies (1!1) This mode will produce the requested number of this User Guide for information about changing this setting. Note: Automatic two-sided copying is available only in the ADF. 2. Press Start to 1) and .../80 gsm). Refer to make single sided or two-sided copies. Use the document glass to Customizing Your WorkCentre section of uncollated (1,1,1...2,2,2...3,3,3...) single sided sets. 18 The WorkCentre will create single sided copies from your originals. 1. The ADF holds up in the copying mode, not the...
...100 sets 1 set 1 set 100 sets Single sided original to single sided copies (1!1) This mode will produce the requested number of this User Guide for information about changing this setting. Note: Automatic two-sided copying is available only in the ADF. 2. Press Start to 1) and .../80 gsm). Refer to make single sided or two-sided copies. Use the document glass to Customizing Your WorkCentre section of uncollated (1,1,1...2,2,2...3,3,3...) single sided sets. 18 The WorkCentre will create single sided copies from your originals. 1. The ADF holds up in the copying mode, not the...
User Guide
Page 50
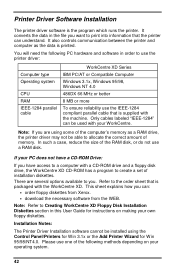
... in this User Guide for Win 95/98/NT4.0. Please use one of memory. Printer Driver Software Installation The printer driver software is printed. It converts the data in the file you . You will need the following methods depending on making your WorkCentre. If your...or more To ensure reliability use a RAM disk. Installation Notes: The Printer Driver Installation software cannot be used with the WorkCentre XD. Only cables labeled "IEEE-1284" can : • order floppy diskettes from Xerox. • download the necessary software from the WEB. Note: Refer to...
... in this User Guide for Win 95/98/NT4.0. Please use one of memory. Printer Driver Software Installation The printer driver software is printed. It converts the data in the file you . You will need the following methods depending on making your WorkCentre. If your...or more To ensure reliability use a RAM disk. Installation Notes: The Printer Driver Installation software cannot be used with the WorkCentre XD. Only cables labeled "IEEE-1284" can : • order floppy diskettes from Xerox. • download the necessary software from the WEB. Note: Refer to...
User Guide
Page 54
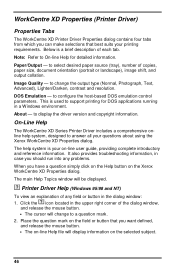
...resolution. Image Quality - DOS Emulation - Place the question mark on the field or button that best suits your on the Xerox WorkCentre XD Properties dialog. to select desired paper source (tray), number of any field or button in case you should run ...or landscape), image shift, and output collation. WorkCentre XD Properties (Printer Driver) Properties Tabs The WorkCentre XD Printer Driver Properties dialog contains four tabs from which you have a question simply click on the Help button on -line user guide, providing complete introductory and reference information. It also...
...resolution. Image Quality - DOS Emulation - Place the question mark on the field or button that best suits your on the Xerox WorkCentre XD Properties dialog. to select desired paper source (tray), number of any field or button in case you should run ...or landscape), image shift, and output collation. WorkCentre XD Properties (Printer Driver) Properties Tabs The WorkCentre XD Printer Driver Properties dialog contains four tabs from which you have a question simply click on the Help button on -line user guide, providing complete introductory and reference information. It also...

User Guide
Page 61
... slow The computer parallel port may be set incorrectly. Click the Xerox Document WorkCentre XD with an ECP parallel port, enable this mode of print manager may be set for high speed communications. Check that meets the specifications required by the printer. Then reinstall the toner cartridge. If using Windows 95, the spool... set incorrectly. Problem Probable Cause Remedy The computer CPU specification may not have Install more RAM in the options menu of operation. If your computers user guide. Black staining There is equipped with the right mouse button.
... slow The computer parallel port may be set incorrectly. Click the Xerox Document WorkCentre XD with an ECP parallel port, enable this mode of print manager may be set for high speed communications. Check that meets the specifications required by the printer. Then reinstall the toner cartridge. If using Windows 95, the spool... set incorrectly. Problem Probable Cause Remedy The computer CPU specification may not have Install more RAM in the options menu of operation. If your computers user guide. Black staining There is equipped with the right mouse button.


