User Guide
Page 18
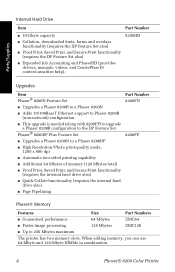
... drivers, manuals, videos, and CentreWare IS context-sensitive help). 8200HD Upgrades Item Phaser® 8200N Feature Set I Upgrades a Phaser 8200B to a Phaser 8200N I Adds 10/100BaseT Ethernet support to Phaser 8200B (non-network) configuration I Up to the DP Feature Set. When adding memory, you can use 64-Mbyte and 128-Mbyte DIMMs in combination. 4 Phaser® 8200 Color Printer Phaser®...
... drivers, manuals, videos, and CentreWare IS context-sensitive help). 8200HD Upgrades Item Phaser® 8200N Feature Set I Upgrades a Phaser 8200B to a Phaser 8200N I Adds 10/100BaseT Ethernet support to Phaser 8200B (non-network) configuration I Up to the DP Feature Set. When adding memory, you can use 64-Mbyte and 128-Mbyte DIMMs in combination. 4 Phaser® 8200 Color Printer Phaser®...
User Guide
Page 22
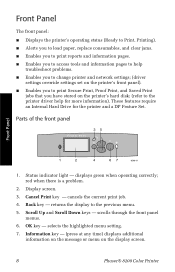
... Saved Print jobs that you have stored on the printer's hard disk; (refer to the printer driver help troubleshoot problems. I Enables you to print reports and information pages. Status indicator light - OK key - Parts of the front panel Phaser 8200 35 OK OK 1 2 4 67 8200-...jams. I Enables you to help for the printer and a DP Feature Set. I Enables you to access tools and information pages to change printer and network settings; (driver settings override settings set on the display screen. 8 Phaser® 8200 Color Printer Cancel Print key - cancels the current print ...
... Saved Print jobs that you have stored on the printer's hard disk; (refer to the printer driver help troubleshoot problems. I Enables you to print reports and information pages. Status indicator light - OK key - Parts of the front panel Phaser 8200 35 OK OK 1 2 4 67 8200-...jams. I Enables you to help for the printer and a DP Feature Set. I Enables you to access tools and information pages to change printer and network settings; (driver settings override settings set on the display screen. 8 Phaser® 8200 Color Printer Cancel Print key - cancels the current print ...

User Guide
Page 24
...printer driver that comes on the following features are described in the printer driver, which is available on your Phaser 8200 Printer CD-ROM. see page 12 I TekColor correction - To ensure that you have access to the printer. Updated printer drivers are also available on the Xerox web site: www.xerox... Separation pages I print-quality mode - see page 40 I Watermarks Features 10 Phaser® 8200 Color Printer see page 11 I 2-sided printing - The following features, refer to the printer driver help you send a print job to all of paper I Booklet printing I ...
...printer driver that comes on the following features are described in the printer driver, which is available on your Phaser 8200 Printer CD-ROM. see page 12 I TekColor correction - To ensure that you have access to the printer. Updated printer drivers are also available on the Xerox web site: www.xerox... Separation pages I print-quality mode - see page 40 I Watermarks Features 10 Phaser® 8200 Color Printer see page 11 I 2-sided printing - The following features, refer to the printer driver help you send a print job to all of paper I Booklet printing I ...
User Guide
Page 30
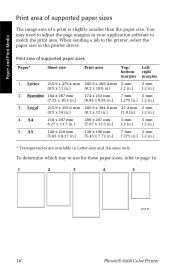
... only. Print area of a print is slightly smaller than the paper size. To determine which tray to use for these paper sizes, refer to the printer, select the paper size in the printer driver. When sending a job to page 14. 1 2 3 4 5 0726-43 16 Phaser® 8200 Color Printer
... only. Print area of a print is slightly smaller than the paper size. To determine which tray to use for these paper sizes, refer to the printer, select the paper size in the printer driver. When sending a job to page 14. 1 2 3 4 5 0726-43 16 Phaser® 8200 Color Printer
User Guide
Page 34
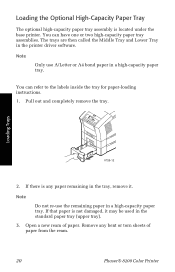
... Tray in the standard paper tray (upper tray). 3. Open a new ream of paper from the ream. 20 Phaser® 8200 Color Printer Remove any paper remaining in the tray, remove it may be used in the printer driver software. You can refer to the labels inside the tray for paper-loading instructions. 1. Loading the Optional...
... Tray in the standard paper tray (upper tray). 3. Open a new ream of paper from the ream. 20 Phaser® 8200 Color Printer Remove any paper remaining in the tray, remove it may be used in the printer driver software. You can refer to the labels inside the tray for paper-loading instructions. 1. Loading the Optional...
User Guide
Page 39
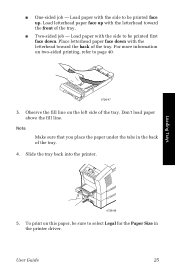
... the side to page 40. 0726-47 3. Place letterhead paper face down . Note Make sure that you place the paper under the tabs in the printer driver. Observe the fill line on two-sided printing, refer to be printed face up with the letterhead toward the front of the tray. User Guide... sure to be printed first face down with the letterhead toward the back of the tray. I Two-sided job - Slide the tray back into the printer. Loading Trays 0726-06 5. I One-sided job - Don't load paper above the fill line.
... the side to page 40. 0726-47 3. Place letterhead paper face down . Note Make sure that you place the paper under the tabs in the printer driver. Observe the fill line on two-sided printing, refer to be printed face up with the letterhead toward the front of the tray. User Guide... sure to be printed first face down with the letterhead toward the back of the tray. I Two-sided job - Slide the tray back into the printer. Loading Trays 0726-06 5. I One-sided job - Don't load paper above the fill line.
User Guide
Page 41
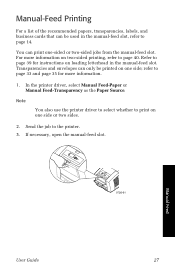
In the printer driver, select Manual Feed-Paper or Manual Feed-Transparency as the Paper Source. refer to page 33 and page 35 for instructions on two-sided printing, ... a list of the recommended papers, transparencies, labels, and business cards that can only be used in the manual-feed slot. Note You also use the printer driver to select whether to the printer. 3. Send the job to print on one -sided or two-sided jobs from the manual-feed slot.
In the printer driver, select Manual Feed-Paper or Manual Feed-Transparency as the Paper Source. refer to page 33 and page 35 for instructions on two-sided printing, ... a list of the recommended papers, transparencies, labels, and business cards that can only be used in the manual-feed slot. Note You also use the printer driver to select whether to the printer. 3. Send the job to print on one -sided or two-sided jobs from the manual-feed slot.
User Guide
Page 44
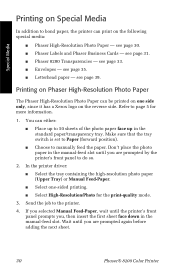
... or Manual Feed-Paper. In the printer driver: I Choose to manually feed the paper. I Select High-Resolution/Photo for more information. 1. I Place up to 50 sheets of the photo paper face up in the manual-feed slot. You can either: I Phaser 8200 Transparencies - see page 33.... prompts you are prompted again before adding the next sheet. 30 Phaser® 8200 Color Printer I Phaser High-Resolution Photo Paper - Make sure that the tray switch is set to the printer. 4. I Select one side only, since it has a Xerox logo on the following special media: I Envelopes - see page ...
... or Manual Feed-Paper. In the printer driver: I Choose to manually feed the paper. I Select High-Resolution/Photo for more information. 1. I Place up to 50 sheets of the photo paper face up in the manual-feed slot. You can either: I Phaser 8200 Transparencies - see page 33.... prompts you are prompted again before adding the next sheet. 30 Phaser® 8200 Color Printer I Phaser High-Resolution Photo Paper - Make sure that the tray switch is set to the printer. 4. I Select one side only, since it has a Xerox logo on the following special media: I Envelopes - see page ...
User Guide
Page 46
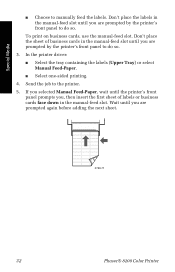
... panel to do so. Don't place the labels in the manual-feed slot. In the printer driver: I Select one-sided printing. 4. Wait until you are prompted by the printer's front panel to do so. 3. I Select the tray containing the labels (Upper Tray) or select ...Manual Feed-Paper. Don't place the sheet of labels or business cards face down in the manual-feed slot until you are prompted again before adding the next sheet. 0726-71 32 Phaser® 8200 Color Printer...
... panel to do so. Don't place the labels in the manual-feed slot. In the printer driver: I Select one-sided printing. 4. Wait until you are prompted by the printer's front panel to do so. 3. I Select the tray containing the labels (Upper Tray) or select ...Manual Feed-Paper. Don't place the sheet of labels or business cards face down in the manual-feed slot until you are prompted again before adding the next sheet. 0726-71 32 Phaser® 8200 Color Printer...
User Guide
Page 47
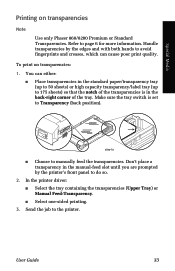
...Select the tray containing the transparencies (Upper Tray) or Manual Feed-Transparency. To print on transparencies Note Use only Phaser 860/8200 Premium or Standard Transparencies. Handle transparencies by the printer's front panel to do so. 2. Refer to avoid fingerprints and creases, which can either: I Choose to 175... more information. Send the job to Transparency (back position). User Guide 33 Special Media Printing on transparencies: 1. In the printer driver: I Select one-sided printing. 3. Don't place a transparency in the back-right corner of the tray.
...Select the tray containing the transparencies (Upper Tray) or Manual Feed-Transparency. To print on transparencies Note Use only Phaser 860/8200 Premium or Standard Transparencies. Handle transparencies by the printer's front panel to do so. 2. Refer to avoid fingerprints and creases, which can either: I Choose to 175... more information. Send the job to Transparency (back position). User Guide 33 Special Media Printing on transparencies: 1. In the printer driver: I Select one-sided printing. 3. Don't place a transparency in the back-right corner of the tray.
User Guide
Page 49
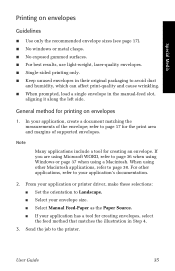
I Single-sided printing only. I No windows or metal clasps. In your application or printer driver, make these selections: I Set the orientation to Landscape. From your application, create a document matching the measurements of supported envelopes. User Guide 35... I For best results, use light-weight, laser-quality envelopes. I Select your application's documentation. 2. If you are using Microsoft WORD, refer to the printer. I If your application has a tool for creating an envelope. Send the job to page 36 when using Windows or page 37 when using other applications...
I Single-sided printing only. I No windows or metal clasps. In your application or printer driver, make these selections: I Set the orientation to Landscape. From your application, create a document matching the measurements of supported envelopes. User Guide 35... I For best results, use light-weight, laser-quality envelopes. I Select your application's documentation. 2. If you are using Microsoft WORD, refer to the printer. I If your application has a tool for creating an envelope. Send the job to page 36 when using Windows or page 37 when using other applications...

User Guide
Page 52
I Paper: select your printer driver before printing on a Macintosh Follow the instructions in the application documentation. If the envelope address prints upside-down menu, select PostScript Options, and make the ... , change the Page Setup settings in the manual-feed slot. 38 Phaser® 8200 Color Printer Click the OK button. 5. For Paper Source, select Manual Feed Paper. 7. When the printer's front panel prompts you , insert the envelope in your envelope size. When the printer's front panel prompts you , insert the envelope in General options, select...
I Paper: select your printer driver before printing on a Macintosh Follow the instructions in the application documentation. If the envelope address prints upside-down menu, select PostScript Options, and make the ... , change the Page Setup settings in the manual-feed slot. 38 Phaser® 8200 Color Printer Click the OK button. 5. For Paper Source, select Manual Feed Paper. 7. When the printer's front panel prompts you , insert the envelope in your envelope size. When the printer's front panel prompts you , insert the envelope in General options, select...
User Guide
Page 53
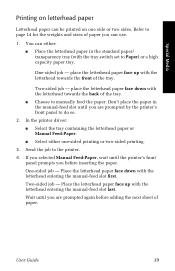
...the letterhead entering the manual-feed slot last. I Place the letterhead paper in the manual-feed slot until you are prompted by the printer's front panel to do so. 2. Refer to Paper) or a high capacity paper tray. place the letterhead paper face down with the..., wait until you are prompted again before inserting the paper. One-sided job - Wait until the printer's front panel prompts you can use. 1. In the printer driver: I Select either : I Choose to the printer. 4. User Guide 39 Two-sided job - Send the job to manually feed the paper. Two-sided...
...the letterhead entering the manual-feed slot last. I Place the letterhead paper in the manual-feed slot until you are prompted by the printer's front panel to do so. 2. Refer to Paper) or a high capacity paper tray. place the letterhead paper face down with the..., wait until you are prompted again before inserting the paper. One-sided job - Wait until the printer's front panel prompts you can use. 1. In the printer driver: I Select either : I Choose to the printer. 4. User Guide 39 Two-sided job - Send the job to manually feed the paper. Two-sided...
User Guide
Page 54
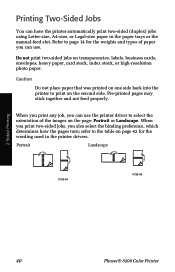
... you can use the printer driver to select the orientation of the images on page 42 for the weights and types of paper you also select the binding preference, which determines how the pages turn; Portrait Landscape 0726-64 0726-65 2-Sided Printing 40 Phaser® 8200 Color Printer Refer to page 14 ...for the wording used in the paper trays or the manual-feed slot. Pre-printed pages may stick together and not feed properly. Caution Do not place paper that was printed on one side back into the printer to the table...
... you can use the printer driver to select the orientation of the images on page 42 for the weights and types of paper you also select the binding preference, which determines how the pages turn; Portrait Landscape 0726-64 0726-65 2-Sided Printing 40 Phaser® 8200 Color Printer Refer to page 14 ...for the wording used in the paper trays or the manual-feed slot. Pre-printed pages may stick together and not feed properly. Caution Do not place paper that was printed on one side back into the printer to the table...
User Guide
Page 55
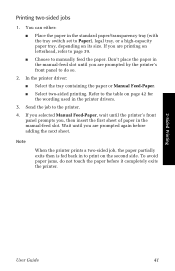
...the tray switch set to page 39. Wait until you are prompted by the printer's front panel to the table on its size. I Place the paper in the printer drivers. 3. You can either: I Choose to the printer. 4. Don't place the paper in the manual-feed slot. Printing two-sided ...jobs 1. To avoid paper jams, do so. 2. In the printer driver: I Select two-sided printing. Send the job to...
...the tray switch set to page 39. Wait until you are prompted by the printer's front panel to the table on its size. I Place the paper in the printer drivers. 3. You can either: I Choose to the printer. 4. Don't place the paper in the manual-feed slot. Printing two-sided ...jobs 1. To avoid paper jams, do so. 2. In the printer driver: I Select two-sided printing. Send the job to...
User Guide
Page 56
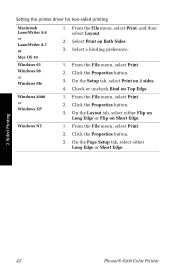
... File menu, select Print. 2. From the File menu, select Print. 2. Check or uncheck Bind on 2 sides. 4. Windows 2000 or Windows XP Windows NT 1. Setting the printer driver for two-sided printing Macintosh LaserWriter 8.6 or LaserWriter 8.7 or Mac OS 10 Windows 95 Windows 98 or Windows Me 1. From the File menu, select Print... Setup tab, select Print on Top Edge. Click the Properties button. 3. On the Layout tab, select either Long Edge or Short Edge. 2-Sided Printing 42 Phaser® 8200 Color Printer Select Print on Short Edge. 1. Click the Properties button. 3.
... File menu, select Print. 2. From the File menu, select Print. 2. Check or uncheck Bind on 2 sides. 4. Windows 2000 or Windows XP Windows NT 1. Setting the printer driver for two-sided printing Macintosh LaserWriter 8.6 or LaserWriter 8.7 or Mac OS 10 Windows 95 Windows 98 or Windows Me 1. From the File menu, select Print... Setup tab, select Print on Top Edge. Click the Properties button. 3. On the Layout tab, select either Long Edge or Short Edge. 2-Sided Printing 42 Phaser® 8200 Color Printer Select Print on Short Edge. 1. Click the Properties button. 3.
User Guide
Page 57
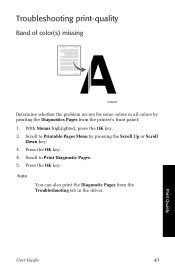
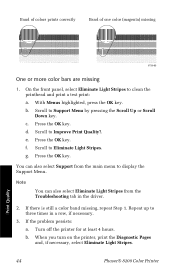
Press the OK key. 4. User Guide 43 Print Quality Scroll to Printable Pages Menu by printing the Diagnostics Pages from the Troubleshooting tab in the driver. Press the OK key. Troubleshooting print-quality Band of color(s) missing Supplies 0726-87 Determine whether the problem occurs for some colors or all colors by pressing the Scroll Up or Scroll Down key. 3. With Menus highlighted, press the OK key. 2. Scroll to Print Diagnostic Pages. 5. Note You can also print the Diagnostic Pages from the printer's front panel: 1.
Press the OK key. 4. User Guide 43 Print Quality Scroll to Printable Pages Menu by printing the Diagnostics Pages from the Troubleshooting tab in the driver. Press the OK key. Troubleshooting print-quality Band of color(s) missing Supplies 0726-87 Determine whether the problem occurs for some colors or all colors by pressing the Scroll Up or Scroll Down key. 3. With Menus highlighted, press the OK key. 2. Scroll to Print Diagnostic Pages. 5. Note You can also print the Diagnostic Pages from the printer's front panel: 1.
User Guide
Page 58
...select Eliminate Light Stripes from the main menu to three times in the driver. 2. Press the OK key. Press the OK key. Note You can also select Support from the Troubleshooting tab in a row, if necessary. 3. Turn off the printer for at least 4 hours. Scroll to clean the printhead and print a... Eliminate Light Stripes to Support Menu by pressing the Scroll Up or Scroll Down key. If the problem persists: a. When you turn on the printer, print the Diagnostic Pages and, if necessary, select Eliminate Light Stripes. 44 Phaser® 8200 Color Printer Print Quality
...select Eliminate Light Stripes from the main menu to three times in the driver. 2. Press the OK key. Press the OK key. Note You can also select Support from the Troubleshooting tab in a row, if necessary. 3. Turn off the printer for at least 4 hours. Scroll to clean the printhead and print a... Eliminate Light Stripes to Support Menu by pressing the Scroll Up or Scroll Down key. If the problem persists: a. When you turn on the printer, print the Diagnostic Pages and, if necessary, select Eliminate Light Stripes. 44 Phaser® 8200 Color Printer Print Quality
User Guide
Page 59
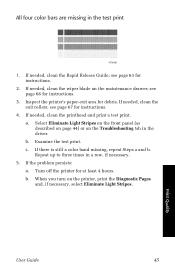
If needed , clean the printhead and print a test print. b. c. Repeat up to three times in the driver. Turn off the printer for instructions. 3. Supplies Print Quality User Guide 45 Select Eliminate Light Stripes on the front panel (as described on page ... , clean the Rapid Release Guide; If needed , clean the exit rollers; If needed , clean the wiper blade on the printer, print the Diagnostic Pages and, if necessary, select Eliminate Light Stripes. Inspect the printer's paper-exit area for debris. a. If there is still a color band missing, repeat Steps a and b.
If needed , clean the printhead and print a test print. b. c. Repeat up to three times in the driver. Turn off the printer for instructions. 3. Supplies Print Quality User Guide 45 Select Eliminate Light Stripes on the front panel (as described on page ... , clean the Rapid Release Guide; If needed , clean the exit rollers; If needed , clean the wiper blade on the printer, print the Diagnostic Pages and, if necessary, select Eliminate Light Stripes. Inspect the printer's paper-exit area for debris. a. If there is still a color band missing, repeat Steps a and b.
User Guide
Page 61
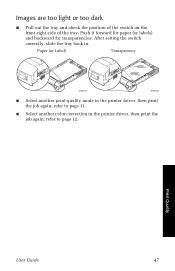
...) and backward for transparencies. refer to page 11. Images are too light or too dark I Select another color correction in the printer driver, then print the job again; I Select another print-quality mode in the printer driver, then print the job again; Supplies Print Quality User Guide 47 refer to page 12. Paper (or Label...
...) and backward for transparencies. refer to page 11. Images are too light or too dark I Select another color correction in the printer driver, then print the job again; I Select another print-quality mode in the printer driver, then print the job again; Supplies Print Quality User Guide 47 refer to page 12. Paper (or Label...

