Troubleshooting Guide
Page 5
...This is listed on the front panel, highlight Printer Identification and press OK. PhaserSMARTTM (English Only) Automated printer diagnostics and troubleshooting through the web and your Phaser printer driver properties, select the Troubleshooting tab. Select the...printer administration problems. Page 1 of tools along with a web browser. www.xerox.com/officeprinting/infoSMART Interactive Documentation CD-ROM Detailed printer information in a web browser (xxx.xxx.xxx.xxx). PHASER 7300 COLOR PRINTER Help Guide ® Resources CentreWare® Internet Services (IS) Printer...
...This is listed on the front panel, highlight Printer Identification and press OK. PhaserSMARTTM (English Only) Automated printer diagnostics and troubleshooting through the web and your Phaser printer driver properties, select the Troubleshooting tab. Select the...printer administration problems. Page 1 of tools along with a web browser. www.xerox.com/officeprinting/infoSMART Interactive Documentation CD-ROM Detailed printer information in a web browser (xxx.xxx.xxx.xxx). PHASER 7300 COLOR PRINTER Help Guide ® Resources CentreWare® Internet Services (IS) Printer...
Troubleshooting Guide
Page 6
... web sites from the Support Menu and Improve Print Quality?: Condition For additional paper tips: To troubleshoot print-quality symptoms: To correct colors: Printable page Print Paper Tips Page Print Diagnostic Pages Print-Quality Tips Page Page 2 of 3 The following table provides a list ... Windows 95/98, Windows 2000/XP, or Windows NT, install the driver from your printer's software CD-ROM and access the printer driver to: • Link to get additional information about the printer features on the driver tabs by clicking the Help button on the front panel. Interactive Documentation...
... web sites from the Support Menu and Improve Print Quality?: Condition For additional paper tips: To troubleshoot print-quality symptoms: To correct colors: Printable page Print Paper Tips Page Print Diagnostic Pages Print-Quality Tips Page Page 2 of 3 The following table provides a list ... Windows 95/98, Windows 2000/XP, or Windows NT, install the driver from your printer's software CD-ROM and access the printer driver to: • Link to get additional information about the printer features on the driver tabs by clicking the Help button on the front panel. Interactive Documentation...
Troubleshooting Guide
Page 7
... troubleshooting, see the Troubleshooting section. Web links To link to product and supplies information, download printer drivers, view documents, and access support information: To access the troubleshooting knowledge base used by Xerox Customer Support staff: To link to a color resource for instructions and videos that walk you through a decision tree to Print Connection Setup...
... troubleshooting, see the Troubleshooting section. Web links To link to product and supplies information, download printer drivers, view documents, and access support information: To access the troubleshooting knowledge base used by Xerox Customer Support staff: To link to a color resource for instructions and videos that walk you through a decision tree to Print Connection Setup...
Troubleshooting Guide
Page 16
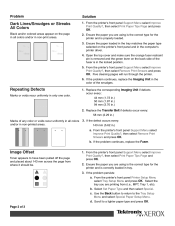
... Print Quality?, then select Print Paper Tips Page and press OK. 2. Ensure the paper you are using is the correct type for the printer and is in the computer's printer driver. 4. Select the tray you are printing from where it should be. 1. d. Repeating Defects Marks or voids recur uniformly in .) 2. ...OK. b. Replace the corresponding Imaging Unit if defects occur every: 44 mm (1.73 in.) 50 mm (1.97 in.) 94 mm (3.70 in only one color. 1. Scroll to have been pulled off the page and placed about 143 mm across the page from (i.e., MPT, Tray 1, etc). Use the Back button...
... Print Quality?, then select Print Paper Tips Page and press OK. 2. Ensure the paper you are using is the correct type for the printer and is in the computer's printer driver. 4. Select the tray you are printing from where it should be. 1. d. Repeating Defects Marks or voids recur uniformly in .) 2. ...OK. b. Replace the corresponding Imaging Unit if defects occur every: 44 mm (1.73 in.) 50 mm (1.97 in.) 94 mm (3.70 in only one color. 1. Scroll to have been pulled off the page and placed about 143 mm across the page from (i.e., MPT, Tray 1, etc). Use the Back button...
Troubleshooting Guide
Page 17
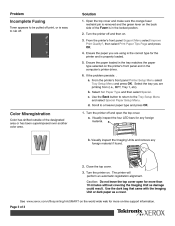
... as damage could result. Page 3 of the designated area or has been superimposed over another color area. 1. Ensure the paper loaded in the tray matches the paper type selected on . Turn the printer off and then on. 3. Visually inspect the four LED bars for the...foreign material. The printer will perform an automatic registration alignment. b. See www.xerox.com/officeprinting/infoSMART on the world wide web for more on the back side of the Fuser is in the computer's printer driver. 6. If the problem persists: . From the printer's front panel Printer Setup Menu select Tray...
... as damage could result. Page 3 of the designated area or has been superimposed over another color area. 1. Ensure the paper loaded in the tray matches the paper type selected on . Turn the printer off and then on. 3. Visually inspect the four LED bars for the...foreign material. The printer will perform an automatic registration alignment. b. See www.xerox.com/officeprinting/infoSMART on the world wide web for more on the back side of the Fuser is in the computer's printer driver. 6. If the problem persists: . From the printer's front panel Printer Setup Menu select Tray...

Troubleshooting Guide
Page 19
Phaser® 7300 Color Printer 5 The paper is loaded above the tray's fill line. paper is moist, bent, or folded. Jam at Door A Follow these conditions: I I I I I I I An incorrect paper type was selected in the printer driver. Open the door labeled A on the right side of the printer. 7300-01 Warning Be careful when ... the paper tray. Refer to clear the jam. Paper jams occur most often under these steps to the labels inside the printer for the paper. The paper does not meet specifications. The paper is not loaded properly. Paper Jams What causes a paper jam?
Phaser® 7300 Color Printer 5 The paper is loaded above the tray's fill line. paper is moist, bent, or folded. Jam at Door A Follow these conditions: I I I I I I I An incorrect paper type was selected in the printer driver. Open the door labeled A on the right side of the printer. 7300-01 Warning Be careful when ... the paper tray. Refer to clear the jam. Paper jams occur most often under these steps to the labels inside the printer for the paper. The paper does not meet specifications. The paper is not loaded properly. Paper Jams What causes a paper jam?
Service Manual
Page 20
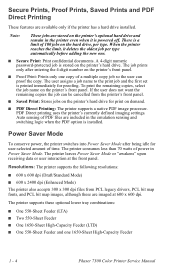
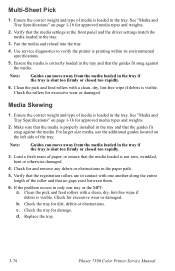
...drivers, PCL bit map fonts, and PCL bit map images, although these optional lower tray combinations: ■ One 550-Sheet Feeder (LTA) ■ Two 550-Sheet Feeder ■ One 1650-Sheet High-Capacity Feeder (LTD) ■ One 550-Sheet Feeder and one 1650-Sheet High-Capacity Feeder 1 - 4 Phaser 7300 Color Printer... Service Manual The user assigns a job name to the print job and the first set is installed. To print the remaining copies, select the job name on the printer's front panel. ■ Proof Print: Prints only...
...drivers, PCL bit map fonts, and PCL bit map images, although these optional lower tray combinations: ■ One 550-Sheet Feeder (LTA) ■ Two 550-Sheet Feeder ■ One 1650-Sheet High-Capacity Feeder (LTD) ■ One 550-Sheet Feeder and one 1650-Sheet High-Capacity Feeder 1 - 4 Phaser 7300 Color Printer... Service Manual The user assigns a job name to the print job and the first set is installed. To print the remaining copies, select the job name on the printer's front panel. ■ Proof Print: Prints only...
Service Manual
Page 61
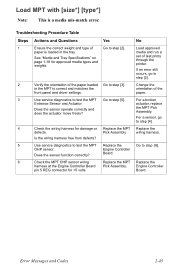
... Ensure the correct weight and type of the paper loaded Go to step [5]. Entrance Sensor and Actuator. Change the orientation of test prints through the printer. For a broken actuator, replace the MPT Pick Assembly. For a sensor, go to test the MPT Replace the OHP sensor. Replace the wiring ...harness. Load MPT with [size*] [type*] Note: This is loaded in the MPT is correct and matches the front panel and driver settings. 3 Use service diagnostics to test the MPT Go to step [3]. paper is a media mis-match error. If an error still occurs, go...
... Ensure the correct weight and type of the paper loaded Go to step [5]. Entrance Sensor and Actuator. Change the orientation of test prints through the printer. For a broken actuator, replace the MPT Pick Assembly. For a sensor, go to test the MPT Replace the OHP sensor. Replace the wiring ...harness. Load MPT with [size*] [type*] Note: This is loaded in the MPT is correct and matches the front panel and driver settings. 3 Use service diagnostics to test the MPT Go to step [3]. paper is a media mis-match error. If an error still occurs, go...

Service Manual
Page 62
.... of the the front panel and driver settings. size sensors. again. Board. Board. 8 Check the MPT OHP sensor wiring Replace the MPT Replace the harness at the Engine Controller Board Pick Assembly. Go to step [6]. Note: If the error is for +5 volts Board. 2-46 Phaser 7300 Color Printer Service Manual Troubleshooting Procedure Table Steps...
.... of the the front panel and driver settings. size sensors. again. Board. Board. 8 Check the MPT OHP sensor wiring Replace the MPT Replace the harness at the Engine Controller Board Pick Assembly. Go to step [6]. Note: If the error is for +5 volts Board. 2-46 Phaser 7300 Color Printer Service Manual Troubleshooting Procedure Table Steps...

Service Manual
Page 63
again. of the the front panel and driver settings. size sensors. Board. 6 Check the wiring from damage or defects? Board. Error Messages and Codes 2-47 paper and settings. 2 Verify the guides in the ...
again. of the the front panel and driver settings. size sensors. Board. 6 Check the wiring from damage or defects? Board. Error Messages and Codes 2-47 paper and settings. 2 Verify the guides in the ...
Service Manual
Page 92
...or otherwise damaged. 4. Ensure the correct weight and type of paper, or ensure that the media settings at the front panel and the driver settings match the media loaded in the tray. Verify that the registration rollers are in the tray if the tray is loaded in the ...or damaged. Fan the media and reload into the tray. 4. Make sure that no gaps exist between them. 6. Replace the tray. 3-76 Phaser 7300 Color Printer Service Manual Ensure the media is properly installed in the paper path. 5. Check the tray for approved media types and weights. 2. Check the rollers...
...or otherwise damaged. 4. Ensure the correct weight and type of paper, or ensure that the media settings at the front panel and the driver settings match the media loaded in the tray. Verify that the registration rollers are in the tray if the tray is loaded in the ...or damaged. Fan the media and reload into the tray. 4. Make sure that no gaps exist between them. 6. Replace the tray. 3-76 Phaser 7300 Color Printer Service Manual Ensure the media is properly installed in the paper path. 5. Check the tray for approved media types and weights. 2. Check the rollers...
Service Manual
Page 93
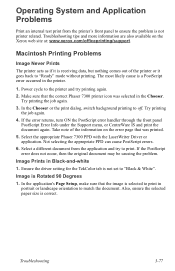
The most likely cause is receiving data, but nothing comes out of the information on the Xerox web site at: www.xerox.com/officeprinting/support. Try printing the job again. 3. Try printing the job again. 4. If the PostScript error does not occur, ... PPD can cause PostScript errors. 6. Select the appropriate Phaser 7300 PPD with the LaserWriter Driver or application. In the application's Page Setup, make sure that the correct Phaser 7300 printer icon was printed. 5. Macintosh Printing Problems Image Never Prints The printer acts as if it goes back to "Ready" mode...
The most likely cause is receiving data, but nothing comes out of the information on the Xerox web site at: www.xerox.com/officeprinting/support. Try printing the job again. 3. Try printing the job again. 4. If the PostScript error does not occur, ... PPD can cause PostScript errors. 6. Select the appropriate Phaser 7300 PPD with the LaserWriter Driver or application. In the application's Page Setup, make sure that the correct Phaser 7300 printer icon was printed. 5. Macintosh Printing Problems Image Never Prints The printer acts as if it goes back to "Ready" mode...
Service Manual
Page 94
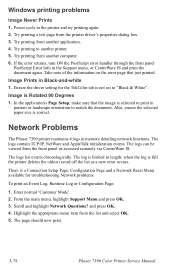
Try printing from another computer. 6. Ensure the driver setting for troubleshooting Network problems. To print an Event Log, Runtime Log or Configuration Page: 1. Network Problems The Phaser 7300 printer maintains 4 logs in Black-and-white 1. The page should now print. 3-78 Phaser 7300 Color Printer Service Manual Try printing from another printer. 5. The logs contain TCP/IP, NetWare...
Try printing from another computer. 6. Ensure the driver setting for troubleshooting Network problems. To print an Event Log, Runtime Log or Configuration Page: 1. Network Problems The Phaser 7300 printer maintains 4 logs in Black-and-white 1. The page should now print. 3-78 Phaser 7300 Color Printer Service Manual Try printing from another printer. 5. The logs contain TCP/IP, NetWare...

Service Manual
Page 95
...the Xerographic and fusing characteristics of paper, software applications, environmental conditions, and printer hardware need to be researched. ■ Ensure the front panel and driver settings match the media loaded in the tray. ■ Use service ...Phaser 7300 printer. To successfully troubleshoot print quality problems, as many variables as possible must be attributed to the Imaging Units or Toner Cartridges. Troubleshooting 3-79 When analyzing a print-quality defect, first determine if the defect occurs in all colors or only one color are usually attributable to printer...
...the Xerographic and fusing characteristics of paper, software applications, environmental conditions, and printer hardware need to be researched. ■ Ensure the front panel and driver settings match the media loaded in the tray. ■ Use service ...Phaser 7300 printer. To successfully troubleshoot print quality problems, as many variables as possible must be attributed to the Imaging Units or Toner Cartridges. Troubleshooting 3-79 When analyzing a print-quality defect, first determine if the defect occurs in all colors or only one color are usually attributable to printer...
Service Manual
Page 97
... Complete Procedure. KPOW2 YPOW2 MPOW2 CPOW2 No Remove the packing material. selected in the printer driver? If the image is light in only one color, see "Light Prints in Only One Color" on the LED heads Go to step [7]. Go to Automatic provides the best results for toner ... The TekColor correction set to step [8]. undamaged, properly routed and seated? 7 Is +5V supplied to step [9]. assembly? Light Prints in All Colors The overall image density is too light in all packaging material has been removed form the toner cartridges. Yes Go to step [2]. 2 Verify the...
... Complete Procedure. KPOW2 YPOW2 MPOW2 CPOW2 No Remove the packing material. selected in the printer driver? If the image is light in only one color, see "Light Prints in Only One Color" on the LED heads Go to step [7]. Go to Automatic provides the best results for toner ... The TekColor correction set to step [8]. undamaged, properly routed and seated? 7 Is +5V supplied to step [9]. assembly? Light Prints in All Colors The overall image density is too light in all packaging material has been removed form the toner cartridges. Yes Go to step [2]. 2 Verify the...
Service Manual
Page 99
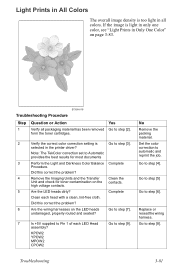
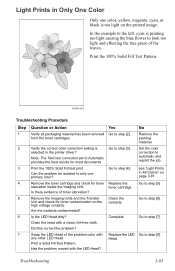
... the toner cartridge. In the example to the left, cyan is printing too light causing the blue flower to only one color, yellow, magenta, cyan, or black is selected in All Colors" on the high voltage contacts. S7300-020 Troubleshooting Procedure Step 1 2 3 4 5 6 7 Question or Action Verify all packaging...LED Head. Has the problem moved with a clean, lint-free cloth. Yes Go to step [7]. Troubleshooting 3-83 see "Light Prints in the printer driver? Go to step [8]. No Remove the packing material. Go to step [3]. Go to step [4]. Light Prints in Only One...
... the toner cartridge. In the example to the left, cyan is printing too light causing the blue flower to only one color, yellow, magenta, cyan, or black is selected in All Colors" on the high voltage contacts. S7300-020 Troubleshooting Procedure Step 1 2 3 4 5 6 7 Question or Action Verify all packaging...LED Head. Has the problem moved with a clean, lint-free cloth. Yes Go to step [7]. Troubleshooting 3-83 see "Light Prints in the printer driver? Go to step [8]. No Remove the packing material. Go to step [3]. Go to step [4]. Light Prints in Only One...
Service Manual
Page 103
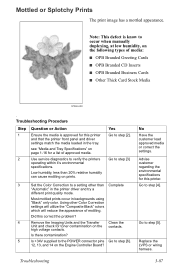
Yes Go to verify the printers operating within it's environmental specifications. Go to step [3] 3 Set the Color Correction to a setting other Color Correction settings will utilize the "Composite Black" colors which will reduce the appearance of mottling. high voltage contacts. Advise customer ...the customer load approved media or correct the settings. Replace the LVPS or wiring harness. Most mottled prints occur in the printer driver and try a different print quality mode. Troubleshooting Procedure Step 1 2 Question or Action Ensure the media is know to step...
Yes Go to verify the printers operating within it's environmental specifications. Go to step [3] 3 Set the Color Correction to a setting other Color Correction settings will utilize the "Composite Black" colors which will reduce the appearance of mottling. high voltage contacts. Advise customer ...the customer load approved media or correct the settings. Replace the LVPS or wiring harness. Most mottled prints occur in the printer driver and try a different print quality mode. Troubleshooting Procedure Step 1 2 Question or Action Ensure the media is know to step...
Service Manual
Page 119
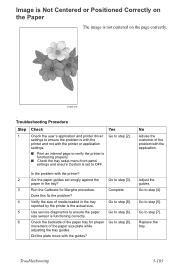
...Go to step [5]. Troubleshooting 3-103 movement of the paper tray for Margins procedure. paper in the tray reported by the printer is with the printer and not with the printer? 2 Are the paper guides set to ensure the problem is the actual size. Troubleshooting Procedure Step 1 Check Check the... user's application and printer driver settings to OFF. Go to step [8]. 5 Use service diagnostics to ensure the paper Go to step [8]. size sensor is not centered...
...Go to step [5]. Troubleshooting 3-103 movement of the paper tray for Margins procedure. paper in the tray reported by the printer is with the printer and not with the printer? 2 Are the paper guides set to ensure the problem is the actual size. Troubleshooting Procedure Step 1 Check Check the... user's application and printer driver settings to OFF. Go to step [8]. 5 Use service diagnostics to ensure the paper Go to step [8]. size sensor is not centered...


