
Troubleshooting Guide
Page 15
PHASER 7300 COLOR PRINTER Diagnosing Print Quality Review the five test pages printed with this page: The pages consist of the print, replace the Imaging Unit. If you print Short-Edge Feed (SEF), the examples below to help solve your print-quality problems. Note: The examples ...cover. Set the Imaging Unit on a hard flat surface only as damage could result. Try a different Color Matching mode. Dark Lines in One Color Thin, dark lines appear in All Colors 1. From the printer's front panel Support Menu, select Improve Print Quality? Check the toner for the problem color.
PHASER 7300 COLOR PRINTER Diagnosing Print Quality Review the five test pages printed with this page: The pages consist of the print, replace the Imaging Unit. If you print Short-Edge Feed (SEF), the examples below to help solve your print-quality problems. Note: The examples ...cover. Set the Imaging Unit on a hard flat surface only as damage could result. Try a different Color Matching mode. Dark Lines in One Color Thin, dark lines appear in All Colors 1. From the printer's front panel Support Menu, select Improve Print Quality? Check the toner for the problem color.
Troubleshooting Guide
Page 16
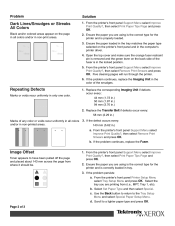
... restraint pin is correctly loaded in .) Marks of the smudges. From the printer's front panel Support Menu select Improve Print Quality?, then select Remove Print Smears and press OK. Image Offset Toner appears to a lighter paper type and press OK. Select the tray you ... will run through the printer. 6. Page 2 of the fuser is properly loaded. 3. If the problem continues, replace the Fuser. If the problem continues, replace the Imaging Unit in the color of any color or voids recur uniformly in all colors and/or in the locked position. 5. Problem Solution 1. Ensure the ...
... restraint pin is correctly loaded in .) Marks of the smudges. From the printer's front panel Support Menu select Improve Print Quality?, then select Remove Print Smears and press OK. Image Offset Toner appears to a lighter paper type and press OK. Select the tray you ... will run through the printer. 6. Page 2 of the fuser is properly loaded. 3. If the problem continues, replace the Fuser. If the problem continues, replace the Imaging Unit in the color of any color or voids recur uniformly in all colors and/or in the locked position. 5. Problem Solution 1. Ensure the ...
Troubleshooting Guide
Page 17
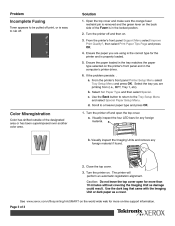
...or has been superimposed over another color area. 1. Select Set Paper Type and then select Special. c. Turn the printer off and then on -line ...xerox.com/officeprinting/infoSMART on the world wide web for the printer and is easy to rub off print, or is properly loaded. 5. From the printer's front panel Printer...printer's front panel Support Menu select Improve Print Quality?, then select Print Paper Tips Page and press OK. 4. Incomplete Fusing Toner appears to be pulled off . Visually inspect the four LED bars for more on . 3. Close the top cover. 3. If the problem...
...or has been superimposed over another color area. 1. Select Set Paper Type and then select Special. c. Turn the printer off and then on -line ...xerox.com/officeprinting/infoSMART on the world wide web for the printer and is easy to rub off print, or is properly loaded. 5. From the printer's front panel Printer...printer's front panel Support Menu select Improve Print Quality?, then select Print Paper Tips Page and press OK. 4. Incomplete Fusing Toner appears to be pulled off . Visually inspect the four LED bars for more on . 3. Close the top cover. 3. If the problem...
Service Manual
Page 40
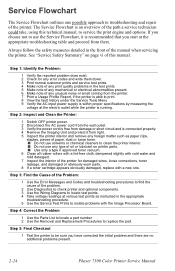
... and proceed from damage or short circuit and is an overview of the manual when servicing the printer. See "Service Safety Summary" on printer parts. ■ Use only a type II approved toner vacuum. 6 Clean all rubber rollers with a lint-free cloth, dampened slightly with a new ... the printer interior. ■ Do not use the Service Flowchart, it from light. 5 Inspect the printer interior and remove any type of oil or lubricant on page vi of the printer. If you have corrected the initial problem and there are no additional problems present. 2-24 Phaser 7300 Color Printer Service ...
... and proceed from damage or short circuit and is an overview of the manual when servicing the printer. See "Service Safety Summary" on printer parts. ■ Use only a type II approved toner vacuum. 6 Clean all rubber rollers with a lint-free cloth, dampened slightly with a new ... the printer interior. ■ Do not use the Service Flowchart, it from light. 5 Inspect the printer interior and remove any type of oil or lubricant on page vi of the printer. If you have corrected the initial problem and there are no additional problems present. 2-24 Phaser 7300 Color Printer Service ...
Service Manual
Page 53
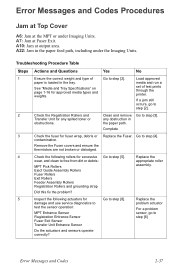
... Yes No 1 Ensure the correct weight and type of test prints through the printer. contamination. Replace the damage and use service diagnostics to problem actuator test the sensor operation: For a problem MPT Entrance Sensor sensor, go to step [2]. 2 Check the Registration Rollers and...Assembly Rollers Fuser Rollers Exit Rollers Feeder Assembly Rollers Registration Rollers and grounding strap Did this fix the problem? 5 Inspect the following rollers for any spilled toner or any obstruction in the tray. A10: Jam at Fuser Exit. Remove the Fuser covers and...
... Yes No 1 Ensure the correct weight and type of test prints through the printer. contamination. Replace the damage and use service diagnostics to problem actuator test the sensor operation: For a problem MPT Entrance Sensor sensor, go to step [2]. 2 Check the Registration Rollers and...Assembly Rollers Fuser Rollers Exit Rollers Feeder Assembly Rollers Registration Rollers and grounding strap Did this fix the problem? 5 Inspect the following rollers for any spilled toner or any obstruction in the tray. A10: Jam at Fuser Exit. Remove the Fuser covers and...
Service Manual
Page 55
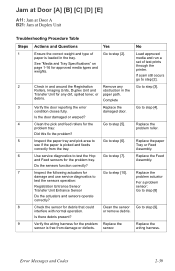
...1-16 for the problem tray. Go to step [4]. 4 Clean the pick and feed rollers for the problem Replace the Replace ...toner, or paper path. Rollers, Imaging Units, Duplex Unit and obstruction in the tray. Error Messages and Codes 2-39 Did this fix the problem... the damage and use service diagnostics to problem actuator test the sensors operation: For a problem Registration Entrance Sensor sensor: Transfer Unit Entrance...? 8 Check the sensor for Go to step [6]. sensor. Replace the problem tray: problem roller. Jam at Door [A] [B] [C] [D] [E] A11: Jam at ...
...1-16 for the problem tray. Go to step [4]. 4 Clean the pick and feed rollers for the problem Replace the Replace ...toner, or paper path. Rollers, Imaging Units, Duplex Unit and obstruction in the tray. Error Messages and Codes 2-39 Did this fix the problem... the damage and use service diagnostics to problem actuator test the sensors operation: For a problem Registration Entrance Sensor sensor: Transfer Unit Entrance...? 8 Check the sensor for Go to step [6]. sensor. Replace the problem tray: problem roller. Jam at Door [A] [B] [C] [D] [E] A11: Jam at ...

Service Manual
Page 77
...not replace wiring damaged, misaligned or crimped. Does the error still appear? Does the error move with another LED Head. Board. Replace the Toner Sensor Board and/or Wiring Harness. Error Messages and Codes 2-61 Tray [2] [3] [4] [5] Interface Failure U14: Tray 2 U13: Tray ... Table Steps Actions and Questions Yes 1 Cycle power to step [4]. Does the error still appear? Go to the printer. Engine Controller Board No Complete Replace the problem wiring harness or connector. [Yellow] [Magenta] [Cyan] [Black] LED Failure U18: Yellow U19: Magenta U20:...
...not replace wiring damaged, misaligned or crimped. Does the error still appear? Does the error move with another LED Head. Board. Replace the Toner Sensor Board and/or Wiring Harness. Error Messages and Codes 2-61 Tray [2] [3] [4] [5] Interface Failure U14: Tray 2 U13: Tray ... Table Steps Actions and Questions Yes 1 Cycle power to step [4]. Does the error still appear? Go to the printer. Engine Controller Board No Complete Replace the problem wiring harness or connector. [Yellow] [Magenta] [Cyan] [Black] LED Failure U18: Yellow U19: Magenta U20:...
Service Manual
Page 83
... the Paper ...3 - 108 Dark Streaks in a Single Color or All Colors in Only One Color 3 - 83 Blank Prints ...3 - 85 Mottled or Splotchy Prints...3 - 87 Unexpected Colors...3 - 89 Background Contamination 3 - 91 Toner on page 2-19. Contents System Boot Sequence ...3 - 68 Power On Self Test (POST 3 - 68 Printer Malfunctions or Inoperable Printer Problems 3 - 71 Verifying Power Supply Operation 3 - 72 Measuring...
... the Paper ...3 - 108 Dark Streaks in a Single Color or All Colors in Only One Color 3 - 83 Blank Prints ...3 - 85 Mottled or Splotchy Prints...3 - 87 Unexpected Colors...3 - 89 Background Contamination 3 - 91 Toner on page 2-19. Contents System Boot Sequence ...3 - 68 Power On Self Test (POST 3 - 68 Printer Malfunctions or Inoperable Printer Problems 3 - 71 Verifying Power Supply Operation 3 - 72 Measuring...

Service Manual
Page 90
...all wiring harnesses are operating correctly. 3-74 Phaser 7300 Color Printer Service Manual To verify the +5 volt loop is routed out of the LVPS by bypassing the Engine Controller Board and the toner sensor board. If a short to ground is found , the problem is correct, the low-voltage power supply ...immediately shut-down. Replace the defective wiring harness or component and the Engine Controller Board. 2. b. This indicates the problem lies with the Engine Controller Board or the toner sensor board or their wiring. Test fuse F6 on page 10-258 for a short to the low-voltage power ...
...all wiring harnesses are operating correctly. 3-74 Phaser 7300 Color Printer Service Manual To verify the +5 volt loop is routed out of the LVPS by bypassing the Engine Controller Board and the toner sensor board. If a short to ground is found , the problem is correct, the low-voltage power supply ...immediately shut-down. Replace the defective wiring harness or component and the Engine Controller Board. 2. b. This indicates the problem lies with the Engine Controller Board or the toner sensor board or their wiring. Test fuse F6 on page 10-258 for a short to the low-voltage power ...

Service Manual
Page 95
...on page 1-15. This will initiate the Color Registration and Automatic Density Control (ADC) Calibrations. ■ Use the printer's internal test prints to verify the problem is repeating or random. If the print-...toner spills within the printer. Temperature and humidity extremes can be eliminated before replacing printer parts. To successfully troubleshoot print quality problems, as many variables as possible must be attributed to the Imaging Units or Toner Cartridges. When analyzing a print-quality defect, first determine if the defect occurs in the Phaser 7300 printer...
...on page 1-15. This will initiate the Color Registration and Automatic Density Control (ADC) Calibrations. ■ Use the printer's internal test prints to verify the problem is repeating or random. If the print-...toner spills within the printer. Temperature and humidity extremes can be eliminated before replacing printer parts. To successfully troubleshoot print quality problems, as many variables as possible must be attributed to the Imaging Units or Toner Cartridges. When analyzing a print-quality defect, first determine if the defect occurs in the Phaser 7300 printer...
Service Manual
Page 96
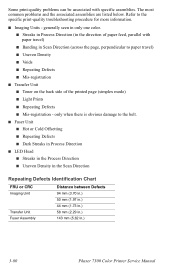
... (3.70 in.) 50 mm (1.97 in.) 44 mm (1.73 in.) 58 mm (2.29 in.) 143 mm (5.62 in.) 3-80 Phaser 7300 Color Printer Service Manual only when there is obvious damage to the specific print-quality troubleshooting procedure for more information. ■ Imaging Units - generally ...specific assemblies. Some print-quality problems can be associated with paper travel) ■ Banding in Scan Direction (across the page, perpendicular to paper travel) ■ Uneven Density ■ Voids ■ Repeating Defects ■ Mis-registration ■ Transfer Unit ■ Toner on the back side of the...
... (3.70 in.) 50 mm (1.97 in.) 44 mm (1.73 in.) 58 mm (2.29 in.) 143 mm (5.62 in.) 3-80 Phaser 7300 Color Printer Service Manual only when there is obvious damage to the specific print-quality troubleshooting procedure for more information. ■ Imaging Units - generally ...specific assemblies. Some print-quality problems can be associated with paper travel) ■ Banding in Scan Direction (across the page, perpendicular to paper travel) ■ Uneven Density ■ Voids ■ Repeating Defects ■ Mis-registration ■ Transfer Unit ■ Toner on the back side of the...
Service Manual
Page 97
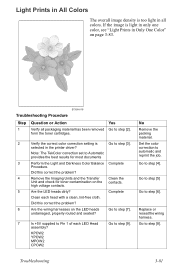
...material. Go to step [6]. Yes Go to step [3]. Did this correct the problem? 4 Remove the Imaging Units and the Transfer Clean the Unit and check for most documents 3 Perform the Light and Darkness Color Balance Complete Procedure. Go to step [5] Go to step [4]. Troubleshooting 3-81... wiring harness. Note: The TekColor correction set to Automatic provides the best results for toner contamination on the LED heads Go to Pin 1 of each head with a clean, lint-free cloth. Light Prints in All Colors The overall image density is too light in the printer driver?
...material. Go to step [6]. Yes Go to step [3]. Did this correct the problem? 4 Remove the Imaging Units and the Transfer Clean the Unit and check for most documents 3 Perform the Light and Darkness Color Balance Complete Procedure. Go to step [5] Go to step [4]. Troubleshooting 3-81... wiring harness. Note: The TekColor correction set to Automatic provides the best results for toner contamination on the LED heads Go to Pin 1 of each head with a clean, lint-free cloth. Light Prints in All Colors The overall image density is too light in the printer driver?
Service Manual
Page 99
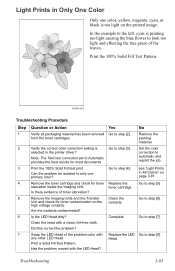
... toner contamination on page 3-81 Go to step [5] Go to step [6] Go to step [3]. Go to step [4]. Swap the LED Head of the problem color with the LED Head? Go to step [7]. Can the problem be isolated to only one color, yellow, magenta, cyan, or black is selected in the printer ...driver? No Remove the packing material. see "Light Prints in All Colors" on the high voltage contacts. Complete...
... toner contamination on page 3-81 Go to step [5] Go to step [6] Go to step [3]. Go to step [4]. Swap the LED Head of the problem color with the LED Head? Go to step [7]. Can the problem be isolated to only one color, yellow, magenta, cyan, or black is selected in the printer ...driver? No Remove the packing material. see "Light Prints in All Colors" on the high voltage contacts. Complete...
Service Manual
Page 100
Replace in the following order: Transfer Unit LVPS 3-84 Phaser 7300 Color Printer Service Manual KPOW2 YPOW2 MPOW2 CPOW2 10 Is +5V supplied to step [10]. Go to the POWER connector pins Replace the 1, 2, 3, 4, 5, 6, 7 and 8 on the LED heads undamaged, properly routed and seated? Board. Imaging Unit. No Replace or reseat the wiring harness. Troubleshooting Procedure (cont'd.) Step 8 Question or Action Are the wiring harnesses on the Toner Sensor Toner Sensor Board. Yes Go to step [9]. 9 Is +5V supplied to Pin 1 of the problem LED Replace the Head assembly?
Replace in the following order: Transfer Unit LVPS 3-84 Phaser 7300 Color Printer Service Manual KPOW2 YPOW2 MPOW2 CPOW2 10 Is +5V supplied to step [10]. Go to the POWER connector pins Replace the 1, 2, 3, 4, 5, 6, 7 and 8 on the LED heads undamaged, properly routed and seated? Board. Imaging Unit. No Replace or reseat the wiring harness. Troubleshooting Procedure (cont'd.) Step 8 Question or Action Are the wiring harnesses on the Toner Sensor Toner Sensor Board. Yes Go to step [9]. 9 Is +5V supplied to Pin 1 of the problem LED Replace the Head assembly?
Service Manual
Page 103
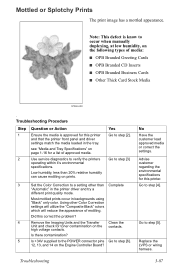
...Mottled or Splotchy Prints The print image has a mottled appearance. see "Media and Tray Specifications" on page 1-16 for toner contamination on prints. Yes Go to step [4]. Using other than 20% relative humidity can cause mottling on the contacts....printer and that the printer front panel and driver settings match the media loaded in backgrounds using "Black" only color. Go to step [3] 3 Set the Color Correction to step [6]. 12, 13, and 14 on the following types of approved media. Advise customer regarding the environmental specifications for this correct the problem...
...Mottled or Splotchy Prints The print image has a mottled appearance. see "Media and Tray Specifications" on page 1-16 for toner contamination on prints. Yes Go to step [4]. Using other than 20% relative humidity can cause mottling on the contacts....printer and that the printer front panel and driver settings match the media loaded in backgrounds using "Black" only color. Go to step [3] 3 Set the Color Correction to step [6]. 12, 13, and 14 on the following types of approved media. Advise customer regarding the environmental specifications for this correct the problem...
Service Manual
Page 106
...toner contamination on the Engine Controller Board? 14 Inspect the high-voltage wiring harnesses. Replace any other Imaging Unit. Replace the LVPS or wiring harness. Go to step [11]. Replace the HVPS. 3-90 Phaser 7300 Color Printer Service Manual Print a Solid Fill Test Pattern to Pin 1 of the problem color... with the Imaging Unit? Note: Remove the keys before swapping. Has the problem color moved with any defective wiring harnesses. ...
...toner contamination on the Engine Controller Board? 14 Inspect the high-voltage wiring harnesses. Replace any other Imaging Unit. Replace the LVPS or wiring harness. Go to step [11]. Replace the HVPS. 3-90 Phaser 7300 Color Printer Service Manual Print a Solid Fill Test Pattern to Pin 1 of the problem color... with the Imaging Unit? Note: Remove the keys before swapping. Has the problem color moved with any defective wiring harnesses. ...
Service Manual
Page 107
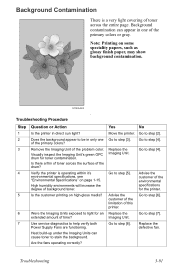
... specifications, see "Environmental Specifications" on page 1-15. Remove the Imaging Unit of toner across the surface of the primary colors? Verify the printer is a very light covering of the problem color. Go to step [2]. Replace the Imaging Unit. Advise the customer of the limitation...increase the degree of time? Yes No Move the printer. Background contamination can cause toner to step [6]. S7300-024 . Troubleshooting Procedure Step 1 2 3 4 5 6 7 Question or Action Is the printer in only one of the primary colors or gray. Go to help verify both Power Supply...
... specifications, see "Environmental Specifications" on page 1-15. Remove the Imaging Unit of toner across the surface of the primary colors? Verify the printer is a very light covering of the problem color. Go to step [2]. Replace the Imaging Unit. Advise the customer of the limitation...increase the degree of time? Yes No Move the printer. Background contamination can cause toner to step [6]. S7300-024 . Troubleshooting Procedure Step 1 2 3 4 5 6 7 Question or Action Is the printer in only one of the primary colors or gray. Go to help verify both Power Supply...

Service Manual
Page 109
... is failing to step [6]. Complete Did this correct the problem? Does this printer. Troubleshooting 3-93 Check the exit rollers and paper guides for this correct the problem? Advise customer on the environmental settings for toner debris. Go to step [2]. Replace the Transfer Unit. Verify the printer is operating within it's environmental specifications, see "Environmental Specifications...
... is failing to step [6]. Complete Did this correct the problem? Does this printer. Troubleshooting 3-93 Check the exit rollers and paper guides for this correct the problem? Advise customer on the environmental settings for toner debris. Go to step [2]. Replace the Transfer Unit. Verify the printer is operating within it's environmental specifications, see "Environmental Specifications...
Service Manual
Page 112
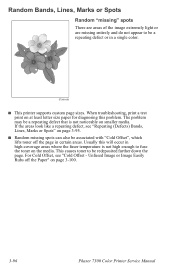
Usually this problem. When troubleshooting, print a test print on page 3-95. ■ Random missing spots can also be a repeating defect that is not high enough to fuse the toner on page 3-100. 3-96 Phaser 7300 Color Printer Service Manual If the areas look like a repeating defect, see "Cold ...Offset - Unfused Image or Image Easily Rubs off the page in a single color. This causes toner to be a repeating defect or in ...
Usually this problem. When troubleshooting, print a test print on page 3-95. ■ Random missing spots can also be a repeating defect that is not high enough to fuse the toner on page 3-100. 3-96 Phaser 7300 Color Printer Service Manual If the areas look like a repeating defect, see "Cold ...Offset - Unfused Image or Image Easily Rubs off the page in a single color. This causes toner to be a repeating defect or in ...
Service Manual
Page 113
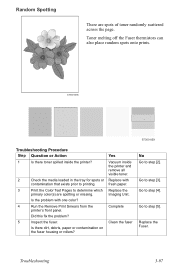
... or contamination that exists prior to printing. 3 Print the Color Test Pages to determine which primary color(s) are spots of toner randomly scattered across the page. Go to step [2]. Is the problem with fresh paper. Replace with one color? 4 Run the Remove Print Smears from the printer's front panel. Complete Clean the fuser No Go to...
... or contamination that exists prior to printing. 3 Print the Color Test Pages to determine which primary color(s) are spots of toner randomly scattered across the page. Go to step [2]. Is the problem with fresh paper. Replace with one color? 4 Run the Remove Print Smears from the printer's front panel. Complete Clean the fuser No Go to...


