
Troubleshooting Guide
Page 3
All Rights Reserved. Contents Resources ...1 Calibration ...2 Diagnosing Print Quality ...3 Paper Jams ...4 Preventing jams ...4 What causes a paper jam? ...5 Jam at Door A...5 Jam at the duplex unit ...6 Jam at the Multi-Purpose Tray ...7 Jam at the top cover ...8 Jam at the tray ...11 Regular Printer Maintenance ...13 Cleaning the printer ...13 Cleaning Kit ...14 Replacing the Fuser ...15 Replacing an Imaging Unit ...17 Replacing a Toner Cartridge ...20 Replacing the Transfer Unit ...22 Repacking Instructions ...24 Index...26 Copyright © 2002 Xerox Corporation. i
All Rights Reserved. Contents Resources ...1 Calibration ...2 Diagnosing Print Quality ...3 Paper Jams ...4 Preventing jams ...4 What causes a paper jam? ...5 Jam at Door A...5 Jam at the duplex unit ...6 Jam at the Multi-Purpose Tray ...7 Jam at the top cover ...8 Jam at the tray ...11 Regular Printer Maintenance ...13 Cleaning the printer ...13 Cleaning Kit ...14 Replacing the Fuser ...15 Replacing an Imaging Unit ...17 Replacing a Toner Cartridge ...20 Replacing the Transfer Unit ...22 Repacking Instructions ...24 Index...26 Copyright © 2002 Xerox Corporation. i
Troubleshooting Guide
Page 9
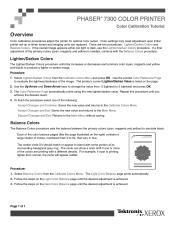
...circle (0) should match or appear to the Main Menu. The Light Color Balance page prints automatically. 2. PHASER 7300 COLOR PRINTER Color Calibration Tutorial ® Overview Color calibration procedures adjust the printer for optimal color output. If a finer adjustment of its surrounding hexagonal gray ring. ... 1. Select Balance Colors from the Calibrate Colors Menu and press OK. Color settings may need adjustment upon initial printer set-up or when toners and imaging units are two procedures: Lighten/Darken Colors and Balance Colors. Use the printed Color Reference Page to ...
...circle (0) should match or appear to the Main Menu. The Light Color Balance page prints automatically. 2. PHASER 7300 COLOR PRINTER Color Calibration Tutorial ® Overview Color calibration procedures adjust the printer for optimal color output. If a finer adjustment of its surrounding hexagonal gray ring. ... 1. Select Balance Colors from the Calibrate Colors Menu and press OK. Color settings may need adjustment upon initial printer set-up or when toners and imaging units are two procedures: Lighten/Darken Colors and Balance Colors. Use the printed Color Reference Page to ...

Troubleshooting Guide
Page 15
... problem persists after cleaning the LED bars, do the following: a. Check the toner for the problem color, keeping the toner cartridge installed. b. Caution: Do not touch the shiny green surface of 3 From the printer's front panel Support Menu, select Improve Print Quality? Open the top cover. Dark... toner spills), lift it high enough to Automatic provides the best results for reference only. Set the Imaging Unit on a hard flat surface only as scratching or damage can occur causing more than 10 minutes without covering the Imaging Unit as a cover. PHASER 7300 COLOR PRINTER Diagnosing...
... problem persists after cleaning the LED bars, do the following: a. Check the toner for the problem color, keeping the toner cartridge installed. b. Caution: Do not touch the shiny green surface of 3 From the printer's front panel Support Menu, select Improve Print Quality? Open the top cover. Dark... toner spills), lift it high enough to Automatic provides the best results for reference only. Set the Imaging Unit on a hard flat surface only as scratching or damage can occur causing more than 10 minutes without covering the Imaging Unit as a cover. PHASER 7300 COLOR PRINTER Diagnosing...
Troubleshooting Guide
Page 16
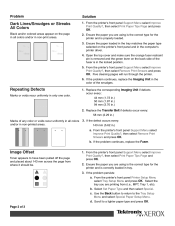
... panel Support Menu select Improve Print Quality?, then select Remove Print Smears and press OK. Dark Lines/Smudges or Streaks All Colors Black and/or colored areas appear on the printer's front panel and in the locked position. 5. Replace the Transfer Belt if defects occur every: 58 mm (2.29 in.) ...Improve Print Quality?, then select Print Paper Tips Page and press OK. 2. If the defect occurs every: 143 mm (5.62 in .) 2. Image Offset Toner appears to a lighter paper type and press OK. c. Open the top cover and make sure the orange fuser restraint pin is in the computer...
... panel Support Menu select Improve Print Quality?, then select Remove Print Smears and press OK. Dark Lines/Smudges or Streaks All Colors Black and/or colored areas appear on the printer's front panel and in the locked position. 5. Replace the Transfer Belt if defects occur every: 58 mm (2.29 in.) ...Improve Print Quality?, then select Print Paper Tips Page and press OK. 2. If the defect occurs every: 143 mm (5.62 in .) 2. Image Offset Toner appears to a lighter paper type and press OK. c. Open the top cover and make sure the orange fuser restraint pin is in the computer...
Troubleshooting Guide
Page 17
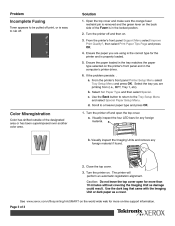
...came with the Imaging Unit or dark paper as damage could result. Incomplete Fusing Toner appears to rub off and open for the printer and is in the computer's printer driver. 6. Color Misregistration Color has shifted outside of 3 Visually inspect the four LED bars for more than ...10 minutes without covering the Imaging Unit as a cover. See www.xerox.com/officeprinting/infoSMART on the ...
...came with the Imaging Unit or dark paper as damage could result. Incomplete Fusing Toner appears to rub off and open for the printer and is in the computer's printer driver. 6. Color Misregistration Color has shifted outside of 3 Visually inspect the four LED bars for more than ...10 minutes without covering the Imaging Unit as a cover. See www.xerox.com/officeprinting/infoSMART on the ...

Troubleshooting Guide
Page 18
...'s fill line. I I I I I I To reduce the frequency of paper and transparency jams, use only Xerox Phaser paper, Xerox Phaser labels, and Xerox Phaser 35 transparencies. Phaser® 7300 Color Printer Paper Jams In addition to information on preventing jams and what causes a paper jam, this section includes instructions for ...the Interactive Documentation CD-ROM. When there is a paper jam, the printer's front panel displays a message about the jam location and information on the jammed paper, because the toner has not been fused to clear the jam. For proper paper-loading instructions...
...'s fill line. I I I I I I To reduce the frequency of paper and transparency jams, use only Xerox Phaser paper, Xerox Phaser labels, and Xerox Phaser 35 transparencies. Phaser® 7300 Color Printer Paper Jams In addition to information on preventing jams and what causes a paper jam, this section includes instructions for ...the Interactive Documentation CD-ROM. When there is a paper jam, the printer's front panel displays a message about the jam location and information on the jammed paper, because the toner has not been fused to clear the jam. For proper paper-loading instructions...
Troubleshooting Guide
Page 22
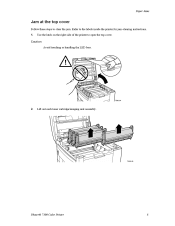
Lift out each toner cartridge/imaging unit assembly. 7300-05 Phaser® 7300 Color Printer 8 Caution Avoid touching or handling the LED bars. 7300-04 2. Use the latch on the right side of the printer to the labels inside the printer for jam-clearing instructions. 1. Refer to open the top cover. Paper Jams Jam at the top cover Follow these steps to clear the jam.
Lift out each toner cartridge/imaging unit assembly. 7300-05 Phaser® 7300 Color Printer 8 Caution Avoid touching or handling the LED bars. 7300-04 2. Use the latch on the right side of the printer to the labels inside the printer for jam-clearing instructions. 1. Refer to open the top cover. Paper Jams Jam at the top cover Follow these steps to clear the jam.
Troubleshooting Guide
Page 23
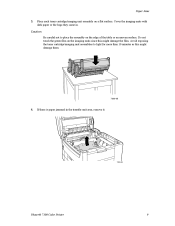
Do not touch the green film on the imaging units since this might damage the film. Place each toner cartridge/imaging unit assembly on the edge of the table or an uneven surface. Cover the imaging units with dark paper or the bags they came in the transfer unit area, remove it. 7300-08 Phaser® 7300 Color Printer 9 Avoid exposing the toner cartridge/imaging unit assemblies to place the assembly on a flat surface. Caution Be careful not to light for more than 10 minutes as this might damage them. 7300-06 4. If there is paper jammed in . Paper Jams 3.
Do not touch the green film on the imaging units since this might damage the film. Place each toner cartridge/imaging unit assembly on the edge of the table or an uneven surface. Cover the imaging units with dark paper or the bags they came in the transfer unit area, remove it. 7300-08 Phaser® 7300 Color Printer 9 Avoid exposing the toner cartridge/imaging unit assemblies to place the assembly on a flat surface. Caution Be careful not to light for more than 10 minutes as this might damage them. 7300-06 4. If there is paper jammed in . Paper Jams 3.
Troubleshooting Guide
Page 24
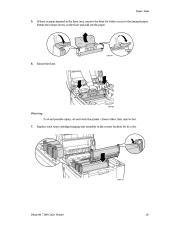
Rotate the release levers on the fuser and pull out the paper. 7300-91 6. Replace each toner cartridge/imaging unit assembly in the fuser area, remove the fuser for its color. 7300-10 Phaser® 7300 Color Printer 10 they may be hot. 7. Reseat the fuser. 7300-92 Warning To avoid possible injury, do not touch the printer's fuser rollers; Paper Jams 5. If there is paper jammed in the correct location for better access to the jammed paper.
Rotate the release levers on the fuser and pull out the paper. 7300-91 6. Replace each toner cartridge/imaging unit assembly in the fuser area, remove the fuser for its color. 7300-10 Phaser® 7300 Color Printer 10 they may be hot. 7. Reseat the fuser. 7300-92 Warning To avoid possible injury, do not touch the printer's fuser rollers; Paper Jams 5. If there is paper jammed in the correct location for better access to the jammed paper.
Troubleshooting Guide
Page 27
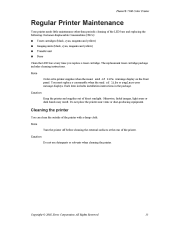
... the printer. The replacement toner cartridge package includes cleaning instructions. Otherwise, faded images, light areas or dark bands may result. Copyright © 2002 Xerox Corporation. Note Turn the printer off before cleaning the external surfaces at the rear of direct sunlight. Each item includes installation instructions in the package. Phaser® 7300 Color Printer Regular Printer Maintenance Your printer...
... the printer. The replacement toner cartridge package includes cleaning instructions. Otherwise, faded images, light areas or dark bands may result. Copyright © 2002 Xerox Corporation. Note Turn the printer off before cleaning the external surfaces at the rear of direct sunlight. Each item includes installation instructions in the package. Phaser® 7300 Color Printer Regular Printer Maintenance Your printer...
Troubleshooting Guide
Page 34
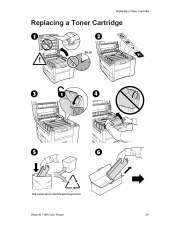
Replacing a Toner Cartridge Replacing a Toner Cartridge 00:10 4 Phaser® 7300 Color Printer 20
Replacing a Toner Cartridge Replacing a Toner Cartridge 00:10 4 Phaser® 7300 Color Printer 20
Troubleshooting Guide
Page 35
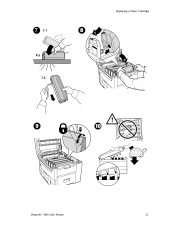
Replacing a Toner Cartridge 7 7.1 8 4x 7.2 9 10 Phaser® 7300 Color Printer 21
Replacing a Toner Cartridge 7 7.1 8 4x 7.2 9 10 Phaser® 7300 Color Printer 21
Troubleshooting Guide
Page 40
... 2 Diagnosing Print Quality 3 Help Guide 1 Light Color Balance 2 printer cleaning 14 D diagnosing print quality 3 Door A jam 5 duplex unit jam 6 F fuser replacing 15 R repacking instructions 24 resources 1 I imaging unit replacing 17 instruction sheets Cleaning Kit 14 Repacking Instructions 24 Replacing a Toner Cartridge 20 Replacing an Imaging Unit 17 Replacing the Fuser 15 Replacing the... 7 jam at the top cover 8 jam at the tray 11 jams clearing 4 preventing 4 M misfeed at the tray 11 Multi-Purpose Tray jam 7 Copyright © 2002 Xerox Corporation. All Rights Reserved. 26
... 2 Diagnosing Print Quality 3 Help Guide 1 Light Color Balance 2 printer cleaning 14 D diagnosing print quality 3 Door A jam 5 duplex unit jam 6 F fuser replacing 15 R repacking instructions 24 resources 1 I imaging unit replacing 17 instruction sheets Cleaning Kit 14 Repacking Instructions 24 Replacing a Toner Cartridge 20 Replacing an Imaging Unit 17 Replacing the Fuser 15 Replacing the... 7 jam at the top cover 8 jam at the tray 11 jams clearing 4 preventing 4 M misfeed at the tray 11 Multi-Purpose Tray jam 7 Copyright © 2002 Xerox Corporation. All Rights Reserved. 26
Service Manual
Page 9
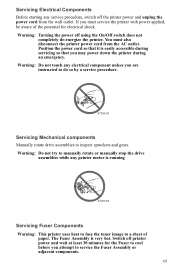
... so that it is easily accessible during an emergency. Servicing Electrical Components Before starting any printer motor is running S7300-03 Servicing Fuser Components Warning: This printer uses heat to fuse the toner image to a sheet of the potential for the Fuser to inspect sprockets and gears. Warning...: Do not touch any electrical component unless you may power down the printer during servicing so that you are ...
... so that it is easily accessible during an emergency. Servicing Electrical Components Before starting any printer motor is running S7300-03 Servicing Fuser Components Warning: This printer uses heat to fuse the toner image to a sheet of the potential for the Fuser to inspect sprockets and gears. Warning...: Do not touch any electrical component unless you may power down the printer during servicing so that you are ...
Service Manual
Page 15
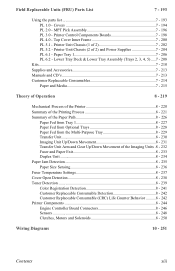
... 7 - 213 Customer Replaceable Consumables 7 - 214 Paper and Media 7 - 215 Theory of Operation 8 - 219 Mechanical Process of the Printer 8 - 220 Summary of the Printing Process 8 - 221 Summary of the Paper Path 8 - 226 Paper Fed from Tray 1 8 ... 236 Fuser Temperature Settings 8 - 237 Cover Open Detection 8 - 238 Toner Detection 8 - 239 Color Registration Detection 8 - 241 Customer Replaceable Consumable Detection 8 - 242 Customer Replaceable Consumable (CRC) Life Counter Behavior ..........8 - 242 Printer Components 8 - 244 Engine Controller Board Connectors 8 - 246 Sensors...8 ...
... 7 - 213 Customer Replaceable Consumables 7 - 214 Paper and Media 7 - 215 Theory of Operation 8 - 219 Mechanical Process of the Printer 8 - 220 Summary of the Printing Process 8 - 221 Summary of the Paper Path 8 - 226 Paper Fed from Tray 1 8 ... 236 Fuser Temperature Settings 8 - 237 Cover Open Detection 8 - 238 Toner Detection 8 - 239 Color Registration Detection 8 - 241 Customer Replaceable Consumable Detection 8 - 242 Customer Replaceable Consumable (CRC) Life Counter Behavior ..........8 - 242 Printer Components 8 - 244 Engine Controller Board Connectors 8 - 246 Sensors...8 ...
Service Manual
Page 30
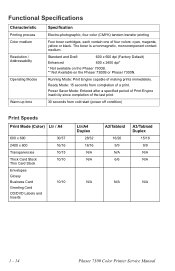
.../Tabloid Duplex 15/18 9/9 N/A N/A N/A N/A 1 - 14 Phaser 7300 Color Printer Service Manual Running Mode: Print Engine capable of the last print. 30 seconds from completion of four colors: cyan, magenta, yellow or black. The toner is a nonmagnetic, monocomponent contact medium. Standard and Draft 600 x 600... dpi (Factory Default) Enhanced 600 x 2400 dpi* * Not available on the Phaser 7300B. ** Not Available on the Phaser 7300B or Phaser 7300N....
.../Tabloid Duplex 15/18 9/9 N/A N/A N/A N/A 1 - 14 Phaser 7300 Color Printer Service Manual Running Mode: Print Engine capable of the last print. 30 seconds from completion of four colors: cyan, magenta, yellow or black. The toner is a nonmagnetic, monocomponent contact medium. Standard and Draft 600 x 600... dpi (Factory Default) Enhanced 600 x 2400 dpi* * Not available on the Phaser 7300B. ** Not Available on the Phaser 7300B or Phaser 7300N....

Service Manual
Page 31
... (CH) -1000 to -1400+50V Voltage to charge roller (DB) -50 to -300V/+300V Voltage to developing roller (SB) -300 to -450/0V Voltage to toner supply roller (TR) C: 0 to 7KV K,Y,M: 0 TO 6KV Voltage to transfer unit (variable) Environmental Specifications Characteristic Temperature Operating Storage Transport Humidity Operating Storage Transport Altitude Operating...
... (CH) -1000 to -1400+50V Voltage to charge roller (DB) -50 to -300V/+300V Voltage to developing roller (SB) -300 to -450/0V Voltage to toner supply roller (TR) C: 0 to 7KV K,Y,M: 0 TO 6KV Voltage to transfer unit (variable) Environmental Specifications Characteristic Temperature Operating Storage Transport Humidity Operating Storage Transport Altitude Operating...

Service Manual
Page 38
... 55 Adjust Tray [2] Size 56 Adjust Tray [3] Size 57 Adjust Tray [4] Size 58 Adjust Tray [5] Size 59 Replace Cyan Toner Cartridge 65 Replace Magenta Toner Cartridge 66 Replace Yellow Toner Cartridge 67 Replace Black Toner Cartridge 68 Replace Cyan Imaging Unit 69 Replace Magenta Imaging Unit 70 Replace Yellow Imaging Unit 71 Replace Black... 2 - 47 2 - 47 2 - 53 2 - 53 2 - 53 2 - 53 2 - 52 2 - 52 2 - 52 2 - 52 2 - 55 2 - 49 2 - 49 2 - 49 2 - 49 2 - 49 2 - 49 2 - 48 2 - 50 2 - 44 2 - 44 2 - 44 2 - 44 2 - 44 2-22 Phaser 7300 Color Printer Service Manual
... 55 Adjust Tray [2] Size 56 Adjust Tray [3] Size 57 Adjust Tray [4] Size 58 Adjust Tray [5] Size 59 Replace Cyan Toner Cartridge 65 Replace Magenta Toner Cartridge 66 Replace Yellow Toner Cartridge 67 Replace Black Toner Cartridge 68 Replace Cyan Imaging Unit 69 Replace Magenta Imaging Unit 70 Replace Yellow Imaging Unit 71 Replace Black... 2 - 47 2 - 47 2 - 53 2 - 53 2 - 53 2 - 53 2 - 52 2 - 52 2 - 52 2 - 52 2 - 55 2 - 49 2 - 49 2 - 49 2 - 49 2 - 49 2 - 49 2 - 48 2 - 50 2 - 44 2 - 44 2 - 44 2 - 44 2 - 44 2-22 Phaser 7300 Color Printer Service Manual

Service Manual
Page 39
... Tray [4] with [size*] [type*] Load Tray [5] with [size*] [type*] Load MPT with [size*] [type*] Install or Reseat Toner Cartridge Cyan Install or Reseat Toner Cartridge Magenta Install or Reseat Toner Cartridge Yellow Install or Reseat Toner Cartridge Black Install or Reseat Cyan Imaging Unit Install or Reseat Magenta Imaging Unit Install or Reseat Yellow...
... Tray [4] with [size*] [type*] Load Tray [5] with [size*] [type*] Load MPT with [size*] [type*] Install or Reseat Toner Cartridge Cyan Install or Reseat Toner Cartridge Magenta Install or Reseat Toner Cartridge Yellow Install or Reseat Toner Cartridge Black Install or Reseat Cyan Imaging Unit Install or Reseat Magenta Imaging Unit Install or Reseat Yellow...
Service Manual
Page 40
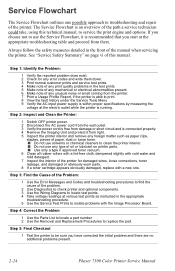
... be sure you choose not to isolate problems with the Image Processor Board. See "Service Safety Summary" on printer parts. ■ Use only a type II approved toner vacuum. 6 Clean all rubber rollers with a lint-free cloth, dampened slightly with a new one possible approach to service ...of oil or lubricant on page vi of the manual when servicing the printer. The Service Flowchart is running. If you have corrected the initial problem and there are no additional problems present. 2-24 Phaser 7300 Color Printer Service Manual Service Flowchart The Service Flowchart outlines one .
... be sure you choose not to isolate problems with the Image Processor Board. See "Service Safety Summary" on printer parts. ■ Use only a type II approved toner vacuum. 6 Clean all rubber rollers with a lint-free cloth, dampened slightly with a new one possible approach to service ...of oil or lubricant on page vi of the manual when servicing the printer. The Service Flowchart is running. If you have corrected the initial problem and there are no additional problems present. 2-24 Phaser 7300 Color Printer Service Manual Service Flowchart The Service Flowchart outlines one .


