

Installation Instructions
Page 3
...) countertop; Oven racks ■ 2 - #12 x 1⁵⁄₈" screws (for Mobile Home Construction and Safety, Title 24, HUD Part 280). See "Electrical Requirements" section. Mobile home installations require: ■ When this range must conform to the Manufactured Home Construction and Safety Standard..., Title 24 CFR, Part 3280 (formerly the Federal Standard for mounting anti-tip bracket) ■ Anti-tip bracket (taped inside storage drawer) Anti-tip ...
...) countertop; Oven racks ■ 2 - #12 x 1⁵⁄₈" screws (for Mobile Home Construction and Safety, Title 24, HUD Part 280). See "Electrical Requirements" section. Mobile home installations require: ■ When this range must conform to the Manufactured Home Construction and Safety Standard..., Title 24 CFR, Part 3280 (formerly the Federal Standard for mounting anti-tip bracket) ■ Anti-tip bracket (taped inside storage drawer) Anti-tip ...

Installation Instructions
Page 5
... range power supply cord (pigtail). This cord contains 3 copper conductors with ring terminals or open-end spade terminals with CSA Standard C22.1, Canadian Electrical Code, Part 1 - Countertop Preparation (for Slide-in Ranges Only) The cooktop sides of range's final location. ■ Do not use a 50-amp rated cord with kit. If...
... range power supply cord (pigtail). This cord contains 3 copper conductors with ring terminals or open-end spade terminals with CSA Standard C22.1, Canadian Electrical Code, Part 1 - Countertop Preparation (for Slide-in Ranges Only) The cooktop sides of range's final location. ■ Do not use a 50-amp rated cord with kit. If...

Installation Instructions
Page 6
Keep cardboard bottom under the range for the anti-tip bracket. Remove oven racks and parts package from the range. Pull storage drawer out completely. 4. Use an adjustable wrench to rear range foot. Using 2 or more people, stand range back up ...
Keep cardboard bottom under the range for the anti-tip bracket. Remove oven racks and parts package from the range. Pull storage drawer out completely. 4. Use an adjustable wrench to rear range foot. Using 2 or more people, stand range back up ...

Installation Instructions
Page 9
... Section: connecting to the terminal block. ■ Tighten strain relief screw against the flexible conduit. A B C A. Save the ground-link screw and the end of range. Part of metal ground strap must be cut out and removed. Ground-link screw 2. Feed the power supply cord through the strain relief, allowing enough slack...
... Section: connecting to the terminal block. ■ Tighten strain relief screw against the flexible conduit. A B C A. Save the ground-link screw and the end of range. Part of metal ground strap must be cut out and removed. Ground-link screw 2. Feed the power supply cord through the strain relief, allowing enough slack...
Installation Instructions
Page 11
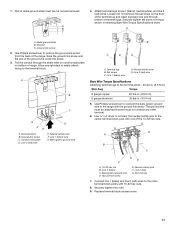
... one of terminal lugs. Ground-link screw E. Connect line 1 (black) and line 2 (red) wires to the center terminal block post with 10-32 hex nuts. 8. Part of range. A B C G D FE A. Neutral (white) wire F. Securely tighten set screw on the front of the terminal lug and insert exposed wire end through the strain...
... one of terminal lugs. Ground-link screw E. Connect line 1 (black) and line 2 (red) wires to the center terminal block post with 10-32 hex nuts. 8. Part of range. A B C G D FE A. Neutral (white) wire F. Securely tighten set screw on the front of the terminal lug and insert exposed wire end through the strain...

Installation Instructions
Page 13
... Hazard A child or adult can result in death or electrical shock. 1. Check that you have all packaging materials. 4. Check that all parts and panels before servicing. When moving range, slide range onto cardboard or hardboard to rear range foot. Dispose of/recycle all of your tools...anti-tip bracket securely attached to follow these instructions can tip the range and be killed. Replace all parts are not bent. 8. Check that the range is an extra part, go back through the steps to remove waxy residue caused by protective shipping material. Complete Installation 1. ...
... Hazard A child or adult can result in death or electrical shock. 1. Check that you have all packaging materials. 4. Check that all parts and panels before servicing. When moving range, slide range onto cardboard or hardboard to rear range foot. Dispose of/recycle all of your tools...anti-tip bracket securely attached to follow these instructions can tip the range and be killed. Replace all parts are not bent. 8. Check that the range is an extra part, go back through the steps to remove waxy residue caused by protective shipping material. Complete Installation 1. ...


