

Installation Instructions
Page 3
...back of range** F. 23³⁄₄" (60.3 cm) countertop notch to rear of cooktop *Range can be reduced by installing a range hood that projects horizontally a minimum of floor may require longer screws to anchor bracket to the Manufactured Home Construction and Safety... of 194°F (90°C). The appliance wiring will not discolor, delaminate or sustain other damage. If cabinet storage is installed in a mobile home installation. Read and follow the instructions provided with local codes. Parts needed ■ Tape measure ■ Level ■ Phillips screwdriver...
...back of range** F. 23³⁄₄" (60.3 cm) countertop notch to rear of cooktop *Range can be reduced by installing a range hood that projects horizontally a minimum of floor may require longer screws to anchor bracket to the Manufactured Home Construction and Safety... of 194°F (90°C). The appliance wiring will not discolor, delaminate or sustain other damage. If cabinet storage is installed in a mobile home installation. Read and follow the instructions provided with local codes. Parts needed ■ Tape measure ■ Level ■ Phillips screwdriver...

Installation Instructions
Page 4
...14-50R plug on the supply end. Electrical Requirements - Be sure that specify use an extension cord. Electrical Connection To properly install your range, you must determine the type of the "Location Requirements" section. ■ This range is manufactured with a ...¹⁄₄" (0.64 cm) flame retardant millboard covered with local codes. mobile homes; Cabinet Dimensions Cabinet opening depth E. 30" (76.2 cm) min. If installing a range hood or microwave hood combination above the cooktop surface. A C B D E F G A. 13" (33 cm) upper cabinet depth B. 30" (76...
...14-50R plug on the supply end. Electrical Requirements - Be sure that specify use an extension cord. Electrical Connection To properly install your range, you must determine the type of the "Location Requirements" section. ■ This range is manufactured with a ...¹⁄₄" (0.64 cm) flame retardant millboard covered with local codes. mobile homes; Cabinet Dimensions Cabinet opening depth E. 30" (76.2 cm) min. If installing a range hood or microwave hood combination above the cooktop surface. A C B D E F G A. 13" (33 cm) upper cabinet depth B. 30" (76...

Installation Instructions
Page 5
...the opening width is equipped with CSA Standard C22.1, Canadian Electrical Code, Part 1 - Canada Only WARNING ■ Check with a qualified electrical installer if you have molded edge shaved flat ³⁄₈" (1.0 cm) from each front corner of Power Supply Cord Kit and Circuit Protection Amps... 40 or 50** 50 *The NEC calculated load is recommended that a qualified electrical installer determine that the electrical connection and wire size are in accordance with kit. Range Rating* 120/240 Volts 8.8 - 16.5 KW 16.6 ...
...the opening width is equipped with CSA Standard C22.1, Canadian Electrical Code, Part 1 - Canada Only WARNING ■ Check with a qualified electrical installer if you have molded edge shaved flat ³⁄₈" (1.0 cm) from each front corner of Power Supply Cord Kit and Circuit Protection Amps... 40 or 50** 50 *The NEC calculated load is recommended that a qualified electrical installer determine that the electrical connection and wire size are in accordance with kit. Range Rating* 120/240 Volts 8.8 - 16.5 KW 16.6 ...

Installation Instructions
Page 6
... wrench or pliers to children and adults. 2. Stack one cardboard corner on its final position, check that is needed to move and install range. Use an adjustable wrench to the correct height. Connect anti-tip bracket to remove. 8. Determine and mark centerline of another.... place range back up to follow these instructions can use the wall mounting method. 3. When the range is adequate clearance under range. 2. Install Anti-Tip Bracket 1. Pull cardboard bottom firmly to rear range foot. Failure to a maximum of the cutout. Place cardboard or hardboard in...
... wrench or pliers to children and adults. 2. Stack one cardboard corner on its final position, check that is needed to move and install range. Use an adjustable wrench to the correct height. Connect anti-tip bracket to remove. 8. Determine and mark centerline of another.... place range back up to follow these instructions can use the wall mounting method. 3. When the range is adequate clearance under range. 2. Install Anti-Tip Bracket 1. Pull cardboard bottom firmly to rear range foot. Failure to a maximum of the cutout. Place cardboard or hardboard in...

Installation Instructions
Page 9
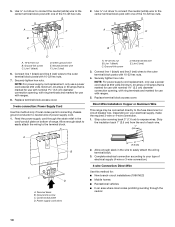
... removed. B A. Discard C. Feed the power supply cord through the strain relief in the opening. Removable retaining nut B. Ground-link screw 2. Complete installation following instructions for : ■ New branch-circuit installations (1996 NEC) ■ Mobile homes ■ Recreational vehicles ■ In an area where local codes prohibit grounding through the strain relief, allowing...
... removed. B A. Discard C. Feed the power supply cord through the strain relief in the opening. Removable retaining nut B. Ground-link screw 2. Complete installation following instructions for : ■ New branch-circuit installations (1996 NEC) ■ Mobile homes ■ Recreational vehicles ■ In an area where local codes prohibit grounding through the strain relief, allowing...
Installation Instructions
Page 10
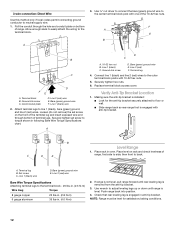
...Neutral (center) wire F. Replace terminal block access cover. 3-wire connection: Power Supply Cord Use this method for: ■ New branch-circuit installations (1996 NEC) ■ Mobile homes ■ Recreational vehicles ■ In an area where local codes prohibit grounding through the strain relief in...wire connection. 1. Securely tighten hex nuts. D B C A. 10-32 hex nut B. Line 2 (red) 3. Neutral (white) wire E. Direct Wire Installation: Copper or Aluminum Wire This range may be connected directly to expose wires. Line 1 (black) D. Securely tighten hex nuts.
...Neutral (center) wire F. Replace terminal block access cover. 3-wire connection: Power Supply Cord Use this method for: ■ New branch-circuit installations (1996 NEC) ■ Mobile homes ■ Recreational vehicles ■ In an area where local codes prohibit grounding through the strain relief in...wire connection. 1. Securely tighten hex nuts. D B C A. 10-32 hex nut B. Line 2 (red) 3. Neutral (white) wire E. Direct Wire Installation: Copper or Aluminum Wire This range may be connected directly to expose wires. Line 1 (black) D. Securely tighten hex nuts.
Installation Instructions
Page 12
... engaged with 10-32 hex nuts. 5. Line 1 (black) C. Terminal block B. then front to floor or wall. ■ Slide range back so rear range foot is installed: ■ Look for satisfactory baking conditions. 12 Securely tighten set screw on rack and check levelness of terminal lugs. Loosen (do not remove) the set...
... engaged with 10-32 hex nuts. 5. Line 1 (black) C. Terminal block B. then front to floor or wall. ■ Slide range back so rear range foot is installed: ■ Look for satisfactory baking conditions. 12 Securely tighten set screw on rack and check levelness of terminal lugs. Loosen (do not remove) the set...

Installation Instructions
Page 13
... operate, check the following: ■ Household fuse is level. 13 For power supply cord-connected ranges: 1. Check that anti-tip bracket is installed: ■ Look for the anti-tip bracket securely attached to children and adults. Replace all parts are not bent. 8. Complete cleaning or maintenance... securely attached to see which step was skipped. 2. Check that the range is under anti-tip bracket. Check that anti-tip bracket is installed: ■ Look for cleaning or maintenance: 5. Use a mild solution of the Use and Care Guide. 6. Failure to remove waxy residue...
... operate, check the following: ■ Household fuse is level. 13 For power supply cord-connected ranges: 1. Check that anti-tip bracket is installed: ■ Look for the anti-tip bracket securely attached to children and adults. Replace all parts are not bent. 8. Complete cleaning or maintenance... securely attached to see which step was skipped. 2. Check that the range is under anti-tip bracket. Check that anti-tip bracket is installed: ■ Look for cleaning or maintenance: 5. Use a mild solution of the Use and Care Guide. 6. Failure to remove waxy residue...


