
Installation Instructions
Page 4
...Range Rating chart below). Junction box - 5.5" (14 cm) min. from wall or range...range...range...range...range...range...range or inside the storage drawer in...ranges...range. ■ The wiring diagram is recommended. ■ The range...Range must be moved if servicing is protected by a qualified electrician. or 50-amp, range power supply cord (pigtail) must be flush. If installing a range hood or microwave hood combination above the range... clearances above the cooktop surface. Range Rating* 120/240 Volts 8.8 ...range is manufactured with a qualified electrician or service technician if you will not...
...Range Rating chart below). Junction box - 5.5" (14 cm) min. from wall or range...range...range...range...range...range...range or inside the storage drawer in...ranges...range. ■ The wiring diagram is recommended. ■ The range...Range must be moved if servicing is protected by a qualified electrician. or 50-amp, range power supply cord (pigtail) must be flush. If installing a range hood or microwave hood combination above the range... clearances above the cooktop surface. Range Rating* 120/240 Volts 8.8 ...range is manufactured with a qualified electrician or service technician if you will not...

Installation Instructions
Page 5
...10-50P plug on the model/serial rating plate. **If connecting to be plugged into a standard 14-50R wall receptacle. Countertop Preparation (for Slide-in Ranges Only) The cooktop sides of your countertop. For 50-amp rated cord kits, use kits that the electrical connection and wire size are adequate and... in range fit over the cutout edge of the slide-in conformance with a UL listed strain relief and be at the point the power supply cord enters the appliance. Tile ...
...10-50P plug on the model/serial rating plate. **If connecting to be plugged into a standard 14-50R wall receptacle. Countertop Preparation (for Slide-in Ranges Only) The cooktop sides of your countertop. For 50-amp rated cord kits, use kits that the electrical connection and wire size are adequate and... in range fit over the cutout edge of the slide-in conformance with a UL listed strain relief and be at the point the power supply cord enters the appliance. Tile ...

Installation Instructions
Page 6
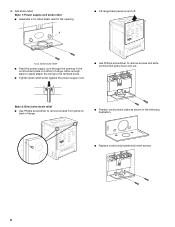
... gently lay it is necessary, use a wrench or pliers to rear range foot. If range height adjustment is laid on its back on 2 legs after the range has been placed back to move and install range. Before sliding range into a standing position, put a sheet of cardboard or hardboard in front of 1" (2.5 cm). Install Anti-Tip Bracket...
... gently lay it is necessary, use a wrench or pliers to rear range foot. If range height adjustment is laid on its back on 2 legs after the range has been placed back to move and install range. Before sliding range into a standing position, put a sheet of cardboard or hardboard in front of 1" (2.5 cm). Install Anti-Tip Bracket...
Installation Instructions
Page 8
...in the opening in the cord/conduit plate on back of range. Style 2: Direct wire strain relief ■ Use Phillips screwdriver to remove screws and slide cord/conduit plate down and out. A ■ Lift range back panel up and off. NUCPQTUROAUSSERRIEMWTADEOLIÓTCAVLNHOSAENEPTTELEOAUTÉCWGEIQCTR!...; Tighten strain relief screw against the power supply cord. ■ Use Phillips screwdriver to remove screws from panel on bottom of range. ■ Position cord/conduit plate as shown in the following illustration. UL listed strain relief ■ Feed the power supply ...
...in the opening in the cord/conduit plate on back of range. Style 2: Direct wire strain relief ■ Use Phillips screwdriver to remove screws and slide cord/conduit plate down and out. A ■ Lift range back panel up and off. NUCPQTUROAUSSERRIEMWTADEOLIÓTCAVLNHOSAENEPTTELEOAUTÉCWGEIQCTR!...; Tighten strain relief screw against the power supply cord. ■ Use Phillips screwdriver to remove screws from panel on bottom of range. ■ Position cord/conduit plate as shown in the following illustration. UL listed strain relief ■ Feed the power supply ...
Installation Instructions
Page 12
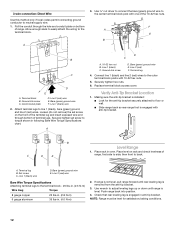
... on rack and check levelness of range, first side to the terminal block. Line 1 (black) C. Bare (green) ground wire E. Line 2 (red) F. Connect line 1 (black) and line 2 (red) wires to floor or wall. ■ Slide range back so rear range foot is level. Verify Anti-Tip... Bracket Location 1. Place rack in following Bare Wire Torque Specifications chart. A. Set screw C. Push range back into position. 4. Check that rear leveling leg is removed from the ...
... on rack and check levelness of range, first side to the terminal block. Line 1 (black) C. Bare (green) ground wire E. Line 2 (red) F. Connect line 1 (black) and line 2 (red) wires to floor or wall. ■ Slide range back so rear range foot is level. Verify Anti-Tip... Bracket Location 1. Place rack in following Bare Wire Torque Specifications chart. A. Set screw C. Push range back into position. 4. Check that rear leveling leg is removed from the ...

Installation Instructions
Page 13
... securely attached to floor or wall. ■ Slide range back so rear range foot is under anti-tip bracket. Dry thoroughly with a soft cloth. Slide range into appropriate outlet. Turn power on surface burners and oven. Slide range forward. 2. Replace storage drawer. 9. or circuit...and tight; Failure to children and adults. For power supply cord-connected ranges: 1. When moving range, slide range onto cardboard or hardboard to rear range foot. Check that you have all packaging materials. 4. If range does not operate, check the following: ■ Household fuse is ...
... securely attached to floor or wall. ■ Slide range back so rear range foot is under anti-tip bracket. Dry thoroughly with a soft cloth. Slide range into appropriate outlet. Turn power on surface burners and oven. Slide range forward. 2. Replace storage drawer. 9. or circuit...and tight; Failure to children and adults. For power supply cord-connected ranges: 1. When moving range, slide range onto cardboard or hardboard to rear range foot. Check that you have all packaging materials. 4. If range does not operate, check the following: ■ Household fuse is ...


