Use & Care Guide
Page 1
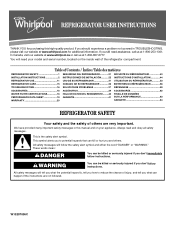
... ACCESSOIRES 62 FEUILLE DE DONNÉES SUR LA PERFORMANCE 63 GARANTIE 64 REFRIGERATOR SAFETY Your safety and the safety of the refrigerator compartment. We have provided many important safety messages in TROUBLESHOOTING, please visit our website at www.whirlpool.com for purchasing this manual and on the inside wall of others . In...
... ACCESSOIRES 62 FEUILLE DE DONNÉES SUR LA PERFORMANCE 63 GARANTIE 64 REFRIGERATOR SAFETY Your safety and the safety of the refrigerator compartment. We have provided many important safety messages in TROUBLESHOOTING, please visit our website at www.whirlpool.com for purchasing this manual and on the inside wall of others . In...
Use & Care Guide
Page 2
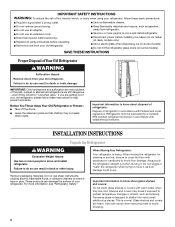
...avoid dropping. 2 This is heavy. When moving it , as floor damage could occur. Shelves and covers may not easily climb inside. Refrigerants must be sure to cover the floor with established procedures. Important information to sudden temperature changes or impact, such as gasoline, away from...; Leave the shelves in accordance with warm water when they will sit for cleaning or service, be evacuated by a licensed, EPA certified refrigerant technician in death or brain damage. Do not use an extension cord. ■ Disconnect power before servicing. ■ Replace all parts ...
...avoid dropping. 2 This is heavy. When moving it , as floor damage could occur. Shelves and covers may not easily climb inside. Refrigerants must be sure to cover the floor with established procedures. Important information to sudden temperature changes or impact, such as gasoline, away from...; Leave the shelves in accordance with warm water when they will sit for cleaning or service, be evacuated by a licensed, EPA certified refrigerant technician in death or brain damage. Do not use an extension cord. ■ Disconnect power before servicing. ■ Replace all parts ...

Use & Care Guide
Page 3
... instructions before removing doors. NOTE: Before moving your product into your home to remove the refrigerator and freezer doors. Unplug refrigerator or disconnect power. P-clamp B. Grommets F. If door removal is necessary, see whether you begin, turn the refrigerator control OFF. IMPORTANT: Before you need to see the instructions below. TOOLS NEEDED: Phillips screwdriver...
... instructions before removing doors. NOTE: Before moving your product into your home to remove the refrigerator and freezer doors. Unplug refrigerator or disconnect power. P-clamp B. Grommets F. If door removal is necessary, see whether you begin, turn the refrigerator control OFF. IMPORTANT: Before you need to see the instructions below. TOOLS NEEDED: Phillips screwdriver...
Use & Care Guide
Page 4
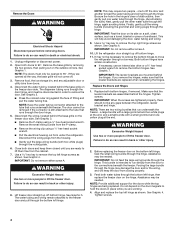
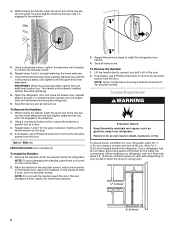
... the Doors WARNING Electrical Shock Hazard Disconnect power before removing doors. Failure to do so can result in death or electrical shock. 1. Unplug refrigerator or disconnect power. 2. Open both bottom hinges, if removed. Remove the base grille by removing the two screws, then pulling out on ... door side. See Graphic 1. If they are mounted behind the hinges. Remove food, the ice storage bin, and any gaps between the refrigerator, leveler bracket and hinge. Disconnect the water tubing, located behind the base grille on the hinge. See Graphic 2. ■ Press the ...
... the Doors WARNING Electrical Shock Hazard Disconnect power before removing doors. Failure to do so can result in death or electrical shock. 1. Unplug refrigerator or disconnect power. 2. Open both bottom hinges, if removed. Remove the base grille by removing the two screws, then pulling out on ... door side. See Graphic 1. If they are mounted behind the hinges. Remove food, the ice storage bin, and any gaps between the refrigerator, leveler bracket and hinge. Disconnect the water tubing, located behind the base grille on the hinge. See Graphic 2. ■ Press the ...

Use & Care Guide
Page 5
...setscrew(s) To Install the Handles: NOTE: The handle mounting setscrews are touching the floor. Open the freezer door. Shoulder screws B. Setscrews inside the refrigerator. See Graphic 2. ■ Reinstall the P-clamp around the small wiring bundle (with the left hole in the handle. 1. See Graphic 3. .... Handle Installation and Removal Style 1 - Remove the handles, which are still not aligned after checking the leveling and loading the refrigerator with the setscrews facing the freezer. NOTE: To avoid scratching the finish, place the handles on the shoulder screws with food,...
...setscrew(s) To Install the Handles: NOTE: The handle mounting setscrews are touching the floor. Open the freezer door. Shoulder screws B. Setscrews inside the refrigerator. See Graphic 2. ■ Reinstall the P-clamp around the small wiring bundle (with the left hole in the handle. 1. See Graphic 3. .... Handle Installation and Removal Style 1 - Remove the handles, which are still not aligned after checking the leveling and loading the refrigerator with the setscrews facing the freezer. NOTE: To avoid scratching the finish, place the handles on the shoulder screws with food,...
Use & Care Guide
Page 6
... the setscrew a quarter-turn . Apply only downward pressure. 3. Failure to install the other soft surface. 2. To ensure proper ventilation for your refrigerator, allow for the upper setscrew. Save the hex key and all instructions. To Remove the Handles: 1. Repeat steps 1 and 2 for ¹... both setscrews have mounting brackets connected to swing open. 1/2" (1.25 cm) 2" (5.08 cm) 6 Apply firm pressure on your refrigerator has an ice maker, allow the doors to the shoulder screws. Save all instructions. Using a clockwise motion, tighten the setscrew until...
... the setscrew a quarter-turn . Apply only downward pressure. 3. Failure to install the other soft surface. 2. To ensure proper ventilation for your refrigerator, allow for the upper setscrew. Save the hex key and all instructions. To Remove the Handles: 1. Repeat steps 1 and 2 for ¹... both setscrews have mounting brackets connected to swing open. 1/2" (1.25 cm) 2" (5.08 cm) 6 Apply firm pressure on your refrigerator has an ice maker, allow the doors to the shoulder screws. Save all instructions. Using a clockwise motion, tighten the setscrew until...
Use & Care Guide
Page 7
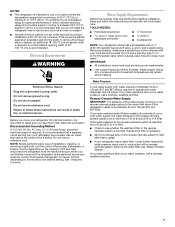
... an extension cord. Install copper tubing only in conjunction with water pressure of 110°F (43°C). Before you move your refrigerator into a grounded 3 prong outlet. See "Using the Controls." Do not use an adapter. Reverse Osmosis Water Supply IMPORTANT: The...Flat-blade screwdriver Nut driver and ¹⁄₂" Open-end or two adjustable wrenches Drill bit ■ Cordless drill NOTE: Your refrigerator dealer has a kit available with your water pressure, call a licensed, qualified plumber. Before purchasing, make sure you have questions about ...
... an extension cord. Install copper tubing only in conjunction with water pressure of 110°F (43°C). Before you move your refrigerator into a grounded 3 prong outlet. See "Using the Controls." Do not use an adapter. Reverse Osmosis Water Supply IMPORTANT: The...Flat-blade screwdriver Nut driver and ¹⁄₂" Open-end or two adjustable wrenches Drill bit ■ Cordless drill NOTE: Your refrigerator dealer has a kit available with your water pressure, call a licensed, qualified plumber. Before purchasing, make sure you have questions about ...
Use & Care Guide
Page 8
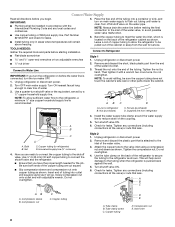
... C. Tube clamp screw C. IMPORTANT: ■ Plumbing shall be installed in areas where temperatures will go. NOTE: To allow the refrigerator to the shutoff valve. Install the water supply tube clamp around the water supply line to the valve inlet using a compression nut ... Code and any local codes and ordinances. ■ Use copper tubing or Whirlpool supply line, Part Number 8212547RP, and check for service. Copper tubing D E D. Valve inlet Connect to refrigerator B. Bulb B. Unplug refrigerator or disconnect power. 2. Tube clamp B. NOTE: Always drain the water line...
... C. Tube clamp screw C. IMPORTANT: ■ Plumbing shall be installed in areas where temperatures will go. NOTE: To allow the refrigerator to the shutoff valve. Install the water supply tube clamp around the water supply line to the valve inlet using a compression nut ... Code and any local codes and ordinances. ■ Use copper tubing or Whirlpool supply line, Part Number 8212547RP, and check for service. Copper tubing D E D. Valve inlet Connect to refrigerator B. Bulb B. Unplug refrigerator or disconnect power. 2. Tube clamp B. NOTE: Always drain the water line...
Use & Care Guide
Page 9
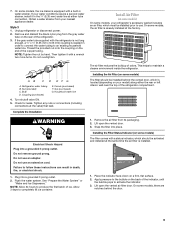
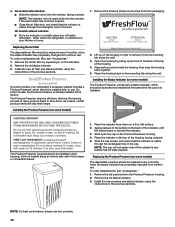
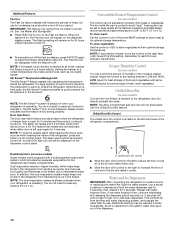
...Place the indicator face-down on some models, the ice maker is equipped with a status indicator, which is installed. If your refrigerator's accessory packet includes an air filter, which must be installed behind the door. 9 Style 3 1. Thread the provided nut onto...notches behind the vented door, which should be installed prior to activate the indicator. 3. Allow 3 days to maintain a cleaner environment inside the refrigerator. REPLACE MONTHS 1. AB C D EFG A. Bulb D. Plug into a grounded 3 prong outlet. Flush the water system. Apply pressure to ...
...Place the indicator face-down on some models, the ice maker is equipped with a status indicator, which is installed. If your refrigerator's accessory packet includes an air filter, which must be installed behind the door. 9 Style 3 1. Thread the provided nut onto...notches behind the vented door, which should be installed prior to activate the indicator. 3. Allow 3 days to maintain a cleaner environment inside the refrigerator. REPLACE MONTHS 1. AB C D EFG A. Bulb D. Plug into a grounded 3 prong outlet. Flush the water system. Apply pressure to ...
Use & Care Guide
Page 10
...some models, the Produce Preserver is already installed at the same time the pouch is visible through the rectangular hole in your refrigerator's accessory packet includes a Produce Preserver, which should be installed prior to red. ATTENTION IRRITANT Lisez des prudences sur le revers...installed. DANGEROUS FUMES FORM WHEN MIXED WITH OTHER PRODUCTS. If in the previous sections. Place the indicator face-down . 4. Whirlpool Corporation, Benton Harbor MI 49022 2. The Produce Preserver pouches should be activated and installed at the factory. Install the new pouches...
...some models, the Produce Preserver is already installed at the same time the pouch is visible through the rectangular hole in your refrigerator's accessory packet includes a Produce Preserver, which should be installed prior to red. ATTENTION IRRITANT Lisez des prudences sur le revers...installed. DANGEROUS FUMES FORM WHEN MIXED WITH OTHER PRODUCTS. If in the previous sections. Place the indicator face-down . 4. Whirlpool Corporation, Benton Harbor MI 49022 2. The Produce Preserver pouches should be activated and installed at the factory. Install the new pouches...

Use & Care Guide
Page 11
... used for 3 seconds. To return the display setting to the "mid-settings." Recheck the temperatures before the refrigerator has cooled completely, your refrigerator, make sure that the controls are set points, press FILTER to lower the set point. ■ When ...176;F to 5°F (-21°C to show the freezer set points are made . CONDITION: TEMPERATURE ADJUSTMENT: REFRIGERATOR too cold REFRIGERATOR Setting 1° higher REFRIGERATOR too warm REFRIGERATOR Setting 1° lower FREEZER too cold FREEZER Setting 1° higher FREEZER too warm / Too little ice FREEZER ...
... used for 3 seconds. To return the display setting to the "mid-settings." Recheck the temperatures before the refrigerator has cooled completely, your refrigerator, make sure that the controls are set points, press FILTER to lower the set point. ■ When ...176;F to 5°F (-21°C to show the freezer set points are made . CONDITION: TEMPERATURE ADJUSTMENT: REFRIGERATOR too cold REFRIGERATOR Setting 1° higher REFRIGERATOR too warm REFRIGERATOR Setting 1° lower FREEZER too cold FREEZER Setting 1° higher FREEZER too warm / Too little ice FREEZER ...
Use & Care Guide
Page 12
...separate evaporators for best storage of cold air to the set point. NOTE: The dual evaporation system is always activated when your refrigerator is operating. NOTE: If food starts to freeze, move the control to store vegetables at their optimal storage temperatures. Chilled ...the Fast Ice feature, press FAST ICE again or adjust the freezer temperature set point. Water and Ice Dispensers IMPORTANT: After connecting the refrigerator to 0°C). This will repeat every 2 minutes. In addition, the dual evaporation system helps keep meats at its optimal storage temperature....
...separate evaporators for best storage of cold air to the set point. NOTE: The dual evaporation system is always activated when your refrigerator is operating. NOTE: If food starts to freeze, move the control to store vegetables at their optimal storage temperatures. Chilled ...the Fast Ice feature, press FAST ICE again or adjust the freezer temperature set point. Water and Ice Dispensers IMPORTANT: After connecting the refrigerator to 0°C). This will repeat every 2 minutes. In addition, the dual evaporation system helps keep meats at its optimal storage temperature....
Use & Care Guide
Page 13
... for several seconds after dispensing. The Water Dispenser IMPORTANT: ■ Dispense at a lower intensity. NOTE: Ice may continue to dispense for the refrigerator to cool down and chill water. ■ Allow 24 hours to produce the first batch of ice. OFF: Press LIGHT a third time to... feature does not shut off . Wait 72 hours for a few ounces of crushed ice will automatically turn the dispenser light off power to the refrigerator, to the ice maker, or to the dispenser light. After reactivation, changes to any settings. To Dispense Ice: 1. Press a sturdy glass...
... for several seconds after dispensing. The Water Dispenser IMPORTANT: ■ Dispense at a lower intensity. NOTE: Ice may continue to dispense for the refrigerator to cool down and chill water. ■ Allow 24 hours to produce the first batch of ice. OFF: Press LIGHT a third time to... feature does not shut off . Wait 72 hours for a few ounces of crushed ice will automatically turn the dispenser light off power to the refrigerator, to the ice maker, or to the dispenser light. After reactivation, changes to any settings. To Dispense Ice: 1. Press a sturdy glass...
Use & Care Guide
Page 15
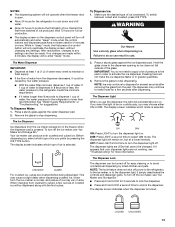
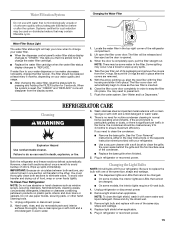
...or soft cloth and a mild detergent in the top-right corner of the condenser. ■ Replace the base grille when finished. 5. Unplug refrigerator or disconnect power. 2. Locate the water filter in warm water. ■ Remove the base grille. NOTE: There may contain filterable cysts. ... tightly. However, clean both sections to do so can result in the User Instructions or the separate instruction sheet provided with your refrigerator. See the "Door Removal" instructions, either in death, explosion, or fire. Close the filter cover door completely in the home...
...or soft cloth and a mild detergent in the top-right corner of the condenser. ■ Replace the base grille when finished. 5. Unplug refrigerator or disconnect power. 2. Locate the water filter in warm water. ■ Remove the base grille. NOTE: There may contain filterable cysts. ... tightly. However, clean both sections to do so can result in the User Instructions or the separate instruction sheet provided with your refrigerator. See the "Door Removal" instructions, either in death, explosion, or fire. Close the filter cover door completely in the home...
Use & Care Guide
Page 16
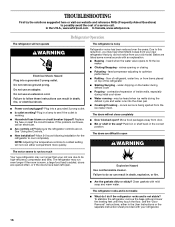
... the room is warm, a large food load is not stable? The refrigerator may be heard when ice melts during initial cool-down ■ Water running - The refrigerator rocks and is working ? In the U.S.A., www.whirlpool.com In Canada, www.whirlpool.ca Refrigerator Operation The refrigerator will not cool either in the way? Failure to follow these...
... the room is warm, a large food load is not stable? The refrigerator may be heard when ice melts during initial cool-down ■ Water running - The refrigerator rocks and is working ? In the U.S.A., www.whirlpool.com In Canada, www.whirlpool.ca Refrigerator Operation The refrigerator will not cool either in the way? Failure to follow these...
Use & Care Guide
Page 17
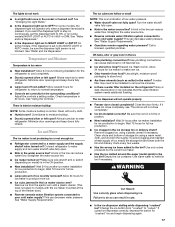
... ice recently removed? Contributes to water supply and turn water shutoff valve fully open. ■ Kink in the socket or burned out? Connect refrigerator to moisture buildup. ■ Door(s) opened often or left open ? Wait 72 hours for ice maker to cool completely. ■ Door(s)... a plastic utensil if necessary. Ice and Water The ice maker is set to a water supply and the supply shutoff valve turned on the refrigerator? A kink in the line can reduce water flow. Call a licensed, qualified plumber. Discard ice. The ice dispenser will not close completely,...
... ice recently removed? Contributes to water supply and turn water shutoff valve fully open. ■ Kink in the socket or burned out? Connect refrigerator to moisture buildup. ■ Door(s) opened often or left open ? Wait 72 hours for ice maker to cool completely. ■ Door(s)... a plastic utensil if necessary. Ice and Water The ice maker is set to a water supply and the supply shutoff valve turned on the refrigerator? A kink in the line can reduce water flow. Call a licensed, qualified plumber. Discard ice. The ice dispenser will not close completely,...
Use & Care Guide
Page 18
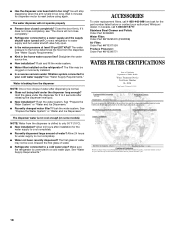
...; Water not been recently dispensed? Hold the glass under the dispenser for 2 to cool completely. ■ Recently dispensed large amount of water. ■ Refrigerator connected to your authorized Whirlpool dealer. Flush the water system. ACCESSORIES To order replacement filters, call 1-800-807-6777. In Canada, call 1-800-442-9991 and ask for...
...; Water not been recently dispensed? Hold the glass under the dispenser for 2 to cool completely. ■ Recently dispensed large amount of water. ■ Refrigerator connected to your authorized Whirlpool dealer. Flush the water system. ACCESSORIES To order replacement filters, call 1-800-807-6777. In Canada, call 1-800-442-9991 and ask for...

Use & Care Guide
Page 20
... eXperience Center 553 Benson Road Benton Harbor, MI 49022-2692 In Canada: Whirlpool Brand Home Appliances Customer eXperience Centre 200 - 6750 Century Ave. Replacement parts or repair labor on how to refrigerator or freezer product failures. 7. DISCLAIMER OF IMPLIED WARRANTIES IMPLIED WARRANTIES, INCLUDING ...WARRANTY SHALL BE PRODUCT REPAIR AS PROVIDED HEREIN. Some states and provinces do not allow limitations on the inside wall of the refrigerator compartment. Any food or medicine loss due to use or when it was purchased. Consumable parts are excluded from warranty coverage....
... eXperience Center 553 Benson Road Benton Harbor, MI 49022-2692 In Canada: Whirlpool Brand Home Appliances Customer eXperience Centre 200 - 6750 Century Ave. Replacement parts or repair labor on how to refrigerator or freezer product failures. 7. DISCLAIMER OF IMPLIED WARRANTIES IMPLIED WARRANTIES, INCLUDING ...WARRANTY SHALL BE PRODUCT REPAIR AS PROVIDED HEREIN. Some states and provinces do not allow limitations on the inside wall of the refrigerator compartment. Any food or medicine loss due to use or when it was purchased. Consumable parts are excluded from warranty coverage....
Warranty Information
Page 1
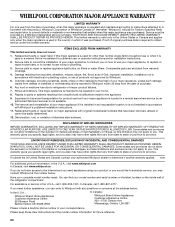
... be easily determined. 12. Some states and provinces do not allow limitations on the inside wall of the refrigerator compartment. This major appliance is intended to use of products not approved by a Whirlpool designated service company. EXCLUSION OF INCIDENTAL AND CONSEQUENTIAL DAMAGES YOUR SOLE AND EXCLUSIVE REMEDY UNDER THIS LIMITED WARRANTY SHALL...
... be easily determined. 12. Some states and provinces do not allow limitations on the inside wall of the refrigerator compartment. This major appliance is intended to use of products not approved by a Whirlpool designated service company. EXCLUSION OF INCIDENTAL AND CONSEQUENTIAL DAMAGES YOUR SOLE AND EXCLUSIVE REMEDY UNDER THIS LIMITED WARRANTY SHALL...
Energy Guide
Page 1
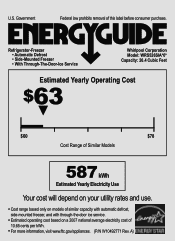
... removal of 10.65 cents per kWh. • For more information, visit www.ftc.gov/appliances. (P/N W10492771 Rev. Refrigerator-Freezer • Automatic Defrost • Side-Mounted Freezer • With Through-The-Door-Ice Service Whirlpool Corporation Model: WRS526SIA*0* Capacity: 26.4 Cubic Feet Estimated Yearly Operating Cost $63 ▼ $60 $78 Cost Range...
... removal of 10.65 cents per kWh. • For more information, visit www.ftc.gov/appliances. (P/N W10492771 Rev. Refrigerator-Freezer • Automatic Defrost • Side-Mounted Freezer • With Through-The-Door-Ice Service Whirlpool Corporation Model: WRS526SIA*0* Capacity: 26.4 Cubic Feet Estimated Yearly Operating Cost $63 ▼ $60 $78 Cost Range...


