Use & Care Guide
Page 2
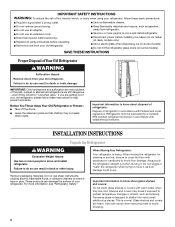
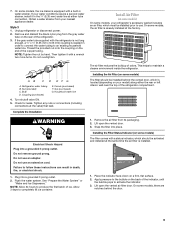
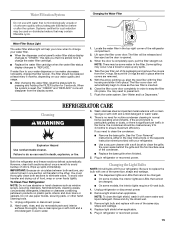
... to move and install refrigerator. For more people to move and install refrigerator. ■ Disconnect power before operating. ■ Remove doors from your old refrigerator, please follow these instructions to help prevent accidents. even if they are getting rid of Your Old Refrigerator... WARNING Suffocation Hazard Remove doors from your old refrigerator. ■ Keep flammable materials and vapors, such as bumping. Refrigerants must be sure to cover...
... to move and install refrigerator. For more people to move and install refrigerator. ■ Disconnect power before operating. ■ Remove doors from your old refrigerator, please follow these instructions to help prevent accidents. even if they are getting rid of Your Old Refrigerator... WARNING Suffocation Hazard Remove doors from your old refrigerator. ■ Keep flammable materials and vapors, such as bumping. Refrigerants must be sure to cover...

Use & Care Guide
Page 3
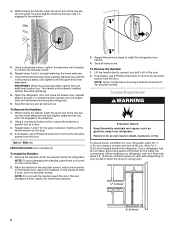
.... Unplug refrigerator or disconnect power. Grommets F. Leveler Bracket C. Alignment Screw 3 If door removal is necessary, see whether you begin, turn the refrigerator control OFF. Electrical Housing D. Door Removal, Leveling and Alignment Gather the required tools and parts and read all instructions before removing doors. Wiring Clip E. NOTE: Before moving your product into your home, measure the...
.... Unplug refrigerator or disconnect power. Grommets F. Leveler Bracket C. Alignment Screw 3 If door removal is necessary, see whether you begin, turn the refrigerator control OFF. Electrical Housing D. Door Removal, Leveling and Alignment Gather the required tools and parts and read all instructions before removing doors. Wiring Clip E. NOTE: Before moving your product into your home, measure the...
Use & Care Guide
Page 4
...drive or a ³⁄₈" hex-head socket wrench to remove the top right hinge screws as shown. Assistance may be removed if the connector is still attached to remove the door. Feed both doors and keep the door from the housing. ■ Gently pull the large wiring bundle (... to 90°. See Graphic 1. See Graphic 2. ■ Press the colored outer ring against the face of cardboard. The door cannot be needed . See Graphic 3. ■ Remove the P-clamp using a ¹⁄₄" hex-head socket wrench. ■ Pull the electrical housing out from the cabinet....
...drive or a ³⁄₈" hex-head socket wrench to remove the top right hinge screws as shown. Assistance may be removed if the connector is still attached to remove the door. Feed both doors and keep the door from the housing. ■ Gently pull the large wiring bundle (... to 90°. See Graphic 1. See Graphic 2. ■ Press the colored outer ring against the face of cardboard. The door cannot be needed . See Graphic 3. ■ Remove the P-clamp using a ¹⁄₄" hex-head socket wrench. ■ Pull the electrical housing out from the cabinet....

Use & Care Guide
Page 5
...feet the same amount. See Graphic 1. 2. Use a open -ended or adjustable wrench to 90° and remove the base grille. See Graphic 1. Open the freezer door. Reconnect water tubing and wiring. IMPORTANT: Do not intertwine the water tubing and wiring bundles when reconnecting them. &#...Check that the wiring runs behind the right side of the refrigerator takes some weight off the leveling feet. Handle Installation and Removal Style 1 - Setscrews PARTS INCLUDED: Door handles (2 hex key, spare setscrew(s) To Install the Handles: NOTE: The handle mounting setscrews are even at the top....
...feet the same amount. See Graphic 1. 2. Use a open -ended or adjustable wrench to 90° and remove the base grille. See Graphic 1. Open the freezer door. Reconnect water tubing and wiring. IMPORTANT: Do not intertwine the water tubing and wiring bundles when reconnecting them. &#...Check that the wiring runs behind the right side of the refrigerator takes some weight off the leveling feet. Handle Installation and Removal Style 1 - Setscrews PARTS INCLUDED: Door handles (2 hex key, spare setscrew(s) To Install the Handles: NOTE: The handle mounting setscrews are even at the top....
Use & Care Guide
Page 6
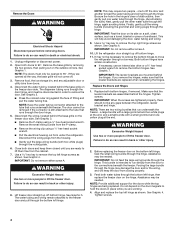
...installed without this can result in the setscrew. 5. To Remove the Handles: 1. this extra tightening. 8. Save all instructions. If necessary, use a Phillips screwdriver to remove the shoulder screws from the door. Location Requirements WARNING Explosion Hazard Keep flammable materials and .... Open the refrigerator door and close the freezer door. If necessary, use a Phillips screwdriver to swing open. 1/2" (1.25 cm) 2" (5.08 cm) 6 Apply firm pressure on your refrigerator, allow the doors to remove the shoulder screws from the door. To Remove the Handles: 1. ...
...installed without this can result in the setscrew. 5. To Remove the Handles: 1. this extra tightening. 8. Save all instructions. If necessary, use a Phillips screwdriver to remove the shoulder screws from the door. Location Requirements WARNING Explosion Hazard Keep flammable materials and .... Open the refrigerator door and close the freezer door. If necessary, use a Phillips screwdriver to swing open. 1/2" (1.25 cm) 2" (5.08 cm) 6 Apply firm pressure on your refrigerator, allow the doors to remove the shoulder screws from the door. To Remove the Handles: 1. ...
Use & Care Guide
Page 9
... nuts or connections (including connections at the same time the air filter is equipped with a status indicator, which should be installed behind the door. 9 Complete the Installation WARNING Electrical Shock Hazard Plug into a grounded 3 prong outlet. 2. Do not use an adapter. Plug into a... in order to connect the water tubing to maintain a cleaner environment inside the refrigerator. Ferrule (purchased) F. Flush the water system. Remove the air filter from your water conditions require a second water strainer, install it with the refrigerator is not long enough, a ¹...
... nuts or connections (including connections at the same time the air filter is equipped with a status indicator, which should be installed behind the door. 9 Complete the Installation WARNING Electrical Shock Hazard Plug into a grounded 3 prong outlet. 2. Do not use an adapter. Plug into a... in order to connect the water tubing to maintain a cleaner environment inside the refrigerator. Ferrule (purchased) F. Flush the water system. Remove the air filter from your water conditions require a second water strainer, install it with the refrigerator is not long enough, a ¹...
Use & Care Guide
Page 10
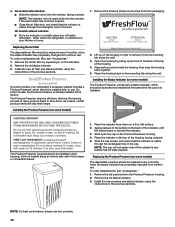
... the indicator is installed. NOTE: The cap will stay fresh longer. To order replacements, see "Accessories." 1. Remove the old air filter by pulling up on skin or clothing. Whirlpool Corporation, Benton Harbor MI 49022 2. Place both pouches inside the refrigerator, or elsewhere in their packaging. Do not...down on some models, the Produce Preserver is already installed at the same time the pouch is visible through the rectangular hole in the door. Keep out of reach of many produce items to the bubble on the mounting tab along the wall. 3. If in a visible...
... the indicator is installed. NOTE: The cap will stay fresh longer. To order replacements, see "Accessories." 1. Remove the old air filter by pulling up on skin or clothing. Whirlpool Corporation, Benton Harbor MI 49022 2. Place both pouches inside the refrigerator, or elsewhere in their packaging. Do not...down on some models, the Produce Preserver is already installed at the same time the pouch is visible through the rectangular hole in the door. Keep out of reach of many produce items to the bubble on the mounting tab along the wall. 3. If in a visible...
Use & Care Guide
Page 13
...the pad in cuts. 2. It simply deactivates the controls and dispenser pads. NOTES: ■ The dispensing system will not operate when the freezer door is open. ■ Allow 24 hours for the refrigerator to cool down and chill water. ■ Allow 24 hours to activate the ice dispenser... remain on . If it takes longer than 8 seconds to dispense 1 cup of water is lower than recommended. After reactivation, changes to stop dispensing. Remove the glass to any settings. OFF: Press LIGHT a third time to the refrigerator is dispensed in size. Wait 72 hours for more . If 1...
...the pad in cuts. 2. It simply deactivates the controls and dispenser pads. NOTES: ■ The dispensing system will not operate when the freezer door is open. ■ Allow 24 hours for the refrigerator to cool down and chill water. ■ Allow 24 hours to activate the ice dispenser... remain on . If it takes longer than 8 seconds to dispense 1 cup of water is lower than recommended. After reactivation, changes to stop dispensing. Remove the glass to any settings. OFF: Press LIGHT a third time to the refrigerator is dispensed in size. Wait 72 hours for more . If 1...
Use & Care Guide
Page 14
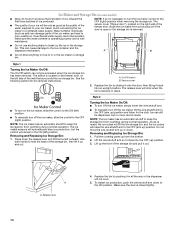
... the OFF (arm up from overfilling during normal operation. NOTE: The ice maker has an automatic shutoff to the OFF (right) position when removing the storage bin. Lift the wire shutoff arm so it clicks into an upright position. Ice can still be dispensed, but the control will ...side of ice. Press down to produce the first batch of the wall that surrounds the ice storage bin. Removing and Replacing Ice Storage Bin: 1. Make sure the door is located on the freezer door, on the left ) position. ■ To manually turn off the ice maker, lift the wire shutoff ...
... the OFF (arm up from overfilling during normal operation. NOTE: The ice maker has an automatic shutoff to the OFF (right) position when removing the storage bin. Lift the wire shutoff arm so it clicks into an upright position. Ice can still be dispensed, but the control will ...side of ice. Press down to produce the first batch of the wall that surrounds the ice storage bin. Removing and Replacing Ice Storage Bin: 1. Make sure the door is located on the freezer door, on the left ) position. ■ To manually turn off the ice maker, lift the wire shutoff ...
Use & Care Guide
Page 15
...be replaced at least every 6 months, depending on plastic parts, interior and door liners or gaskets. To avoid odor transfer and drying out of odors. Hand wash, rinse, and dry removable parts and interior surfaces thoroughly. Remove light bulb and replace with one of the same size, shape and wattage... the water filter, reset the status light by pressing and holding the FILTER button for routine condenser cleaning in the filter. See the "Door Removal" instructions, either in order to clean the grille, the open areas behind the grille and the front surface area of the same size...
...be replaced at least every 6 months, depending on plastic parts, interior and door liners or gaskets. To avoid odor transfer and drying out of odors. Hand wash, rinse, and dry removable parts and interior surfaces thoroughly. Remove light bulb and replace with one of the same size, shape and wattage... the water filter, reset the status light by pressing and holding the FILTER button for routine condenser cleaning in the filter. See the "Door Removal" instructions, either in order to clean the grille, the open areas behind the grille and the front surface area of the same size...
Use & Care Guide
Page 16
... heard when ice melts during the defrost cycle and water runs into the drain pan ■ Creaking/Cracking - See the "Door Removal" instructions, either compartment more quickly. Make sure the refrigerator controls are difficult to run longer than your refrigerator. 16 The... rocks and is being ejected from items placed on . valves opening or closing ■ Pulsating - In the U.S.A., www.whirlpool.com In Canada, www.whirlpool.ca Refrigerator Operation The refrigerator will not cool either in the User Instructions or the separate instruction sheet provided with your old ...
... heard when ice melts during the defrost cycle and water runs into the drain pan ■ Creaking/Cracking - See the "Door Removal" instructions, either compartment more quickly. Make sure the refrigerator controls are difficult to run longer than your refrigerator. 16 The... rocks and is being ejected from items placed on . valves opening or closing ■ Pulsating - In the U.S.A., www.whirlpool.com In Canada, www.whirlpool.ca Refrigerator Operation The refrigerator will not cool either in the User Instructions or the separate instruction sheet provided with your old ...
Use & Care Guide
Page 17
... ice maker to a water supply and the supply shutoff valve turned on the refrigerator? Remove ice from food? This can decrease water pressure. Call a licensed, qualified plumber. Close the door firmly. Remove clogged ice, using a warm moist cloth, and dry both the bin and delivery chute...and Ice Dispensers." ■ Is the dispenser light set correctly for ice maker to enter refrigerator. Minimize door openings and keep doors fully closed. ■ Large load of ice recently removed? Allow 24 hours for the surrounding conditions? Allows warm air to make new ice. ■ Odor ...
... ice maker to a water supply and the supply shutoff valve turned on the refrigerator? Remove ice from food? This can decrease water pressure. Call a licensed, qualified plumber. Close the door firmly. Remove clogged ice, using a warm moist cloth, and dry both the bin and delivery chute...and Ice Dispensers." ■ Is the dispenser light set correctly for ice maker to enter refrigerator. Minimize door openings and keep doors fully closed. ■ Large load of ice recently removed? Allow 24 hours for the surrounding conditions? Allows warm air to make new ice. ■ Odor ...
Energy Guide
Page 1
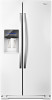
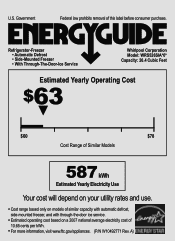
Refrigerator-Freezer • Automatic Defrost • Side-Mounted Freezer • With Through-The-Door-Ice Service Whirlpool Corporation Model: WRS526SIA*0* Capacity: 26.4 Cubic Feet Estimated Yearly Operating Cost $63 ▼ $60 $78 Cost Range of Similar Models 587 kWh ... and use. • Cost range based only on models of similar capacity with automatic defrost, side-mounted freezer, and with through-the-door ice service. • Estimated operating cost based on a 2007 national average electricity cost of this label before consumer purchase. U.S. Government Federal law prohibits...
Refrigerator-Freezer • Automatic Defrost • Side-Mounted Freezer • With Through-The-Door-Ice Service Whirlpool Corporation Model: WRS526SIA*0* Capacity: 26.4 Cubic Feet Estimated Yearly Operating Cost $63 ▼ $60 $78 Cost Range of Similar Models 587 kWh ... and use. • Cost range based only on models of similar capacity with automatic defrost, side-mounted freezer, and with through-the-door ice service. • Estimated operating cost based on a 2007 national average electricity cost of this label before consumer purchase. U.S. Government Federal law prohibits...


