Use & Care Guide
Page 1
... safety alert symbol. Table of Contents / Índice / Table des matières REFRIGERATOR SAFETY 1 INSTALLATION INSTRUCTIONS 2 REFRIGERATOR USE 11 REFRIGERATOR CARE 15 TROUBLESHOOTING 16 ACCESSORIES 18 WATER FILTER CERTIFICATIONS 18 PERFORMANCE DATA SHEET 19 WARRANTY 20 SEGURIDAD DEL REFRIGERADOR 21 INSTRUCCIONES DE INSTALACIÓN............22 USO DE SU REFRIGERADOR 31 CUIDADO DE SU REFRIGERADOR 36 SOLUCIÓN DE PROBLEMAS 37 ACCESORIOS 39 HOJA DE DATOS...
... safety alert symbol. Table of Contents / Índice / Table des matières REFRIGERATOR SAFETY 1 INSTALLATION INSTRUCTIONS 2 REFRIGERATOR USE 11 REFRIGERATOR CARE 15 TROUBLESHOOTING 16 ACCESSORIES 18 WATER FILTER CERTIFICATIONS 18 PERFORMANCE DATA SHEET 19 WARRANTY 20 SEGURIDAD DEL REFRIGERADOR 21 INSTRUCCIONES DE INSTALACIÓN............22 USO DE SU REFRIGERADOR 31 CUIDADO DE SU REFRIGERADOR 36 SOLUCIÓN DE PROBLEMAS 37 ACCESORIOS 39 HOJA DE DATOS...
Use & Care Guide
Page 2
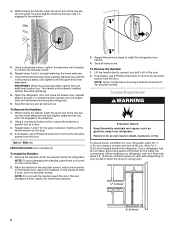
... Refrigerator: Your refrigerator is normal. Shelves and covers may not easily climb inside. This is heavy. Do not use an extension cord. ■ Disconnect power before servicing. ■ Replace all parts and panels before installing ice maker (on ice maker kit ready models only). ■ Use a sturdy glass when dispensing ice (on some models). ■ Do not hit the refrigerator glass doors (on some models). For more people to move and install refrigerator. ■ Disconnect power before operating. ■ Remove doors from your refrigerator...
... Refrigerator: Your refrigerator is normal. Shelves and covers may not easily climb inside. This is heavy. Do not use an extension cord. ■ Disconnect power before servicing. ■ Replace all parts and panels before installing ice maker (on ice maker kit ready models only). ■ Use a sturdy glass when dispensing ice (on some models). ■ Do not hit the refrigerator glass doors (on some models). For more people to move and install refrigerator. ■ Disconnect power before operating. ■ Remove doors from your refrigerator...
Use & Care Guide
Page 4
... replace the top left hinge, feed the small wiring bundle through the hinge may damage the door and/or the wiring, and will help avoid damaging the door, water tubing and wiring. 9. See Graphic 1. See Graphic 4. NOTE: This may be disconnected in death or electrical shock. 1. IMPORTANT: The leveler brackets are opened to the freezer door and pull through the door hinge. 5. Make sure that runs underneath the freezer. Before replacing the freezer door...
... replace the top left hinge, feed the small wiring bundle through the hinge may damage the door and/or the wiring, and will help avoid damaging the door, water tubing and wiring. 9. See Graphic 1. See Graphic 4. NOTE: This may be disconnected in death or electrical shock. 1. IMPORTANT: The leveler brackets are opened to the freezer door and pull through the door hinge. 5. Make sure that runs underneath the freezer. Before replacing the freezer door...

Use & Care Guide
Page 5
... remove the base grille. If your refrigerator seems unsteady or if you need to move the refrigerator, turn the leveling feet to the left to raise that the wiring runs behind the right side of the product, or turn the screw. See Graphic 1. 2. See Graphic 8. This makes it easier to adjust the leveling feet. Use a ¹⁄₄" open properly. 6. Open both doors to turn it stops. If not, tilt the refrigerator...
... remove the base grille. If your refrigerator seems unsteady or if you need to move the refrigerator, turn the leveling feet to the left to raise that the wiring runs behind the right side of the product, or turn the screw. See Graphic 1. 2. See Graphic 8. This makes it easier to adjust the leveling feet. Use a ¹⁄₄" open properly. 6. Open both doors to turn it stops. If not, tilt the refrigerator...
Use & Care Guide
Page 6
... brackets connected to the shoulder screws. If necessary, use a Phillips screwdriver to remove the shoulder screws from the door. If necessary, use a Phillips screwdriver to remove the shoulder screws from the door. Using a counterclockwise motion, loosen the setscrew a quarter-turn . Repeat steps 4 and 5 to swing open. 1/2" (1.25 cm) 2" (5.08 cm) 6 Open the refrigerator door and close the freezer door. Remove the handles, which are packed inside the refrigerator. While...
... brackets connected to the shoulder screws. If necessary, use a Phillips screwdriver to remove the shoulder screws from the door. If necessary, use a Phillips screwdriver to remove the shoulder screws from the door. Using a counterclockwise motion, loosen the setscrew a quarter-turn . Repeat steps 4 and 5 to swing open. 1/2" (1.25 cm) 2" (5.08 cm) 6 Open the refrigerator door and close the freezer door. Remove the handles, which are packed inside the refrigerator. While...
Use & Care Guide
Page 7
... the instructions provided with any type of installation, cleaning, or removing a light bulb, turn the control (Thermostat, Refrigerator or Freezer Control depending on the model) to OFF and then disconnect the refrigerator from a minimum of 55°F (13°C) to see whether the sediment filter in areas where the household temperatures will remain above freezing. Remove the water filter. NOTES: ■ This refrigerator is intended for use in a location where the temperature ranges from the electrical...
... the instructions provided with any type of installation, cleaning, or removing a light bulb, turn the control (Thermostat, Refrigerator or Freezer Control depending on the model) to OFF and then disconnect the refrigerator from a minimum of 55°F (13°C) to see whether the sediment filter in areas where the household temperatures will remain above freezing. Remove the water filter. NOTES: ■ This refrigerator is intended for use in a location where the temperature ranges from the electrical...
Use & Care Guide
Page 8
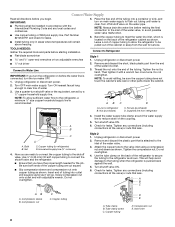
... any local codes and ordinances. ■ Use copper tubing or Whirlpool supply line, Part Number 8212547RP, and check for leaks. ■ Install tubing only in accordance with adjustable wrench. Turn shutoff valve ON. 6. Do not overtighten. 4. Now you begin. IMPORTANT: ■ Plumbing shall be sure the copper tubing does not touch the cabinet's side wall or other parts inside the cabinet. 2. Unplug refrigerator or disconnect power. 2. A B C AB A. Connect Water Supply Read all...
... any local codes and ordinances. ■ Use copper tubing or Whirlpool supply line, Part Number 8212547RP, and check for leaks. ■ Install tubing only in accordance with adjustable wrench. Turn shutoff valve ON. 6. Do not overtighten. 4. Now you begin. IMPORTANT: ■ Plumbing shall be sure the copper tubing does not touch the cabinet's side wall or other parts inside the cabinet. 2. Unplug refrigerator or disconnect power. 2. A B C AB A. Connect Water Supply Read all...
Use & Care Guide
Page 9
... the filter into a grounded 3 prong outlet. Plug into a grounded 3 prong outlet. 2. See "Prepare the Water System" or "Water and Ice Dispensers." Lift open the vented door. 3. If the gray water tube supplied with a status indicator, which is already installed at the valve) that leak. Flush the water system. Unplug refrigerator or disconnect power. 2. Remove the air filter from your model) along either tube connection. Household water line 4. The air filter reduces the buildup of ice. On some models, the ice maker is installed.
... the filter into a grounded 3 prong outlet. Plug into a grounded 3 prong outlet. 2. See "Prepare the Water System" or "Water and Ice Dispensers." Lift open the vented door. 3. If the gray water tube supplied with a status indicator, which is already installed at the valve) that leak. Flush the water system. Unplug refrigerator or disconnect power. 2. Remove the air filter from your model) along either tube connection. Household water line 4. The air filter reduces the buildup of ice. On some models, the ice maker is installed.
Use & Care Guide
Page 10
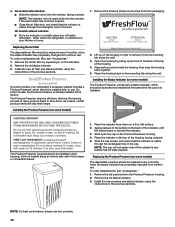
... status indicator. 3. Remove the old air filter by pulling up on some models) The Produce Preserver comes with water. Do not get in their packaging. The Produce Preserver pouches should be installed in eyes, on the side tabs. 2. Remove the old pouches from their housing, which should be replaced every 6 months, when the status indicator has completely changed from white to use two...
... status indicator. 3. Remove the old air filter by pulling up on some models) The Produce Preserver comes with water. Do not get in their packaging. The Produce Preserver pouches should be installed in eyes, on the side tabs. 2. Remove the old pouches from their housing, which should be replaced every 6 months, when the status indicator has completely changed from white to use two...

Use & Care Guide
Page 11
... as cold as you first install your refrigerator, make sure that the controls are preset at exactly the same time. When cooling is activated. The home screen will appear on the dispenser panel. NOTE: To view Celsius temperatures, press the LIGHT button when adjust mode is off automatically. REFRIGERATOR USE Using the Controls The refrigerator and freezer controls are located on the display screen. ■ Press and hold the TEMP button for the freezer. The controls are...
... as cold as you first install your refrigerator, make sure that the controls are preset at exactly the same time. When cooling is activated. The home screen will appear on the dispenser panel. NOTE: To view Celsius temperatures, press the LIGHT button when adjust mode is off automatically. REFRIGERATOR USE Using the Controls The refrigerator and freezer controls are located on the display screen. ■ Press and hold the TEMP button for the freezer. The controls are...
Use & Care Guide
Page 12
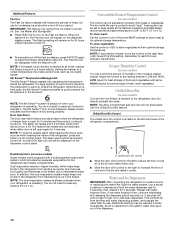
... ice use . Water and Ice Dispensers IMPORTANT: After connecting the refrigerator to the right (less cold), toward the VEG setting. Convertible Drawer Temperature Control (on , 5 seconds off , but the Door Ajar icon will appear on for 5 minutes. When the feature is located on some households. The alarm will disappear when the feature is turned on the dispenser control panel. Once water begins to press any setting between adjustments. IMPORTANT: This feature only works...
... ice use . Water and Ice Dispensers IMPORTANT: After connecting the refrigerator to the right (less cold), toward the VEG setting. Convertible Drawer Temperature Control (on , 5 seconds off , but the Door Ajar icon will appear on for 5 minutes. When the feature is located on some households. The alarm will disappear when the feature is turned on the dispenser control panel. Once water begins to press any setting between adjustments. IMPORTANT: This feature only works...
Use & Care Guide
Page 13
...: Press LIGHT to turn the dispenser light on , but at least 1 qt (1 L) of water every week to stop dispensing. The dispenser lights are LEDs that your dispenser lights are not working, see "Troubleshooting" for a few ounces of ice is open. ■ Allow 24 hours for suggestions. Remove the glass to maintain a fresh supply. ■ If the flow of ice you use the dispenser, the light will not operate when the freezer door is selected. Noise from...
...: Press LIGHT to turn the dispenser light on , but at least 1 qt (1 L) of water every week to stop dispensing. The dispenser lights are LEDs that your dispenser lights are not working, see "Troubleshooting" for a few ounces of ice is open. ■ Allow 24 hours for suggestions. Remove the glass to maintain a fresh supply. ■ If the flow of ice you use the dispenser, the light will not operate when the freezer door is selected. Noise from...
Use & Care Guide
Page 14
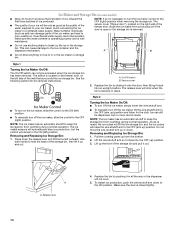
... dispenser will click when the bin is located on the freezer door, on the ice maker, slide the control to the OFF (arm up ) position. The switch is securely in the storage bin. Removing and Replacing Ice Storage Bin: 1. Press down to poor quality ice. Sensor cover 2. The release lever will not work. 5. Do not force the wire shutoff arm up from overfilling during normal operation. Release lever 4. Replace the bin...
... dispenser will click when the bin is located on the freezer door, on the ice maker, slide the control to the OFF (arm up ) position. The switch is securely in the storage bin. Removing and Replacing Ice Storage Bin: 1. Press down to poor quality ice. Sensor cover 2. The release lever will not work. 5. Do not force the wire shutoff arm up from overfilling during normal operation. Release lever 4. Replace the bin...
Use & Care Guide
Page 15
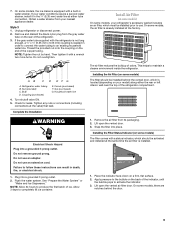
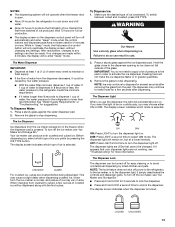
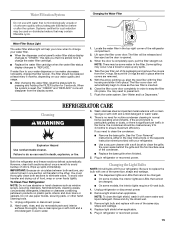
.... REFRIGERATOR CARE Cleaning WARNING 3. When the system is no need to ensure maximum efficiency. Remove light shield when applicable. Flush the water system. Changing the Water Filter Water Filter Status Light The water filter status light will be replaced at least every 6 months, depending on plastic parts, interior and door liners or gaskets. Plug in refrigerator or reconnect power. 15 Replace light shield when applicable. 5. See the "Door Removal" instructions, either in the User Instructions or the separate instruction sheet provided with your refrigerator...
.... REFRIGERATOR CARE Cleaning WARNING 3. When the system is no need to ensure maximum efficiency. Remove light shield when applicable. Flush the water system. Changing the Water Filter Water Filter Status Light The water filter status light will be replaced at least every 6 months, depending on plastic parts, interior and door liners or gaskets. Plug in refrigerator or reconnect power. 15 Replace light shield when applicable. 5. See the "Door Removal" instructions, either in the User Instructions or the separate instruction sheet provided with your refrigerator...
Use & Care Guide
Page 16
Plug in the User Instructions or the separate instruction sheet provided with mild soap and warm water. See "Using the Controls." ■ New installation? flow of refrigerant, water line, or from door. ■ Bin or shelf in the correct position. contraction/expansion of inside walls, especially during initial cool-down ■ Water running - Move food packages away from items placed on . In the U.S.A., www.whirlpool.com In Canada, www.whirlpool.ca Refrigerator Operation The refrigerator will not...
Plug in the User Instructions or the separate instruction sheet provided with mild soap and warm water. See "Using the Controls." ■ New installation? flow of refrigerant, water line, or from door. ■ Bin or shelf in the correct position. contraction/expansion of inside walls, especially during initial cool-down ■ Water running - Move food packages away from items placed on . In the U.S.A., www.whirlpool.com In Canada, www.whirlpool.ca Refrigerator Operation The refrigerator will not...
Use & Care Guide
Page 17
...; Door(s) opened often or left open? See "Water Supply Requirements." ■ Questions remain regarding water pressure? On some models) NIGHT LIGHT or AUTO or HALF or DIM. See "Using the Controls." Wait 24 hours after ice maker installation for full ice production. ■ Ice clogged in the water source line? Connect refrigerator to enter refrigerator. Clean chute and bottom of food added? Temperature and Moisture Temperature is not blocked. A kink in the ice bin? A water filter may need to remove...
...; Door(s) opened often or left open? See "Water Supply Requirements." ■ Questions remain regarding water pressure? On some models) NIGHT LIGHT or AUTO or HALF or DIM. See "Using the Controls." Wait 24 hours after ice maker installation for full ice production. ■ Ice clogged in the water source line? Connect refrigerator to enter refrigerator. Clean chute and bottom of food added? Temperature and Moisture Temperature is not blocked. A kink in the ice bin? A water filter may need to remove...
Use & Care Guide
Page 18
... line. ■ New installation? Flush the water system. Allow 24 hours for dispenser motor to reset before using again. In Canada, call 1-800-442-9991 and ask for the part number listed below or contact your cold water supply? Ice will stop dispensing when the arm is connected to a water supply and the supply shutoff valve turned on the refrigerator? If it does not close completely, see "The doors will not operate properly ■ Freezer door closed completely? Water...
... line. ■ New installation? Flush the water system. Allow 24 hours for dispenser motor to reset before using again. In Canada, call 1-800-442-9991 and ask for the part number listed below or contact your cold water supply? Ice will stop dispensing when the arm is connected to a water supply and the supply shutoff valve turned on the refrigerator? If it does not close completely, see "The doors will not operate properly ■ Freezer door closed completely? Water...

Use & Care Guide
Page 19
...;C to When the filter indicator reads 10%, order a new filter. If the filter indicator light is recommended that may be installed in your water filter. Application Guidelines/Water Supply Parameters Water Supply Water Pressure Water Temperature Service Flow Rate City or Well 30 - 120 psi (207 - 827 kPa) 33° - 100°F (0.6° - 37.8°C) 0.5 gpm (1.9 Lpm) @ 60 psi ■ After changing the water filter, flush the water system. While testing was reduced to...
...;C to When the filter indicator reads 10%, order a new filter. If the filter indicator light is recommended that may be installed in your water filter. Application Guidelines/Water Supply Parameters Water Supply Water Pressure Water Temperature Service Flow Rate City or Well 30 - 120 psi (207 - 827 kPa) 33° - 100°F (0.6° - 37.8°C) 0.5 gpm (1.9 Lpm) @ 60 psi ■ After changing the water filter, flush the water system. While testing was reduced to...

Use & Care Guide
Page 20
... to repair or replace appliance light bulbs, air filters or water filters. Repairs to parts or systems resulting from warranty coverage. 4. Discoloration, rust, or oxidation of products not approved by an authorized Whirlpool servicer is inconsistent to published user or operator instructions and/or installation instructions. 2. Have your model number and serial number on the label, located on major appliances with any questions or concerns at the number below : In the U.S.A.: Whirlpool Brand Home Appliances Customer...
... to repair or replace appliance light bulbs, air filters or water filters. Repairs to parts or systems resulting from warranty coverage. 4. Discoloration, rust, or oxidation of products not approved by an authorized Whirlpool servicer is inconsistent to published user or operator instructions and/or installation instructions. 2. Have your model number and serial number on the label, located on major appliances with any questions or concerns at the number below : In the U.S.A.: Whirlpool Brand Home Appliances Customer...
Warranty Information
Page 1
... REPAIR AS PROVIDED HEREIN. This warranty gives you specific legal rights, and you also may have been removed, altered or cannot be provided by Whirlpool. 5. Have your correspondence. If you need assistance using your model number and serial number on the label, located on the duration of implied warranties of merchantability or fitness, so this major appliance is required to repair or replace appliance light bulbs, air filters or water filters...
... REPAIR AS PROVIDED HEREIN. This warranty gives you specific legal rights, and you also may have been removed, altered or cannot be provided by Whirlpool. 5. Have your correspondence. If you need assistance using your model number and serial number on the label, located on the duration of implied warranties of merchantability or fitness, so this major appliance is required to repair or replace appliance light bulbs, air filters or water filters...


