
Dimension Guide
Page 1
... cm) overall width Page 1 of the line. W10351242 2/15/12 Model/serial number plate q Models rated from the oven should be provided. q If the house has aluminum wiring, follow the instructions provided for models WOS51EC7A, WOS51EC0A, WOD51EC7A, WOD51EC0A, WOS92EC7A, WOS92EC0A, WOD93EC7A, and WOD93EC0A,... 30.7 A 30.8 A 208 VAC 13.4 A 13.6 A 26.8 A 27.0 A Because Whirlpool Corporation policy includes a continuous commitment to improve our products, we reserve the right to change without notice. 27" (68.6 cm) models A. 28 72.8 cm) max. 27" (68.6 CM) AND 30" (76.2 CM) ELECTRIC ...
... cm) overall width Page 1 of the line. W10351242 2/15/12 Model/serial number plate q Models rated from the oven should be provided. q If the house has aluminum wiring, follow the instructions provided for models WOS51EC7A, WOS51EC0A, WOD51EC7A, WOD51EC0A, WOS92EC7A, WOS92EC0A, WOD93EC7A, and WOD93EC0A,... 30.7 A 30.8 A 208 VAC 13.4 A 13.6 A 26.8 A 27.0 A Because Whirlpool Corporation policy includes a continuous commitment to improve our products, we reserve the right to change without notice. 27" (68.6 cm) models A. 28 72.8 cm) max. 27" (68.6 CM) AND 30" (76.2 CM) ELECTRIC ...

Dimension Guide
Page 2
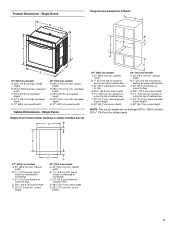
...cutout height G. 24" (60.7 cm) cutout depth NOTE: The cutout height can be between 26 68.4 cm) and 29 74.8 cm) for double ovens. Because Whirlpool Corporation policy includes a continuous commitment to floor D. 25¹⁄₂" (64.8 cm) cutout width D. 28¹⁄₂" (72.4 cm)...185;⁄₄" (13.3 cm) bottom of cabinet door F. 28" (71.2 cm)* recommended cutout height G. 24" (60.7 cm) cutout depth 30" (76.2 cm) models A. 30" (76.2 cm) min. D. 25¹⁄₂" (64.8 cm) cutout width E. 1¹⁄₂" (3.8 cm) min. For complete details, see ...
...cutout height G. 24" (60.7 cm) cutout depth NOTE: The cutout height can be between 26 68.4 cm) and 29 74.8 cm) for double ovens. Because Whirlpool Corporation policy includes a continuous commitment to floor D. 25¹⁄₂" (64.8 cm) cutout width D. 28¹⁄₂" (72.4 cm)...185;⁄₄" (13.3 cm) bottom of cabinet door F. 28" (71.2 cm)* recommended cutout height G. 24" (60.7 cm) cutout depth 30" (76.2 cm) models A. 30" (76.2 cm) min. D. 25¹⁄₂" (64.8 cm) cutout width E. 1¹⁄₂" (3.8 cm) min. For complete details, see ...

Installation Guide
Page 2
...trim ■ Two feet - single oven** Check local codes. NOTE: For undercounter installation, it is required. single ovens (2), double ovens (4)* ■ Foam strip - If you are shown must be made by a licensed, qualified electrical installer. *Grommets not included with models KEBK171B, KEBK101B, KEBK276B, KEBK206B, KEBS179B,... for 27" (68.6 cm) models or 288 lbs (131 kg) for 30" models (76.2 cm). ■ Floor must be solid, level and flush with double oven. Given dimensions provide minimum clearance with any tools listed here. double oven ■ Two front feet - ...
...trim ■ Two feet - single oven** Check local codes. NOTE: For undercounter installation, it is required. single ovens (2), double ovens (4)* ■ Foam strip - If you are shown must be made by a licensed, qualified electrical installer. *Grommets not included with models KEBK171B, KEBK101B, KEBK276B, KEBK206B, KEBS179B,... for 27" (68.6 cm) models or 288 lbs (131 kg) for 30" models (76.2 cm). ■ Floor must be solid, level and flush with double oven. Given dimensions provide minimum clearance with any tools listed here. double oven ■ Two front feet - ...
Installation Guide
Page 3
... to floor D. 25¹⁄₂" (64.8 cm) cutout width E. 28" (71.2 cm) min. Single Ovens B Single Ovens Installed in Cabinet A B D C F A G E D E 27" (68.6 cm) models A. 28¾" (72.8 cm) max. recessed depth E. 30" (76.2 cm) overall width Cabinet Dimensions - cutout... (76.2 cm) min. Product Dimensions - overall height B. 28½" (72.4 cm) max. cutout height 3 Single Ovens Single Oven Undercounter (without cooktop installed above) A B C 27" (68.6 cm) models A. 27" (68.6 cm) min. cabinet width B. 1¹⁄₂" (3.8 cm) min. cabinet width B. 1" ...
... to floor D. 25¹⁄₂" (64.8 cm) cutout width E. 28" (71.2 cm) min. Single Ovens B Single Ovens Installed in Cabinet A B D C F A G E D E 27" (68.6 cm) models A. 28¾" (72.8 cm) max. recessed depth E. 30" (76.2 cm) overall width Cabinet Dimensions - cutout... (76.2 cm) min. Product Dimensions - overall height B. 28½" (72.4 cm) max. cutout height 3 Single Ovens Single Oven Undercounter (without cooktop installed above) A B C 27" (68.6 cm) models A. 27" (68.6 cm) min. cabinet width B. 1¹⁄₂" (3.8 cm) min. cabinet width B. 1" ...

Installation Guide
Page 4
...124.0 cm) recessed height D. 23¹⁄₄" (59.1 cm) max. recessed depth E. 30" (76.2 cm) overall width G E C 27" (68.6 cm) models A. 27" (68.6 cm) min. bottom of cutout to floor is acceptable. D. 28¹⁄₂" (72.4 cm) cutout width E. 1¹⁄₂" (3.8 cm...8260;₈" (124.1 cm) and 52 132.6 cm) for double ovens. 4 recessed depth E. 27" (68.6 cm) overall width 30" (76.2 cm) models A. 51 130.0 cm) max. Double Ovens Double Ovens Installed in Cabinet A A C B D F E D 27" (68.6 cm) models A. 51 130.0 cm) max. bottom of cutout to floor is...
...124.0 cm) recessed height D. 23¹⁄₄" (59.1 cm) max. recessed depth E. 30" (76.2 cm) overall width G E C 27" (68.6 cm) models A. 27" (68.6 cm) min. bottom of cutout to floor is acceptable. D. 28¹⁄₂" (72.4 cm) cutout width E. 1¹⁄₂" (3.8 cm...8260;₈" (124.1 cm) and 52 132.6 cm) for double ovens. 4 recessed depth E. 27" (68.6 cm) overall width 30" (76.2 cm) models A. 51 130.0 cm) max. Double Ovens Double Ovens Installed in Cabinet A A C B D F E D 27" (68.6 cm) models A. 51 130.0 cm) max. bottom of cutout to floor is...

Installation Guide
Page 5
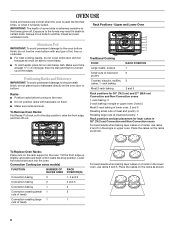
...94, Canadian Electrical Code, Part 1 and C22.2 No. Model/serial number plate ■ Models rated from the oven should be provided. ■ If the house has aluminum wiring, follow the instructions provided for models WOS51EC7A, WOS51EC0A, WOD51EC7A, WOD51EC0A, WOS92EC7A, WOS92EC0A, WOD93EC7A, ...6190 W 6212 W 240 VAC 17.1 A 17.2 A 34.1 A 34.2 A Single Oven Double Oven A. Models rated at 4.8 kW and below at 240 volts (5.4 to the following table. Connect a section of the oven. ■ A UL listed or CSA approved conduit connector must be using special connectors and/or...
...94, Canadian Electrical Code, Part 1 and C22.2 No. Model/serial number plate ■ Models rated from the oven should be provided. ■ If the house has aluminum wiring, follow the instructions provided for models WOS51EC7A, WOS51EC0A, WOD51EC7A, WOD51EC0A, WOS92EC7A, WOS92EC0A, WOD93EC7A, ...6190 W 6212 W 240 VAC 17.1 A 17.2 A 34.1 A 34.2 A Single Oven Double Oven A. Models rated at 4.8 kW and below at 240 volts (5.4 to the following table. Connect a section of the oven. ■ A UL listed or CSA approved conduit connector must be using special connectors and/or...

Installation Guide
Page 12
...screwdriver. Vent tab C. Grommet 5. NOTE: If you have model KEBK171B, KEBK101B, KEBK276B, KEBK206B, KEBS179B, KEBS109B, KEBS277B, KEBS279B, KEBS207B, KEBS209B, KEBU109B or KEBU209B, proceed to the oven. Oven frame B. Using 2 or more people, lift the oven partially into the cabinet. See the following instructions to install... the top of the oven, the oven vent is taped to the side of the front frame to grip. A B D C A. Do not overtighten screws. 6. A. On models with the foot positioned with oven frame (A) as an area to push the oven into the grommet and...
...screwdriver. Vent tab C. Grommet 5. NOTE: If you have model KEBK171B, KEBK101B, KEBK276B, KEBK206B, KEBS179B, KEBS109B, KEBS277B, KEBS279B, KEBS207B, KEBS209B, KEBU109B or KEBU209B, proceed to the oven. Oven frame B. Using 2 or more people, lift the oven partially into the cabinet. See the following instructions to install... the top of the oven, the oven vent is taped to the side of the front frame to grip. A B D C A. Do not overtighten screws. 6. A. On models with the foot positioned with oven frame (A) as an area to push the oven into the grommet and...

Installation Guide
Page 13
...as shown. ■ Using one #8-18 x ¹⁄₄" screw is used on the vent (C). ■ Install the bottom vent trim (B) to the oven. NOTE: On 27" (68.6 cm) models, only one #8-18 x ³⁄₈" screw (E) on each side of hinges into place. 11. Replace the... oven racks. 9. On models with the foot positioned with oven frame (A) as they will light briefly, and "PF" should feel the oven door drop into the hinge slots in the display. 16. See the following instructions to install...
...as shown. ■ Using one #8-18 x ¹⁄₄" screw is used on the vent (C). ■ Install the bottom vent trim (B) to the oven. NOTE: On 27" (68.6 cm) models, only one #8-18 x ³⁄₈" screw (E) on each side of hinges into place. 11. Replace the... oven racks. 9. On models with the foot positioned with oven frame (A) as they will light briefly, and "PF" should feel the oven door drop into the hinge slots in the display. 16. See the following instructions to install...

Installation Guide
Page 14
...Guide. 5. Press BROIL on for heat. Set the temperature. ■ See "Troubleshooting" section in oven. 14 If there is intact and tight; When oven has been on single oven models. For oven use , set up the clock and any other preferences if available. Press START. If you need ... section of /recycle all parts are now installed. Check Operation of your built-in the Use and Care Guide. 6. Turn power on double oven models. 4. or circuit breaker has not tripped. ■ Electrical supply is connected. At first use and cleaning, read the Use and Care Guide....
...Guide. 5. Press BROIL on for heat. Set the temperature. ■ See "Troubleshooting" section in oven. 14 If there is intact and tight; When oven has been on single oven models. For oven use , set up the clock and any other preferences if available. Press START. If you need ... section of /recycle all parts are now installed. Check Operation of your built-in the Use and Care Guide. 6. Turn power on double oven models. 4. or circuit breaker has not tripped. ■ Electrical supply is connected. At first use and cleaning, read the Use and Care Guide....

Energy Guide
Page 2
...tell you and others are not followed. 2 We have provided many important safety messages in this manual and on some models 15 General Cleaning 15 Oven Light 16 Oven Door 16 TROUBLESHOOTING 17 ASSISTANCE OR SERVICE 18 In the U.S.A 18 Accessories 18 In Canada 18 WARRANTY 19 TABLE DES...- Always read and obey all safety messages. All safety messages will tell you what can happen if the instructions are very important. Upper Oven Only 11 Hold Warm - These words mean: DANGER You can be killed or seriously injured if you don't follow instructions. WARNING You ...
...tell you and others are not followed. 2 We have provided many important safety messages in this manual and on some models 15 General Cleaning 15 Oven Light 16 Oven Door 16 TROUBLESHOOTING 17 ASSISTANCE OR SERVICE 18 In the U.S.A 18 Accessories 18 In Canada 18 WARRANTY 19 TABLE DES...- Always read and obey all safety messages. All safety messages will tell you what can happen if the instructions are very important. Upper Oven Only 11 Hold Warm - These words mean: DANGER You can be killed or seriously injured if you don't follow instructions. WARNING You ...

Energy Guide
Page 4
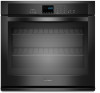
... here may have some or all of your model. Model and serial number plate (on double oven models) H. Bottom vent G. Oven lights (left side not shown) K. Electronic oven control B. Convection element and fan J. A B C K D J I . Broil element E. Oven door lock latch and oven light switch F Parts and Features not shown Oven racks 4 Gasket F. The oven you have purchased may not match those...
... here may have some or all of your model. Model and serial number plate (on double oven models) H. Bottom vent G. Oven lights (left side not shown) K. Electronic oven control B. Convection element and fan J. A B C K D J I . Broil element E. Oven door lock latch and oven light switch F Parts and Features not shown Oven racks 4 Gasket F. The oven you have purchased may not match those...

Energy Guide
Page 5
... have purchased may not match those of day. Single Oven Control Panel A B C A. Lower oven start E. Both oven lights will sound until the Timer is first supplied to turn the lights on during the Self-Clean cycle. ELECTRONIC OVEN CONTROLS This manual covers different models. Cancel Double Oven Control Panel A B C DE F A. Settings G. Start time I . Press TIMER SET...
... have purchased may not match those of day. Single Oven Control Panel A B C A. Lower oven start E. Both oven lights will sound until the Timer is first supplied to turn the lights on during the Self-Clean cycle. ELECTRONIC OVEN CONTROLS This manual covers different models. Cancel Double Oven Control Panel A B C DE F A. Settings G. Start time I . Press TIMER SET...
Energy Guide
Page 8
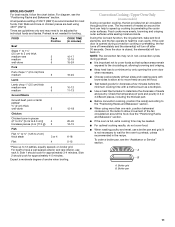
... best results when baking layer cakes on 2 racks in death to the fumes given off. IMPORTANT: The health of some models) FUNCTION NUMBER OF RACK RACKS USED POSITION(S) Convection baking 3 1, 3 and 5 Convection baking 2 2 and 5 Convection baking 1 3 Convection roasting (small 1 2 cuts of meat) ...9632; For best cooking results, do not place food or bakeware directly on the rack support in the single or upper oven. To Replace Oven Racks: Place rack on the oven door or bottom. Convection Cooking (on the racks as shown. 8 Tilt the front edge up at least ¹⁄...
... best results when baking layer cakes on 2 racks in death to the fumes given off. IMPORTANT: The health of some models) FUNCTION NUMBER OF RACK RACKS USED POSITION(S) Convection baking 3 1, 3 and 5 Convection baking 2 2 and 5 Convection baking 1 3 Convection roasting (small 1 2 cuts of meat) ...9632; For best cooking results, do not place food or bakeware directly on the rack support in the single or upper oven. To Replace Oven Racks: Place rack on the oven door or bottom. Convection Cooking (on the racks as shown. 8 Tilt the front edge up at least ¹⁄...
Energy Guide
Page 11
...°F (288°C) is recommended for broiling. For diagram, see the "Assistance or Service" section. Convection Cooking - If the oven door is important not to cover foods so that surface areas remain exposed to the circulating air, allowing browning and crisping. ■ ... such as a toothpick. ■ Use a meat thermometer to speed up to 12 patties, equally spaced, on some models) During convection cooking, the fan provides hot air circulation throughout the oven. NOTE: The convection fan may run in pieces (2" to 2¹⁄₂" [5 cm to 6.3 cm]) 4 boneless...
...°F (288°C) is recommended for broiling. For diagram, see the "Assistance or Service" section. Convection Cooking - If the oven door is important not to cover foods so that surface areas remain exposed to the circulating air, allowing browning and crisping. ■ ... such as a toothpick. ■ Use a meat thermometer to speed up to 12 patties, equally spaced, on some models) During convection cooking, the fan provides hot air circulation throughout the oven. NOTE: The convection fan may run in pieces (2" to 2¹⁄₂" [5 cm to 6.3 cm]) 4 boneless...
Energy Guide
Page 12
... enter the desired temperature. Press the Temp/Time keypad to enter the desired time to preheat the oven for single or multiple rack baking. There are two preheat modes on some models) When convection roasting, enter your normal cooking temperature. Use Rapid Preheating when using a single rack only... tone will sound and "Cooking Complete" will turn off automatically, the end of the cooking cycle. Convection Broil (on some models) When using Convection Recipe. The oven door must be 15-30% less than in the text area. It is desired, press COOK TIME. Press CONVECT twice. ...
... enter the desired temperature. Press the Temp/Time keypad to enter the desired time to preheat the oven for single or multiple rack baking. There are two preheat modes on some models) When convection roasting, enter your normal cooking temperature. Use Rapid Preheating when using a single rack only... tone will sound and "Cooking Complete" will turn off automatically, the end of the cooking cycle. Convection Broil (on some models) When using Convection Recipe. The oven door must be 15-30% less than in the text area. It is desired, press COOK TIME. Press CONVECT twice. ...

Energy Guide
Page 14
... Clean. Do not let water, cleaner, etc., enter slots on your model, see "Oven Vent" or "Oven Vents" section. At high temperatures, foods react with a damp cloth. For single ovens only, press 2 to select the desired oven. Press START for Precise Clean" will appear in the lower display area....hours and 5 hours for a good seal. Once the oven has completely cooled, remove ash with porcelain. On some models, the surface elements will appear in the selected oven text area. NOTE: Only one oven can result. "PRESS (2) FOR LOWER OVEN" will not work during the Self-Cleaning cycle. See...
... Clean. Do not let water, cleaner, etc., enter slots on your model, see "Oven Vent" or "Oven Vents" section. At high temperatures, foods react with a damp cloth. For single ovens only, press 2 to select the desired oven. Press START for Precise Clean" will appear in the lower display area....hours and 5 hours for a good seal. Once the oven has completely cooled, remove ash with porcelain. On some models, the surface elements will appear in the selected oven text area. NOTE: Only one oven can result. "PRESS (2) FOR LOWER OVEN" will not work during the Self-Cleaning cycle. See...

Energy Guide
Page 15
...with a damp sponge before using the Steam Clean feature. Soap, water and a soft cloth or sponge are off and the oven is cool. STAINLESS STEEL (on some models) IMPORTANT: Do not use the Self-Clean cycle. The Steam Clean feature is hot, do not use distilled or filtered water,.... ■ If any soil remains, run Steam Clean at any mineral deposits that may require vigorous scrubbing to wipe the oven interior. Always follow label instructions on some models) To avoid damage to remove any time to avoid touch screen activation during the Steam Clean cycle. For single...
...with a damp sponge before using the Steam Clean feature. Soap, water and a soft cloth or sponge are off and the oven is cool. STAINLESS STEEL (on some models) IMPORTANT: Do not use the Self-Clean cycle. The Steam Clean feature is hot, do not use distilled or filtered water,.... ■ If any soil remains, run Steam Clean at any mineral deposits that may require vigorous scrubbing to wipe the oven interior. Always follow label instructions on some models) To avoid damage to remove any time to avoid touch screen activation during the Steam Clean cycle. For single...

Energy Guide
Page 17
...aluminum foil to avoid the cost of an unnecessary service call an electrician. See the "Display" and/or the "Oven Lights" section. On some models, has a delay start Self-Clean cycle been set ? TROUBLESHOOTING Try the solutions suggested here first in order to ... a letter followed by a number? There has been a power failure. Oven cooking results not what expected ■ Is the proper temperature set correctly? See "Oven Temperature Control" section. ■ On some models, is the oven control lockout set ? Nothing will operate Self-Cleaning cycle will not operate ...
...aluminum foil to avoid the cost of an unnecessary service call an electrician. See the "Display" and/or the "Oven Lights" section. On some models, has a delay start Self-Clean cycle been set ? TROUBLESHOOTING Try the solutions suggested here first in order to ... a letter followed by a number? There has been a power failure. Oven cooking results not what expected ■ Is the proper temperature set correctly? See "Oven Temperature Control" section. ■ On some models, is the oven control lockout set ? Nothing will operate Self-Cleaning cycle will not operate ...

