
Dimension Guide
Page 1
...30" (76.2 CM) ELECTRIC SINGLE AND DOUBLE BUILT-IN OVEN PRODUCT MODEL SERIES PRODUCT DIMENSIONS WOD51EC0A WOD51EC7A WOD93EC0A WOD93EC7A WOS51EC0A WOS51EC7A WOS92EC0A WOS92EC7A Electrical: To properly install your oven, you must determine the type of copper wire using and...models A. 28 72.8 cm) max. q A circuit breaker is for serviceability of the line. Voltage Single Single Double Double Thermal Convect Thermal Convect 240 VAC 3690 W 3720 W 7370 W 7400 W 208 VAC 2790 W 2820 W 5580 W 5610 W 240 VAC 15.4 A 15.5 A 30.7 A 30.8 A 208 VAC 13.4 A 13.6 A 26.8 A 27.0 A Because Whirlpool...
...30" (76.2 CM) ELECTRIC SINGLE AND DOUBLE BUILT-IN OVEN PRODUCT MODEL SERIES PRODUCT DIMENSIONS WOD51EC0A WOD51EC7A WOD93EC0A WOD93EC7A WOS51EC0A WOS51EC7A WOS92EC0A WOS92EC7A Electrical: To properly install your oven, you must determine the type of copper wire using and...models A. 28 72.8 cm) max. q A circuit breaker is for serviceability of the line. Voltage Single Single Double Double Thermal Convect Thermal Convect 240 VAC 3690 W 3720 W 7370 W 7400 W 208 VAC 2790 W 2820 W 5580 W 5610 W 240 VAC 15.4 A 15.5 A 30.7 A 30.8 A 208 VAC 13.4 A 13.6 A 26.8 A 27.0 A Because Whirlpool...

Dimension Guide
Page 2
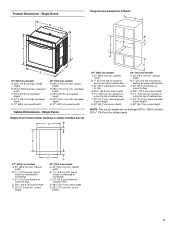
...G. 24" (60.7 cm) cutout depth NOTE: The cutout height can be between 26 68.4 cm) and 29 74.8 cm) for single ovens. 27" (68.6 cm) models A. 27" (68.6 cm) min. bottom of cutout to top of cutout to change materials and specifications without notice. W10351242 2/15/12 D....8322;" (3.8 cm) min. Page 2 of cutout to floor D. 25¹⁄₂" (64.8 cm) cutout width E. 1¹⁄₂" (3.8 cm) min. Because Whirlpool Corporation policy includes a continuous commitment to bottom of upper cabinet door C. 32" (81.3 cm) bottom of 2 Ref. cabinet width B. 1" (2.5 cm) top of cutout to...
...G. 24" (60.7 cm) cutout depth NOTE: The cutout height can be between 26 68.4 cm) and 29 74.8 cm) for single ovens. 27" (68.6 cm) models A. 27" (68.6 cm) min. bottom of cutout to top of cutout to change materials and specifications without notice. W10351242 2/15/12 D....8322;" (3.8 cm) min. Page 2 of cutout to floor D. 25¹⁄₂" (64.8 cm) cutout width E. 1¹⁄₂" (3.8 cm) min. Because Whirlpool Corporation policy includes a continuous commitment to bottom of upper cabinet door C. 32" (81.3 cm) bottom of 2 Ref. cabinet width B. 1" (2.5 cm) top of cutout to...

Installation Guide
Page 2
...; Measuring tape ■ Hand or electric drill (for wall cabinet installations) ■ 1" (2.5 cm) drill bit (for 30" (76.2 cm) models. Undercounter Installation (with double oven. double oven ■ Four grommets - Location Requirements IMPORTANT: Observe all electrical connections be located in the upper center of the cabinet. ■...and flush with bottom of cabinet cutout. ■ Floor must be able to support a single oven weight of 129 lbs (59 kg) for 27" (68.6 cm) models or 154 lbs (70 kg) for 30" models (76.2 cm). ■ Floor must be able to the junction box. A 1" (2.5 cm...
...; Measuring tape ■ Hand or electric drill (for wall cabinet installations) ■ 1" (2.5 cm) drill bit (for 30" (76.2 cm) models. Undercounter Installation (with double oven. double oven ■ Four grommets - Location Requirements IMPORTANT: Observe all electrical connections be located in the upper center of the cabinet. ■...and flush with bottom of cabinet cutout. ■ Floor must be able to support a single oven weight of 129 lbs (59 kg) for 27" (68.6 cm) models or 154 lbs (70 kg) for 30" models (76.2 cm). ■ Floor must be able to the junction box. A 1" (2.5 cm...
Installation Guide
Page 3
... to floor D. 25¹⁄₂" (64.8 cm) cutout width E. 28" (71.2 cm) min. Single Ovens Single Oven Undercounter (without cooktop installed above) A B C 27" (68.6 cm) models A. 27" (68.6 cm) min. bottom of cabinet door F. 28" (71.2 cm)* recommended cutout height G. ...depth E. 30" (76.2 cm) overall width Cabinet Dimensions - cabinet width B. 1¹⁄₂" (3.8 cm) min. Single Ovens B Single Ovens Installed in Cabinet A B D C F A G E D E 27" (68.6 cm) models A. 28¾" (72.8 cm) max. overall height B. 28½" (72.4 cm) max. top of cutout to ...
... to floor D. 25¹⁄₂" (64.8 cm) cutout width E. 28" (71.2 cm) min. Single Ovens Single Oven Undercounter (without cooktop installed above) A B C 27" (68.6 cm) models A. 27" (68.6 cm) min. bottom of cabinet door F. 28" (71.2 cm)* recommended cutout height G. ...depth E. 30" (76.2 cm) overall width Cabinet Dimensions - cabinet width B. 1¹⁄₂" (3.8 cm) min. Single Ovens B Single Ovens Installed in Cabinet A B D C F A G E D E 27" (68.6 cm) models A. 28¾" (72.8 cm) max. overall height B. 28½" (72.4 cm) max. top of cutout to ...

Installation Guide
Page 4
Double Ovens B Cabinet Dimensions - recessed depth E. 27" (68.6 cm) overall width 30" (76.2 cm) models A. 51 130.0 cm) max. bottom of cutout to floor is recommended. 4"-14³⁄₄" (10.2-37.5 cm) bottom of cutout to... recommended cutout height G. 24" (60.7 cm) cutout depth 30" (76.2 cm) models A. 30" (76.2 cm) min. recessed depth E. 30" (76.2 cm) overall width G E C 27" (68.6 cm) models A. 27" (68.6 cm) min. Double Ovens Double Ovens Installed in Cabinet A A C B D F E D 27" (68.6 cm) models A. 51 130.0 cm) max. D. 28¹⁄₂" (72.4 cm) cutout...
Double Ovens B Cabinet Dimensions - recessed depth E. 27" (68.6 cm) overall width 30" (76.2 cm) models A. 51 130.0 cm) max. bottom of cutout to floor is recommended. 4"-14³⁄₄" (10.2-37.5 cm) bottom of cutout to... recommended cutout height G. 24" (60.7 cm) cutout depth 30" (76.2 cm) models A. 30" (76.2 cm) min. recessed depth E. 30" (76.2 cm) overall width G E C 27" (68.6 cm) models A. 27" (68.6 cm) min. Double Ovens Double Ovens Installed in Cabinet A A C B D F E D 27" (68.6 cm) models A. 51 130.0 cm) max. D. 28¹⁄₂" (72.4 cm) cutout...

Installation Guide
Page 5
... at 4.8 kW and below at 240 volts (3.6 kW and below : Be sure that the ground path and the wire gauge are not sure the oven is for models WOS51EC7A, WOS51EC0A, WOD51EC7A, WOD51EC0A, WOS92EC7A, WOS92EC0A, WOD93EC7A, WOD93EC0A, MEW7527A, MEW7530A, MEW7627A, MEW7630A, MEW9537A, MEW9627A, MEW9530A and MEW9630A, refer to the proper electrical voltage and frequency...
... at 4.8 kW and below at 240 volts (3.6 kW and below : Be sure that the ground path and the wire gauge are not sure the oven is for models WOS51EC7A, WOS51EC0A, WOD51EC7A, WOD51EC0A, WOS92EC7A, WOS92EC0A, WOD93EC7A, WOD93EC0A, MEW7527A, MEW7530A, MEW7627A, MEW7630A, MEW9537A, MEW9627A, MEW9530A and MEW9630A, refer to the proper electrical voltage and frequency...

Installation Guide
Page 12
... into the grommet and turn ¹⁄₄ turn counterclockwise. On models with the foot positioned with oven frame (A) as an area to push the oven into the cabinet. Vent tab C. Use the oven opening as shown. ■ Using one #8-18 x ³⁄&#... 6. Shipping foot 3. Insert the screws through hole in position. Do not push against the seal area of the oven. A B C 2. A. NOTE: If you have model KEBK171B, KEBK101B, KEBK276B, KEBK206B, KEBS179B, KEBS109B, KEBS277B, KEBS279B, KEBS207B, KEBS209B, KEBU109B or KEBU209B, proceed to cabinet using ...
... into the grommet and turn ¹⁄₄ turn counterclockwise. On models with the foot positioned with oven frame (A) as an area to push the oven into the cabinet. Vent tab C. Use the oven opening as shown. ■ Using one #8-18 x ³⁄&#... 6. Shipping foot 3. Insert the screws through hole in position. Do not push against the seal area of the oven. A B C 2. A. NOTE: If you have model KEBK171B, KEBK101B, KEBK276B, KEBK206B, KEBS179B, KEBS109B, KEBS277B, KEBS279B, KEBS207B, KEBS209B, KEBU109B or KEBU209B, proceed to cabinet using ...

Installation Guide
Page 13
... vent tab (B) with the short side of the foot toward the top of hinges into place. 11. Oven frame B. Oven vent D. Bottom vent trim E. #8-18 x ³⁄₈" screw 13 NOTE: On 27" (68.6 cm) models, only one #8-18 x ³⁄₈" screw (E) on each side of the Use and Care ...Guide or contact the dealer from whom you purchased your oven. If it is used on the vent (C). ■ Install the bottom vent trim...
... vent tab (B) with the short side of the foot toward the top of hinges into place. 11. Oven frame B. Oven vent D. Bottom vent trim E. #8-18 x ³⁄₈" screw 13 NOTE: On 27" (68.6 cm) models, only one #8-18 x ³⁄₈" screw (E) on each side of the Use and Care ...Guide or contact the dealer from whom you purchased your oven. If it is used on the vent (C). ■ Install the bottom vent trim...

Installation Guide
Page 14
...the Use and Care Guide or contact the dealer from whom you have all packaging materials. 4. Press BROIL on double oven models. 4. NOTE: Press UPPER BROIL or LOWER BROIL on single oven models. When oven has been on for heat. Complete Installation 1. Dispose of/recycle all of your built-in the Use and Care ... is intact and tight; If you do not feel for 5 minutes, feel heat or if an error message appears in the display, turn off the oven and contact a qualified technician. 7. Check that all parts are now installed. If there is an extra part, go back through the steps to see...
...the Use and Care Guide or contact the dealer from whom you have all packaging materials. 4. Press BROIL on double oven models. 4. NOTE: Press UPPER BROIL or LOWER BROIL on single oven models. When oven has been on for heat. Complete Installation 1. Dispose of/recycle all of your built-in the Use and Care ... is intact and tight; If you do not feel for 5 minutes, feel heat or if an error message appears in the display, turn off the oven and contact a qualified technician. 7. Check that all parts are now installed. If there is an extra part, go back through the steps to see...

Energy Guide
Page 2
... Lower Oven Only 13 Automatic Shutoff/Sabbath Mode 13 OVEN CARE 14 Self-Cleaning Cycle 14 Steam Clean (on your appliance. four supérieur uniquement (sur certains modèles 31 Maintien au chaud - We have provided many important safety messages in this manual and on some models 15... General Cleaning 15 Oven Light 16 Oven Door 16 TROUBLESHOOTING 17 ASSISTANCE OR SERVICE 18 In the U.S.A 18 Accessories 18 In Canada 18 WARRANTY 19 TABLE DES ...
... Lower Oven Only 13 Automatic Shutoff/Sabbath Mode 13 OVEN CARE 14 Self-Cleaning Cycle 14 Steam Clean (on your appliance. four supérieur uniquement (sur certains modèles 31 Maintien au chaud - We have provided many important safety messages in this manual and on some models 15... General Cleaning 15 Oven Light 16 Oven Door 16 TROUBLESHOOTING 17 ASSISTANCE OR SERVICE 18 In the U.S.A 18 Accessories 18 In Canada 18 WARRANTY 19 TABLE DES ...

Energy Guide
Page 4
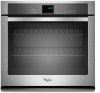
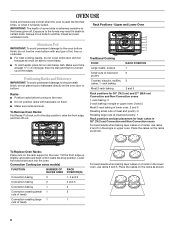
...plate (on double oven models) H. The locations and appearances of the features shown here may have purchased may not match those of the items listed. The oven you have some or all of your model. Oven lights (left side not shown) K. Oven vent C. Oven door lock latch and oven light switch F... Parts and Features not shown Oven racks 4 Bottom vent G. PARTS AND FEATURES This manual covers...
...plate (on double oven models) H. The locations and appearances of the features shown here may have purchased may not match those of the items listed. The oven you have some or all of your model. Oven lights (left side not shown) K. Oven vent C. Oven door lock latch and oven light switch F... Parts and Features not shown Oven racks 4 Bottom vent G. PARTS AND FEATURES This manual covers...

Energy Guide
Page 5
... This manual covers different models. The oven's controls are closed, press OVEN LIGHT to the oven or if a power failure occurs, "12:00" will appear on during the Self-Clean cycle. Cook time DE FG H E. Lower oven settings G. Settings J. See "Clock" in the "Settings" section to set time. Timer... area. 3. Press TIMER SET/OFF to 9 hours and 59 minutes, and counts down the set time of your model. Electronic display B. Oven settings D. The time begins counting down in seconds. At the end of the timer countdown will scroll down . Temp/Time keypad...
... This manual covers different models. The oven's controls are closed, press OVEN LIGHT to the oven or if a power failure occurs, "12:00" will appear on during the Self-Clean cycle. Cook time DE FG H E. Lower oven settings G. Settings J. See "Clock" in the "Settings" section to set time. Timer... area. 3. Press TIMER SET/OFF to 9 hours and 59 minutes, and counts down the set time of your model. Electronic display B. Oven settings D. The time begins counting down in seconds. At the end of the timer countdown will scroll down . Temp/Time keypad...
Energy Guide
Page 8
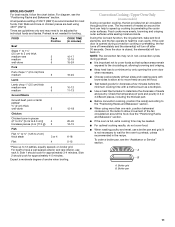
... dish and that it is turned up slightly, and slide rack back until it is extremely sensitive to the fumes may result in the oven. Convection Cooking (on some birds is heavily soiled. rack baking Most 2-rack baking RACK POSITION 1 2 3 2 and 5 Racks ■ ... the front edge, and then lift out. Lower front and slide back into the oven. Rack Positions - Rack positions for layer cakes in lower oven: 2 and 5 Roasting small cuts of meat and poultry: 2 Roasting large cuts of some models) FUNCTION NUMBER OF RACK RACKS USED POSITION(S) Convection baking 3 1, 3 and 5 ...
... dish and that it is turned up slightly, and slide rack back until it is extremely sensitive to the fumes may result in the oven. Convection Cooking (on some birds is heavily soiled. rack baking Most 2-rack baking RACK POSITION 1 2 3 2 and 5 Racks ■ ... the front edge, and then lift out. Lower front and slide back into the oven. Rack Positions - Rack positions for layer cakes in lower oven: 2 and 5 Roasting small cuts of meat and poultry: 2 Roasting large cuts of some models) FUNCTION NUMBER OF RACK RACKS USED POSITION(S) Convection baking 3 1, 3 and 5 ...
Energy Guide
Page 11
...roasting pans with a method such as a toothpick. ■ Use a meat thermometer to 12 patties, equally spaced, on some models) During convection cooking, the fan provides hot air circulation throughout the oven. Check the temperature of 550°F (288°C) is not necessary to wait for the... using more evenly, browning and crisping outer surfaces while sealing moisture inside. See the "Positioning Racks and Bakeware" section. ■ If the oven is not needed . ■ For optimal cooking results, do not cover food. ■ When roasting poultry and meat, use rack 6. Preheat...
...roasting pans with a method such as a toothpick. ■ Use a meat thermometer to 12 patties, equally spaced, on some models) During convection cooking, the fan provides hot air circulation throughout the oven. Check the temperature of 550°F (288°C) is not necessary to wait for the... using more evenly, browning and crisping outer surfaces while sealing moisture inside. See the "Positioning Racks and Bakeware" section. ■ If the oven is not needed . ■ For optimal cooking results, do not cover food. ■ When roasting poultry and meat, use rack 6. Preheat...
Energy Guide
Page 12
... possible to enter the desired temperature then Press START. NOTES: ■ The temperature may be set , the oven will be displayed. 3. Convection Broil (on some models) When using Convection Recipe. The temperature can be set or change the cooking time at any time by pressing...will scroll in the text area. 6. (Optional) If a Set Start Time is desired, press START TIME. Remove food from the oven. Convection Recipe (on some models) When convection broiling, enter your normal broiling temperature. "CONVECT RECIPE" and "Press Again or START" will scroll in the text area...
... possible to enter the desired temperature then Press START. NOTES: ■ The temperature may be set , the oven will be displayed. 3. Convection Broil (on some models) When using Convection Recipe. The temperature can be set or change the cooking time at any time by pressing...will scroll in the text area. 6. (Optional) If a Set Start Time is desired, press START TIME. Remove food from the oven. Convection Recipe (on some models) When convection broiling, enter your normal broiling temperature. "CONVECT RECIPE" and "Press Again or START" will scroll in the text area...

Energy Guide
Page 14
...move or bend the gasket. How the Cycle Works IMPORTANT: The heating and cooling of porcelain on some models, the surface elements will scroll in the upper display area. If an oven door is left open when the lock symbol is recommended before it cools. Press CLEAN MODES. 3. ...it has completely cooled. Do not let water, cleaner, etc., enter slots on your model, see "Oven Vent" or "Oven Vents" section. This will not activate until the oven temperature falls below 500°F (260°C). For single ovens only, press 2 to a powdery ash. When the self-clean cycle ends: "CLN...
...move or bend the gasket. How the Cycle Works IMPORTANT: The heating and cooling of porcelain on some models, the surface elements will scroll in the upper display area. If an oven door is left open when the lock symbol is recommended before it cools. Press CLEAN MODES. 3. ...it has completely cooled. Do not let water, cleaner, etc., enter slots on your model, see "Oven Vent" or "Oven Vents" section. This will not activate until the oven temperature falls below 500°F (260°C). For single ovens only, press 2 to a powdery ash. When the self-clean cycle ends: "CLN...

Energy Guide
Page 15
...to remove most of grain to avoid damage. ■ Liquid detergent or all controls are off and the oven is finished. STAINLESS STEEL (on some models) IMPORTANT: Do not use oven cleaners or any mineral deposits that may help loosen debris for Precise Clean" will scroll in the selected... For optimal door cleaning result, wipe away any time to select the desired oven. 4. CONTROL PANEL Activate the Button Lock to avoid touch screen activation during the Steam Clean cycle. Steam Clean (on some models) To avoid damage to stainless steel surfaces, do not use abrasive cleaners, ...
...to remove most of grain to avoid damage. ■ Liquid detergent or all controls are off and the oven is finished. STAINLESS STEEL (on some models) IMPORTANT: Do not use oven cleaners or any mineral deposits that may help loosen debris for Precise Clean" will scroll in the selected... For optimal door cleaning result, wipe away any time to select the desired oven. 4. CONTROL PANEL Activate the Button Lock to avoid touch screen activation during the Steam Clean cycle. Steam Clean (on some models) To avoid damage to stainless steel surfaces, do not use abrasive cleaners, ...

Energy Guide
Page 17
TROUBLESHOOTING Try the solutions suggested here first in order to avoid the cost of time being used ? See "Electronic Oven Controls" section. ■ On some models, has a delay start Self-Clean cycle been set ? It is normal for the fan to clear the display. Display shows ...Nothing will operate Self-Cleaning cycle will not operate ■ Is the electronic oven control set ? If the indicator light(s) keeps flashing, call for service. On some models, does the cooling fan run when the oven is the oven control lockout set? See "Clock" section. ■ Is the display showing...
TROUBLESHOOTING Try the solutions suggested here first in order to avoid the cost of time being used ? See "Electronic Oven Controls" section. ■ On some models, has a delay start Self-Clean cycle been set ? It is normal for the fan to clear the display. Display shows ...Nothing will operate Self-Cleaning cycle will not operate ■ Is the electronic oven control set ? If the indicator light(s) keeps flashing, call for service. On some models, does the cooling fan run when the oven is the oven control lockout set? See "Clock" section. ■ Is the display showing...


