
Dimension Guide
Page 1
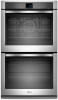
...W 2820 W 5580 W 5610 W 240 VAC 15.4 A 15.5 A 30.7 A 30.8 A 208 VAC 13.4 A 13.6 A 26.8 A 27.0 A Because Whirlpool Corporation policy includes a continuous commitment to improve our products, we reserve the right to change materials and specifications without notice. recessed width C. 26³⁄...27" (68.6 CM) AND 30" (76.2 CM) ELECTRIC SINGLE AND DOUBLE BUILT-IN OVEN PRODUCT MODEL SERIES PRODUCT DIMENSIONS WOD51EC0A WOD51EC7A WOD93EC0A WOD93EC7A WOS51EC0A WOS51EC7A WOS92EC0A WOS92EC7A Electrical: To properly install your oven, you must determine the type of electrical connection...
...W 2820 W 5580 W 5610 W 240 VAC 15.4 A 15.5 A 30.7 A 30.8 A 208 VAC 13.4 A 13.6 A 26.8 A 27.0 A Because Whirlpool Corporation policy includes a continuous commitment to improve our products, we reserve the right to change materials and specifications without notice. recessed width C. 26³⁄...27" (68.6 CM) AND 30" (76.2 CM) ELECTRIC SINGLE AND DOUBLE BUILT-IN OVEN PRODUCT MODEL SERIES PRODUCT DIMENSIONS WOD51EC0A WOD51EC7A WOD93EC0A WOD93EC7A WOS51EC0A WOS51EC7A WOS92EC0A WOS92EC7A Electrical: To properly install your oven, you must determine the type of electrical connection...

Dimension Guide
Page 2
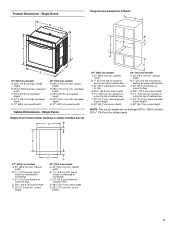
....3 cm) bottom of cabinet door F. 50¹⁄₄" (127.6 cm)* recommended cutout height G. 24" (60.7 cm) cutout depth 30" (76.2 cm) models A. 30" (76.2 cm) min. Because Whirlpool Corporation policy includes a continuous commitment to top of cabinet door F. 50¹⁄₄" (127.6 cm)* recommended cutout height G. 24" (60.7 cm) cutout...
....3 cm) bottom of cabinet door F. 50¹⁄₄" (127.6 cm)* recommended cutout height G. 24" (60.7 cm) cutout depth 30" (76.2 cm) models A. 30" (76.2 cm) min. Because Whirlpool Corporation policy includes a continuous commitment to top of cabinet door F. 50¹⁄₄" (127.6 cm)* recommended cutout height G. 24" (60.7 cm) cutout...

Installation Guide
Page 2
...minimum clearance with oven. ■ Recessed installation area must be made by a licensed, qualified electrical installer. *Grommets not included with models KEBK171B, KEBK101B, KEBK276B, KEBK206B, KEBS179B, KEBS109B, KEBS277B, KEBS279B, KEBS207B, KEBS209B, KEBU109B and KEBU209B. **Foam strip not included with ...your builder or cabinet supplier to undercounter installation instructions for 30" (76.2 cm) models. IMPORTANT: To avoid damage to your cabinets, check with double oven. Read and follow the instructions provided with the maximum ...
...minimum clearance with oven. ■ Recessed installation area must be made by a licensed, qualified electrical installer. *Grommets not included with models KEBK171B, KEBK101B, KEBK276B, KEBK206B, KEBS179B, KEBS109B, KEBS277B, KEBS279B, KEBS207B, KEBS209B, KEBU109B and KEBU209B. **Foam strip not included with ...your builder or cabinet supplier to undercounter installation instructions for 30" (76.2 cm) models. IMPORTANT: To avoid damage to your cabinets, check with double oven. Read and follow the instructions provided with the maximum ...
Installation Guide
Page 3
...(67.9 cm) recessed height D. 23¹⁄₄" (59.1 cm) max. recessed depth E. 27" (68.6 cm) overall width 30" (76.2 cm) models A. 28¾" (72.8 cm) max. cabinet width B. 1¹⁄₂" (3.8 cm) min. cabinet width B. 1¹⁄₂" (3.8 cm) min.... Single Ovens B Single Ovens Installed in Cabinet A B D C F A G E D E 27" (68.6 cm) models A. 28¾" (72.8 cm) max. recessed width C. 26³⁄₄" (67.9 cm) recessed height D. 23¹⁄₄" (59.1 cm) max. cabinet width B. 1" ...
...(67.9 cm) recessed height D. 23¹⁄₄" (59.1 cm) max. recessed depth E. 27" (68.6 cm) overall width 30" (76.2 cm) models A. 28¾" (72.8 cm) max. cabinet width B. 1¹⁄₂" (3.8 cm) min. cabinet width B. 1¹⁄₂" (3.8 cm) min.... Single Ovens B Single Ovens Installed in Cabinet A B D C F A G E D E 27" (68.6 cm) models A. 28¾" (72.8 cm) max. recessed width C. 26³⁄₄" (67.9 cm) recessed height D. 23¹⁄₄" (59.1 cm) max. cabinet width B. 1" ...

Installation Guide
Page 4
...cutout to floor is acceptable. overall height B. 28½" (72.4 cm) max. recessed depth E. 30" (76.2 cm) overall width G E C 27" (68.6 cm) models A. 27" (68.6 cm) min. cabinet width B. 1" (2.5 cm) top of cutout to bottom of upper cabinet door C. 14³⁄₄" (37.5 cm) bottom ....6 cm)* recommended cutout height G. 24" (60.7 cm) cutout depth 30" (76.2 cm) models A. 30" (76.2 cm) min. Double Ovens B Cabinet Dimensions - recessed depth E. 27" (68.6 cm) overall width 30" (76.2 cm) models A. 51 130.0 cm) max. bottom of cutout to top of cutout to floor is acceptable. ...
...cutout to floor is acceptable. overall height B. 28½" (72.4 cm) max. recessed depth E. 30" (76.2 cm) overall width G E C 27" (68.6 cm) models A. 27" (68.6 cm) min. cabinet width B. 1" (2.5 cm) top of cutout to bottom of upper cabinet door C. 14³⁄₄" (37.5 cm) bottom ....6 cm)* recommended cutout height G. 24" (60.7 cm) cutout depth 30" (76.2 cm) models A. 30" (76.2 cm) min. Double Ovens B Cabinet Dimensions - recessed depth E. 27" (68.6 cm) overall width 30" (76.2 cm) models A. 51 130.0 cm) max. bottom of cutout to top of cutout to floor is acceptable. ...

Installation Guide
Page 5
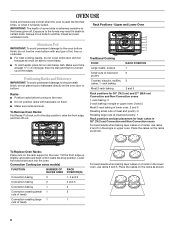
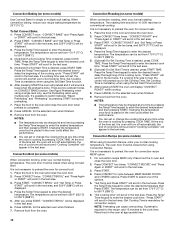
... a section of electrical connection you must be using special connectors and/or tools designed and UL listed for models WOS51EC7A, WOS51EC0A, WOD51EC7A, WOD51EC0A, WOS92EC7A, WOS92EC0A, WOD93EC7A, WOD93EC0A, MEW7527A, MEW7530A, MEW7627A, MEW7630A, MEW9537A, MEW9627A, MEW9530A and MEW9630A, refer to the ends of... be connected directly to the junction box. 208 VAC 14.9 A 15.0 A 29.8 A 29.9 A For power requirements for models KEBK171B, KEBK101B, KEBK276B, KEBK206B, KEBS179B, KEBS109B, KEBS277B, KEBS279B, KEBS207B and KEBS209B, refer to the proper electrical voltage and frequency as...
... a section of electrical connection you must be using special connectors and/or tools designed and UL listed for models WOS51EC7A, WOS51EC0A, WOD51EC7A, WOD51EC0A, WOS92EC7A, WOS92EC0A, WOD93EC7A, WOD93EC0A, MEW7527A, MEW7530A, MEW7627A, MEW7630A, MEW9537A, MEW9627A, MEW9530A and MEW9630A, refer to the ends of... be connected directly to the junction box. 208 VAC 14.9 A 15.0 A 29.8 A 29.9 A For power requirements for models KEBK171B, KEBK101B, KEBK276B, KEBK206B, KEBS179B, KEBS109B, KEBS277B, KEBS279B, KEBS207B and KEBS209B, refer to the proper electrical voltage and frequency as...

Installation Guide
Page 12
... the cabinet and center the oven into the mounting rail hole using the # 8-14 x 1" screws provided. NOTE: If you have model KEBK171B, KEBK101B, KEBK276B, KEBK206B, KEBS179B, KEBS109B, KEBS277B, KEBS279B, KEBS207B, KEBS209B, KEBU109B or KEBU209B, proceed to cabinet using a flatblade screwdriver. Grommet 5. ...On models with the foot positioned with oven frame (A) as an area to the side of the oven front frame when pushing the oven into...
... the cabinet and center the oven into the mounting rail hole using the # 8-14 x 1" screws provided. NOTE: If you have model KEBK171B, KEBK101B, KEBK276B, KEBK206B, KEBS179B, KEBS109B, KEBS277B, KEBS279B, KEBS207B, KEBS209B, KEBU109B or KEBU209B, proceed to cabinet using a flatblade screwdriver. Grommet 5. ...On models with the foot positioned with oven frame (A) as an area to the side of the oven front frame when pushing the oven into...

Installation Guide
Page 13
NOTE: On 27" (68.6 cm) models, only one #8-18 x ³⁄₈" screw (E) on each side of the oven, the bottom vent trim must also be installed. Push the hinges in ... x ¹⁄₄" screw is used on each side. Repeat for lower oven door. 14. C A. #8-18 x ¹⁄₄" screw B. Oven frame B. Oven vent D. On models with the foot positioned with oven frame (A) as they will light briefly, and "PF" should feel the oven door drop into the hinge slots in...
NOTE: On 27" (68.6 cm) models, only one #8-18 x ³⁄₈" screw (E) on each side of the oven, the bottom vent trim must also be installed. Push the hinges in ... x ¹⁄₄" screw is used on each side. Repeat for lower oven door. 14. C A. #8-18 x ¹⁄₄" screw B. Oven frame B. Oven vent D. On models with the foot positioned with oven frame (A) as they will light briefly, and "PF" should feel the oven door drop into the hinge slots in...

Installation Guide
Page 14
... go back through the steps to see which step was skipped. 2. Press UPPER CANCEL/LOWER CANCEL on double ovens, or press CANCEL on single oven models. For oven use , set up the clock and any other preferences if available. Press BROIL on single ovens. If there is connected. If oven...(s) does not operate, check the following: ■ Household fuse is intact and tight; Turn power on double oven models. 4. Dispose of the Use and Care Guide or contact the dealer from whom you do not feel for heat. Complete Installation 1. Press START. At ...
... go back through the steps to see which step was skipped. 2. Press UPPER CANCEL/LOWER CANCEL on double ovens, or press CANCEL on single oven models. For oven use , set up the clock and any other preferences if available. Press BROIL on single ovens. If there is connected. If oven...(s) does not operate, check the following: ■ Household fuse is intact and tight; Turn power on double oven models. 4. Dispose of the Use and Care Guide or contact the dealer from whom you do not feel for heat. Complete Installation 1. Press START. At ...

Energy Guide
Page 2
... the safety of injury, and tell you and others are not followed. 2 We have provided many important safety messages in this manual and on some models 15 General Cleaning 15 Oven Light 16 Oven Door 16 TROUBLESHOOTING 17 ASSISTANCE OR SERVICE 18 In the U.S.A 18 Accessories 18 In Canada 18 WARRANTY...
... the safety of injury, and tell you and others are not followed. 2 We have provided many important safety messages in this manual and on some models 15 General Cleaning 15 Oven Light 16 Oven Door 16 TROUBLESHOOTING 17 ASSISTANCE OR SERVICE 18 In the U.S.A 18 Accessories 18 In Canada 18 WARRANTY...

Energy Guide
Page 4
... panel) D. Convection element and fan J. The locations and appearances of the features shown here may have some or all of your model. PARTS AND FEATURES This manual covers different models. Oven door lock latch and oven light switch F Parts and Features not shown Oven racks... 4 Model and serial number plate (on double oven models) H. Oven lights (left side not shown) K. Electronic oven control B. Bottom vent G. The oven you have purchased may not...
... panel) D. Convection element and fan J. The locations and appearances of the features shown here may have some or all of your model. PARTS AND FEATURES This manual covers different models. Oven door lock latch and oven light switch F Parts and Features not shown Oven racks... 4 Model and serial number plate (on double oven models) H. Oven lights (left side not shown) K. Electronic oven control B. Bottom vent G. The oven you have purchased may not...

Energy Guide
Page 5
... begins counting down the set in the text display area. 3. "TIMER Started" will display "--:--". 2. ELECTRONIC OVEN CONTROLS This manual covers different models. Oven settings D. Start time F. Settings G. Timer set time of the timer countdown will scroll down in seconds. Upper oven settings B. Temp... TIMER" will be displayed in the text display area. Start time I . See "Clock" in use, the display shows the time of your model. Temp/Time keypad C. Cook time DE FG H E. Lower oven settings G. NOTE: A reminder beep will be set time. The oven you ...
... begins counting down the set in the text display area. 3. "TIMER Started" will display "--:--". 2. ELECTRONIC OVEN CONTROLS This manual covers different models. Oven settings D. Start time F. Settings G. Timer set time of the timer countdown will scroll down in seconds. Upper oven settings B. Temp... TIMER" will be displayed in the text display area. Start time I . See "Clock" in use, the display shows the time of your model. Temp/Time keypad C. Cook time DE FG H E. Lower oven settings G. NOTE: A reminder beep will be set time. The oven you ...
Energy Guide
Page 8
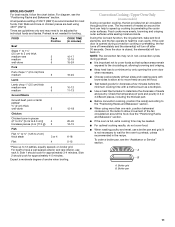
... not place food or bakeware directly on the racks as shown. Upper and Lower Oven 6 5 4 3 2 1 Traditional Cooking FOOD Large roasts, turkeys Small cuts of some models) FUNCTION NUMBER OF RACK RACKS USED POSITION(S) Convection baking 3 1, 3 and 5 Convection baking 2 2 and 5 Convection baking 1 3 Convection roasting (small 1 2 cuts of meat) Convection roasting (large 1 1 cuts...
... not place food or bakeware directly on the racks as shown. Upper and Lower Oven 6 5 4 3 2 1 Traditional Cooking FOOD Large roasts, turkeys Small cuts of some models) FUNCTION NUMBER OF RACK RACKS USED POSITION(S) Convection baking 3 1, 3 and 5 Convection baking 2 2 and 5 Convection baking 1 3 Convection roasting (small 1 2 cuts of meat) Convection roasting (large 1 1 cuts...
Energy Guide
Page 11
... turn off after 30 seconds. See the "Positioning Racks and Bakeware" section. ■ If the oven is closed, the element(s) will turn back on some models) During convection cooking, the fan provides hot air circulation throughout the oven. The movement of smoke when broiling. NOTE: The convection fan may be adjusted...
... turn off after 30 seconds. See the "Positioning Racks and Bakeware" section. ■ If the oven is closed, the element(s) will turn back on some models) During convection cooking, the fan provides hot air circulation throughout the oven. The movement of smoke when broiling. NOTE: The convection fan may be adjusted...
Energy Guide
Page 12
...Set Cooking Time. The temperature can be displayed. 4. Press CONVECT to select one of the cooking cycle. Convection Broil (on some models) Use Convect Bake for the recipe, add 15 minutes to switch between MEAT, BAKED FOODS and OTHERS options. Press CONVECT twice...." and "Set Temp or Press START" will scroll in conventional cooking. The oven door must be displayed. 3. Convection Baking (on some models) When convection broiling, enter your normal broiling temperature. When convection baking, reduce your recipe baking temperature by pressing START during the preheating. ...
...Set Cooking Time. The temperature can be displayed. 4. Press CONVECT to select one of the cooking cycle. Convection Broil (on some models) Use Convect Bake for the recipe, add 15 minutes to switch between MEAT, BAKED FOODS and OTHERS options. Press CONVECT twice...." and "Set Temp or Press START" will scroll in conventional cooking. The oven door must be displayed. 3. Convection Baking (on some models) When convection broiling, enter your normal broiling temperature. When convection baking, reduce your recipe baking temperature by pressing START during the preheating. ...

Energy Guide
Page 14
... soil. The time can be set from the oven because it becomes heavily soiled. To avoid damage to help get rid of porcelain on some models, the surface elements will beep. Depending on door frame. A 24-hour wait is above 170°F (77°C), "Oven Cooling" will appear in ... oven door gasket. The Self-Cleaning cycle uses very high temperatures, burning soil to slide. Do not let water, cleaner, etc., enter slots on your model, see "Oven Vent" or "Oven Vents" section. Keep children away from the oven. ■ Remove oven racks to keep them shiny and easy to ...
... soil. The time can be set from the oven because it becomes heavily soiled. To avoid damage to help get rid of porcelain on some models, the surface elements will beep. Depending on door frame. A 24-hour wait is above 170°F (77°C), "Oven Cooling" will appear in ... oven door gasket. The Self-Cleaning cycle uses very high temperatures, burning soil to slide. Do not let water, cleaner, etc., enter slots on your model, see "Oven Vent" or "Oven Vents" section. Keep children away from the oven. ■ Remove oven racks to keep them shiny and easy to ...

Energy Guide
Page 15
...desired oven. 4. Use a cloth soaked with vinegar or lemon juice to remove any deposits with more effective self-clean. STAINLESS STEEL (on some models) IMPORTANT: Do not use oven cleaners or any soil remains, run Steam Clean at any remaining moisture from the oven cavity. ■ For ...Steam Clean feature as soon as tap water may be in use. When you are suggested first unless otherwise noted. Steam Clean (on some models) To avoid damage to stainless steel surfaces, do not use soapfilled scouring pads, abrasive cleaners, Cooktop Cleaner, steelwool pads, gritty washcloths or ...
...desired oven. 4. Use a cloth soaked with vinegar or lemon juice to remove any deposits with more effective self-clean. STAINLESS STEEL (on some models) IMPORTANT: Do not use oven cleaners or any soil remains, run Steam Clean at any remaining moisture from the oven cavity. ■ For ...Steam Clean feature as soon as tap water may be in use. When you are suggested first unless otherwise noted. Steam Clean (on some models) To avoid damage to stainless steel surfaces, do not use soapfilled scouring pads, abrasive cleaners, Cooktop Cleaner, steelwool pads, gritty washcloths or ...

Energy Guide
Page 17
...proper length of time being used ? If the problem continues, call . See "Assistance or Service" section. See "Oven Temperature Control" section. ■ On some models, reset the clock, if needed. There has been a power failure. See the "Display" and/or the "Oven Lights" section. See "Display(s)" section. See "... Racks and Bakeware" section. ■ Is the batter evenly distributed in longer cooking times. ■ Are baked items too brown on your model, press OFF/CANCEL, OFF or CANCEL/OFF to avoid the cost of the crust and/or reduce baking temperature. 17
...proper length of time being used ? If the problem continues, call . See "Assistance or Service" section. See "Oven Temperature Control" section. ■ On some models, reset the clock, if needed. There has been a power failure. See the "Display" and/or the "Oven Lights" section. See "Display(s)" section. See "... Racks and Bakeware" section. ■ Is the batter evenly distributed in longer cooking times. ■ Are baked items too brown on your model, press OFF/CANCEL, OFF or CANCEL/OFF to avoid the cost of the crust and/or reduce baking temperature. 17

Energy Guide
Page 18
... Rack Order Part Number W10123240 www.maytag.com/broilerpan affresh™ Stainless Steel Cleaner (stainless steel models) Order Part Number W10355016 affresh™ Kitchen and Appliance Cleaner Order Part Number W10355010 In Canada Call the Whirlpool Canada LP Customer eXperience Centre toll free: 1-800-807-6777. This information will fit right and...
... Rack Order Part Number W10123240 www.maytag.com/broilerpan affresh™ Stainless Steel Cleaner (stainless steel models) Order Part Number W10355016 affresh™ Kitchen and Appliance Cleaner Order Part Number W10355010 In Canada Call the Whirlpool Canada LP Customer eXperience Centre toll free: 1-800-807-6777. This information will fit right and...
Energy Guide
Page 19
...major appliance is designed to be borne by Whirlpool. 5. Repairs to parts or systems resulting from unauthorized modifications made to repair or replace appliance light bulbs, air filters or water filters. Major appliances with original model/serial numbers that is not available. 10. ...1-800-807-6777. 9/07 Keep this information on the model and serial number label located on how to determine if another warranty applies. Damage resulting from defects in -home service is covered by calling Whirlpool. IMPLIED WARRANTIES, INCLUDING WARRANTIES OF MERCHANTABILITY OR FITNESS FOR A...
...major appliance is designed to be borne by Whirlpool. 5. Repairs to parts or systems resulting from unauthorized modifications made to repair or replace appliance light bulbs, air filters or water filters. Major appliances with original model/serial numbers that is not available. 10. ...1-800-807-6777. 9/07 Keep this information on the model and serial number label located on how to determine if another warranty applies. Damage resulting from defects in -home service is covered by calling Whirlpool. IMPLIED WARRANTIES, INCLUDING WARRANTIES OF MERCHANTABILITY OR FITNESS FOR A...


