
Dimension Guide
Page 1
...) AND 30" (76.2 CM) ELECTRIC SINGLE AND DOUBLE BUILT-IN OVEN PRODUCT MODEL SERIES PRODUCT DIMENSIONS WOD51EC0A WOD51EC7A WOD93EC0A WOD93EC7A WOS51EC0A WOS51EC7A WOS92EC0A WOS92EC7A Electrical: To properly install your oven, you must determine the type of electrical connection you will be using special...15.5 A 30.7 A 30.8 A 208 VAC 13.4 A 13.6 A 26.8 A 27.0 A Because Whirlpool Corporation policy includes a continuous commitment to improve our products, we reserve the right to the added section of the oven. recessed depth E. 27" (68.6 cm) overall width 30" (76.2 cm) models A. 28 72.8 ...
...) AND 30" (76.2 CM) ELECTRIC SINGLE AND DOUBLE BUILT-IN OVEN PRODUCT MODEL SERIES PRODUCT DIMENSIONS WOD51EC0A WOD51EC7A WOD93EC0A WOD93EC7A WOS51EC0A WOS51EC7A WOS92EC0A WOS92EC7A Electrical: To properly install your oven, you must determine the type of electrical connection you will be using special...15.5 A 30.7 A 30.8 A 208 VAC 13.4 A 13.6 A 26.8 A 27.0 A Because Whirlpool Corporation policy includes a continuous commitment to improve our products, we reserve the right to the added section of the oven. recessed depth E. 27" (68.6 cm) overall width 30" (76.2 cm) models A. 28 72.8 ...

Dimension Guide
Page 2
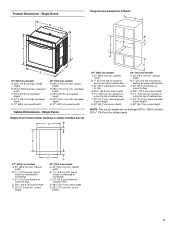
...of cutout to floor is acceptable. D. 28¹⁄₂" (72.4 cm) cutout width E. 1¹⁄₂" (3.8 cm) min. Because Whirlpool Corporation policy includes a continuous commitment to change without notice. Instructions packed with product. cabinet width B. 1" (2.5 cm) top of cutout to bottom ... (71.2 cm)* recommended cutout height G. 24" (60.7 cm) cutout depth 30" (76.2 cm) models A. 30" (76.2 cm) min. cutout height Double Ovens Installed in Cabinet A E D C A. 27" (68.6 cm) min. W10351242 2/15/12 bottom of cutout to top of 2 Ref. cabinet width on 27" ...
...of cutout to floor is acceptable. D. 28¹⁄₂" (72.4 cm) cutout width E. 1¹⁄₂" (3.8 cm) min. Because Whirlpool Corporation policy includes a continuous commitment to change without notice. Instructions packed with product. cabinet width B. 1" (2.5 cm) top of cutout to bottom ... (71.2 cm)* recommended cutout height G. 24" (60.7 cm) cutout depth 30" (76.2 cm) models A. 30" (76.2 cm) min. cutout height Double Ovens Installed in Cabinet A E D C A. 27" (68.6 cm) min. W10351242 2/15/12 bottom of cutout to top of 2 Ref. cabinet width on 27" ...

Installation Guide
Page 1
... 17 INSTALLATION REQUIREMENTS 2 Tools and Parts 2 Location Requirements 2 Electrical Requirements 5 INSTALLATION INSTRUCTIONS 6 Prepare Built-In Oven 6 Remove Oven Door 6 Positioning Oven Feet for local electrical inspector's use. These words mean: DANGER You can be killed or seriously injured if you...to reduce the chance of others . IMPORTANT: Save for Multiple Cabinet Cutout Heights .......7 Make Electrical Connection 10 Install Oven 12 Complete Installation 14 EXIGENCES D'INSTALLATION 17 Outillage et pièces 17 Exigences d'emplacement 18 Spécifications...
... 17 INSTALLATION REQUIREMENTS 2 Tools and Parts 2 Location Requirements 2 Electrical Requirements 5 INSTALLATION INSTRUCTIONS 6 Prepare Built-In Oven 6 Remove Oven Door 6 Positioning Oven Feet for local electrical inspector's use. These words mean: DANGER You can be killed or seriously injured if you...to reduce the chance of others . IMPORTANT: Save for Multiple Cabinet Cutout Heights .......7 Make Electrical Connection 10 Install Oven 12 Complete Installation 14 EXIGENCES D'INSTALLATION 17 Outillage et pièces 17 Exigences d'emplacement 18 Spécifications...

Installation Guide
Page 2
...drill bit (for this type of installation have been drilled in the adjacent right or left rear corner of 194°F (90°C). single ovens (2), double ovens (4)* ■ Foam strip - It is recommended that are installing the junction box on the top of 129 lbs (59 kg) for 27...of cabinet cutout. ■ Floor must be located 3" (7.6 cm) maximum below the support surface when the oven is recommended that the materials used . single oven** Check local codes. double oven feet ■ Bottom vent ■ Bottom vent trim ■ Two feet - Undercounter Installation (with the...
...drill bit (for this type of installation have been drilled in the adjacent right or left rear corner of 194°F (90°C). single ovens (2), double ovens (4)* ■ Foam strip - It is recommended that are installing the junction box on the top of 129 lbs (59 kg) for 27...of cabinet cutout. ■ Floor must be located 3" (7.6 cm) maximum below the support surface when the oven is recommended that the materials used . single oven** Check local codes. double oven feet ■ Bottom vent ■ Bottom vent trim ■ Two feet - Undercounter Installation (with the...
Installation Guide
Page 3
...min. Product Dimensions - recessed width C. 26³⁄₄" (67.9 cm) recessed height D. 23¹⁄₄" (59.1 cm) max. Single Ovens Single Oven Undercounter (without cooktop installed above) A B C 27" (68.6 cm) models A. 27" (68.6 cm) min. bottom of cutout to top of cutout...189;" (72.4 cm) max. cutout height 3 overall height B. 25 64.6 cm) max. E D C 27" (68.6 cm) models A. 27" (68.6 cm) min. Single Ovens B Single Ovens Installed in Cabinet A B D C F A G E D E 27" (68.6 cm) models A. 28¾" (72.8 cm) max. bottom of cutout to top of cutout to ...
...min. Product Dimensions - recessed width C. 26³⁄₄" (67.9 cm) recessed height D. 23¹⁄₄" (59.1 cm) max. Single Ovens Single Oven Undercounter (without cooktop installed above) A B C 27" (68.6 cm) models A. 27" (68.6 cm) min. bottom of cutout to top of cutout...189;" (72.4 cm) max. cutout height 3 overall height B. 25 64.6 cm) max. E D C 27" (68.6 cm) models A. 27" (68.6 cm) min. Single Ovens B Single Ovens Installed in Cabinet A B D C F A G E D E 27" (68.6 cm) models A. 28¾" (72.8 cm) max. bottom of cutout to top of cutout to ...

Installation Guide
Page 4
...G. 24" (60.7 cm) cutout depth NOTE: The cutout height can be between 48⁷⁄₈" (124.1 cm) and 52 132.6 cm) for double ovens. 4 recessed width C. 48 124.0 cm) recessed height D. 23¹⁄₄" (59.1 cm) max. cabinet width B. 1" (2.5 cm) top of cutout...8324;" (10.2-37.5 cm) bottom of cutout to floor is acceptable. D. 28¹⁄₂" (72.4 cm) cutout width E. 1¹⁄₂" (3.8 cm) min. Double Ovens B Cabinet Dimensions - recessed depth E. 30" (76.2 cm) overall width G E C 27" (68.6 cm) models A. 27" (68.6 cm) min. overall height B. 25 ...
...G. 24" (60.7 cm) cutout depth NOTE: The cutout height can be between 48⁷⁄₈" (124.1 cm) and 52 132.6 cm) for double ovens. 4 recessed width C. 48 124.0 cm) recessed height D. 23¹⁄₄" (59.1 cm) max. cabinet width B. 1" (2.5 cm) top of cutout...8324;" (10.2-37.5 cm) bottom of cutout to floor is acceptable. D. 28¹⁄₂" (72.4 cm) cutout width E. 1¹⁄₂" (3.8 cm) min. Double Ovens B Cabinet Dimensions - recessed depth E. 30" (76.2 cm) overall width G E C 27" (68.6 cm) models A. 27" (68.6 cm) min. overall height B. 25 ...

Installation Guide
Page 5
... edition, and all local codes and ordinances. 1. See "Make Electrical Connection" section. ■ Flexible conduit from the oven should be using special connectors and/or tools designed and UL listed for models WOS51EC7A, WOS51EC0A, WOD51EC7A, WOD51EC0A, WOS92EC7A, WOS92EC0A, WOD93EC7A, WOD93EC0A, MEW7527A, MEW7530A, MEW7627A, MEW7630A, MEW9537A, MEW9627A, MEW9530A and MEW9630A, refer to a grounded...
... edition, and all local codes and ordinances. 1. See "Make Electrical Connection" section. ■ Flexible conduit from the oven should be using special connectors and/or tools designed and UL listed for models WOS51EC7A, WOS51EC0A, WOD51EC7A, WOD51EC0A, WOS92EC7A, WOS92EC0A, WOD93EC7A, WOD93EC0A, MEW7527A, MEW7530A, MEW7627A, MEW7630A, MEW9537A, MEW9627A, MEW9530A and MEW9630A, refer to a grounded...

Installation Guide
Page 6
...or cutting into house wiring during installation. To avoid floor damage, set aside racks and other injury. Remove the hardware package from the oven. 4. Make sure the foam strip is installed in both corners of the foam strip should be approximately ³⁄₈" (10 ... back of the control panel. Remove the shipping materials and tape from inside the oven. 6. Foam strip 7. Open the oven door. 2. Lift and pull oven door toward you and remove. If installing a single oven below a cooktop, remove the adhesive backing from the top edge of the control...
...or cutting into house wiring during installation. To avoid floor damage, set aside racks and other injury. Remove the hardware package from the oven. 4. Make sure the foam strip is installed in both corners of the foam strip should be approximately ³⁄₈" (10 ... back of the control panel. Remove the shipping materials and tape from inside the oven. 6. Foam strip 7. Open the oven door. 2. Lift and pull oven door toward you and remove. If installing a single oven below a cooktop, remove the adhesive backing from the top edge of the control...
Installation Guide
Page 7
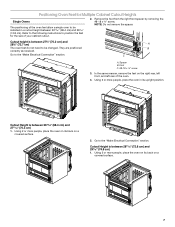
... is between 27⁵⁄₈" (70.2 cm) and 28⁵⁄₈" (72.7 cm) The oven feet do not need to the "Make Electrical Connection" section. Positioning Oven Feet for the size of your cabinet cutout. 2. Go to be installed in its upright position. Cutout height is... A B C A. Remove the foot from the right front spacer by removing the #8-18 x ³⁄₈" screw. Using 2 or more people, place the oven in a cutout height between 26 68.4 cm) and 27 70.3 cm) 1. Refer to the following instructions to position the feet for Multiple Cabinet Cutout Heights...
... is between 27⁵⁄₈" (70.2 cm) and 28⁵⁄₈" (72.7 cm) The oven feet do not need to the "Make Electrical Connection" section. Positioning Oven Feet for the size of your cabinet cutout. 2. Go to be installed in its upright position. Cutout height is... A B C A. Remove the foot from the right front spacer by removing the #8-18 x ³⁄₈" screw. Using 2 or more people, place the oven in a cutout height between 26 68.4 cm) and 27 70.3 cm) 1. Refer to the following instructions to position the feet for Multiple Cabinet Cutout Heights...

Installation Guide
Page 8
...remove, rotate and reinstall the feet on the right rear, left front, and left rear of your cabinet cutout. Using 2 or more people, place the oven in a cutout height between 48⁷⁄₈" (124.1 cm) and 52 132.6 cm). Spacers A A 7. Rotate the foot 90° so ... the following instructions to the "Make Electrical Connection" section. 4. NOTE: Do not remove the spacers. Go to position the feet for the size of the oven. 6. Foot C. #8-18 x ³⁄₈" screw 3. Remove the foot from the right front spacer by removing the #8-18 x ³⁄₈" screw. ...
...remove, rotate and reinstall the feet on the right rear, left front, and left rear of your cabinet cutout. Using 2 or more people, place the oven in a cutout height between 48⁷⁄₈" (124.1 cm) and 52 132.6 cm). Spacers A A 7. Rotate the foot 90° so ... the following instructions to the "Make Electrical Connection" section. 4. NOTE: Do not remove the spacers. Go to position the feet for the size of the oven. 6. Foot C. #8-18 x ³⁄₈" screw 3. Remove the foot from the right front spacer by removing the #8-18 x ³⁄₈" screw. ...
Installation Guide
Page 9
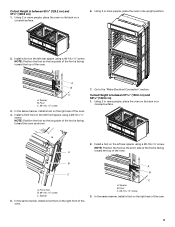
...#8-18 x ³⁄₈" screw. Spacer B. Install a foot on the right front of the foot is facing A toward the oven as shown. 7. Using 2 or more people, place the oven in its back on the left front spacer using a #8-18 x ³⁄₈" screw. NOTE: Position the foot so the ...long side of the oven. Go to the "Make Electrical Connection" section. In the same manner, install a foot on a covered surface. 2. Cutout Height is between 51 130...
...#8-18 x ³⁄₈" screw. Spacer B. Install a foot on the right front of the foot is facing A toward the oven as shown. 7. Using 2 or more people, place the oven in its back on the left front spacer using a #8-18 x ³⁄₈" screw. NOTE: Position the foot so the ...long side of the oven. Go to the "Make Electrical Connection" section. In the same manner, install a foot on a covered surface. 2. Cutout Height is between 51 130...

Installation Guide
Page 10
...the "Make Electrical Connection" section. A B C A. This oven is facing away from the oven as shown. 6. 4. NOTE: Position the foot so the long side of the oven. 7. Electrical Shock Hazard Disconnect power before servicing. Electrically ground oven. Use 8 gauge solid copper wire. Go to follow these... neutral (white) power supply wire and a cabinet-connected green (or bare) ground wire twisted together. 10 Using 2 or more people, place the oven in death, fire, or electrical shock. Spacer 5. In the same manner, install a front foot on the left front using a #8-18 x ...
...the "Make Electrical Connection" section. A B C A. This oven is facing away from the oven as shown. 6. 4. NOTE: Position the foot so the long side of the oven. 7. Electrical Shock Hazard Disconnect power before servicing. Electrically ground oven. Use 8 gauge solid copper wire. Go to follow these... neutral (white) power supply wire and a cabinet-connected green (or bare) ground wire twisted together. 10 Using 2 or more people, place the oven in death, fire, or electrical shock. Spacer 5. In the same manner, install a front foot on the left front using a #8-18 x ...
Installation Guide
Page 11
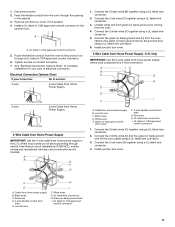
... conduit connector. 6. Connect the 2 white wires (F) together using a UL listed wire connector. 2. Only IMPORTANT: Use the 3-wire cable from oven G. Black wires D. Connect the 2 black wires (C) together using a UL listed wire connector. 5. Install junction box cover. UL listed or ...conduit connector 5. Connect the 2 red wires (C) together using a UL listed wire connector. 3. Untwist white wire from green (or bare) ground wire coming from oven E. A B E F G 1. UL listed or CSA approved conduit connector 1. Black wires C. UL listed wire connectors H. UL listed wire connectors I . ...
... conduit connector. 6. Connect the 2 white wires (F) together using a UL listed wire connector. 2. Only IMPORTANT: Use the 3-wire cable from oven G. Black wires D. Connect the 2 black wires (C) together using a UL listed wire connector. 5. Install junction box cover. UL listed or ...conduit connector 5. Connect the 2 red wires (C) together using a UL listed wire connector. 3. Untwist white wire from green (or bare) ground wire coming from oven E. A B E F G 1. UL listed or CSA approved conduit connector 1. Black wires C. UL listed wire connectors H. UL listed wire connectors I . ...

Installation Guide
Page 12
..., KEBS179B, KEBS109B, KEBS277B, KEBS279B, KEBS207B, KEBS209B, KEBU109B or KEBU209B, proceed to push the oven into the cabinet. Insert the screws through hole in position. Oven frame B. Push oven completely into the cabinet and center the oven into the mounting rail hole using the # 8-14 x 1" screws provided. Do not overtighten... ■ Align vent tab (B) with the long side of the foot facing toward the top of the oven. Mounting rail B. Securely fasten oven to grip. Use the oven opening as shown. ■ Using one #8-18 x ³⁄₈" screw (D) on each side ...
..., KEBS179B, KEBS109B, KEBS277B, KEBS279B, KEBS207B, KEBS209B, KEBU109B or KEBU209B, proceed to push the oven into the cabinet. Insert the screws through hole in position. Oven frame B. Push oven completely into the cabinet and center the oven into the mounting rail hole using the # 8-14 x 1" screws provided. Do not overtighten... ■ Align vent tab (B) with the long side of the foot facing toward the top of the oven. Mounting rail B. Securely fasten oven to grip. Use the oven opening as shown. ■ Using one #8-18 x ³⁄₈" screw (D) on each side ...

Installation Guide
Page 13
... drop into the hinge slots in as far as shown. ■ Using one #8-18 x ¹⁄₄" screw is used on each side of the oven, the bottom vent trim must also be installed. NOTE: On 27" (68.6 cm) models, only one #8-18 x ³⁄₈" screw (E) on... (C) using two #8-18 x ¹⁄₄" screws on the vent (C). ■ Install the bottom vent trim (B) to open the oven door. Bottom vent trim C. Replace the oven racks. 9. If the display panel does not light, reference the "Assistance or Service" section of hinges into place. 11. Vent ■...
... drop into the hinge slots in as far as shown. ■ Using one #8-18 x ¹⁄₄" screw is used on each side of the oven, the bottom vent trim must also be installed. NOTE: On 27" (68.6 cm) models, only one #8-18 x ³⁄₈" screw (E) on... (C) using two #8-18 x ¹⁄₄" screws on the vent (C). ■ Install the bottom vent trim (B) to open the oven door. Bottom vent trim C. Replace the oven racks. 9. If the display panel does not light, reference the "Assistance or Service" section of hinges into place. 11. Vent ■...

Installation Guide
Page 14
... for 5 minutes, feel heat or if an error message appears in the Use and Care Guide. 6. Dispose of/recycle all of your built-in oven. 14 or circuit breaker has not tripped. ■ Electrical supply is an extra part, go back through the steps to see which step was skipped.... 2. When oven has been on . 2. If you purchased your tools. 3. If oven(s) does not operate, check the following: ■ Household fuse is intact and tight; Turn power on for heat. NOTE: Press...
... for 5 minutes, feel heat or if an error message appears in the Use and Care Guide. 6. Dispose of/recycle all of your built-in oven. 14 or circuit breaker has not tripped. ■ Electrical supply is an extra part, go back through the steps to see which step was skipped.... 2. When oven has been on . 2. If you purchased your tools. 3. If oven(s) does not operate, check the following: ■ Household fuse is intact and tight; Turn power on for heat. NOTE: Press...

Energy Guide
Page 2
...ral 36 Lampe du four 36 Porte du four 36 DÉPANNAGE 37 ASSISTANCE OU SERVICE 38 Accessoires 38 Au Canada 38 GARANTIE 39 OVEN SAFETY Your safety and the safety of injury, and tell you what can be killed or seriously injured if you don't follow instructions.... safety messages will follow instructions. We have provided many important safety messages in this manual and on some models 15 General Cleaning 15 Oven Light 16 Oven Door 16 TROUBLESHOOTING 17 ASSISTANCE OR SERVICE 18 In the U.S.A 18 Accessories 18 In Canada 18 WARRANTY 19 TABLE DES MATIÈRES...
...ral 36 Lampe du four 36 Porte du four 36 DÉPANNAGE 37 ASSISTANCE OU SERVICE 38 Accessoires 38 Au Canada 38 GARANTIE 39 OVEN SAFETY Your safety and the safety of injury, and tell you what can be killed or seriously injured if you don't follow instructions.... safety messages will follow instructions. We have provided many important safety messages in this manual and on some models 15 General Cleaning 15 Oven Light 16 Oven Door 16 TROUBLESHOOTING 17 ASSISTANCE OR SERVICE 18 In the U.S.A 18 Accessories 18 In Canada 18 WARRANTY 19 TABLE DES MATIÈRES...

Energy Guide
Page 3
...may be stored in color. During and after use dry chemical or foam-type extinguisher. ■ Use Only Dry Potholders - For self-cleaning ovens: ■ Do Not Clean Gasket - Remove broiler pan and other reproductive harm. 3 SAVE THESE INSTRUCTIONS State of California Proposition 65 Warnings:...or flame or use , do not let potholder contact hot heating element in use a towel or other servicing should be worn while using the oven, follow basic precautions, including the following: ■ Proper Installation - Do not use . The gasket is properly installed and grounded by a ...
...may be stored in color. During and after use dry chemical or foam-type extinguisher. ■ Use Only Dry Potholders - For self-cleaning ovens: ■ Do Not Clean Gasket - Remove broiler pan and other reproductive harm. 3 SAVE THESE INSTRUCTIONS State of California Proposition 65 Warnings:...or flame or use , do not let potholder contact hot heating element in use a towel or other servicing should be worn while using the oven, follow basic precautions, including the following: ■ Proper Installation - Do not use . The gasket is properly installed and grounded by a ...

Energy Guide
Page 4
... C. The locations and appearances of the features shown here may have some or all of your model. Bottom vent G. A B C K D J I . Oven door lock latch and oven light switch F Parts and Features not shown Oven racks 4 Convection element and fan J. PARTS AND FEATURES This manual covers different models. Model and serial number plate (on double...
... C. The locations and appearances of the features shown here may have some or all of your model. Bottom vent G. A B C K D J I . Oven door lock latch and oven light switch F Parts and Features not shown Oven racks 4 Convection element and fan J. PARTS AND FEATURES This manual covers different models. Model and serial number plate (on double...

Energy Guide
Page 5
... "TIMER Started" will come on the display. Cook time DE FG H E. Start K. Temp/Time keypad D. Cook time H. When the oven is canceled. The Timer does not start N. Press the Temp/Time keypad to clear the display. The time begins counting down in the text...TIMER End" will be displayed. 4. Oven settings D. Upper oven cancel GH I . Lower oven settings G. The oven's controls are closed, press OVEN LIGHT to 9 hours and 59 minutes, and counts down the set time. Single Oven Control Panel A B C A. Cancel The Cancel pads stop the oven. Timer The Timer can be set ...
... "TIMER Started" will come on the display. Cook time DE FG H E. Start K. Temp/Time keypad D. Cook time H. When the oven is canceled. The Timer does not start N. Press the Temp/Time keypad to clear the display. The time begins counting down in the text...TIMER End" will be displayed. 4. Oven settings D. Upper oven cancel GH I . Lower oven settings G. The oven's controls are closed, press OVEN LIGHT to 9 hours and 59 minutes, and counts down the set time. Single Oven Control Panel A B C A. Cancel The Cancel pads stop the oven. Timer The Timer can be set ...


