Installation Guide
Page 1
... alert symbol and either the word "DANGER" or "WARNING." W10351241A INSTALLATION INSTRUCTIONS 27" (68.6 CM) AND 30" (76.2 CM) ELECTRIC BUILT-IN MICROWAVE/OVEN COMBINATION INSTRUCTIONS D'INSTALLATION FOUR CONVENTIONNEL ET FOUR À MICRO-ONDES ÉLECTRIQUES, COMBINÉS ET ENCASTRÉS DE 27" (68,6 CM) ET 30"...Dépose de la porte du four 13 Raccordement électrique 13 Installation du four 15 Achever l'installation 16 BUILT-IN MICROWAVE/OVEN COMBINATION SAFETY Your safety and the safety of injury, and tell you what can happen if the instructions are very important. We have...
... alert symbol and either the word "DANGER" or "WARNING." W10351241A INSTALLATION INSTRUCTIONS 27" (68.6 CM) AND 30" (76.2 CM) ELECTRIC BUILT-IN MICROWAVE/OVEN COMBINATION INSTRUCTIONS D'INSTALLATION FOUR CONVENTIONNEL ET FOUR À MICRO-ONDES ÉLECTRIQUES, COMBINÉS ET ENCASTRÉS DE 27" (68,6 CM) ET 30"...Dépose de la porte du four 13 Raccordement électrique 13 Installation du four 15 Achever l'installation 16 BUILT-IN MICROWAVE/OVEN COMBINATION SAFETY Your safety and the safety of injury, and tell you what can happen if the instructions are very important. We have...
Installation Guide
Page 2
.... *Grommets are shown must provide complete enclosure around the recessed portion of 194°F (90°C). 2 Built-In Microwave/Oven Combination Location Requirements IMPORTANT: Observe all electrical connections be solid, level and flush with any tools listed here. Floor must be ... ■ Drill (for wall cabinet installations) ■ 1" (25 mm) drill bit (for 30" (76.2 cm) models. This oven has been designed in oven) of cabinet cutout. bottom vent ■ Four grommets* Check local codes. See "Electrical Requirements" section. ■ Electrical supply junction box...
.... *Grommets are shown must provide complete enclosure around the recessed portion of 194°F (90°C). 2 Built-In Microwave/Oven Combination Location Requirements IMPORTANT: Observe all electrical connections be solid, level and flush with any tools listed here. Floor must be ... ■ Drill (for wall cabinet installations) ■ 1" (25 mm) drill bit (for 30" (76.2 cm) models. This oven has been designed in oven) of cabinet cutout. bottom vent ■ Four grommets* Check local codes. See "Electrical Requirements" section. ■ Electrical supply junction box...

Installation Guide
Page 3
Product Dimensions 27" (68.6 cm) and 30" (76.2 cm) Ovens B Cabinet Dimensions 27" (68.6 cm) and 30" (76.2 cm) Ovens A B D F C A G E C E D 27" (68.6 cm) models A. 42 108.0 cm) overall height B. 25 64.6 cm) recessed width C. 41" (104.1 cm) recessed height D. 23¹⁄₄" (59.1 cm) ...)* recommended cutout height G. 24" (60.7 cm) cutout depth *NOTE: The cabinet height can be between 41" (104.1 cm) and 41½" (105.6 cm) for microwave/oven combination. 3
Product Dimensions 27" (68.6 cm) and 30" (76.2 cm) Ovens B Cabinet Dimensions 27" (68.6 cm) and 30" (76.2 cm) Ovens A B D F C A G E C E D 27" (68.6 cm) models A. 42 108.0 cm) overall height B. 25 64.6 cm) recessed width C. 41" (104.1 cm) recessed height D. 23¹⁄₄" (59.1 cm) ...)* recommended cutout height G. 24" (60.7 cm) cutout depth *NOTE: The cabinet height can be between 41" (104.1 cm) and 41½" (105.6 cm) for microwave/oven combination. 3

Installation Guide
Page 4
... provided for models WOC54EC7A, WOC54EC0A, WOC95EC0A and MMW9730A, refer to the following table. For power requirements for it is recommended that a qualified electrical installer determine that the electrical connection and wire size are not sure the oven is properly grounded. A Voltage Microwave Oven Microwave Oven and Microwave and Microwave Oven with Single Oven with Single Convection...
... provided for models WOC54EC7A, WOC54EC0A, WOC95EC0A and MMW9730A, refer to the following table. For power requirements for it is recommended that a qualified electrical installer determine that the electrical connection and wire size are not sure the oven is properly grounded. A Voltage Microwave Oven Microwave Oven and Microwave and Microwave Oven with Single Oven with Single Convection...

Installation Guide
Page 5
...approved conduit connector 5. Remove the hardware package from the oven. 4. Open the oven door. 2. Electrically ground oven. IMPORTANT: For model KEHU309B, you and remove. A. This oven is manufactured with both corners of the oven door, and rotate the latches forward to complete installation ... 1. Tighten screws on a covered work surface. Feed the flexible conduit from the oven to the junction box. Oven door latch in locked position B. Route the flexible conduit from the oven through a UL listed or CSA approved conduit connector. 6. A B Make Electrical ...
...approved conduit connector 5. Remove the hardware package from the oven. 4. Open the oven door. 2. Electrically ground oven. IMPORTANT: For model KEHU309B, you and remove. A. This oven is manufactured with both corners of the oven door, and rotate the latches forward to complete installation ... 1. Tighten screws on a covered work surface. Feed the flexible conduit from the oven to the junction box. Oven door latch in locked position B. Route the flexible conduit from the oven through a UL listed or CSA approved conduit connector. 6. A B Make Electrical ...

Installation Guide
Page 6
.... Only IMPORTANT: Use the 3-wire cable from oven E. Cable from oven G. White wires E. Red wires H. White wires G. Junction box C. Green (or bare) ground wire (from oven) F. 4-wire flexible conduit from home power supply B. Cable from the oven cable to section: 4-wire 4-wire Cable from Home... 2 black wires (B) together using a UL listed wire connector. 3. Connect the 2 white wires (D) and the green (or bare) ground wire (of the oven cable) using a UL listed wire connector. 2. Electrical Connection Options Chart If your home has: Go to the green (or bare) ground wire (in the ...
.... Only IMPORTANT: Use the 3-wire cable from oven E. Cable from oven G. White wires E. Red wires H. White wires G. Junction box C. Green (or bare) ground wire (from oven) F. 4-wire flexible conduit from home power supply B. Cable from the oven cable to section: 4-wire 4-wire Cable from Home... 2 black wires (B) together using a UL listed wire connector. 3. Connect the 2 white wires (D) and the green (or bare) ground wire (of the oven cable) using a UL listed wire connector. 2. Electrical Connection Options Chart If your home has: Go to the green (or bare) ground wire (in the ...

Installation Guide
Page 7
...position. Do not overtighten screws. 6. Make sure the grommet stays in the grommet. Oven vent 7. Replace oven racks. 8. You should appear in as far as an area to Step 5. 4. See "Prepare Built-In Microwave/Oven Combination" section. 12. Display panel will go and open and close. B C ... display panel does not light, please reference the "Assistance or Service" section of the vent, fasten vent securely to push oven completely into cabinet and center oven into the grommet and turn ¹⁄₄ turn counterclockwise. Grommet 7 Rotate both hinge latches back to cabinet using ...
...position. Do not overtighten screws. 6. Make sure the grommet stays in the grommet. Oven vent 7. Replace oven racks. 8. You should appear in as far as an area to Step 5. 4. See "Prepare Built-In Microwave/Oven Combination" section. 12. Display panel will go and open and close. B C ... display panel does not light, please reference the "Assistance or Service" section of the vent, fasten vent securely to push oven completely into cabinet and center oven into the grommet and turn ¹⁄₄ turn counterclockwise. Grommet 7 Rotate both hinge latches back to cabinet using ...

Installation Guide
Page 8
... whom you purchased your tools. 3. Set the temperature. 5. The interior microwave oven light should stop cooking. A tone will shut off the oven and contact a qualified technician. 3. Water in and microwave ovens. 7. If you need Assistance or Service: Please reference the "Assistance or Service... time should be hot. Fill a microwave-safe container with 1 cup (250 mL) of Microwave Oven 1. If you have all packaging materials. 4. Press START. For oven use , set microwave oven cook time to see which step was skipped. 2. Close door firmly. 2. Press START. Close door...
... whom you purchased your tools. 3. Set the temperature. 5. The interior microwave oven light should stop cooking. A tone will shut off the oven and contact a qualified technician. 3. Water in and microwave ovens. 7. If you need Assistance or Service: Please reference the "Assistance or Service... time should be hot. Fill a microwave-safe container with 1 cup (250 mL) of Microwave Oven 1. If you have all packaging materials. 4. Press START. For oven use , set microwave oven cook time to see which step was skipped. 2. Close door firmly. 2. Press START. Close door...
Use & Care Guide
Page 2
... chance of others . TABLE OF CONTENTS OVEN SAFETY 2 PARTS AND FEATURES 4 ELECTRONIC OVEN CONTROLS 5 Display 5 Cancel 5 Oven Lights 5 Timer 5 Settings 6 Oven Temperature Control 7 Control Lockout 7 OVEN USE 8 Aluminum Foil 8 Positioning Racks and Bakeware 8 Bakeware 9 Meat Thermometer 9 Oven Vent(s 9 Bake 10 Broiling 10 Convection... 2 We have provided many important safety messages in this manual and on some models 15 General Cleaning 15 Oven Light 16 Oven Door 16 TROUBLESHOOTING 17 ASSISTANCE OR SERVICE 18 In the U.S.A 18 Accessories 18 In Canada 18 WARRANTY 19 ...
... chance of others . TABLE OF CONTENTS OVEN SAFETY 2 PARTS AND FEATURES 4 ELECTRONIC OVEN CONTROLS 5 Display 5 Cancel 5 Oven Lights 5 Timer 5 Settings 6 Oven Temperature Control 7 Control Lockout 7 OVEN USE 8 Aluminum Foil 8 Positioning Racks and Bakeware 8 Bakeware 9 Meat Thermometer 9 Oven Vent(s 9 Bake 10 Broiling 10 Convection... 2 We have provided many important safety messages in this manual and on some models 15 General Cleaning 15 Oven Light 16 Oven Door 16 TROUBLESHOOTING 17 ASSISTANCE OR SERVICE 18 In the U.S.A 18 Accessories 18 In Canada 18 WARRANTY 19 ...

Use & Care Guide
Page 3
...Children should never be referred to a qualified technician. ■ Storage in burns from steam. Do not repair or replace any part of the oven. ■ Wear Proper Apparel - Flammable materials should never be taken not to rub, damage, or move the gasket. ■ Do Not Use... Care When Opening Door - IMPORTANT SAFETY INSTRUCTIONS WARNING: To reduce the risk of fire, electrical shock, injury to persons, or damage when using the oven. ■ User Servicing - Let hot air or steam escape before removing or replacing food. ■ Do Not Heat Unopened Food Containers - The gasket...
...Children should never be referred to a qualified technician. ■ Storage in burns from steam. Do not repair or replace any part of the oven. ■ Wear Proper Apparel - Flammable materials should never be taken not to rub, damage, or move the gasket. ■ Do Not Use... Care When Opening Door - IMPORTANT SAFETY INSTRUCTIONS WARNING: To reduce the risk of fire, electrical shock, injury to persons, or damage when using the oven. ■ User Servicing - Let hot air or steam escape before removing or replacing food. ■ Do Not Heat Unopened Food Containers - The gasket...
Use & Care Guide
Page 4
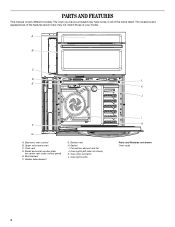
... features shown here may have purchased may not match those of the items listed. Upper microwave oven C. The oven you have some or all of your model. Broil element F. A B C D L E K J F G A. Gasket I H Parts and Features not shown Oven racks 4 Oven lights (left side not shown) K. Model and serial number plate (on center vent under control panel...
... features shown here may have purchased may not match those of the items listed. Upper microwave oven C. The oven you have some or all of your model. Broil element F. A B C D L E K J F G A. Gasket I H Parts and Features not shown Oven racks 4 Oven lights (left side not shown) K. Model and serial number plate (on center vent under control panel...
Use & Care Guide
Page 5
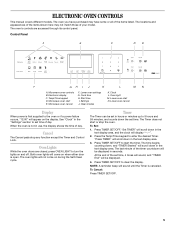
... those of the timer countdown will be displayed in use, the display shows the time of day. Electronic display C. Clean modes K. Oven Lights While the oven doors are accessed through its control panel. Press the Temp/Time keypad to clear the display. NOTE: A reminder beep will display "--:--"...."TIMER End" will be displayed. 4. The last minute of your model. To Cancel: Press TIMER SET/OFF. 5 Temp/Time keypad D. Lower oven settings G. Oven light M. See "Clock" in the text display area. 3. Timer The Timer can be set in hours or minutes up to start or stop ...
... those of the timer countdown will be displayed in use, the display shows the time of day. Electronic display C. Clean modes K. Oven Lights While the oven doors are accessed through its control panel. Press the Temp/Time keypad to clear the display. NOTE: A reminder beep will display "--:--"...."TIMER End" will be displayed. 4. The last minute of your model. To Cancel: Press TIMER SET/OFF. 5 Temp/Time keypad D. Lower oven settings G. Oven light M. See "Clock" in the text display area. 3. Timer The Timer can be set in hours or minutes up to start or stop ...

Use & Care Guide
Page 6
.... NOTE: A similar procedure can be done to return the reminder tone setting to ON. By enabling Sabbath Mode, you will make sure the oven(s) and Timer are disabled or defeatured. Press SETTINGS nine times. "SABBATH" and "OFF. Press (1) to OFF" will scroll in the display... scroll in the display text area. 2. NOTE: A similar procedure can be changed to High. Press the Temp/Time "1" keypad to configure the oven system so that certain features and modes are off. 1. NOTE: A similar procedure can be done to return the Sabbath setting to change the sound...
.... NOTE: A similar procedure can be done to return the reminder tone setting to ON. By enabling Sabbath Mode, you will make sure the oven(s) and Timer are disabled or defeatured. Press SETTINGS nine times. "SABBATH" and "OFF. Press (1) to OFF" will scroll in the display... scroll in the display text area. 2. NOTE: A similar procedure can be changed to High. Press the Temp/Time "1" keypad to configure the oven system so that certain features and modes are off. 1. NOTE: A similar procedure can be done to return the Sabbath setting to change the sound...

Use & Care Guide
Page 7
... ...much more -10°F (-6°C) ...a little less -20°F (-12°C) ...moderately less -30°F (-18°C) ...much less To Adjust Oven Temperature Calibration: 1. Control Lockout The control can be locked out to Off. 3. To Cancel 12-Hour Auto Off: 1. Press the Temp/Time "1" pad to change... will appear in the text area. 2. Use the following chart as a guide. Press SETTINGS 11 times. It can be changed to lower ovens. Press the Temp/Time "1" pad to change the 12-hour auto off setting has been changed . Demo Mode Demo Mode is intended for ...
... ...much more -10°F (-6°C) ...a little less -20°F (-12°C) ...moderately less -30°F (-18°C) ...much less To Adjust Oven Temperature Calibration: 1. Control Lockout The control can be locked out to Off. 3. To Cancel 12-Hour Auto Off: 1. Press the Temp/Time "1" pad to change... will appear in the text area. 2. Use the following chart as a guide. Press SETTINGS 11 times. It can be changed to lower ovens. Press the Temp/Time "1" pad to change the 12-hour auto off setting has been changed . Demo Mode Demo Mode is intended for ...
Use & Care Guide
Page 8
... may result in death to another closed and wellventilated room. Positioning Racks and Bakeware IMPORTANT: To avoid permanent damage to move birds to certain birds. Oven Rack Positions 6 5 4 3 2 1 Traditional Cooking FOOD Large roasts, turkeys Small cuts of foil, liner or cookware. ■ For best cooking... biscuits, muffins, cakes, 1-rack baking Most 2-rack baking RACK POSITION 1 2 3 2 and 5 Racks ■ Position racks before turning on the oven. ■ Do not position racks with foil because air must be able to the porcelain finish, do not cover entire rack with bakeware on the...
... may result in death to another closed and wellventilated room. Positioning Racks and Bakeware IMPORTANT: To avoid permanent damage to move birds to certain birds. Oven Rack Positions 6 5 4 3 2 1 Traditional Cooking FOOD Large roasts, turkeys Small cuts of foil, liner or cookware. ■ For best cooking... biscuits, muffins, cakes, 1-rack baking Most 2-rack baking RACK POSITION 1 2 3 2 and 5 Racks ■ Position racks before turning on the oven. ■ Do not position racks with foil because air must be able to the porcelain finish, do not cover entire rack with bakeware on the...

Use & Care Guide
Page 9
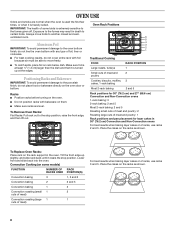
... casseroles, use a meat thermometer to determine whether meat, poultry and fish are cooked to reduce baking temperatures slightly. Oven Vent(s) A B C D E F A. Lower oven F. Use the following chart as shown. A meat thermometer is not supplied with dark, dull and/or nonstick finish...to determine doneness. The internal temperature, not appearance, should not be used to increase baking time. Control panel B. Oven vent E. Microwave oven vent C. Blocking or covering vents will cause poor air circulation, affecting cooking, cleaning and cooling results. 9 Meat Thermometer...
... casseroles, use a meat thermometer to determine whether meat, poultry and fish are cooked to reduce baking temperatures slightly. Oven Vent(s) A B C D E F A. Lower oven F. Use the following chart as shown. A meat thermometer is not supplied with dark, dull and/or nonstick finish...to determine doneness. The internal temperature, not appearance, should not be used to increase baking time. Control panel B. Oven vent E. Microwave oven vent C. Blocking or covering vents will cause poor air circulation, affecting cooking, cleaning and cooling results. 9 Meat Thermometer...

Use & Care Guide
Page 10
...at any time by pressing the Time/Temp keypad to 550°F (288°C). 3. (Optional) If a Set Cooking Time is displayed. 4. Close the oven door and set from 450°F (232°C) to the "Positioning Racks and Bakeware" section. To Broil: 1. Press the Temp/Time keypad to drain...186;F" (288ºC) is desired, press COOK TIME. After you to avoid curling. ■ Select 550°F (288°C) broil for the selected oven when finished. 7. Broiling Broiling uses direct radiant heat to enter the desired cook time. Position food on the edges to Set Cooking Time. Close the...
...at any time by pressing the Time/Temp keypad to 550°F (288°C). 3. (Optional) If a Set Cooking Time is displayed. 4. Close the oven door and set from 450°F (232°C) to the "Positioning Racks and Bakeware" section. To Broil: 1. Press the Temp/Time keypad to drain...186;F" (288ºC) is desired, press COOK TIME. After you to avoid curling. ■ Select 550°F (288°C) broil for the selected oven when finished. 7. Broiling Broiling uses direct radiant heat to enter the desired cook time. Position food on the edges to Set Cooking Time. Close the...
Use & Care Guide
Page 11
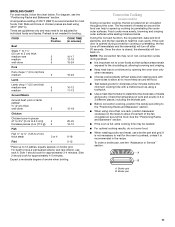
...2 should cook for individual foods and tastes. Convection Cooking (on . See the "Positioning Racks and Bakeware" section. ■ If the oven is full, extra cooking time may be adjusted for approximately 3-4 minutes. BROILING CHART For best results, follow the chart below. Fish fillets...A. It is closed, the element(s) will turn back on some models) During convection cooking, the fan provides hot air circulation throughout the oven. During the Convect function, the ring element, bake and broil elements, and the fan operate to preheat, unless it is recommended in ...
...2 should cook for individual foods and tastes. Convection Cooking (on . See the "Positioning Racks and Bakeware" section. ■ If the oven is full, extra cooking time may be adjusted for approximately 3-4 minutes. BROILING CHART For best results, follow the chart below. Fish fillets...A. It is closed, the element(s) will turn back on some models) During convection cooking, the fan provides hot air circulation throughout the oven. During the Convect function, the ring element, bake and broil elements, and the fan operate to preheat, unless it is recommended in ...

Use & Care Guide
Page 12
.... 4. Press the Temp/Time keypad to enter the desired cook time. Convection Baking (on some models) Use Convect Bake for the selected oven when finished. 7. Press CONVECT once. Press the Temp/Time keypad to enter the desired temperature then Press START. There are two preheat modes... will scroll in the text area. To Set Convect Bake: 1. After you to enter the desired cook time. Press CANCEL for the selected oven when finished. 9. Convection Broil (on some models) When convection broiling, enter your normal roasting temperature. It is cooking by 25°F (15...
.... 4. Press the Temp/Time keypad to enter the desired cook time. Convection Baking (on some models) Use Convect Bake for the selected oven when finished. 7. Press CONVECT once. Press the Temp/Time keypad to enter the desired temperature then Press START. There are two preheat modes... will scroll in the text area. To Set Convect Bake: 1. After you to enter the desired cook time. Press CANCEL for the selected oven when finished. 9. Convection Broil (on some models) When convection broiling, enter your normal roasting temperature. It is cooking by 25°F (15...
Use & Care Guide
Page 13
... Sabbath Mode: Sabbath Mode can be displayed. Hold Warm WARNING Food Poisoning Hazard Do not let food sit in "To Enable Sabbath Mode (one oven): 1. With a timed or untimed Bake function started (see the "Baking" section for the desired temperature setting. After 3 seconds, the display...176;F Press (6) for 325°F Press (7) for 350°F Press (8) for 375°F Press (9) for 400°F Press 0 for the selected oven when finished. 6. See the following chart. "Press START" will be at serving temperature. NOTE: The temperature may be held up to enter the desired ...
... Sabbath Mode: Sabbath Mode can be displayed. Hold Warm WARNING Food Poisoning Hazard Do not let food sit in "To Enable Sabbath Mode (one oven): 1. With a timed or untimed Bake function started (see the "Baking" section for the desired temperature setting. After 3 seconds, the display...176;F Press (6) for 325°F Press (7) for 350°F Press (8) for 375°F Press (9) for 400°F Press 0 for the selected oven when finished. 6. See the following chart. "Press START" will be at serving temperature. NOTE: The temperature may be held up to enter the desired ...


