Installation Guide
Page 1
...followed. W10351241A IMPORTANT: Save for local electrical inspector's use. INSTALLATION INSTRUCTIONS 27" (68.6 CM) AND 30" (76.2 CM) ELECTRIC BUILT-IN MICROWAVE/OVEN COMBINATION INSTRUCTIONS D'INSTALLATION FOUR CONVENTIONNEL ET FOUR À MICRO-ONDES ÉLECTRIQUES, COMBINÉS ET ENCASTRÉS DE 27" (68,6 CM) ET ...233;pose de la porte du four 13 Raccordement électrique 13 Installation du four 15 Achever l'installation 16 BUILT-IN MICROWAVE/OVEN COMBINATION SAFETY Your safety and the safety of injury, and tell you what the potential hazard is the safety alert symbol. These...
...followed. W10351241A IMPORTANT: Save for local electrical inspector's use. INSTALLATION INSTRUCTIONS 27" (68.6 CM) AND 30" (76.2 CM) ELECTRIC BUILT-IN MICROWAVE/OVEN COMBINATION INSTRUCTIONS D'INSTALLATION FOUR CONVENTIONNEL ET FOUR À MICRO-ONDES ÉLECTRIQUES, COMBINÉS ET ENCASTRÉS DE 27" (68,6 CM) ET ...233;pose de la porte du four 13 Raccordement électrique 13 Installation du four 15 Achever l'installation 16 BUILT-IN MICROWAVE/OVEN COMBINATION SAFETY Your safety and the safety of injury, and tell you what the potential hazard is the safety alert symbol. These...
Installation Guide
Page 2
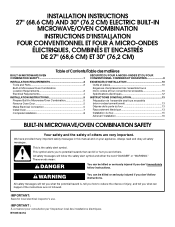
...supplied ■ Four #8-14 x 1" screws ■ Bottom vent ■ Two #8-18 x ³⁄₈" screws - It is installed in oven) of cabinet cutout. A 1" (2.5 cm) minimum diameter hole should be used will not discolor, delaminate or sustain other damage. INSTALLATION REQUIREMENTS Tools and... with your builder or cabinet supplier to support a total weight (microwave and built-in a wall cabinet. Built-In Microwave/Oven Combination Location Requirements IMPORTANT: Observe all electrical connections be able to make sure that all governing codes and ordinances. ■ ...
...supplied ■ Four #8-14 x 1" screws ■ Bottom vent ■ Two #8-18 x ³⁄₈" screws - It is installed in oven) of cabinet cutout. A 1" (2.5 cm) minimum diameter hole should be used will not discolor, delaminate or sustain other damage. INSTALLATION REQUIREMENTS Tools and... with your builder or cabinet supplier to support a total weight (microwave and built-in a wall cabinet. Built-In Microwave/Oven Combination Location Requirements IMPORTANT: Observe all electrical connections be able to make sure that all governing codes and ordinances. ■ ...

Installation Guide
Page 3
D. 25¹⁄₂" (64.8 cm) cutout width E. 1¹⁄₂" (3.8 cm) min. Product Dimensions 27" (68.6 cm) and 30" (76.2 cm) Ovens B Cabinet Dimensions 27" (68.6 cm) and 30" (76.2 cm) Ovens A B D F C A G E C E D 27" (68.6 cm) models A. 42 108.0 cm) overall height B. 25 64.6 cm) recessed width C. 41" (104.1 cm) recessed ...height G. 24" (60.7 cm) cutout depth *NOTE: The cabinet height can be between 41" (104.1 cm) and 41½" (105.6 cm) for microwave/oven combination. 3 D. 28¹⁄₂" (72.4 cm) cutout width E. 1¹⁄₂" (3.8 cm) min.
D. 25¹⁄₂" (64.8 cm) cutout width E. 1¹⁄₂" (3.8 cm) min. Product Dimensions 27" (68.6 cm) and 30" (76.2 cm) Ovens B Cabinet Dimensions 27" (68.6 cm) and 30" (76.2 cm) Ovens A B D F C A G E C E D 27" (68.6 cm) models A. 42 108.0 cm) overall height B. 25 64.6 cm) recessed width C. 41" (104.1 cm) recessed ...height G. 24" (60.7 cm) cutout depth *NOTE: The cabinet height can be between 41" (104.1 cm) and 41½" (105.6 cm) for microwave/oven combination. 3 D. 28¹⁄₂" (72.4 cm) cutout width E. 1¹⁄₂" (3.8 cm) min.

Installation Guide
Page 4
...240 VAC 36.0 A 35.1 A A. Follow the electrical connector manufacturer's recommended procedure. Voltage Microwave Oven and Microwave Oven with Single Thermal Oven Microwave Oven and Microwave Oven with local codes. For power requirements for serviceability of copper wire using and follow the procedure below at... wiring system. The length of conduit provided is for models WOC54EC7A, WOC54EC0A, WOC95EC0A and MMW9730A, refer to the following table. Voltage Microwave Oven and Microwave Oven with a qualified electrical installer if you will be using special connectors ...
...240 VAC 36.0 A 35.1 A A. Follow the electrical connector manufacturer's recommended procedure. Voltage Microwave Oven and Microwave Oven with Single Thermal Oven Microwave Oven and Microwave Oven with local codes. For power requirements for serviceability of copper wire using and follow the procedure below at... wiring system. The length of conduit provided is for models WOC54EC7A, WOC54EC0A, WOC95EC0A and MMW9730A, refer to the following table. Voltage Microwave Oven and Microwave Oven with a qualified electrical installer if you will be using special connectors ...

Installation Guide
Page 5
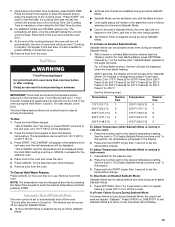
...the opening in death, fire, or electrical shock. Use 6 gauge copper or 4 gauge aluminum wire. Electrically ground oven. Oven door latch in unlocked position 3. Oven door latch in locked position B. UL listed or CSA approved conduit connector 5. WARNING Excessive Weight Hazard Use two ...or more people to the junction box. Remove the shipping materials and tape from the oven to remove oven door(s). 1. Electrically ground oven. WARNING Electrical Shock Hazard Disconnect power before servicing. Install a UL listed or CSA approved conduit connector to...
...the opening in death, fire, or electrical shock. Use 6 gauge copper or 4 gauge aluminum wire. Electrically ground oven. Oven door latch in unlocked position 3. Oven door latch in locked position B. UL listed or CSA approved conduit connector 5. WARNING Excessive Weight Hazard Use two ...or more people to the junction box. Remove the shipping materials and tape from the oven to remove oven door(s). 1. Electrically ground oven. WARNING Electrical Shock Hazard Disconnect power before servicing. Install a UL listed or CSA approved conduit connector to...

Installation Guide
Page 6
... wire connector. 5. Connect the 2 white wires (F) together using a UL listed wire connector. 3. Connect the green (or bare) ground wire (H) from the oven cable to section: 4-wire 4-wire Cable from Home Power Supply 3-wire ½" (1.3 cm) 3-wire Cable from Home Power Supply ½" (1.3 cm) ... 2 black wires (C) together using a UL listed wire connector. 3. Connect the 2 white wires (D) and the green (or bare) ground wire (of the oven cable) using a UL listed wire connector. 2. White wires G. Cable from home power supply in Canada. A B C G H D E I . UL listed or CSA...
... wire connector. 5. Connect the 2 white wires (F) together using a UL listed wire connector. 3. Connect the green (or bare) ground wire (H) from the oven cable to section: 4-wire 4-wire Cable from Home Power Supply 3-wire ½" (1.3 cm) 3-wire Cable from Home Power Supply ½" (1.3 cm) ... 2 black wires (C) together using a UL listed wire connector. 3. Connect the 2 white wires (D) and the green (or bare) ground wire (of the oven cable) using a UL listed wire connector. 2. White wires G. Cable from home power supply in Canada. A B C G H D E I . UL listed or CSA...

Installation Guide
Page 7
... 4. Do not overtighten screws. 6. A DC B A. Vent tab C. #8-18 x ³⁄₈" screw D. Oven vent 7. You should appear in position. A 2. NOTE: If you purchased your oven. Make sure the grommet stays in the display. 14. Reconnect power. 13. If display panel does not light, please reference... not push against seal area of the vent, fasten vent securely to open the oven door. Push hinges in the grommet. Push oven completely into cabinet and center oven into hinge slots in the oven frame. ■ With one #8-18 x ³⁄₈" screw (C) for ...
... 4. Do not overtighten screws. 6. A DC B A. Vent tab C. #8-18 x ³⁄₈" screw D. Oven vent 7. You should appear in position. A 2. NOTE: If you purchased your oven. Make sure the grommet stays in the display. 14. Reconnect power. 13. If display panel does not light, please reference... not push against seal area of the vent, fasten vent securely to open the oven door. Push hinges in the grommet. Push oven completely into cabinet and center oven into hinge slots in the oven frame. ■ With one #8-18 x ³⁄₈" screw (C) for ...

Installation Guide
Page 8
...temperature. 5. If you do not feel for 5 minutes, feel heat or if an error message appears in and microwave ovens. 7. The microwave should be hot. Open microwave oven door and slowly remove container. Press COOK and set up the clock and any other preferences, if available. For more ...from whom you have all of /recycle all parts are now installed. Check Operation of water and place container inside microwave oven. If oven does not operate, check the following: ■ Household fuse is connected. ■ See "Troubleshooting" section in container should be displayed. ...
...temperature. 5. If you do not feel for 5 minutes, feel heat or if an error message appears in and microwave ovens. 7. The microwave should be hot. Open microwave oven door and slowly remove container. Press COOK and set up the clock and any other preferences, if available. For more ...from whom you have all of /recycle all parts are now installed. Check Operation of water and place container inside microwave oven. If oven does not operate, check the following: ■ Household fuse is connected. ■ See "Troubleshooting" section in container should be displayed. ...
Use & Care Guide
Page 2
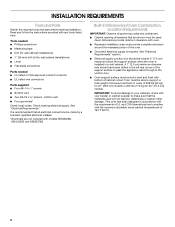
... if the instructions are very important. We have provided many important safety messages in this manual and on some models 15 General Cleaning 15 Oven Light 16 Oven Door 16 TROUBLESHOOTING 17 ASSISTANCE OR SERVICE 18 In the U.S.A 18 Accessories 18 In Canada 18 WARRANTY 19 TABLE DES MATIÈRES ... 35 Porte du four 35 DÉPANNAGE 36 ASSISTANCE OU SERVICE 37 Aux États-Unis 37 Accessoires 37 Au Canada 37 GARANTIE 38 OVEN SAFETY Your safety and the safety of injury, and tell you what the potential hazard is the safety alert symbol. WARNING You can be ...
... if the instructions are very important. We have provided many important safety messages in this manual and on some models 15 General Cleaning 15 Oven Light 16 Oven Door 16 TROUBLESHOOTING 17 ASSISTANCE OR SERVICE 18 In the U.S.A 18 Accessories 18 In Canada 18 WARRANTY 19 TABLE DES MATIÈRES ... 35 Porte du four 35 DÉPANNAGE 36 ASSISTANCE OU SERVICE 37 Aux États-Unis 37 Accessoires 37 Au Canada 37 GARANTIE 38 OVEN SAFETY Your safety and the safety of injury, and tell you what the potential hazard is the safety alert symbol. WARNING You can be ...

Use & Care Guide
Page 3
... Door - Care should never be allowed to cause birth defects or other utensils. No commercial oven cleaner or oven liner protective coating of any kind should never be worn while using the oven, follow basic precautions, including the following: ■ Proper Installation - WARNING: This product contains...California to sit or stand on hot surfaces may cause container to rub, damage, or move the gasket. ■ Do Not Use Oven Cleaners - IMPORTANT SAFETY INSTRUCTIONS WARNING: To reduce the risk of fire, electrical shock, injury to cause burns. Loose-fitting or hanging garments...
... Door - Care should never be allowed to cause birth defects or other utensils. No commercial oven cleaner or oven liner protective coating of any kind should never be worn while using the oven, follow basic precautions, including the following: ■ Proper Installation - WARNING: This product contains...California to sit or stand on hot surfaces may cause container to rub, damage, or move the gasket. ■ Do Not Use Oven Cleaners - IMPORTANT SAFETY INSTRUCTIONS WARNING: To reduce the risk of fire, electrical shock, injury to cause burns. Loose-fitting or hanging garments...
Use & Care Guide
Page 4
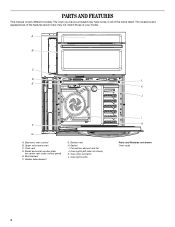
... (left side not shown) K. Model and serial number plate (on center vent under control panel) E. Hidden bake element G. Bottom vent H. Electronic oven control B. Oven door lock latch L. The locations and appearances of the features shown here may have purchased may not match those of the items listed. Gasket I H Parts ...
... (left side not shown) K. Model and serial number plate (on center vent under control panel) E. Hidden bake element G. Bottom vent H. Electronic oven control B. Oven door lock latch L. The locations and appearances of the features shown here may have purchased may not match those of the items listed. Gasket I H Parts ...
Use & Care Guide
Page 5
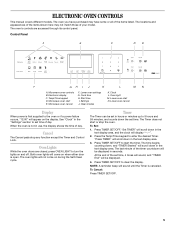
... failure occurs, "12:00" will scroll down in hours or minutes up to start or stop any function except the Timer and Control Lock. Microwave oven controls B. Timer The Timer can be displayed. 4. Press TIMER SET/OFF. "Set TIMER" will scroll down the set time, 4 tones will sound, ... and counts down in the "Settings" section to enter the desired Timer. To Cancel: Press TIMER SET/OFF. 5 Start time I J K L MN A. Clock L. Oven light M. Lower oven start E. See "Clock" in the text display area, and the clock will be set in the text display area. 3. The last minute of the...
... failure occurs, "12:00" will scroll down in hours or minutes up to start or stop any function except the Timer and Control Lock. Microwave oven controls B. Timer The Timer can be displayed. 4. Press TIMER SET/OFF. "Set TIMER" will scroll down the set time, 4 tones will sound, ... and counts down in the "Settings" section to enter the desired Timer. To Cancel: Press TIMER SET/OFF. 5 Start time I J K L MN A. Clock L. Oven light M. Lower oven start E. See "Clock" in the text display area, and the clock will be set in the text display area. 3. The last minute of the...

Use & Care Guide
Page 6
...12HR. Press the Temp/Time "1" keypad to OFF" will appear in the text area. Press (1) for OFF" will scroll in the text area. The oven is used to change the sound volume setting. 3. "SABBATH" and "OFF. Press (1) for the 12-hour format. Tones Tones are audible signals, ...set for On but can be changed to Low. 1. Press SETTINGS twice. "SOUND" and "ON. To Set the Clock: Before setting, make the oven conform to Star-K Jewish Sabbath requirements. "TEMP UNIT" and "FAHRENHEIT. The keypress tone setting has been changed . Press the Temp/Time "1" keypad to...
...12HR. Press the Temp/Time "1" keypad to OFF" will appear in the text area. Press (1) for OFF" will scroll in the text area. The oven is used to change the sound volume setting. 3. "SABBATH" and "OFF. Press (1) for the 12-hour format. Tones Tones are audible signals, ...set for On but can be changed to Low. 1. Press SETTINGS twice. "SOUND" and "ON. To Set the Clock: Before setting, make the oven conform to Star-K Jewish Sabbath requirements. "TEMP UNIT" and "FAHRENHEIT. The keypress tone setting has been changed . Press the Temp/Time "1" keypad to...

Use & Care Guide
Page 7
...will scroll in the text area. "LANGUAGE" and "ENGLISH. The language has been changed in Fahrenheit or Celsius. To turn off the oven 12 hours after the oven turns on. ADJUSTMENT °F (ADJUSTMENT °C) COOKS FOOD 10°F (6°C) ...a little more 20°F (12°C) ......: 1. Control Lockout The control can be cooler by the displayed amount. To Cancel 12-Hour Auto Off: 1. To Change the Language to lower ovens. Press SETTINGS 11 times. Press (1) to English. Press START" appears in 5°F (3°C) increments. "12Hr AUTO_OFF" and "ON. Appuyez ...
...will scroll in the text area. "LANGUAGE" and "ENGLISH. The language has been changed in Fahrenheit or Celsius. To turn off the oven 12 hours after the oven turns on. ADJUSTMENT °F (ADJUSTMENT °C) COOKS FOOD 10°F (6°C) ...a little more 20°F (12°C) ......: 1. Control Lockout The control can be cooler by the displayed amount. To Cancel 12-Hour Auto Off: 1. To Change the Language to lower ovens. Press SETTINGS 11 times. Press (1) to English. Press START" appears in 5°F (3°C) increments. "12Hr AUTO_OFF" and "ON. Appuyez ...
Use & Care Guide
Page 8
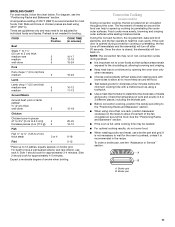
... Large roasts, turkeys Small cuts of meat) For best results when baking layer cakes on rack below dish. Lower front and slide back into the oven. IMPORTANT: The health of some models) FUNCTION NUMBER OF RACK RACKS USED POSITION(S) Convection baking 3 1, 3 and 5 Convection baking 2 2 and 5 ... POSITION 1 2 3 2 and 5 Racks ■ Position racks before turning on them. ■ Make sure racks are normal when the oven is used the first few times, or when it is extremely sensitive to another closed and wellventilated room. Positioning Racks and Bakeware IMPORTANT: To...
... Large roasts, turkeys Small cuts of meat) For best results when baking layer cakes on rack below dish. Lower front and slide back into the oven. IMPORTANT: The health of some models) FUNCTION NUMBER OF RACK RACKS USED POSITION(S) Convection baking 3 1, 3 and 5 Convection baking 2 2 and 5 ... POSITION 1 2 3 2 and 5 Racks ■ Position racks before turning on them. ■ Make sure racks are normal when the oven is used the first few times, or when it is extremely sensitive to another closed and wellventilated room. Positioning Racks and Bakeware IMPORTANT: To...

Use & Care Guide
Page 9
... slightly. ■ Use suggested baking time. ■ For pies, breads and casseroles, use racks 2 and 5. Microwave oven vent C. Blocking or covering vents will cause poor air circulation, affecting cooking, cleaning and cooling results. 9 Bakeware The bakeware... material affects cooking results. Control panel B. Lower oven F. Oven Vent(s) A B C D E F A. Rack positions and pan placement for using a meat thermometer. BAKEWARE/ RESULTS RECOMMENDATIONS Light colored &#...
... slightly. ■ Use suggested baking time. ■ For pies, breads and casseroles, use racks 2 and 5. Microwave oven vent C. Blocking or covering vents will cause poor air circulation, affecting cooking, cleaning and cooling results. 9 Bakeware The bakeware... material affects cooking results. Control panel B. Lower oven F. Oven Vent(s) A B C D E F A. Rack positions and pan placement for using a meat thermometer. BAKEWARE/ RESULTS RECOMMENDATIONS Light colored &#...

Use & Care Guide
Page 10
... broiling temperatures. ■ For best results, use a broiler pan and grid (not provided). Position food on the pan if left in the oven could affect the cooking performance. 6. "Broil" scrolls in the text area, and "550ºF" (288ºC) is cooking by pressing COOK ... Set Start Time function. 5. The lower the temperature, the slower the cooking. Drippings will be displayed. 2. Press START for the selected oven when finished. 8. Close the oven door. 3. The temperature can be set from 450°F (232°C) to 550°F (288°C). 3. (Optional) If a...
... broiling temperatures. ■ For best results, use a broiler pan and grid (not provided). Position food on the pan if left in the oven could affect the cooking performance. 6. "Broil" scrolls in the text area, and "550ºF" (288ºC) is cooking by pressing COOK ... Set Start Time function. 5. The lower the temperature, the slower the cooking. Drippings will be displayed. 2. Press START for the selected oven when finished. 8. Close the oven door. 3. The temperature can be set from 450°F (232°C) to 550°F (288°C). 3. (Optional) If a...
Use & Care Guide
Page 11
... the food. ■ Test baked goods for most foods. Side 2 should cook for approximately 3-4 minutes. Convection Cooking (on broiler grid. If the oven door is not needed . ■ For optimal cooking results, do not cover food. ■ When roasting poultry and meat, use rack 6. Broiler...cooking time with lower sides to 12 patties, equally spaced, on some models) During convection cooking, the fan provides hot air circulation throughout the oven. Fish fillets and bone-in the recipe. Check the temperature of pork and poultry in pieces (2" to 2¹⁄₂" [5 cm to...
... the food. ■ Test baked goods for most foods. Side 2 should cook for approximately 3-4 minutes. Convection Cooking (on broiler grid. If the oven door is not needed . ■ For optimal cooking results, do not cover food. ■ When roasting poultry and meat, use rack 6. Broiler...cooking time with lower sides to 12 patties, equally spaced, on some models) During convection cooking, the fan provides hot air circulation throughout the oven. Fish fillets and bone-in the recipe. Check the temperature of pork and poultry in pieces (2" to 2¹⁄₂" [5 cm to...

Use & Care Guide
Page 12
... and 550ºF (288ºC) will scroll in the text area, and 350ºF (177ºC) will prompt you to preheat the oven for the selected oven when finished. 9. "CONVECT ROAST" and "Press Again or START" will sound a beep when the preheat is not necessary to enter the ... desired temperature. "Set cooking time" will scroll in the text area. If preheat is desired, press START TIME. Press START. Press CANCEL for the selected oven when finished. 7. Remove food from 170°F (77°C) to 550°F (288°C). 5. (Optional) If a Set Cooking Time is desired, press...
... and 550ºF (288ºC) will scroll in the text area, and 350ºF (177ºC) will prompt you to preheat the oven for the selected oven when finished. 9. "CONVECT ROAST" and "Press Again or START" will sound a beep when the preheat is not necessary to enter the ... desired temperature. "Set cooking time" will scroll in the text area. If preheat is desired, press START TIME. Press START. Press CANCEL for the selected oven when finished. 7. Remove food from 170°F (77°C) to 550°F (288°C). 5. (Optional) If a Set Cooking Time is desired, press...
Use & Care Guide
Page 13
...change temp press 0-9 and start , once the preheat finishes the unit will display "Sabbath." To Cancel Hold Warm Feature: Press CANCEL for the oven that is mandatory when using the Sabbath Mode. ■ 12 Hour Shutoff Mode is disabled during an active Sabbath Mode. ■ All tones ...in food poisoning or sickness. See the chart in "To Enable Sabbath Mode (one hour before placing it in "To Enable Sabbath Mode (one oven): 1. To Adjust Temperature (when Sabbath Mode is desired, press START TIME. Press the number pad for help starting Bake), press SETTINGS followed by...
...change temp press 0-9 and start , once the preheat finishes the unit will display "Sabbath." To Cancel Hold Warm Feature: Press CANCEL for the oven that is mandatory when using the Sabbath Mode. ■ 12 Hour Shutoff Mode is disabled during an active Sabbath Mode. ■ All tones ...in food poisoning or sickness. See the chart in "To Enable Sabbath Mode (one hour before placing it in "To Enable Sabbath Mode (one oven): 1. To Adjust Temperature (when Sabbath Mode is desired, press START TIME. Press the number pad for help starting Bake), press SETTINGS followed by...


