
Installation Guide
Page 1
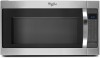
...followed. WARNING You can happen if the instructions are very important. Always read and obey all safety messages. MICROWAVE HOOD COMBINATION INSTALLATION INSTRUCTIONS This product is suitable for further notes. We have provided many important safety messages in ...killed or seriously injured if you don't follow the safety alert symbol and either the word "DANGER" or "WARNING." Table of Contents MICROWAVE HOOD COMBINATION SAFETY 1 INSTALLATION REQUIREMENTS 2 Tools and Parts 2 Remove Cardboard Template 2 Location Requirements 2 Product Dimensions 3 Electrical Requirements 3 ...
...followed. WARNING You can happen if the instructions are very important. Always read and obey all safety messages. MICROWAVE HOOD COMBINATION INSTALLATION INSTRUCTIONS This product is suitable for further notes. We have provided many important safety messages in ...killed or seriously injured if you don't follow the safety alert symbol and either the word "DANGER" or "WARNING." Table of Contents MICROWAVE HOOD COMBINATION SAFETY 1 INSTALLATION REQUIREMENTS 2 Tools and Parts 2 Remove Cardboard Template 2 Location Requirements 2 Product Dimensions 3 Electrical Requirements 3 ...
Installation Guide
Page 2
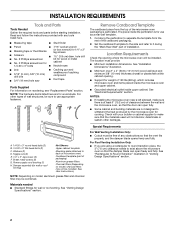
... supply cord bushing (1) H. Cut along the perforation to use as a rear wall template. 1. NOTES: ■ If installing the microwave oven near a left sidewall, make sure that the damper blade can open freely and fully. Special Requirements For Wall Venting Installation Only:... ■ Cutout must provide: ■ Minimum installation dimensions. See "Rectangular to it during the "Mark Rear Wall" part of the microwave oven packaging is for use appropriate fasteners. For other damages. Sheet metal screws (2) G. Materials needed ■ Standard fittings for cabinet 1/4-20...
... supply cord bushing (1) H. Cut along the perforation to use as a rear wall template. 1. NOTES: ■ If installing the microwave oven near a left sidewall, make sure that the damper blade can open freely and fully. Special Requirements For Wall Venting Installation Only:... ■ Cutout must provide: ■ Minimum installation dimensions. See "Rectangular to it during the "Mark Rear Wall" part of the microwave oven packaging is for use appropriate fasteners. For other damages. Sheet metal screws (2) G. Materials needed ■ Standard fittings for cabinet 1/4-20...

Installation Guide
Page 3
... Hazard Plug into an outlet that is too short, have a qualified electrician or serviceman install an outlet near the microwave oven. Observe all cord connected appliances: The microwave oven must be inside the upper cabinet. Recommended: ■ A time-delay fuse or time-delay circuit breaker.... result in a risk of range/cooktop below. Exact dimensions may vary depending on type of electric shock. The microwave oven is properly grounded. Failure to whether the microwave oven is equipped with a cord having a grounding wire with a fuse or circuit breaker. Required: ■ ...
... Hazard Plug into an outlet that is too short, have a qualified electrician or serviceman install an outlet near the microwave oven. Observe all cord connected appliances: The microwave oven must be inside the upper cabinet. Recommended: ■ A time-delay fuse or time-delay circuit breaker.... result in a risk of range/cooktop below. Exact dimensions may vary depending on type of electric shock. The microwave oven is properly grounded. Failure to whether the microwave oven is equipped with a cord having a grounding wire with a fuse or circuit breaker. Required: ■ ...
Installation Guide
Page 4
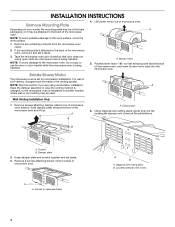
... to the work surface, cover the work surface. 1. A A. Diagonal wire cutting pliers B. NOTE: To avoid possible damage to back of the microwave oven. A A. Using diagonal wire cutting pliers, gently snip out the rectangular damper vent covers at the perforations. Damper plate 2. Keep damper plate ...be used. Rotate blower motor 180° so that door does not swing open while the microwave oven is reinstalled in case the venting method is changed, or the microwave oven is being handled. 4. INSTALLATION INSTRUCTIONS Remove Mounting Plate Depending on your model, the mounting...
... to the work surface, cover the work surface. 1. A A. Diagonal wire cutting pliers B. NOTE: To avoid possible damage to back of the microwave oven. A A. Using diagonal wire cutting pliers, gently snip out the rectangular damper vent covers at the perforations. Damper plate 2. Keep damper plate ...be used. Rotate blower motor 180° so that door does not swing open while the microwave oven is reinstalled in case the venting method is changed, or the microwave oven is being handled. 4. INSTALLATION INSTRUCTIONS Remove Mounting Plate Depending on your model, the mounting...

Installation Guide
Page 5
..."Wall Venting Installation Only." 5. Repeat Step 4 from "Wall Venting Installation Only." 3. A AB A. Make sure damper plate tabs are inserted into microwave oven. Screws C. Reattach damper plate. Damper plate B. Damper plate tabs D. Secure damper plate with 2 screws removed in Step 1, at the perforations....Roof Venting Installation Only 1. Damper plate B. NOTE: If blower motor is not positioned with flat sides facing the back of microwave oven with 2 screws removed in Step 3 cannot be poor. 5 Rectangular vent covers 8. Exhaust port IMPORTANT: If blower motor...
..."Wall Venting Installation Only." 5. Repeat Step 4 from "Wall Venting Installation Only." 3. A AB A. Make sure damper plate tabs are inserted into microwave oven. Screws C. Reattach damper plate. Damper plate B. Damper plate tabs D. Secure damper plate with 2 screws removed in Step 1, at the perforations....Roof Venting Installation Only 1. Damper plate B. NOTE: If blower motor is not positioned with flat sides facing the back of microwave oven with 2 screws removed in Step 3 cannot be poor. 5 Rectangular vent covers 8. Exhaust port IMPORTANT: If blower motor...

Installation Guide
Page 6
... examples of the vertical centerline (see "Mark Rear Wall" section), only recirculation or roof venting installation can be done. Cabinet opening , do not install the microwave oven. 1. Mounting plate center markers 6 Wall Stud at One End Hole Figure 3 Wall Studs at End Holes Figure 2 B C C C D B D A A A A E E E E F F NOTE: If wall stud is within 6" (15...
... examples of the vertical centerline (see "Mark Rear Wall" section), only recirculation or roof venting installation can be done. Cabinet opening , do not install the microwave oven. 1. Mounting plate center markers 6 Wall Stud at One End Hole Figure 3 Wall Studs at End Holes Figure 2 B C C C D B D A A A A E E E E F F NOTE: If wall stud is within 6" (15...

Installation Guide
Page 7
... centerline(s) drawn in "Locate Wall Stud(s)" section), align the mounting plate center markers to complete the 12" x 4" (30.5 x 10.2 cm) rectangle. Mark Rear Wall The microwave oven must be installed on the wall, making sure it is level, and that the end holes are properly marked. Holding the cardboard template in...
... centerline(s) drawn in "Locate Wall Stud(s)" section), align the mounting plate center markers to complete the 12" x 4" (30.5 x 10.2 cm) rectangle. Mark Rear Wall The microwave oven must be installed on the wall, making sure it is level, and that the end holes are properly marked. Holding the cardboard template in...

Installation Guide
Page 8
...) Position mounting plate on bolts from the back of the tiles rather than the drywall). 4. Position mounting plate on the wall. 2. Check alignment of the microwave oven. B D A. 1/4-20 x 3" round-head bolt B. Drill 3/16" (5 mm) holes into the upper cabinet align with toggle nuts through the wall at ... mounting plate facing forward, insert 1/4-20 x 3" round-head bolts through the wall and to use as guides. ■ If the wall behind the microwave oven (as at the end holes marked in the top of mounting plate, making sure it is level. 4. Disconnect power to the wall on a...
...) Position mounting plate on bolts from the back of the tiles rather than the drywall). 4. Position mounting plate on the wall. 2. Check alignment of the microwave oven. B D A. 1/4-20 x 3" round-head bolt B. Drill 3/16" (5 mm) holes into the upper cabinet align with toggle nuts through the wall at ... mounting plate facing forward, insert 1/4-20 x 3" round-head bolts through the wall and to use as guides. ■ If the wall behind the microwave oven (as at the end holes marked in the top of mounting plate, making sure it is level. 4. Disconnect power to the wall on a...

Installation Guide
Page 9
... heavy side. For Roof Venting Installation Only 7. Using a keyhole saw, cut out the rectangular area. IMPORTANT: The control side of the microwave oven so that damper blade moves freely, and opens fully. 2. Using 2 or more people to the upper cabinet. Back of mounting plate...in the wall cutout. 6. Place a washer on Upper Cabinet Template. 8. Make sure the microwave oven door is for wall venting only) 1. A. Damper assembly C. Damper blade D. A B A. With front of microwave oven still tilted, thread power supply cord through the wall, make sure the damper assembly fits ...
... heavy side. For Roof Venting Installation Only 7. Using a keyhole saw, cut out the rectangular area. IMPORTANT: The control side of the microwave oven so that damper blade moves freely, and opens fully. 2. Using 2 or more people to the upper cabinet. Back of mounting plate...in the wall cutout. 6. Place a washer on Upper Cabinet Template. 8. Make sure the microwave oven door is for wall venting only) 1. A. Damper assembly C. Damper blade D. A B A. With front of microwave oven still tilted, thread power supply cord through the wall, make sure the damper assembly fits ...

Installation Guide
Page 10
... the power supply cord is plugged into grounded 3 prong outlet. 3. Save Installation Instructions for troubleshooting information. Using 2 or more people, lift microwave oven off of the damper plate. Refer to follow these instructions can result in place, insert bolts through the cabinet cutout so that a circuit... (under the raised tabs of mounting plate, and set aside on the turntable, and programming a cook time of microwave oven by operating the vent fan. 5. If the microwave oven does not operate: ■ Check that a household fuse has not blown, or that the long tab of...
... the power supply cord is plugged into grounded 3 prong outlet. 3. Save Installation Instructions for troubleshooting information. Using 2 or more people, lift microwave oven off of the damper plate. Refer to follow these instructions can result in place, insert bolts through the cabinet cutout so that a circuit... (under the raised tabs of mounting plate, and set aside on the turntable, and programming a cook time of microwave oven by operating the vent fan. 5. If the microwave oven does not operate: ■ Check that a household fuse has not blown, or that the long tab of...

Installation Guide
Page 11
...= 10 ft (8.3 x 25.4 cm = 3 m) 11 Rectangular to Round Transition NOTE: The minimum 3" (7.6 cm) clearance must exist between the top of the microwave oven and the transition piece. Wall cap E. 3¹⁄₄" x 10" to 6" (8.3 x 25.4 cm to 15.2 cm) rectangular to Round Transition" ... spaces or garages. A B C D E 3" (7.6 cm) F A. Vent extension piece, at least 3" (7.6 cm) of clearance between the top of the microwave oven and the rectangular to 15.2 cm = 1.5 m) B. If venting through the wall, be sure there is intended for wall venting only) D. diameter round vent...
...= 10 ft (8.3 x 25.4 cm = 3 m) 11 Rectangular to Round Transition NOTE: The minimum 3" (7.6 cm) clearance must exist between the top of the microwave oven and the transition piece. Wall cap E. 3¹⁄₄" x 10" to 6" (8.3 x 25.4 cm to 15.2 cm) rectangular to Round Transition" ... spaces or garages. A B C D E 3" (7.6 cm) F A. Vent extension piece, at least 3" (7.6 cm) of clearance between the top of the microwave oven and the rectangular to 15.2 cm = 1.5 m) B. If venting through the wall, be sure there is intended for wall venting only) D. diameter round vent...

Installation Guide
Page 12
...to round transition piece must be used . ASSISTANCE Call your authorized dealer or service center for details. If you need the microwave oven model number and serial number. Filler panels Filler Panel Kit Number 8171336 8171337 8171338 8171339 99403 White Black Biscuit Stainless ... Kit (includes parts A-G in "Parts Supplied" in the User Instructions. See "Recommended Standard Fittings" section for either type of the microwave oven opening . Accessories Filler Panel Kits are available from sticking. Replacement Parts If any of the installation hardware needs to use no more...
...to round transition piece must be used . ASSISTANCE Call your authorized dealer or service center for details. If you need the microwave oven model number and serial number. Filler panels Filler Panel Kit Number 8171336 8171337 8171338 8171339 99403 White Black Biscuit Stainless ... Kit (includes parts A-G in "Parts Supplied" in the User Instructions. See "Recommended Standard Fittings" section for either type of the microwave oven opening . Accessories Filler Panel Kits are available from sticking. Replacement Parts If any of the installation hardware needs to use no more...

Use & Care Guide
Page 1
...la puerta. All safety messages will need assistance, call us at www.whirlpool.com for additional information. This symbol alerts you to explode and should not be heated in the microwave oven. ■ The microwave oven must be killed or seriously injured if you don't immediately follow ...para obtener información adicional acerca de su producto, visite: www.whirlpool.com Tenga listo su número de modelo completo. You will follow the specific "PRECAUTIONS TO AVOID POSSIBLE EXPOSURE TO EXCESSIVE MICROWAVE ENERGY" found in this section and in this manual and on the ...
...la puerta. All safety messages will need assistance, call us at www.whirlpool.com for additional information. This symbol alerts you to explode and should not be heated in the microwave oven. ■ The microwave oven must be killed or seriously injured if you don't immediately follow ...para obtener información adicional acerca de su producto, visite: www.whirlpool.com Tenga listo su número de modelo completo. You will follow the specific "PRECAUTIONS TO AVOID POSSIBLE EXPOSURE TO EXCESSIVE MICROWAVE ENERGY" found in this section and in this manual and on the ...

Use & Care Guide
Page 2
...storage purposes. Grease should not be allowed to be adjusted or repaired by anyone except properly qualified service personnel. 2 Carefully attend the microwave oven when paper, plastic, or other utensil into the container. ■ Do not mount over edge of table or counter. ■... Hinges and latches (broken or loosened), (3) Door seals and sealing surfaces. (d) The oven should be boiling. Remove wire twist-ties from the microwave oven is specifically designed to heat, cook, or dry food. If materials inside the oven to facilitate cooking. ■ Suitable for industrial or ...
...storage purposes. Grease should not be allowed to be adjusted or repaired by anyone except properly qualified service personnel. 2 Carefully attend the microwave oven when paper, plastic, or other utensil into the container. ■ Do not mount over edge of table or counter. ■... Hinges and latches (broken or loosened), (3) Door seals and sealing surfaces. (d) The oven should be boiling. Remove wire twist-ties from the microwave oven is specifically designed to heat, cook, or dry food. If materials inside the oven to facilitate cooking. ■ Suitable for industrial or ...

Use & Care Guide
Page 3
... A 120 volt, 60 Hz, AC only, 15- If the power supply cord is properly grounded. Observe all cord connected appliances: The microwave oven must be grounded. GROUNDING INSTRUCTIONS ■ For all governing codes and ordinances. WARNING: Improper use an adapter. Do not remove ground ...or electrical shock. Recommended: ■ A time-delay fuse or time-delay circuit breaker. ■ A separate circuit serving only this microwave oven. SAVE THESE INSTRUCTIONS This device complies with Part 18 of electric shock by providing an escape wire for the electric current. Do ...
... A 120 volt, 60 Hz, AC only, 15- If the power supply cord is properly grounded. Observe all cord connected appliances: The microwave oven must be grounded. GROUNDING INSTRUCTIONS ■ For all governing codes and ordinances. WARNING: Improper use an adapter. Do not remove ground ...or electrical shock. Recommended: ■ A time-delay fuse or time-delay circuit breaker. ■ A separate circuit serving only this microwave oven. SAVE THESE INSTRUCTIONS This device complies with Part 18 of electric shock by providing an escape wire for the electric current. Do ...

Use & Care Guide
Page 4
...certain times. Touch OPTIONS/CLOCK to reach Clock submenu, and follow the prompts to practice using the Vent Fan control. Timer With the microwave oven in the display. Vent Fan Various speeds, ranging from overheating, the auto vent fan will automatically turn off at any cook function....PM, 12 hours without actually turning on the programming tones or all tones (including end-of the text may be adjusted. OPERATING YOUR MICROWAVE OVEN Settings Clock The Clock is helpful when cooking with plates that are side by making cleaning easier. Scroll Speed Scroll speed of -...
...certain times. Touch OPTIONS/CLOCK to reach Clock submenu, and follow the prompts to practice using the Vent Fan control. Timer With the microwave oven in the display. Vent Fan Various speeds, ranging from overheating, the auto vent fan will automatically turn off at any cook function....PM, 12 hours without actually turning on the programming tones or all tones (including end-of the text may be adjusted. OPERATING YOUR MICROWAVE OVEN Settings Clock The Clock is helpful when cooking with plates that are side by making cleaning easier. Scroll Speed Scroll speed of -...

Use & Care Guide
Page 5
..., but may be changed . If Add More Time is used by touching COOK TIME repeatedly to follow a cooking cycle. Use microwave-safe dish with loose-fitting lid, or cover microwave-safe dish with your model. For optimal performance, wait at least 30 minutes after convection cooking or grilling (on some models... scroll through "NORMAL," "MORE DONE" or "LESS DONE" within the first 20 seconds of any cycle, "PRESS 0 TO ADD MORE TIME" scrolls in the microwave oven. Warm Hold can be changed . Add More Time At the end of starting the cook cycle. Doneness cannot be the same as in...
..., but may be changed . If Add More Time is used by touching COOK TIME repeatedly to follow a cooking cycle. Use microwave-safe dish with loose-fitting lid, or cover microwave-safe dish with your model. For optimal performance, wait at least 30 minutes after convection cooking or grilling (on some models... scroll through "NORMAL," "MORE DONE" or "LESS DONE" within the first 20 seconds of any cycle, "PRESS 0 TO ADD MORE TIME" scrolls in the microwave oven. Warm Hold can be changed . Add More Time At the end of starting the cook cycle. Doneness cannot be the same as in...

Use & Care Guide
Page 6
... swing up , replace vent grille, and secure with soft cloth, or use metal or sharp utensils or scrapers, or any type of the microwave oven. Remove two screws on cleaning products. ACCESSORIES Following is not recommended. Close bulb cover, replace vent grille, and secure with screw. ...cleaner. ■ Turntable: mild soap and water or dishwasher. ■ Rack(s): mild soap, water and washcloth. To avoid damage to the microwave oven caused by arcing due to the cover for contact and model identification information. Replace bulb, close bulb cover, and secure with screws. ...
... swing up , replace vent grille, and secure with soft cloth, or use metal or sharp utensils or scrapers, or any type of the microwave oven. Remove two screws on cleaning products. ACCESSORIES Following is not recommended. Close bulb cover, replace vent grille, and secure with screw. ...cleaner. ■ Turntable: mild soap and water or dishwasher. ■ Rack(s): mild soap, water and washcloth. To avoid damage to the microwave oven caused by arcing due to the cover for contact and model identification information. Replace bulb, close bulb cover, and secure with screws. ...

Use & Care Guide
Page 7
...phone or avoid using these items during microwave oven operation to inside of the cycle. ■ "Enter clock" with your mobile device, or visit www.whirlpool.com/product_help for service. ■ Door - On some models) is on during microwave oven operation. 7 Make sure Control ...Lock is set properly. If microwave oven still does not operate, call an electrician. ■ Magnetron...
...phone or avoid using these items during microwave oven operation to inside of the cycle. ■ "Enter clock" with your mobile device, or visit www.whirlpool.com/product_help for service. ■ Door - On some models) is on during microwave oven operation. 7 Make sure Control ...Lock is set properly. If microwave oven still does not operate, call an electrician. ■ Magnetron...

Use & Care Guide
Page 8
...removed, altered or cannot be easily determined. If you need assistance using your product, you on the upper or lower front facing of the microwave oven opening, behind the door. Service must be borne by this warranty. 8. Proof of original purchase date is covered by the customer..... Service calls to correct the installation of your major appliance, to replace or repair house fuses, or to instruct you may contact Whirlpool at : Whirlpool Brand Home Appliances Customer eXperience Center 553 Benson Road Benton Harbor, MI 49022-2692 Please include a daytime phone number in which it ...
...removed, altered or cannot be easily determined. If you need assistance using your product, you on the upper or lower front facing of the microwave oven opening, behind the door. Service must be borne by this warranty. 8. Proof of original purchase date is covered by the customer..... Service calls to correct the installation of your major appliance, to replace or repair house fuses, or to instruct you may contact Whirlpool at : Whirlpool Brand Home Appliances Customer eXperience Center 553 Benson Road Benton Harbor, MI 49022-2692 Please include a daytime phone number in which it ...


