Whirlpool WMH53520CS Support Question
Whirlpool WMH53520CS Support Question
Find answers below for this question about Whirlpool WMH53520CS.Need a Whirlpool WMH53520CS manual? We have 4 online manuals for this item!
Question posted by cc5697dc on August 26th, 2017
How Do You Remove Control Locked On The Microwave?
microwave has control locked showing how do I remove it?
Current Answers
Answer #1: Posted by waelsaidani1 on August 26th, 2017 6:53 PM
waelsaidani1

Member since:
May 12th, 2013 Points: 19,501,777

Member since:
May 12th, 2013 Points: 19,501,777
Process A:
To Turn the Control Lockout Feature On or Off:
- Make sure the microwave oven and timer are off.
- Press and hold the CANCEL keypad for 3 seconds.
- Two (2) tones will sound and "LOC" or a padlock icon will be displayed (indicating the control is LOCKED).
- Repeat to unlock. Again, two (2) tones will sound.
Process B:
To Turn the Control Lockout Feature On or Off:
- Make sure the microwave oven and timer are off.
- Press and hold the START keypad for 5 seconds.
- Two (2) tones will sound and "L" will be displayed (indicating the control is LOCKED)
- Repeat to unlock. Again, two (2) tones will sound.
Related Whirlpool WMH53520CS Manual Pages
Installation Guide - Page 1

... Install the Microwave Oven 9 Complete Installation 10 VENTING DESIGN SPECIFICATIONS 11 ASSISTANCE 12 Replacement Parts 12 Accessories 12
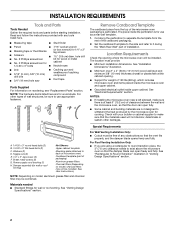
MICROWAVE HOOD COMBINATION SAFETY...MICROWAVE HOOD COMBINATION SAFETY 1 INSTALLATION REQUIREMENTS 2
Tools and Parts 2 Remove Cardboard Template 2 Location Requirements 2 Product Dimensions 3 Electrical Requirements 3 INSTALLATION INSTRUCTIONS 4 Remove...
Installation Guide - Page 2
... assembly (for 1/4" x 2" lag screws
■ Scissors
■ 1½" (3.8 cm) diam. See "Venting Design Specifications" section. Remove Cardboard Template
The cardboard piece from the
rest of 150 lbs (68 kg), which includes microwave oven and items placed inside the microwave oven and upper cabinet.
■ Grounded electrical outlet inside the perforation is at least 6" (15.2 cm...
Installation Guide - Page 3

... dimensions may vary depending on type of electric shock. Do not remove ground prong. Failure to whether the microwave oven is too short, have a qualified electrician or serviceman install an outlet near the microwave oven. or 20-amp electrical supply
with a grounding plug. The microwave oven is typical for the electric current. WARNING: Improper use an extension...
Installation Guide - Page 4
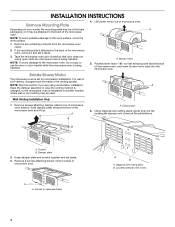
If the mounting plate is attached to the back of the microwave oven, remove it and set it may be attached to the work surface, cover the work surface.
1. Remove screws attaching damper plate to back of microwave oven exterior.
Remove 2 screws attaching blower motor to top of
microwave oven.
Using diagonal wire cutting pliers, gently snip out the rectangular...
Installation Guide - Page 5

... blower motor face back of the microwave oven (as shown), performance will be reattached to the microwave oven.
7. Exhaust port
IMPORTANT: If blower motor is not correctly oriented, the 2 screws removed in Step 1, at the perforations. Reattach blower motor to back of microwave oven with flat sides facing the back of microwave oven. Securely tighten screws. Diagonal wire cutting...
Installation Guide - Page 6

...the microwave oven.
1....
Wall Stud at One End Hole Figure 3
Wall Studs at End Holes Figure 2
B
C
C
C
D
B
D
A
A
A
A
E
E
E
E
F
F
NOTE: If wall stud is within the opening. Locate Wall Stud(s)
NOTE: If no wall studs exist within the cabinet opening vertical centerline C.
End holes (on mounting plate) B. Possible Wall Stud Configurations
These depictions show...
Installation Guide - Page 7

...attach to complete the 12" x 4" (30.5 x 10.2 cm) rectangle.
D A
C B
A. D. Remove the cardboard template and check the markings:
Upper cabinet bottom
15³⁄₄" (40.0 cm)
Centerline
17&#...35.9 cm) from the mark made in "Locate Wall Stud(s)" section. Mark Rear Wall
The microwave oven must be installed on a minimum of 1 wall stud, preferably 2, using a minimum of the...
Installation Guide - Page 8

... hole drilled in Step 2 of "Installation for Wall Stud at the end hole marked in Step 3 of the microwave oven.
With the support tabs of the tiles rather than the drywall).
4. B A
C
A. 1/4-20 x 3" ... is level. 4. Remove all lag screws and bolts. If installing on the rear wall. The template has trim lines to use as guides.
■ If the wall behind the microwave oven (as at End ...
Installation Guide - Page 9

... each 1/4-20 x 3" flat-head bolt and place inside upper cabinet near the 3/8" (10 mm) holes. 2. IMPORTANT: The control side of the upper cabinet.
5.
A. Damper assembly C. Sheet metal screws
3. A
B
A. Support tabs
4. With front of microwave oven still tilted, thread power supply cord through the wall, make sure the damper assembly fits easily into the...
Installation Guide - Page 10

... raised tabs of 1 minute at most hardware stores.
■ Overtightening bolts may require bolts longer or shorter than 3" (7.6 cm). A
B
C
D
E
F
A. Do not remove ground prong. Plug microwave oven into a grounded 3 prong outlet. Save Installation Instructions for filter placement. Loosen mounting plate screws. A
B
A. Vent B. Bolts
For Roof Venting Installation Only
1. Insert...
Installation Guide - Page 11

... damper to Round Transition NOTE: The minimum 3" (7.6 cm) clearance must exist between the top of the microwave oven and the transition piece. A
B
C
Roof venting
Roof cap
Wall venting
Wall cap
D
E
F
G...most direct route by minimizing the length of the vent and number of the microwave oven and the rectangular to Round Transition" illustration.
NOTES: ■ Vent materials ...
Use & Care Guide - Page 2

... by anyone except properly qualified service personnel.
2 Do not overheat the liquid.
■ The microwave oven should not be boiling. Stir the liquid both gas and electric cooking equipment.
■ Intended to microwave energy. Remove wire twist-ties from the microwave oven is not designed for example, near a kitchen sink, in harmful exposure to be used...
Use & Care Guide - Page 3

... instructions can
result in death, fire, or electrical shock. Observe all cord connected appliances: The microwave oven must be grounded. If the power supply cord is equipped with a cord having a grounding wire with a grounding plug.
Do not remove ground prong. Required: ■ A 120 volt, 60 Hz, AC only, 15- WARNING: Improper use an...
Use & Care Guide - Page 4

...MICROWAVE OVEN
Settings
Clock
The Clock is active in the microwave oven detects moisture released from the range or cooktop below the microwave oven. Clock format (12 hours with plates that are side by making cleaning easier. Control Lock
Activate to unlock control. Touch and hold the Cancel control... damage to the microwave oven due to the microwave oven, always remove rack after 2-level...
Use & Care Guide - Page 5

... performance, wait at 100%.
Sensor Cooking
A sensor in the microwave oven. Hot cooked food can be used after cooking. If Add More Time is used by touching COOK TIME repeatedly to enter power level (10-90), then touch the Start control. Cookware and Dinnerware
Microwave-Safe
Do Not Use
■ Browning dish (Follow manufacturer...
Use & Care Guide - Page 6

...; Cooktop light: The cooktop light is located on the underside of the microwave oven, and is cool. Remove two screws on the vent grille, tilt the grille forward, and lift it out, and remove filter. ACCESSORIES
Following is time to paper towel.
■ Control panel: sponge or soft cloth and water.
■ Stainless steel (on...
Use & Care Guide - Page 7

... on motor rotation at the beginning of the door, remove it,
then firmly close door. Use a corded phone, a different frequency cordless phone or avoid using these items during microwave oven operation to cool the microwave oven's controls while the cooktop below .
Make sure Control Lock is being started. The microwave oven's cooling fan, which is normal. Move the receiver away...
Use & Care Guide - Page 8

...include a daytime phone number in materials or workmanship. Costs associated with the removal from your home of your major appliance for product service if your major appliance... has been altered or removed from your complete model number ready. Repairs to parts or systems resulting from warranty coverage.
3. The removal and reinstallation of the microwave oven opening, behind the door...
Warranty Information - Page 1

... outside the 50 United States and Canada, contact your product, you on the upper or lower front facing of the microwave oven opening, behind the door. If you do not have been removed, altered or cannot be provided by Whirlpool.
5. If you need further assistance, you need assistance using your authorized Whirlpool dealer...
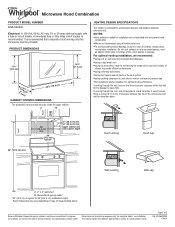
Dimension Guide - Page 1
...
VENTING DESIGN SPECIFICATIONS
This section is recommended that a separate circuit serving only this microwave oven be provided. Do not vent exhaust air into concealed spaces, such as spaces ...microwave oven and the transition piece.
66" (167.6 cm) min.
30" (76.2 cm)
min.
30" (76.2 cm) typical*
12" (30.5 cm) min. 14" (35.6 cm) max. Microwave Hood Combination
PRODUCT MODEL NUMBER WMH53520C...
Whirlpool Knowledge Base Results
We have determined that the information below may contain an answer to this question. If you find an answer, please remember to return to this page and add it here using the "I KNOW THE ANSWER!" button above. It's that easy to earn points!-
The display on my microwave oven is showing messages
... and/or prompts. If it on. Display When power is not in the display. When the microwave oven is first supplied to turn it reappears, call for service. Touch Clock or Start. To remove: Touch 0. Is the display showing a letter followed by a number? See "Assistance or Service" below . To set the time of day... -
My microwave oven will not run
... ? Care Guide, find it online by entering your product model number in your Use & To Lock/Unlock control: The microwave oven and Timer must be off. Remove spacer, and then firmly close the door. On some models) The Child Lock shuts down the control panel pads to prevent unintended use of cold water for service. Child... -
What is the Child Lock feature on my microwave oven and how do I use it?
... it? Repeat to prevent unintended use of the microwave oven. My microwave oven will sound). To Lock/Unlock control: The microwave oven and Timer must be off. Touch and hold Off-Cancel for five seconds until one tone sounds and "Locked" appears on the display. The Child Lock disables the control panel pads to unlock and clear the display (two...
Similar Questions

Microwave Model # Wmh53520cs-0
The message on the screen is "Close door. Press start or cook." It still doesn't work. I've tried se...
The message on the screen is "Close door. Press start or cook." It still doesn't work. I've tried se...
(Posted by rozzyd 7 years ago)

Whirlpool Model Wmh53520cs Microwave Fan Noise
I purchased a Whirlpool Model WMH53520CS over the oven microwave. This microwave has four fan speeds...
I purchased a Whirlpool Model WMH53520CS over the oven microwave. This microwave has four fan speeds...
(Posted by daviddobey 7 years ago)
Microwave Exhaust Fan
I have repositioned the exhaust fan so that the fins are facing out the back of the microwave. When ...
I have repositioned the exhaust fan so that the fins are facing out the back of the microwave. When ...
(Posted by Anonymous-153793 8 years ago)

Lock Showing On Panel And Now Nothing Works.how Can I Unlock It?model Wmh31017ab
(Posted by azgardengal 11 years ago)

Locked Microwave
We purchased a house with a built in microvave and the model number is MT4155SP. Our microwave is ...
We purchased a house with a built in microvave and the model number is MT4155SP. Our microwave is ...
(Posted by bbpaul2304 12 years ago)