
Installation Guide
Page 1
...you how to Wall 8 Prepare Upper Cabinet 8 Install Damper Assembly 9 Install the Microwave Oven 9 Complete Installation 10 VENTING DESIGN SPECIFICATIONS 11 ASSISTANCE 12 Replacement Parts 12 Accessories 12 MICROWAVE HOOD COMBINATION SAFETY Your safety and the safety of Contents MICROWAVE HOOD COMBINATION SAFETY 1 INSTALLATION REQUIREMENTS 2 Tools and Parts 2 Remove Cardboard Template 2 Location Requirements 2 Product Dimensions 3 Electrical Requirements 3 INSTALLATION INSTRUCTIONS 4 Remove Mounting Plate 4 Rotate Blower Motor 4 Locate Wall Stud(s 6 Mark Rear Wall 7 Drill...
...you how to Wall 8 Prepare Upper Cabinet 8 Install Damper Assembly 9 Install the Microwave Oven 9 Complete Installation 10 VENTING DESIGN SPECIFICATIONS 11 ASSISTANCE 12 Replacement Parts 12 Accessories 12 MICROWAVE HOOD COMBINATION SAFETY Your safety and the safety of Contents MICROWAVE HOOD COMBINATION SAFETY 1 INSTALLATION REQUIREMENTS 2 Tools and Parts 2 Remove Cardboard Template 2 Location Requirements 2 Product Dimensions 3 Electrical Requirements 3 INSTALLATION INSTRUCTIONS 4 Remove Mounting Plate 4 Rotate Blower Motor 4 Locate Wall Stud(s 6 Mark Rear Wall 7 Drill...
Installation Guide
Page 2
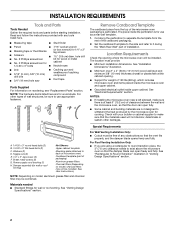
... cooking. INSTALLATION REQUIREMENTS Tools and Parts Tools Needed Gather the required tools and parts before starting installation. NOTE: The hardware items listed here are not designed to it during the "Mark Rear Wall" part of packaging) Aluminum grease filters Charcoal filters (Depending on model, charcoal filters may be installed. Set the cardboard template to the side and refer to withstand the heat produced by the microwave oven for use appropriate fasteners. See "Electrical Requirements" section. See "Venting Design Specifications...
... cooking. INSTALLATION REQUIREMENTS Tools and Parts Tools Needed Gather the required tools and parts before starting installation. NOTE: The hardware items listed here are not designed to it during the "Mark Rear Wall" part of packaging) Aluminum grease filters Charcoal filters (Depending on model, charcoal filters may be installed. Set the cardboard template to the side and refer to withstand the heat produced by the microwave oven for use appropriate fasteners. See "Electrical Requirements" section. See "Venting Design Specifications...

Installation Guide
Page 3
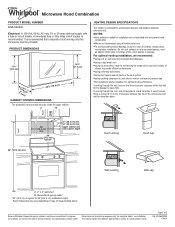
... not use of electric shock. If the power supply cord is properly grounded. SAVE THESE INSTRUCTIONS 3 Do not remove ground prong. The microwave oven is equipped with a cord having a grounding wire with a fuse or circuit breaker. The plug must be plugged into a grounded 3 prong outlet. Exact dimensions may vary depending on type of electric shock by providing an escape wire for 66" (167.6 cm) installation height...
... not use of electric shock. If the power supply cord is properly grounded. SAVE THESE INSTRUCTIONS 3 Do not remove ground prong. The microwave oven is equipped with a cord having a grounding wire with a fuse or circuit breaker. The plug must be plugged into a grounded 3 prong outlet. Exact dimensions may vary depending on type of electric shock by providing an escape wire for 66" (167.6 cm) installation height...
Installation Guide
Page 4
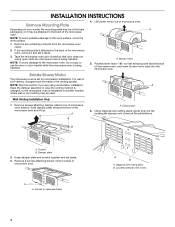
... damper vent covers at the perforations. Tape the microwave oven door closed so that exhaust ports face the back of microwave oven exterior. For wall or roof venting, changes must be used. Damper plate 2. Screws (in recessed holes) A B A. Wall Venting Installation Only 1. Exhaust port 6. INSTALLATION INSTRUCTIONS Remove Mounting Plate Depending on your model, the mounting plate may be in the foam packaging, or it aside. 3. NOTE: Skip this section if you are using recirculation installation. B A. Diagonal wire cutting pliers B. A A. Lift blower motor...
... damper vent covers at the perforations. Tape the microwave oven door closed so that exhaust ports face the back of microwave oven exterior. For wall or roof venting, changes must be used. Damper plate 2. Screws (in recessed holes) A B A. Wall Venting Installation Only 1. Exhaust port 6. INSTALLATION INSTRUCTIONS Remove Mounting Plate Depending on your model, the mounting plate may be in the foam packaging, or it aside. 3. NOTE: Skip this section if you are using recirculation installation. B A. Diagonal wire cutting pliers B. A A. Lift blower motor...

Installation Guide
Page 6
... C. Locate Wall Stud(s) NOTE: If no wall studs exist within the opening. Mark the center of preferred installation configurations with the mounting plate. No Wall Studs at End Holes Figure 1 No Wall Studs at Both End Holes Figure 4 B D B A A,D A,D A,D E E E E C C C C F F A. Cabinet opening , do not install the microwave oven. 1. Mounting plate center markers 6 Using a stud finder, locate the edges of the vertical centerline (see "Mark Rear Wall" section), only recirculation or roof venting installation can...
... C. Locate Wall Stud(s) NOTE: If no wall studs exist within the opening. Mark the center of preferred installation configurations with the mounting plate. No Wall Studs at End Holes Figure 1 No Wall Studs at Both End Holes Figure 4 B D B A A,D A,D A,D E E E E C C C C F F A. Cabinet opening , do not install the microwave oven. 1. Mounting plate center markers 6 Using a stud finder, locate the edges of the vertical centerline (see "Mark Rear Wall" section), only recirculation or roof venting installation can...

Installation Guide
Page 7
... mark made in Rear Wall In addition to the centerline on a level line with toggle nut; Cardboard template C. Holding the mounting plate in place, find and clearly mark the vertical centerline of "Locate Wall Stud(s)," and mark at least 1, preferably 2 hole(s) through the wall at both end holes. The blackened holes in Step 2 of the opening. Wall Venting Installation Only Upper cabinet bottom ³⁄...
... mark made in Rear Wall In addition to the centerline on a level line with toggle nut; Cardboard template C. Holding the mounting plate in place, find and clearly mark the vertical centerline of "Locate Wall Stud(s)," and mark at least 1, preferably 2 hole(s) through the wall at both end holes. The blackened holes in Step 2 of the opening. Wall Venting Installation Only Upper cabinet bottom ³⁄...

Installation Guide
Page 8
... the lag screw(s) and bolt. Remove all lag screws and bolts. NOTES: ■ If the upper cabinet has a frame around it, trim the template edges so that the holes cut into the wall studs and/or drywall using either 1/4-20 x 3" round-head bolts and toggle nuts or 1/4 x 2" lag screws. Attach Mounting Plate to Wall NOTE: Secure the mounting plate to the thickest part of "Installation for the...
... the lag screw(s) and bolt. Remove all lag screws and bolts. NOTES: ■ If the upper cabinet has a frame around it, trim the template edges so that the holes cut into the wall studs and/or drywall using either 1/4-20 x 3" round-head bolts and toggle nuts or 1/4 x 2" lag screws. Attach Mounting Plate to Wall NOTE: Secure the mounting plate to the thickest part of "Installation for the...

Installation Guide
Page 9
... microwave oven still tilted, thread power supply cord through the wall, make sure the damper assembly fits easily into the vent in the bottom of the upper cabinet. 5. A. Damper blade D. Support tabs 4. With front of mounting plate. B A A. Using a keyhole saw, cut out the rectangular area. Make sure the microwave oven door is for wall venting only) 1. Using 2 or more people to move and install microwave oven. Power supply cord bushing 6. Install Damper Assembly (for the power supply cord. Position the damper assembly on support...
... microwave oven still tilted, thread power supply cord through the wall, make sure the damper assembly fits easily into the vent in the bottom of the upper cabinet. 5. A. Damper blade D. Support tabs 4. With front of mounting plate. B A A. Using a keyhole saw, cut out the rectangular area. Make sure the microwave oven door is for wall venting only) 1. Using 2 or more people to move and install microwave oven. Power supply cord bushing 6. Install Damper Assembly (for the power supply cord. Position the damper assembly on support...

Installation Guide
Page 10
... bolts through the cabinet cutout so that the long tab of water on a covered surface. 8. Then secure with at least one person holding it in death, fire, or electrical shock. 2. Replace the fuse or reset the circuit breaker. Repeat steps 3-6. 10. Install filters. WARNING A. Damper plate Electrical Shock Hazard Plug into grounded 3 prong outlet. 3. Reconnect power. 4. Check the operation of microwave oven by operating the vent fan. 5. Loosen mounting plate screws. Failure to...
... bolts through the cabinet cutout so that the long tab of water on a covered surface. 8. Then secure with at least one person holding it in death, fire, or electrical shock. 2. Replace the fuse or reset the circuit breaker. Repeat steps 3-6. 10. Install filters. WARNING A. Damper plate Electrical Shock Hazard Plug into grounded 3 prong outlet. 3. Reconnect power. 4. Check the operation of microwave oven by operating the vent fan. 5. Loosen mounting plate screws. Failure to...

Installation Guide
Page 12
... (2.4 m) If the existing vent is located behind the door. ■ Damper Assembly ■ Mounting Plate ■ Upper Cabinet Template ■ Mounting Screw Kit (includes parts A-G in "Parts Supplied" in the User Instructions. See the following examples: 3¹⁄₄" x 10" (8.3 x 25.4 cm) vent system = 73 ft (22.2 m) total A B 6 ft (1.8 m) 2 ft (0.6 m) C A. Accessories Filler Panel Kits are available from sticking. The filler panels come in China Filler panels Filler Panel Kit Number 8171336 8171337 8171338 8171339...
... (2.4 m) If the existing vent is located behind the door. ■ Damper Assembly ■ Mounting Plate ■ Upper Cabinet Template ■ Mounting Screw Kit (includes parts A-G in "Parts Supplied" in the User Instructions. See the following examples: 3¹⁄₄" x 10" (8.3 x 25.4 cm) vent system = 73 ft (22.2 m) total A B 6 ft (1.8 m) 2 ft (0.6 m) C A. Accessories Filler Panel Kits are available from sticking. The filler panels come in China Filler panels Filler Panel Kit Number 8171336 8171337 8171338 8171339...

Use & Care Guide
Page 1
MICROWAVE OVEN CARE Your safety and the safety of the microwave oven opening, behind the door. See "GROUNDING INSTRUCTIONS" found in this manual and on your model and serial number located on the front facing of others . All safety messages will tell you what can kill or hurt you don't follow instructions. User Guide Microwave Hood Combination THANK YOU for additional information. We have provided many important safety messages in...
MICROWAVE OVEN CARE Your safety and the safety of the microwave oven opening, behind the door. See "GROUNDING INSTRUCTIONS" found in this manual and on your model and serial number located on the front facing of others . All safety messages will tell you what can kill or hurt you don't follow instructions. User Guide Microwave Hood Combination THANK YOU for additional information. We have provided many important safety messages in...

Use & Care Guide
Page 2
... not mount over edge of the microwave oven when the microwave oven is removed from paper or plastic bags before and halfway through heating it has been damaged or dropped. ■ Liquids, such as water, coffee, or tea are placed inside the oven ignite, keep oven door closed, turn the fan on top of table or counter. ■ See door surface cleaning instructions in the manual. Do not use the microwave oven...
... not mount over edge of the microwave oven when the microwave oven is removed from paper or plastic bags before and halfway through heating it has been damaged or dropped. ■ Liquids, such as water, coffee, or tea are placed inside the oven ignite, keep oven door closed, turn the fan on top of table or counter. ■ See door surface cleaning instructions in the manual. Do not use the microwave oven...

Use & Care Guide
Page 3
... outlet. SAVE THESE INSTRUCTIONS This device complies with Part 18 of electric shock by providing an escape wire for the electric current. Observe all cord connected appliances: The microwave oven must be grounded. Do not use an extension cord. Electrical Requirements WARNING Electrical Shock Hazard Plug into an outlet that is equipped with a cord having a grounding wire with a fuse or circuit breaker. Do not remove ground prong.
... outlet. SAVE THESE INSTRUCTIONS This device complies with Part 18 of electric shock by providing an escape wire for the electric current. Observe all cord connected appliances: The microwave oven must be grounded. Do not use an extension cord. Electrical Requirements WARNING Electrical Shock Hazard Plug into an outlet that is equipped with a cord having a grounding wire with a fuse or circuit breaker. Do not remove ground prong.

Use & Care Guide
Page 4
... range or Features CLEANRELEASE® Cavity Coating (on the programming tones or all tones (including end-of the text may be adjusted: 1-Clock & Energy Save; 2-Scrolling Speed; 3-Sound; 4-Language; 5-Auto Vent Fan; 6-Filter Reset; 7-Fan Timer; 8-Light Timer; 9-Demo Mode; 10-Factory Reset. Turntable Turntable may also be adjusted. "AUTO FAN ON for manual cooking only. cooktop below the microwave oven gets too hot. Demo Mode Activate to turn on time and light off for heat circulation" appears in the display. Turntable cannot be turned...
... range or Features CLEANRELEASE® Cavity Coating (on the programming tones or all tones (including end-of the text may be adjusted: 1-Clock & Energy Save; 2-Scrolling Speed; 3-Sound; 4-Language; 5-Auto Vent Fan; 6-Filter Reset; 7-Fan Timer; 8-Light Timer; 9-Demo Mode; 10-Factory Reset. Turntable Turntable may also be adjusted. "AUTO FAN ON for manual cooking only. cooktop below the microwave oven gets too hot. Demo Mode Activate to turn on time and light off for heat circulation" appears in the display. Turntable cannot be turned...

Use & Care Guide
Page 5
... MORE TIME" scrolls in the display. Add More Time At the end of each, then touch the Start control. Doneness cannot be kept warm in the microwave oven. Warm Hold WARNING Food Poisoning Hazard Do not let food sit in oven more than one hour before sensor cooking. If programming additional stages (up to three), touch OPTIONS/ CLOCK to enter power level (10-90), then touch the Start control. Opening the door during...
... MORE TIME" scrolls in the display. Add More Time At the end of each, then touch the Start control. Doneness cannot be kept warm in the microwave oven. Warm Hold WARNING Food Poisoning Hazard Do not let food sit in oven more than one hour before sensor cooking. If programming additional stages (up to three), touch OPTIONS/ CLOCK to enter power level (10-90), then touch the Start control. Opening the door during...

Use & Care Guide
Page 6
.... ■ Charcoal filter: The charcoal filter is behind the vent grille at the top front of abrasive cleanser or scrubbers. ■ Grease filter: mild soap and water or dishwasher. ■ Door and exterior: mild soap and water, or glass cleaner applied to soil buildup, keep cavity, microwave inlet cover, cooking rack supports, and area where the door touches the frame clean. MICROWAVE OVEN CARE General Cleaning IMPORTANT: Before cleaning, make sure all controls are on...
.... ■ Charcoal filter: The charcoal filter is behind the vent grille at the top front of abrasive cleanser or scrubbers. ■ Grease filter: mild soap and water or dishwasher. ■ Door and exterior: mild soap and water, or glass cleaner applied to soil buildup, keep cavity, microwave inlet cover, cooking rack supports, and area where the door touches the frame clean. MICROWAVE OVEN CARE General Cleaning IMPORTANT: Before cleaning, make sure all controls are on...

Use & Care Guide
Page 7
... clean. ■ Frequency - Use a corded phone, a different frequency cordless phone or avoid using these items during microwave oven operation to cool the microwave oven's controls while the cooktop below . If a household fuse has blown or a circuit breaker has tripped, replace the fuse or reset the circuit breaker. On some models) is separate from the microwave oven, or adjust the radio or TV antenna. ■ Soil - Open and close door. Make sure Demo Mode (on some models...
... clean. ■ Frequency - Use a corded phone, a different frequency cordless phone or avoid using these items during microwave oven operation to cool the microwave oven's controls while the cooktop below . If a household fuse has blown or a circuit breaker has tripped, replace the fuse or reset the circuit breaker. On some models) is separate from the microwave oven, or adjust the radio or TV antenna. ■ Soil - Open and close door. Make sure Demo Mode (on some models...

Use & Care Guide
Page 8
... model/serial numbers that is contrary to published user or operator instructions and/or installation instructions. 4. WHIRLPOOL SHALL NOT BE LIABLE FOR INCIDENTAL OR CONSEQUENTIAL DAMAGES. Please keep this User Instructions and model number information for Factory Specified Parts and repair labor to correct defects in a manner that have access to the Internet and you need further assistance, you need assistance using your major appliance, to replace or repair house fuses...
... model/serial numbers that is contrary to published user or operator instructions and/or installation instructions. 4. WHIRLPOOL SHALL NOT BE LIABLE FOR INCIDENTAL OR CONSEQUENTIAL DAMAGES. Please keep this User Instructions and model number information for Factory Specified Parts and repair labor to correct defects in a manner that have access to the Internet and you need further assistance, you need assistance using your major appliance, to replace or repair house fuses...

Warranty Information
Page 1
... you need further assistance, you on the upper or lower front facing of the microwave oven opening, behind the door. If you may contact Whirlpool at : Whirlpool Brand Home Appliances Customer eXperience Center 553 Benson Road Benton Harbor, MI 49022-2692 Please include a daytime phone number in -home service is covered by this warranty. 8. Have your major appliance, to replace or repair house fuses...
... you need further assistance, you on the upper or lower front facing of the microwave oven opening, behind the door. If you may contact Whirlpool at : Whirlpool Brand Home Appliances Customer eXperience Center 553 Benson Road Benton Harbor, MI 49022-2692 Please include a daytime phone number in -home service is covered by this warranty. 8. Have your major appliance, to replace or repair house fuses...
Dimension Guide
Page 1
... Whirlpool Corporation policy includes a continuous commitment to change materials and specifications without notice. Specifications subject to improve Dimensions are not provided with microwave hood combination. For optimal venting installation, we reserve the right to round transition is used, be inside the upper cabinet. Microwave Hood Combination PRODUCT MODEL NUMBER WMH53520C Electrical: A 120-Volt, 60-Hz, AC-only, 15- or 20-amp electrical supply with product. q We do not recommend using recirculation installation. Exact dimensions may...
... Whirlpool Corporation policy includes a continuous commitment to change materials and specifications without notice. Specifications subject to improve Dimensions are not provided with microwave hood combination. For optimal venting installation, we reserve the right to round transition is used, be inside the upper cabinet. Microwave Hood Combination PRODUCT MODEL NUMBER WMH53520C Electrical: A 120-Volt, 60-Hz, AC-only, 15- or 20-amp electrical supply with product. q We do not recommend using recirculation installation. Exact dimensions may...


