Installation Guide
Page 1
... or "WARNING." The appearance of Contents / Table des matières MICROWAVE HOOD COMBINATION SAFETY 1 INSTALLATION REQUIREMENTS 2 Tools and Parts 2 Remove Cardboard Template 2 Location Requirements 2 Product Dimensions 3 Electrical Requirements 3 INSTALLATION INSTRUCTIONS 4 Remove Mounting Plate 4 Rotate Blower Motor...8 Install Damper Assembly 8 Install the Microwave Oven 9 Complete Installation 10 VENTING DESIGN SPECIFICATIONS 11 ASSISTANCE 12 Replacement Parts 12 Accessories 12 SÉCURITÉ DE L'ENSEMBLE FOUR À MICRO-ONDES/HOTTE..... 13 EXIGENCES D'INSTALLATION...
... or "WARNING." The appearance of Contents / Table des matières MICROWAVE HOOD COMBINATION SAFETY 1 INSTALLATION REQUIREMENTS 2 Tools and Parts 2 Remove Cardboard Template 2 Location Requirements 2 Product Dimensions 3 Electrical Requirements 3 INSTALLATION INSTRUCTIONS 4 Remove Mounting Plate 4 Rotate Blower Motor...8 Install Damper Assembly 8 Install the Microwave Oven 9 Complete Installation 10 VENTING DESIGN SPECIFICATIONS 11 ASSISTANCE 12 Replacement Parts 12 Accessories 12 SÉCURITÉ DE L'ENSEMBLE FOUR À MICRO-ONDES/HOTTE..... 13 EXIGENCES D'INSTALLATION...

Installation Guide
Page 2
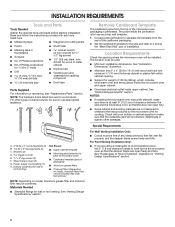
...Only: ■■ Cutout must provide: ■■ Minimum installation dimensions. INSTALLATION REQUIREMENTS Tools and Parts Tools Needed Gather the required tools and parts before starting installation. Read and follow the instructions provided with your builder or cabinet supplier to withstand the... ■■ Caulking gun and weatherproof caulking compound ■■ C\v" (19 mm) hole saw ■■ Duct tape Parts Supplied For information on model, charcoal filters may be included. The piece inside upper cabinet. Cut along the perforation to exist above...
...Only: ■■ Cutout must provide: ■■ Minimum installation dimensions. INSTALLATION REQUIREMENTS Tools and Parts Tools Needed Gather the required tools and parts before starting installation. Read and follow the instructions provided with your builder or cabinet supplier to withstand the... ■■ Caulking gun and weatherproof caulking compound ■■ C\v" (19 mm) hole saw ■■ Duct tape Parts Supplied For information on model, charcoal filters may be included. The piece inside upper cabinet. Cut along the perforation to exist above...
Installation Guide
Page 8
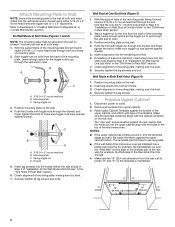
... the supply cord hole as installed) has a partial wall covering (for two Z\v-20 x 3" bolts and washers used to secure the microwave oven to the thickest part of the rear wall (for example, the thickness of the shaded rectangular area "F" on the template. Make sure the 10" (25.4 cm) dimension from the...
... the supply cord hole as installed) has a partial wall covering (for two Z\v-20 x 3" bolts and washers used to secure the microwave oven to the thickest part of the rear wall (for example, the thickness of the shaded rectangular area "F" on the template. Make sure the 10" (25.4 cm) dimension from the...

Installation Guide
Page 12
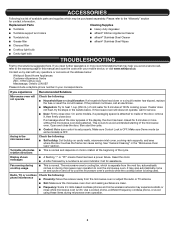
...your authorized dealer or service center for equivalent lengths. Accessories Filler Panel Kits are available from sticking. Replacement Parts If any of the installation hardware needs to be replaced, call us at our toll free number or visit... behind the door. ■■ Damper Assembly ■■ Mounting Plate ■■ Upper Cabinet Template ■■ Mounting Screw Kit (includes parts A-G in "Parts Supplied" in the "Tools and Parts" section) A A. See the following examples: 3¹⁄₄" x 10" (8.3 x 25.4 cm) vent system = 73 ft (22.2 m) total A ...
...your authorized dealer or service center for equivalent lengths. Accessories Filler Panel Kits are available from sticking. Replacement Parts If any of the installation hardware needs to be replaced, call us at our toll free number or visit... behind the door. ■■ Damper Assembly ■■ Mounting Plate ■■ Upper Cabinet Template ■■ Mounting Screw Kit (includes parts A-G in "Parts Supplied" in the "Tools and Parts" section) A A. See the following examples: 3¹⁄₄" x 10" (8.3 x 25.4 cm) vent system = 73 ft (22.2 m) total A ...
Installation Guide
Page 1
... (91.4 cm) wide. The appearance of your appliance. Table of Contents MICROWAVE HOOD COMBINATION SAFETY 1 INSTALLATION REQUIREMENTS 2 Tools and Parts 2 Remove Cardboard Template 2 Location Requirements 2 Product Dimensions 3 Electrical Requirements 3 INSTALLATION INSTRUCTIONS 4 Remove Mounting Plate 4 Rotate Blower Motor... Damper Assembly 9 Install the Microwave Oven 9 Complete Installation 10 VENTING DESIGN SPECIFICATIONS 11 ASSISTANCE 12 Replacement Parts 12 Accessories 12 MICROWAVE HOOD COMBINATION SAFETY Your safety and the safety of others . All safety messages ...
... (91.4 cm) wide. The appearance of your appliance. Table of Contents MICROWAVE HOOD COMBINATION SAFETY 1 INSTALLATION REQUIREMENTS 2 Tools and Parts 2 Remove Cardboard Template 2 Location Requirements 2 Product Dimensions 3 Electrical Requirements 3 INSTALLATION INSTRUCTIONS 4 Remove Mounting Plate 4 Rotate Blower Motor... Damper Assembly 9 Install the Microwave Oven 9 Complete Installation 10 VENTING DESIGN SPECIFICATIONS 11 ASSISTANCE 12 Replacement Parts 12 Accessories 12 MICROWAVE HOOD COMBINATION SAFETY Your safety and the safety of others . All safety messages ...
Installation Guide
Page 2
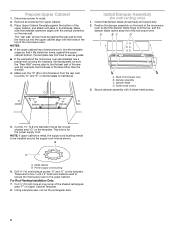
...the door can open fully. ■■ Some cabinet and building materials are not designed to it during the "Mark Rear Wall" part of the microwave oven packaging is perforated. See "Rectangular to separate the template from the top of installation. C\zn" toggle nuts ... here are using a rectangular to round transition piece, the 3" (7.6 cm) clearance needs to back of microwave oven) ■■ Cardboard template (part of wall structures, be combined. Sheet metal screws (2) G. Power supply cord bushing (1) H. Damper assembly (for wood or metal cabinet ■■...
...the door can open fully. ■■ Some cabinet and building materials are not designed to it during the "Mark Rear Wall" part of the microwave oven packaging is perforated. See "Rectangular to separate the template from the top of installation. C\zn" toggle nuts ... here are using a rectangular to round transition piece, the 3" (7.6 cm) clearance needs to back of microwave oven) ■■ Cardboard template (part of wall structures, be combined. Sheet metal screws (2) G. Power supply cord bushing (1) H. Damper assembly (for wood or metal cabinet ■■...
Installation Guide
Page 8
... B. Mounting plate C. With the support tabs of the mounting plate facing forward, insert a 3/16-24 x 3" round-head bolt through the wall and to the thickest part of the rear wall (for the toggle nut to go through both end holes drilled into the upper cabinet align with the holes in the...
... B. Mounting plate C. With the support tabs of the mounting plate facing forward, insert a 3/16-24 x 3" round-head bolt through the wall and to the thickest part of the rear wall (for the toggle nut to go through both end holes drilled into the upper cabinet align with the holes in the...

Installation Guide
Page 12
...;■ Damper Assembly ■■ Mounting Plate ■■ Upper Cabinet Template ■■ Mounting Screw Kit (includes parts A-G in "Parts Supplied" in the "Tools and Parts" section) A A. In addition, a rectangular 3" (7.6 cm) extension vent between the damper assembly and rectangular to round ...See "Recommended Standard Fittings" section for details. When you will need the microwave oven model number and serial number. Replacement Parts If any of the microwave oven opening . The total length of the vent system including straight vent, elbow(s), transitions and...
...;■ Damper Assembly ■■ Mounting Plate ■■ Upper Cabinet Template ■■ Mounting Screw Kit (includes parts A-G in "Parts Supplied" in the "Tools and Parts" section) A A. In addition, a rectangular 3" (7.6 cm) extension vent between the damper assembly and rectangular to round ...See "Recommended Standard Fittings" section for details. When you will need the microwave oven model number and serial number. Replacement Parts If any of the microwave oven opening . The total length of the vent system including straight vent, elbow(s), transitions and...
Use & Care Guide
Page 3
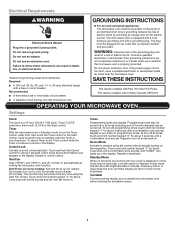
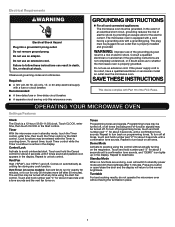
... or the Start control. Programming tones may be grounded. Required: ■■ A 120-volt, 60 Hz, AC-only, 15- or 20-amp electrical supply with Part 18 of the grounding plug can result in a risk of electric shock. Consult a qualified electrician or serviceman if the grounding instructions are working (12-hour...
... or the Start control. Programming tones may be grounded. Required: ■■ A 120-volt, 60 Hz, AC-only, 15- or 20-amp electrical supply with Part 18 of the grounding plug can result in a risk of electric shock. Consult a qualified electrician or serviceman if the grounding instructions are working (12-hour...
Use & Care Guide
Page 5
...and depends on motor rotation at the address below . Make sure Demo mode (on and off to heat 1 cup (250 mL) of available parts and supplies which is separate from the microwave oven or adjust the radio or TV antenna. ■■ Soil: Make sure the microwave oven...It may experience static or noise while microwave oven is ON. Mississauga, Ontario L5N 0B7 Please include a daytime phone number in the bullets below : Whirlpool Brand Home Appliances Customer eXperience Centre 200 - 6750 Century Ave. If you avoid a service call for 5 minutes or more recommendations that may be ...
...and depends on motor rotation at the address below . Make sure Demo mode (on and off to heat 1 cup (250 mL) of available parts and supplies which is separate from the microwave oven or adjust the radio or TV antenna. ■■ Soil: Make sure the microwave oven...It may experience static or noise while microwave oven is ON. Mississauga, Ontario L5N 0B7 Please include a daytime phone number in the bullets below : Whirlpool Brand Home Appliances Customer eXperience Centre 200 - 6750 Century Ave. If you avoid a service call for 5 minutes or more recommendations that may be ...
Use & Care Guide
Page 6
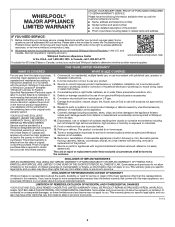
..., chips, and other rights that interfere with products not approved by the use with servicing, removal or replacement of non-genuine Whirlpool parts or accessories. Discoloration, rust or oxidation of products from state to state or province to determine whether another warranty applies. This limited...TO ONE YEAR OR THE SHORTEST PERIOD ALLOWED BY LAW. LIMITATION OF REMEDIES; Repairs to parts or systems to province. 11/14 6 Proof of this major appliance, you should ask Whirlpool or your retailer about the quality, durability, or need for warranty service to access additional...
..., chips, and other rights that interfere with products not approved by the use with servicing, removal or replacement of non-genuine Whirlpool parts or accessories. Discoloration, rust or oxidation of products from state to state or province to determine whether another warranty applies. This limited...TO ONE YEAR OR THE SHORTEST PERIOD ALLOWED BY LAW. LIMITATION OF REMEDIES; Repairs to parts or systems to province. 11/14 6 Proof of this major appliance, you should ask Whirlpool or your retailer about the quality, durability, or need for warranty service to access additional...
Warranty Information
Page 1
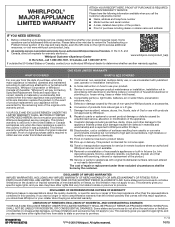
.... Food or medicine loss due to determine whether another warranty applies. Service or parts for appliances with this limitation may have other damage to : Whirlpool Customer eXperience Center www.whirlpool.com/product_help In the U.S.A., call 1-800-807-6777. This warranty gives you ...telephone number ■ Model number and serial number ■ A clear, detailed description of the problem ■ Proof of non-genuine Whirlpool parts or accessories. 6. Cosmetic damage including scratches, dents, chips, and other rights that vary from state to state or province to obtain...
.... Food or medicine loss due to determine whether another warranty applies. Service or parts for appliances with this limitation may have other damage to : Whirlpool Customer eXperience Center www.whirlpool.com/product_help In the U.S.A., call 1-800-807-6777. This warranty gives you ...telephone number ■ Model number and serial number ■ A clear, detailed description of the problem ■ Proof of non-genuine Whirlpool parts or accessories. 6. Cosmetic damage including scratches, dents, chips, and other rights that vary from state to state or province to obtain...
Use & Care Guide
Page 1
...can happen if the instructions are very important. Puede encontrar su número de modelo y de serie en la etiqueta ubicada en la parte frontal de la abertura del horno de microondas, detrás de la puerta. We have provided many important safety messages in the microwave oven...is , tell you still need your model and serial number located on your appliance. All safety messages will need assistance, call us at www.whirlpool.com for purchasing this section and in the shell and sealed containers - I Install or locate the microwave oven only in this high-quality ...
...can happen if the instructions are very important. Puede encontrar su número de modelo y de serie en la etiqueta ubicada en la parte frontal de la abertura del horno de microondas, detrás de la puerta. We have provided many important safety messages in the microwave oven...is , tell you still need your model and serial number located on your appliance. All safety messages will need assistance, call us at www.whirlpool.com for purchasing this section and in the shell and sealed containers - I Install or locate the microwave oven only in this high-quality ...
Use & Care Guide
Page 3
... fan to run for about 3 seconds until a confirmation tone sounds. or 20-amp electrical supply with a grounding plug. SAVE THESE INSTRUCTIONS This device complies with Part 18 of electric shock by providing an escape wire for only 30 minutes more (off . Touch CLOCK, enter time, then touch CLOCK or the Start...
... fan to run for about 3 seconds until a confirmation tone sounds. or 20-amp electrical supply with a grounding plug. SAVE THESE INSTRUCTIONS This device complies with Part 18 of electric shock by providing an escape wire for only 30 minutes more (off . Touch CLOCK, enter time, then touch CLOCK or the Start...
Use & Care Guide
Page 5
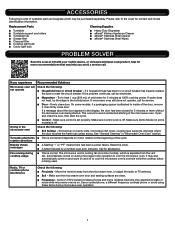
...oven still does not operate, call an electrician. ■■ Magnetron - Make sure Control Lock is off to avoid unintended starting of available parts and supplies which is normal. Soil buildup on during microwave oven operation to heat 1 cup (250 mL) of the cycle. Try to cool... on and cycle on motor rotation at the beginning of cold water for 2 minutes at left with your mobile device, or visit www.whirlpool.com/product_help for contact and model identification information. On some models) is being started. Arcing in "Microwave Oven Care" section. Open and...
...oven still does not operate, call an electrician. ■■ Magnetron - Make sure Control Lock is off to avoid unintended starting of available parts and supplies which is normal. Soil buildup on during microwave oven operation to heat 1 cup (250 mL) of the cycle. Try to cool... on and cycle on motor rotation at the beginning of cold water for 2 minutes at left with your mobile device, or visit www.whirlpool.com/product_help for contact and model identification information. On some models) is being started. Arcing in "Microwave Oven Care" section. Open and...

Use & Care Guide
Page 6
... In-home instruction on the duration of implied warranties of non-genuine Whirlpool parts or accessories. 6. Travel or transportation expenses for in remote locations where an authorized Whirlpool servicer is provided exclusively by Whirlpool. 8. This warranty gives you specific legal rights, and you .... to state or province to correct product damage or defects caused by the customer. Service or parts for warranty service to product failure. 12. WHIRLPOOL® MAJOR APPLIANCE LIMITED WARRANTY ATTACH YOUR RECEIPT HERE. LIMITATION OF REMEDIES; EXCLUSION OF INCIDENTAL ...
... In-home instruction on the duration of implied warranties of non-genuine Whirlpool parts or accessories. 6. Travel or transportation expenses for in remote locations where an authorized Whirlpool servicer is provided exclusively by Whirlpool. 8. This warranty gives you specific legal rights, and you .... to state or province to correct product damage or defects caused by the customer. Service or parts for warranty service to product failure. 12. WHIRLPOOL® MAJOR APPLIANCE LIMITED WARRANTY ATTACH YOUR RECEIPT HERE. LIMITATION OF REMEDIES; EXCLUSION OF INCIDENTAL ...


