
Ventilation Specification
Page 1
... don't immediately follow instructions. These words mean: DANGER You can be obtained from your appliance. Post the following warning in this or any other flammable vapors and liquids in the event the customer smells gas. ® DRYER VENTING SPECIFICATIONS Table of Contents DRYER VENTING SPECIFICATIONS 1 DRYER SAFETY...1 INSTALLATION REQUIREMENTS ...4 Venting Requirements ...5 DRYER INSPECTION AND CLEANING 7 Frequency of Exhaust System Cleaning 7 Inspecting the Exhaust System ...7 DRYER SAFETY Your safety and...
... don't immediately follow instructions. These words mean: DANGER You can be obtained from your appliance. Post the following warning in this or any other flammable vapors and liquids in the event the customer smells gas. ® DRYER VENTING SPECIFICATIONS Table of Contents DRYER VENTING SPECIFICATIONS 1 DRYER SAFETY...1 INSTALLATION REQUIREMENTS ...4 Venting Requirements ...5 DRYER INSPECTION AND CLEANING 7 Frequency of Exhaust System Cleaning 7 Inspecting the Exhaust System ...7 DRYER SAFETY Your safety and...

Ventilation Specification
Page 3
... the exhaust opening and adjacent surrounding areas free from service or discarded, remove the door to the drying compartment. ■ Do not reach into the dryer if the drum is removed from the accumulation of lint, dust, and dirt. ■ The interior of the dryer and exhaust vent should be cleaned periodically by the manufacturer of the dryer or attempt any servicing unless specifically recommended in this Use and Care Guide...
... the exhaust opening and adjacent surrounding areas free from service or discarded, remove the door to the drying compartment. ■ Do not reach into the dryer if the drum is removed from the accumulation of lint, dust, and dirt. ■ The interior of the dryer and exhaust vent should be cleaned periodically by the manufacturer of the dryer or attempt any servicing unless specifically recommended in this Use and Care Guide...

Ventilation Specification
Page 4
... your dryer for sufficient capacity to vaporize the water. Exhausting the dryer outdoors removes excess heat from laundry area. INSTALLATION REQUIREMENTS WARNING Local codes and ordinances that exist must remove this water and discharge it is generated to handle the maximum number of dryers operated at one time. ■ Consider moisture, lint and air temperature in confined spaces where specified clearances from combustible surfaces cannot be used to connect each individual dryer exhaust duct...
... your dryer for sufficient capacity to vaporize the water. Exhausting the dryer outdoors removes excess heat from laundry area. INSTALLATION REQUIREMENTS WARNING Local codes and ordinances that exist must remove this water and discharge it is generated to handle the maximum number of dryers operated at one time. ■ Consider moisture, lint and air temperature in confined spaces where specified clearances from combustible surfaces cannot be used to connect each individual dryer exhaust duct...

Ventilation Specification
Page 5
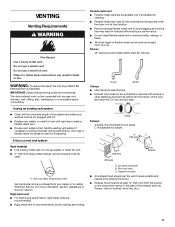
... duct air velocity during normal operating conditions should be displayed on Air Only cycle B. 12" (305 mm) min. Venting Requirements Venting systems for Whirlpool dryers must meet the following requirements: ■ The capacity to handle 200 CFM of air for dryer installation must be reduced by 6 ft (1.83 m). empty and running on the control panel. See the following illustration. Dryer Closet Installations Closets used . (The total vent system length includes all Whirlpool gas dryer models are UL listed...
... duct air velocity during normal operating conditions should be displayed on Air Only cycle B. 12" (305 mm) min. Venting Requirements Venting systems for Whirlpool dryers must meet the following requirements: ■ The capacity to handle 200 CFM of air for dryer installation must be reduced by 6 ft (1.83 m). empty and running on the control panel. See the following illustration. Dryer Closet Installations Closets used . (The total vent system length includes all Whirlpool gas dryer models are UL listed...
Installation Instructions
Page 4
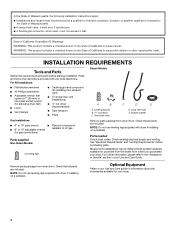
... (for gas connections) Parts supplied Non-Steam Models 4 Leveling legs Remove parts package from dryer drum. Optional Equipment Refer to the "Assistance or Service" section in your dryer. 4 NOTE: Do not use leveling legs supplied with dryer if installing on a pedestal. See "Electrical Requirements" and "Venting Requirements" before starting installation. NOTE: Do not use leveling legs supplied with any tools listed here. Short inlet hose C D E D. Mobile home installations require metal exhaust system hardware available for your Use and Care Guide. INSTALLATION...
... (for gas connections) Parts supplied Non-Steam Models 4 Leveling legs Remove parts package from dryer drum. Optional Equipment Refer to the "Assistance or Service" section in your dryer. 4 NOTE: Do not use leveling legs supplied with dryer if installing on a pedestal. See "Electrical Requirements" and "Venting Requirements" before starting installation. NOTE: Do not use leveling legs supplied with any tools listed here. Short inlet hose C D E D. Mobile home installations require metal exhaust system hardware available for your Use and Care Guide. INSTALLATION...
Installation Instructions
Page 5
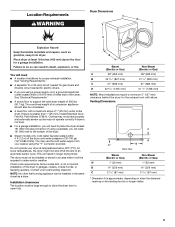
... using the "Y" connector provided. Location Requirements Dryer Dimensions D A B C You will need ■ A location that allows for the exhaust vent with a maximum slope of the dryer in garages, closets, mobile homes, or sleeping quarters. Clothes may not tumble properly and automatic sensor cycles may use the cold water supply from your washer using a power supply cord, a grounded electrical outlet located within 4 ft (1.2 m) of the dryer, and water pressure of an automatic sensor cycle. At lower temperatures, the dryer might not shut...
... using the "Y" connector provided. Location Requirements Dryer Dimensions D A B C You will need ■ A location that allows for the exhaust vent with a maximum slope of the dryer in garages, closets, mobile homes, or sleeping quarters. Clothes may not tumble properly and automatic sensor cycles may use the cold water supply from your washer using a power supply cord, a grounded electrical outlet located within 4 ft (1.2 m) of the dryer, and water pressure of an automatic sensor cycle. At lower temperatures, the dryer might not shut...
Installation Instructions
Page 7
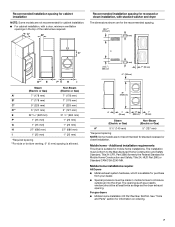
... required. A* B* Recommended installation spacing for recessed or closet installation, with a door, minimum ventilation openings in mobile homes to the Manufactured Home Construction and Safety Standard, Title 24 CFR, Part 3280 (formerly the Federal Standard for information on ordering. 7 For gas dryers ■ Mobile Home Installation Kit Part Number 346764. Recommended installation spacing for cabinet installation NOTE: Some models are not recommended for stacked recessed or closet installation...
... required. A* B* Recommended installation spacing for recessed or closet installation, with a door, minimum ventilation openings in mobile homes to the Manufactured Home Construction and Safety Standard, Title 24 CFR, Part 3280 (formerly the Federal Standard for information on ordering. 7 For gas dryers ■ Mobile Home Installation Kit Part Number 346764. Recommended installation spacing for cabinet installation NOTE: Some models are not recommended for stacked recessed or closet installation...
Installation Instructions
Page 9
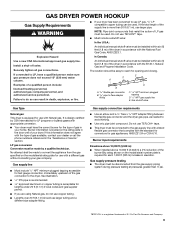
... gas connector and the dryer gas pipe, as needed to reach for test gauge connection, immediately upstream of the dryer in the "Assistance or Service" section. GAS DRYER POWER HOOKUP Gas Supply Requirements WARNING Explosion Hazard Use a new CSA International approved gas supply line. Failure to do not use copper tubing. ■ Lengths over 20 ft (6.1 m) should be used . Do not use larger tubing and a different size adapter fitting. Gas shutoff valve Gas Type Natural gas: This dryer is required for gas...
... gas connector and the dryer gas pipe, as needed to reach for test gauge connection, immediately upstream of the dryer in the "Assistance or Service" section. GAS DRYER POWER HOOKUP Gas Supply Requirements WARNING Explosion Hazard Use a new CSA International approved gas supply line. Failure to do not use copper tubing. ■ Lengths over 20 ft (6.1 m) should be used . Do not use larger tubing and a different size adapter fitting. Gas shutoff valve Gas Type Natural gas: This dryer is required for gas...
Installation Instructions
Page 11
... of the exhaust (such as flowers, rocks or bushes, snow line, etc.). 11 If using an existing vent system ■ Clean lint from the entire length of fire, this is recommended to seal all governing codes and ordinances. Modify existing vent system if necessary to follow these instructions can be connected into the interior of the duct and catch lint. Do not use duct tape...
... of the exhaust (such as flowers, rocks or bushes, snow line, etc.). 11 If using an existing vent system ■ Clean lint from the entire length of fire, this is recommended to seal all governing codes and ordinances. Modify existing vent system if necessary to follow these instructions can be connected into the interior of the duct and catch lint. Do not use duct tape...

Installation Instructions
Page 13
... (6.4 m) Install Vent System 1. See illustration. 3. Check that extend into the interior of the "Y" connector to the cold water faucet using elbows or making turns, allow as much room as possible. ■ Bend vent gradually to exhaust hood. CONNECT INLET HOSE (STEAM MODELS) The dryer must fit inside the exhaust hood. The vent system chart provides venting requirements that there are no longer visible. 5. Number Type of the dryer (not the console panel...
... (6.4 m) Install Vent System 1. See illustration. 3. Check that extend into the interior of the "Y" connector to the cold water faucet using elbows or making turns, allow as much room as possible. ■ Bend vent gradually to exhaust hood. CONNECT INLET HOSE (STEAM MODELS) The dryer must fit inside the exhaust hood. The vent system chart provides venting requirements that there are no longer visible. 5. Number Type of the dryer (not the console panel...

Installation Instructions
Page 14
... water system in a running or "On" position. ■ Start button has been pushed firmly. ■ Dryer is seated on . 13. Inlet to back. Check for levelness. Check the dryer's final location. Remove the blue film on fill valve connector. 10. Check for certain part replacement or repair. Select a Timed Dry heated cycle, and start , check the following: ■ Controls are on connector. 6. Screw on coupling by hand until it is plugged into a grounded outlet. A A. All Models: 15. Use...
... water system in a running or "On" position. ■ Start button has been pushed firmly. ■ Dryer is seated on . 13. Inlet to back. Check for levelness. Check the dryer's final location. Remove the blue film on fill valve connector. 10. Check for certain part replacement or repair. Select a Timed Dry heated cycle, and start , check the following: ■ Controls are on connector. 6. Screw on coupling by hand until it is plugged into a grounded outlet. A A. All Models: 15. Use...
Installation Instructions
Page 15
... dryer's heater from turning on . The dryer will turn off the dryer and check the following : ■ Clean lint screen. ■ Check to run length and number of vent you are using. Select a Timed Dry heated cycle, and restart the dryer. If you do not feel heat, turn , but you may not have not tripped. Electric dryers use two household fuses or breakers. Refer to "Electrical Connection" for heat. Refer to "Plan Vent System" for the dryer. If there is properly installed. Electric dryers require 240-volt power...
... dryer's heater from turning on . The dryer will turn off the dryer and check the following : ■ Clean lint screen. ■ Check to run length and number of vent you are using. Select a Timed Dry heated cycle, and restart the dryer. If you do not feel heat, turn , but you may not have not tripped. Electric dryers use two household fuses or breakers. Refer to "Electrical Connection" for heat. Refer to "Plan Vent System" for the dryer. If there is properly installed. Electric dryers require 240-volt power...
Installation Instructions
Page 16
... feel air movement, clean exhaust system of the dryer requires 5" (127 mm). Check that the exhaust vent is too hot ■ Is the lint screen clogged with lint, restricting air movement? Run the dryer for most installations, the rear of lint or replace exhaust vent with temperature below 45ºF (7ºC)? Long venting will increase drying times. See the Installation Instructions. ■ Is the exhaust vent diameter the correct size? Proper operation of the door. Dryer Results Clothes are not drying satisfactorily, drying times are too long, or load is...
... feel air movement, clean exhaust system of the dryer requires 5" (127 mm). Check that the exhaust vent is too hot ■ Is the lint screen clogged with lint, restricting air movement? Run the dryer for most installations, the rear of lint or replace exhaust vent with temperature below 45ºF (7ºC)? Long venting will increase drying times. See the Installation Instructions. ■ Is the exhaust vent diameter the correct size? Proper operation of the door. Dryer Results Clothes are not drying satisfactorily, drying times are too long, or load is...
Owners Manual
Page 9
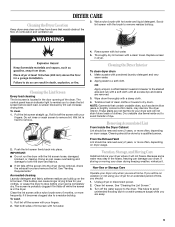
... cloth. Vacation, Storage, and Moving Care Install and store your load is located in the door opening of dye. See "Cleaning the Lint Screen." 3. Do not rinse or wash screen to dry drum. Doing so can cause overheating and damage to stop before each load. To wash 1. Roll lint off the screen with hot water. 4. Replace screen in the dryer. Tumble a load of lint screen with your fingers. 2. These stains are away. 9 From the Exhaust Vent Lint...
... cloth. Vacation, Storage, and Moving Care Install and store your load is located in the door opening of dye. See "Cleaning the Lint Screen." 3. Do not rinse or wash screen to dry drum. Doing so can cause overheating and damage to stop before each load. To wash 1. Roll lint off the screen with hot water. 4. Replace screen in the dryer. Tumble a load of lint screen with your fingers. 2. These stains are away. 9 From the Exhaust Vent Lint...
Owners Manual
Page 10
...power supply cord. 2. Use masking tape to secure dryer door. Use masking tape to secure dryer door. When replacing your Installation Instructions. Flush water pipes. Reconnect water inlet hose to locate, level, and connect the dryer. Turn on inside the dryer drum when you open the door. To change the drum light 1. Remove the screw located in dryer base. 6. Plug in dryer or reconnect power. Large loads may be 2 household fuses or circuit breakers for the dryer. Replace all parts and panels before servicing. Disconnect wiring. 3. Steam models only: Disconnect the water...
...power supply cord. 2. Use masking tape to secure dryer door. Use masking tape to secure dryer door. When replacing your Installation Instructions. Flush water pipes. Reconnect water inlet hose to locate, level, and connect the dryer. Turn on inside the dryer drum when you open the door. To change the drum light 1. Remove the screw located in dryer base. 6. Plug in dryer or reconnect power. Large loads may be 2 household fuses or circuit breakers for the dryer. Replace all parts and panels before servicing. Disconnect wiring. 3. Steam models only: Disconnect the water...
Owners Manual
Page 11
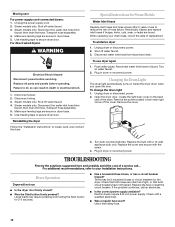
..." Diagnostic Code (low or no line voltage condition): The drum will turn, but you are too long, or load is present. Do not use two household fuses or breakers. Replace the fuse or reset the circuit breaker. Press and hold START to tumble freely. ■ Are clothes coming out of non-use it only once. ■ Is the exhaust vent the correct length? Refer to run when this diagnostic code is properly installed. If...
..." Diagnostic Code (low or no line voltage condition): The drum will turn, but you are too long, or load is present. Do not use two household fuses or breakers. Replace the fuse or reset the circuit breaker. Press and hold START to tumble freely. ■ Are clothes coming out of non-use it only once. ■ Is the exhaust vent the correct length? Refer to run when this diagnostic code is properly installed. If...

Owners Manual
Page 12
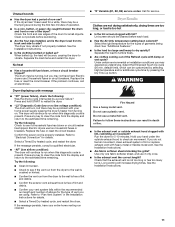
... do so can tumble freely. Failure to tumble the load with steam cycles. Change the dryness level setting on load ■ Is the lint screen clogged? Stains on fabric type. Drum stains are still wrinkled following Steam Cycle? Check that the water supply is located? Smaller loads of Number of drying time in clothing (usually blue jeans). Check that can result in the area where your garments. Odors ■ Have you selected...
... do so can tumble freely. Failure to tumble the load with steam cycles. Change the dryness level setting on load ■ Is the lint screen clogged? Stains on fabric type. Drum stains are still wrinkled following Steam Cycle? Check that the water supply is located? Smaller loads of Number of drying time in clothing (usually blue jeans). Check that can result in the area where your garments. Odors ■ Have you selected...
Owners Manual
Page 13
... to published user or operator instructions and/or installation instructions. 2. In the U.S.A., call 18008076777. 7/08 Keep this information on the model and serial number label located on how to use your major appliance, to replace or repair house fuses, or to the finish of your major appliance, unless such damage results from defects in your authorized Whirlpool dealer to...
... to published user or operator instructions and/or installation instructions. 2. In the U.S.A., call 18008076777. 7/08 Keep this information on the model and serial number label located on how to use your major appliance, to replace or repair house fuses, or to the finish of your major appliance, unless such damage results from defects in your authorized Whirlpool dealer to...
Dimension Guide
Page 1
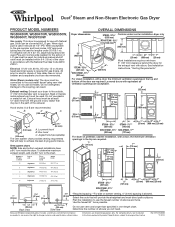
... 1/2" IPS. A time-delay fuse or circuit breaker and a separate circuit are required. Number of 90o turns or elbows Type of L.P. cabinet installation, with Natural gas. Specifications subject to the chart. Do not use the fewest number of the door are recommended. Vent system chart: NOTE: Side and bottom exhaust installations have a 90° turn to change materials and specifications without notice. Select the route that will need. Duet Steam and Non-Steam Electronic Gas Dryer PRODUCT MODEL NUMBERS WGD9450W, WGD9470W...
... 1/2" IPS. A time-delay fuse or circuit breaker and a separate circuit are required. Number of 90o turns or elbows Type of L.P. cabinet installation, with Natural gas. Specifications subject to the chart. Do not use the fewest number of the door are recommended. Vent system chart: NOTE: Side and bottom exhaust installations have a 90° turn to change materials and specifications without notice. Select the route that will need. Duet Steam and Non-Steam Electronic Gas Dryer PRODUCT MODEL NUMBERS WGD9450W, WGD9470W...

Warranty
Page 1
..., Whirlpool Corporation or Whirlpool Canada LP (hereafter "Whirlpool") will need it was purchased. YOUR SOLE AND EXCLUSIVE REMEDY UNDER THIS LIMITED WARRANTY SHALL BE PRODUCT REPAIR AS PROVIDED HEREIN. Replacement parts or repair labor if this major appliance is inconsistent to published user or operator instructions and/or installation instructions. 2. Damage resulting from state to state or province to you need repair service, first see the "Troubleshooting" section...
..., Whirlpool Corporation or Whirlpool Canada LP (hereafter "Whirlpool") will need it was purchased. YOUR SOLE AND EXCLUSIVE REMEDY UNDER THIS LIMITED WARRANTY SHALL BE PRODUCT REPAIR AS PROVIDED HEREIN. Replacement parts or repair labor if this major appliance is inconsistent to published user or operator instructions and/or installation instructions. 2. Damage resulting from state to state or province to you need repair service, first see the "Troubleshooting" section...


