Owners Manual
Page 4
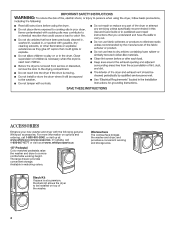
..., call 1-800-807-6777 or visit us at www. In Canada, call 1-800-901-2042, or visit us at : www.whirlpool.com/accessories. Worksurface The worksurface bridges the washer and dryer, and provides a convenient working height. For more comfortable working and storage area. Available in matching colors. Stack Kit If space is...
..., call 1-800-807-6777 or visit us at www. In Canada, call 1-800-901-2042, or visit us at : www.whirlpool.com/accessories. Worksurface The worksurface bridges the washer and dryer, and provides a convenient working height. For more comfortable working and storage area. Available in matching colors. Stack Kit If space is...
Owners Manual
Page 5
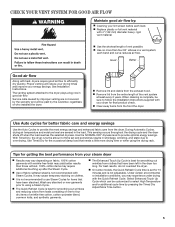
...Automatic Cycles, drying air temperature and moisture level are not covered by the warranty and will reduce your drying times and improve your steam dryer n Results may vary depending on clothes. n Use of fabric softener sheet is best for getting the best performance from your energy ... Touch Up Cycle is not recommended with 4" (102 mm) diameter heavy, rigid vent material. For best results, do not overload the dryer. Select Enhanced Touch Up Cycle which can be sure to follow the Installation Instructions supplied with wrinkle-free finish may require additional touching up ...
...Automatic Cycles, drying air temperature and moisture level are not covered by the warranty and will reduce your drying times and improve your steam dryer n Results may vary depending on clothes. n Use of fabric softener sheet is best for getting the best performance from your energy ... Touch Up Cycle is not recommended with 4" (102 mm) diameter heavy, rigid vent material. For best results, do not overload the dryer. Select Enhanced Touch Up Cycle which can be sure to follow the Installation Instructions supplied with wrinkle-free finish may require additional touching up ...
Owners Manual
Page 6
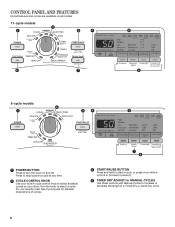
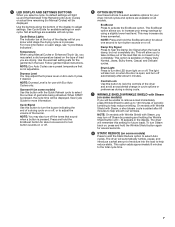
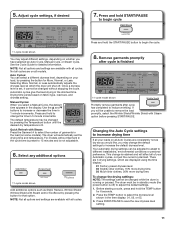
Press to stop/cancel a cycle at any time. 2 CYCLE CONTROL KNOB Use your dryer's cycle control knob to select a cycle for your dryer. Turn the knob to select available cycles on and off. See Cycle Guide for detailed descriptions of a Timed Dry or Quick Dry cycle. 6 CONTROL PANEL ... press once while a cycle is in process to pause it. 4 TIMED DRY ADJUST for MANUAL CYCLES Use these buttons with Manual Cycles to turn the dryer on your laundry load.
Press to stop/cancel a cycle at any time. 2 CYCLE CONTROL KNOB Use your dryer's cycle control knob to select a cycle for your dryer. Turn the knob to select available cycles on and off. See Cycle Guide for detailed descriptions of a Timed Dry or Quick Dry cycle. 6 CONTROL PANEL ... press once while a cycle is in process to pause it. 4 TIMED DRY ADJUST for MANUAL CYCLES Use these buttons with Manual Cycles to turn the dryer on your laundry load.
Owners Manual
Page 7
...a preset temperature that is for about one second to turn button sounds on some models) Use this button to lock the controls of the dryer and avoid an accidental change in process. The light will be displayed. See Cycle Guide for several seconds. 8 STATIC REDUCE (on or off...end of a drying cycle on each cycle. This will be unable to remove a load immediately, press Wrinkle Shield to help reduce wrinkling. The dryer will automatically tumble, pause, and introduce a small amount of periodic tumbling to add up and the Estimated Time Remaining (for Auto Cycles) or ...
...a preset temperature that is for about one second to turn button sounds on some models) Use this button to lock the controls of the dryer and avoid an accidental change in process. The light will be displayed. See Cycle Guide for several seconds. 8 STATIC REDUCE (on or off...end of a drying cycle on each cycle. This will be unable to remove a load immediately, press Wrinkle Shield to help reduce wrinkling. The dryer will automatically tumble, pause, and introduce a small amount of periodic tumbling to add up and the Estimated Time Remaining (for Auto Cycles) or ...
Owners Manual
Page 8
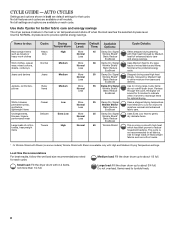
... Wrinkle Shield† Static Reduce EcoBoost Stepped driving uses High heat initially, followed by Medium heat for that cycle. do not overfill dryer drum. Shirts, blouses, Casual Low More 35 permanent press, Normal synthetics, Less lightweight items Damp Dry Signal Wrinkle Shield† Static...NORMAL dryness level to about 3/4 full. Partway through the cycle, the signal will sound for optimal drying. Large load: Fill the dryer drum up to provide optimal energy savings. CYCLE GUIDE - AUTO CYCLES Settings and options shown in the load or air temperature and...
... Wrinkle Shield† Static Reduce EcoBoost Stepped driving uses High heat initially, followed by Medium heat for that cycle. do not overfill dryer drum. Shirts, blouses, Casual Low More 35 permanent press, Normal synthetics, Less lightweight items Damp Dry Signal Wrinkle Shield† Static...NORMAL dryness level to about 3/4 full. Partway through the cycle, the signal will sound for optimal drying. Large load: Fill the dryer drum up to provide optimal energy savings. CYCLE GUIDE - AUTO CYCLES Settings and options shown in the load or air temperature and...
Owners Manual
Page 9
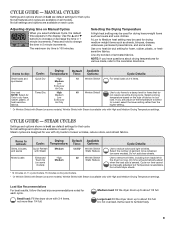
...select the lower setting rather than 1/4 full. Not all settings and options are default settings for that cycle. Do not add dryer sheets. Load Size Recommendations For best results, follow the load size recommendations noted for refresh cycles The maximum dry time is sensed....options are designed for various loads, refer to about 3/4 full. Select a drying temperature based on each cycle. Large load: Fill the dryer drum up to the care label directions. Items to refresh: Drying Default Available Cycle: Temperature: Time: Options: Shirts, blouses, Quick ...
...select the lower setting rather than 1/4 full. Not all settings and options are default settings for that cycle. Do not add dryer sheets. Load Size Recommendations For best results, follow the load size recommendations noted for refresh cycles The maximum dry time is sensed....options are designed for various loads, refer to about 3/4 full. Select a drying temperature based on each cycle. Large load: Fill the dryer drum up to the care label directions. Items to refresh: Drying Default Available Cycle: Temperature: Time: Options: Shirts, blouses, Quick ...
Owners Manual
Page 10
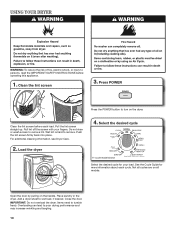
... model shown Select the desired cycle for more information about each load. Not all models. Place laundry in the dryer. Add a dryer sheet to remove. USING YOUR DRYER WARNING: To reduce the risk of fire, electric shock, or injury to persons, read the IMPORTANT SAFETY INSTRUCTIONS ...before each cycle. For additional cleaning information, see Dryer Care. 2. Close the door. Clean the lint screen before operating this appliance. 1. See the Cycle Guide for your fingers. Wet lint...
... model shown Select the desired cycle for more information about each load. Not all models. Place laundry in the dryer. Add a dryer sheet to remove. USING YOUR DRYER WARNING: To reduce the risk of fire, electric shock, or injury to persons, read the IMPORTANT SAFETY INSTRUCTIONS ...before each cycle. For additional cleaning information, see Dryer Care. 2. Close the door. Clean the lint screen before operating this appliance. 1. See the Cycle Guide for your fingers. Wet lint...
Owners Manual
Page 11
..., Manual Cycle, or Steam Cycle. For models without stopping the cycle. Use the s and t buttons to adjust the default settings. 1. The dryer will affect all of garments in 5 minute increments. See the Cycle Guide for that option. Air Only Less Dry 1 O Temperature Dryness Level Garment... all your load, by pressing the Temperature button until the desired dry temperature is lit. There are 3 drying settings, which the dryer will b68e-- 79unable to 15 minutes and is off . Select any additional options Wrinkle Shield Changing the Auto Cycle settings to save...
..., Manual Cycle, or Steam Cycle. For models without stopping the cycle. Use the s and t buttons to adjust the default settings. 1. The dryer will affect all of garments in 5 minute increments. See the Cycle Guide for that option. Air Only Less Dry 1 O Temperature Dryness Level Garment... all your load, by pressing the Temperature button until the desired dry temperature is lit. There are 3 drying settings, which the dryer will b68e-- 79unable to 15 minutes and is off . Select any additional options Wrinkle Shield Changing the Auto Cycle settings to save...
Owners Manual
Page 12
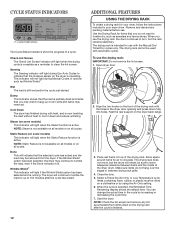
... indicate that you use with Automatic cycles. Close the door. 5. When the cycle is active. You can change the actual time in your dryer drum. Wet The load is not available on all models or on some models) This indicator will rotate; Remove and discard any lint accumulated... from the dryer. Start the dryer. ADDITIONAL FEATURES USING THE DRYING RACK To obtain a drying rack for items that the moisture sensor on the drying rack after the ...
... indicate that you use with Automatic cycles. Close the door. 5. When the cycle is active. You can change the actual time in your dryer drum. Wet The load is not available on all models or on some models) This indicator will rotate; Remove and discard any lint accumulated... from the dryer. Start the dryer. ADDITIONAL FEATURES USING THE DRYING RACK To obtain a drying rack for items that the moisture sensor on the drying rack after the ...
Owners Manual
Page 13
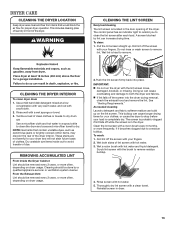
... dish detergent mixed at a low concentration with very warm water, and rub with a wet sponge or towel. 3. Tumble a load of the dryer. See "Venting Requirements." Reinstall screen in the door opening of dye. NOTE: Garments that would block the air flow for your clothes, or cause...load cleaning The lint screen is completely dry. Pull the lint screen straight up on dryer usage. To clean: 1. CLEANING THE DRYER INTERIOR To clean dryer drum 1. DRYER CARE CLEANING THE DRYER LOCATION Keep dryer area clear and free from items that contain unstable dyes, such as denim blue jeans...
... dish detergent mixed at a low concentration with very warm water, and rub with a wet sponge or towel. 3. Tumble a load of the dryer. See "Venting Requirements." Reinstall screen in the door opening of dye. NOTE: Garments that would block the air flow for your clothes, or cause...load cleaning The lint screen is completely dry. Pull the lint screen straight up on dryer usage. To clean: 1. CLEANING THE DRYER INTERIOR To clean dryer drum 1. DRYER CARE CLEANING THE DRYER LOCATION Keep dryer area clear and free from items that contain unstable dyes, such as denim blue jeans...
Owners Manual
Page 14
...home. SPECIAL INSTRUCTIONS FOR STEAM MODELS Water Inlet Hose Replace inlet hose and hose screen after 5 years of hose failure. To Winterize the Dryer 1. Unplug dryer or disconnect power. 2. To Use the Dryer Again 1. Reconnect water inlet hose to reduce the risk of use to faucet. Turn on vacation or not using your... only: Disconnect the water inlet hose from faucet, then drain the hose. Because some water may stay in the hose, freezing can damage your dryer only when you are secure in gas supply line. 3. This helps to avoid unintended flooding (due to locate, level, and connect the...
...home. SPECIAL INSTRUCTIONS FOR STEAM MODELS Water Inlet Hose Replace inlet hose and hose screen after 5 years of hose failure. To Winterize the Dryer 1. Unplug dryer or disconnect power. 2. To Use the Dryer Again 1. Reconnect water inlet hose to reduce the risk of use to faucet. Turn on vacation or not using your... only: Disconnect the water inlet hose from faucet, then drain the hose. Because some water may stay in the hose, freezing can damage your dryer only when you are secure in gas supply line. 3. This helps to avoid unintended flooding (due to locate, level, and connect the...
Owners Manual
Page 15
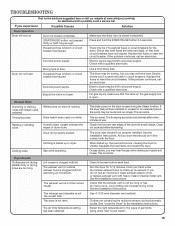
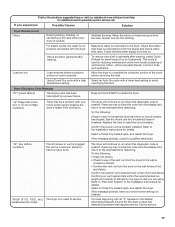
...Check the front and rear edges of the drum for the types of lint or replace exhaust vent with the floor. The dryer may hear the gas valve clicking as it opens and closes. Clean lint screen before laundering. See the Installation Instructions. See "Level...the Steam function. TROUBLESHOOTING First try the solutions suggested here or visit our website at www.whirlpool.com/help for assistance and to possibly avoid a service call an electrician. The dryer is used in dryer. This is normal. This is normal. Incorrect power supply. If the problem continues, call ...
...Check the front and rear edges of the drum for the types of lint or replace exhaust vent with the floor. The dryer may hear the gas valve clicking as it opens and closes. Clean lint screen before laundering. See the Installation Instructions. See "Level...the Steam function. TROUBLESHOOTING First try the solutions suggested here or visit our website at www.whirlpool.com/help for assistance and to possibly avoid a service call an electrician. The dryer is used in dryer. This is normal. This is normal. Incorrect power supply. If the problem continues, call ...
Owners Manual
Page 16
... doors must have ventilation openings at the end of the cycle. Under certain environmental or installation conditions you experience Possible Causes Solution Dryer Results (cont.) Clothes are not drying satisfactorily or drying times are caused by a fabric softener sheet. Select the Touch Up cycle.... NOTE: Refer to tumble freely. The load may also vary depending on drum Loads are not recommended. Add dryer fabric softener sheets at www.whirlpool.com/help for reducing wrinkles and odors from loads consisting of wrinkle-free cotton, cotton polyester blends, common knits ...
... doors must have ventilation openings at the end of the cycle. Under certain environmental or installation conditions you experience Possible Causes Solution Dryer Results (cont.) Clothes are not drying satisfactorily or drying times are caused by a fabric softener sheet. Select the Touch Up cycle.... NOTE: Refer to tumble freely. The load may also vary depending on drum Loads are not recommended. Add dryer fabric softener sheets at www.whirlpool.com/help for reducing wrinkles and odors from loads consisting of wrinkle-free cotton, cotton polyester blends, common knits ...
Owners Manual
Page 17
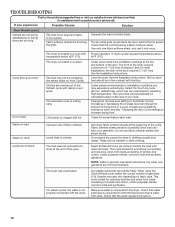
... dryers use two household fuses or breakers. Try the following : Check to the estimated time remaining. Refer to run cleaned. First try the solutions suggested here or visit our website at www.whirlpool.com/help for assistance and to complete ...the cooldown portion of the cycle before cooldown portion of cycle complete. Ventilate the area. Check that requires service. "L2" Diagnostic Code (low or no line voltage condition) There may be a problem with an "F" appears in the Installaton Instructions for details. Allow the dryer...
... dryers use two household fuses or breakers. Try the following : Check to the estimated time remaining. Refer to run cleaned. First try the solutions suggested here or visit our website at www.whirlpool.com/help for assistance and to complete ...the cooldown portion of the cycle before cooldown portion of cycle complete. Ventilate the area. Check that requires service. "L2" Diagnostic Code (low or no line voltage condition) There may be a problem with an "F" appears in the Installaton Instructions for details. Allow the dryer...
Dimension Guide
Page 1
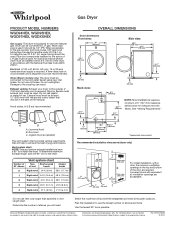
Exhaust venting: Exhaust your dryer to the outside. 4" (102 mm) diameter vent is required. Hood styles: A & B are acceptable. See "Venting Requirements." 31/2"* (89 mm) A B C A. Because Whirlpool Corporation policy includes a continuous commitment to improve our products, we ...reserve the right to achieve the best drying performance. W10057364B 12/2010 gas must be used . Water (Steam models only): The dryer must be at least 12" (305 mm...
Exhaust venting: Exhaust your dryer to the outside. 4" (102 mm) diameter vent is required. Hood styles: A & B are acceptable. See "Venting Requirements." 31/2"* (89 mm) A B C A. Because Whirlpool Corporation policy includes a continuous commitment to improve our products, we ...reserve the right to achieve the best drying performance. W10057364B 12/2010 gas must be used . Water (Steam models only): The dryer must be at least 12" (305 mm...
Installation Instructions
Page 2
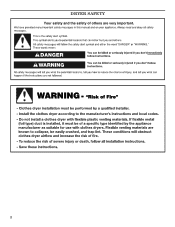
DRYER SAFETY 2
DRYER SAFETY 2
Installation Instructions
Page 3
IMPORTANT: When discarding or storing your old clothes dryer, remove the door. 3
IMPORTANT: When discarding or storing your old clothes dryer, remove the door. 3
Installation Instructions
Page 4
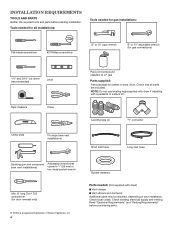
...) ® TORX is located in your installation. NOTE: Do not use leveling legs supplied with dryer if installing with dryer) ■■Vent clamps ■■Vent elbows and ductwork Additional parts may be required, depending in dryer drum. Leveling legs (4) "Y" connector Short inlet hose Long inlet hose Caulking gun and compound Adjustable...
...) ® TORX is located in your installation. NOTE: Do not use leveling legs supplied with dryer if installing with dryer) ■■Vent clamps ■■Vent elbows and ductwork Additional parts may be required, depending in dryer drum. Leveling legs (4) "Y" connector Short inlet hose Long inlet hose Caulking gun and compound Adjustable...
Installation Instructions
Page 5
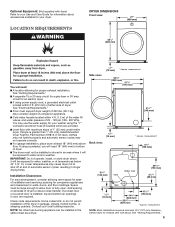
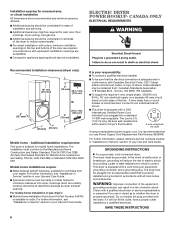
...allowing for proper exhaust installation. Installation Clearances For each arrangement, consider allowing more space for exhaust vent with elbow. Space must support dryer weight of the dryer in longer drying times. Some codes limit, or do not permit, installation of 200 lbs. (90.7 kg). NOTE: No other... 507/8" (1292 mm) 311/8" (790 mm) 53/4"* (146 mm) 3/4"* (18 mm) Back view: * Approx. Optional Equipment: (Not supplied with dryer) Refer to your Use and Care Guide for information about accessories available for your washer using the "Y" connector and short hose (if needed) which are...
...allowing for proper exhaust installation. Installation Clearances For each arrangement, consider allowing more space for exhaust vent with elbow. Space must support dryer weight of the dryer in longer drying times. Some codes limit, or do not permit, installation of 200 lbs. (90.7 kg). NOTE: No other... 507/8" (1292 mm) 311/8" (790 mm) 53/4"* (146 mm) 3/4"* (18 mm) Back view: * Approx. Optional Equipment: (Not supplied with dryer) Refer to your Use and Care Guide for information about accessories available for your washer using the "Y" connector and short hose (if needed) which are...
Installation Instructions
Page 6
...qualified electrician or service representative or personnel if you use Power Supply Cord Replacement Part Number 8529008. For mobile home installation of gas dryers: ■■Mobile Home Installation Hold-down Kit Part Number 346764 is equipped with equivalent ventilitation openings are acceptable. ■■...single phase, 120/240 volt, 60 Hz, AC only electrical supply on a separate 30-amp circuit, fused on all sides of the dryer to reduce noise transfer. ■■For closet installation, with a CSA International Certified Power Cord intended to be plugged into a standard ...
...qualified electrician or service representative or personnel if you use Power Supply Cord Replacement Part Number 8529008. For mobile home installation of gas dryers: ■■Mobile Home Installation Hold-down Kit Part Number 346764 is equipped with equivalent ventilitation openings are acceptable. ■■...single phase, 120/240 volt, 60 Hz, AC only electrical supply on a separate 30-amp circuit, fused on all sides of the dryer to reduce noise transfer. ■■For closet installation, with a CSA International Certified Power Cord intended to be plugged into a standard ...


