
Owners Manual
Page 2
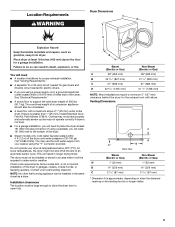
...Kit Door Reversal Kit Back Guard Optional Exhaust Installation Dryer can write to build every new WHIRLPOOL® appliance. To locate FSP® replacement parts in your area: In the U.S.A., call the Whirlpool Canada LP Customer Interaction Centre toll free at 1-800-253-1301 or your appliance. Call ...the Whirlpool Customer eXperience Center toll free: 1-800-253-1301 or visit us at www.whirlpool.com. ASSISTANCE OR SERVICE Before calling for Part Number. It may select a 10" (254 mm) or 15.5" (394 mm)...
...Kit Door Reversal Kit Back Guard Optional Exhaust Installation Dryer can write to build every new WHIRLPOOL® appliance. To locate FSP® replacement parts in your area: In the U.S.A., call the Whirlpool Canada LP Customer Interaction Centre toll free at 1-800-253-1301 or your appliance. Call ...the Whirlpool Customer eXperience Center toll free: 1-800-253-1301 or visit us at www.whirlpool.com. ASSISTANCE OR SERVICE Before calling for Part Number. It may select a 10" (254 mm) or 15.5" (394 mm)...
Owners Manual
Page 7
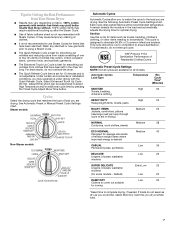
...* (Minutes) SANITIZE Towels, bedding, children's clothing High 60 HEAVY DUTY High 50 Heavyweight items, towels, jeans BULKY ITEMS Medium 55 Jackets, comforters, pillows (rearrange load part way through cycle to aid in the load and automatically adjusts the drying time for smoothing out wrinkles from clothes that have been left in...
...* (Minutes) SANITIZE Towels, bedding, children's clothing High 60 HEAVY DUTY High 50 Heavyweight items, towels, jeans BULKY ITEMS Medium 55 Jackets, comforters, pillows (rearrange load part way through cycle to aid in the load and automatically adjusts the drying time for smoothing out wrinkles from clothes that have been left in...

Owners Manual
Page 11
... hose from faucet, then drain the hose. Remove the cover. 3. Moving care For power supply cord-connected dryers: 1. Unplug the power supply cord. 2. Replace all parts and panels before servicing. Failure to your inlet hoses, record the date of the dryer. Reinstalling the dryer Follow the "Installation Instructions" to reduce the...
... hose from faucet, then drain the hose. Remove the cover. 3. Moving care For power supply cord-connected dryers: 1. Unplug the power supply cord. 2. Replace all parts and panels before servicing. Failure to your inlet hoses, record the date of the dryer. Reinstalling the dryer Follow the "Installation Instructions" to reduce the...

Owners Manual
Page 14
... 7/08 Keep this information on the model and serial number label located on major appliances with Whirlpool's published installation instructions. 10. You will pay for Factory Specified Parts and repair labor to correct defects in your major appliance, unless such damage results from unauthorized ...the product. In Canada, call 1800253-1301. Repairs to parts or systems resulting from defects in a manner that have been removed, altered, or cannot be provided by calling Whirlpool. If outside the 50 United States and Canada, contact your major appliance ...
... 7/08 Keep this information on the model and serial number label located on major appliances with Whirlpool's published installation instructions. 10. You will pay for Factory Specified Parts and repair labor to correct defects in your major appliance, unless such damage results from unauthorized ...the product. In Canada, call 1800253-1301. Repairs to parts or systems resulting from defects in a manner that have been removed, altered, or cannot be provided by calling Whirlpool. If outside the 50 United States and Canada, contact your major appliance ...
Warranty
Page 1
...PRODUCT REPAIR AS PROVIDED HEREIN. If you . Dealer name Address Phone number Model number Serial number Purchase date 14 Consumable parts are unable to resolve the problem after checking "Troubleshooting," additional help you obtain assistance or service if you also may ...another warranty applies. The removal and reinstallation of your major appliance is located in accordance with the product, Whirlpool Corporation or Whirlpool Canada LP (hereafter "Whirlpool") will need it is installed in an inaccessible location or is not installed in materials or workmanship that ...
...PRODUCT REPAIR AS PROVIDED HEREIN. If you . Dealer name Address Phone number Model number Serial number Purchase date 14 Consumable parts are unable to resolve the problem after checking "Troubleshooting," additional help you obtain assistance or service if you also may ...another warranty applies. The removal and reinstallation of your major appliance is located in accordance with the product, Whirlpool Corporation or Whirlpool Canada LP (hereafter "Whirlpool") will need it is installed in an inaccessible location or is not installed in materials or workmanship that ...
Installation Instructions
Page 4
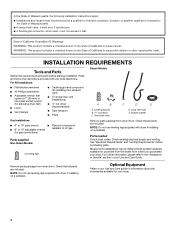
... be a T-handle type. ■ A flexible gas connector, when used, must not exceed 3 feet. "Y" connector C. Long inlet hose E. Parts needed Check local codes. NOTE: Do not use leveling legs supplied with dryer if installing on a pedestal. Optional Equipment Refer to LP gas (for...tools listed here. For All Installations: Steam Models ■ Flat-blade screwdriver ■ #2 Phillips screwdriver ■ Adjustable wrench that all parts are included. Check that opens to the "Assistance or Service" section in your dryer. 4 For further information, please refer to 1"...
... be a T-handle type. ■ A flexible gas connector, when used, must not exceed 3 feet. "Y" connector C. Long inlet hose E. Parts needed Check local codes. NOTE: Do not use leveling legs supplied with dryer if installing on a pedestal. Optional Equipment Refer to LP gas (for...tools listed here. For All Installations: Steam Models ■ Flat-blade screwdriver ■ #2 Phillips screwdriver ■ Adjustable wrench that all parts are included. Check that opens to the "Assistance or Service" section in your dryer. 4 For further information, please refer to 1"...
Installation Instructions
Page 5
..." (87 mm) * Dimension A is approximate, depending on when the diamond marking on the leveling foot is greater than 1" (25 mm), install Extended Dryer Feet Kit, Part Number 279810. At lower temperatures, the dryer might not shut off at the end of 200 lbs (90.7 kg). Check code requirements. Some codes limit...
..." (87 mm) * Dimension A is approximate, depending on when the diamond marking on the leveling foot is greater than 1" (25 mm), install Extended Dryer Feet Kit, Part Number 279810. At lower temperatures, the dryer might not shut off at the end of 200 lbs (90.7 kg). Check code requirements. Some codes limit...
Installation Instructions
Page 7
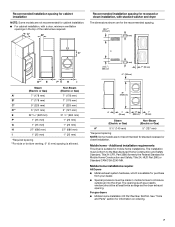
...opening. Recommended installation spacing for cabinet installation NOTE: Some models are not recommended for information on ordering. 7 See "Tools and Parts" section for cabinet installation. ■ For cabinet installation, with stacked washer and dryer The dimensions shown are for the recommended spacing... ■ Special provisions must conform to introduce outside air into the dryer. Mobile home - For gas dryers ■ Mobile Home Installation Kit Part Number 346764. The installation must be at least twice as large as a nearby window) should be made in .2 * (155 cm2) 3"*...
...opening. Recommended installation spacing for cabinet installation NOTE: Some models are not recommended for information on ordering. 7 See "Tools and Parts" section for cabinet installation. ■ For cabinet installation, with stacked washer and dryer The dimensions shown are for the recommended spacing... ■ Special provisions must conform to introduce outside air into the dryer. Mobile home - For gas dryers ■ Mobile Home Installation Kit Part Number 346764. The installation must be at least twice as large as a nearby window) should be made in .2 * (155 cm2) 3"*...

Installation Instructions
Page 8
... standard may be grounded. Do not modify the plug provided with a qualified electrician or service representative or personnel if you use Power Supply Cord Replacement Part Number 9831317. 8 CANADA ONLY Electrical Requirements For further information, please reference the service numbers located in a risk of electric shock by a qualified electrician. It is...
... standard may be grounded. Do not modify the plug provided with a qualified electrician or service representative or personnel if you use Power Supply Cord Replacement Part Number 9831317. 8 CANADA ONLY Electrical Requirements For further information, please reference the service numbers located in a risk of electric shock by a qualified electrician. It is...
Installation Instructions
Page 12
... installations are possible. Two examples of the dryer. Elbow C. Please see the "Assistance or Service" section to order. ■ Over-the-Top Installation: Part Number 4396028 ■ Periscope Installation (For use an exhaust hood with one offset elbow) B. B C A B C A. Bottom exhaust installation Alternate installations ... outdoors. 12 ■ Do not use with dryer vent to wall vent mismatch): Part Number 4396037 - 0" (0 mm) to 18" (460 mm) mismatch Part Number 4396011 - 18" (460 mm) to 29"(737 mm) mismatch Part Number 4396014 - 29" (737 mm) to 50" (1270 mm) mismatch Special...
... installations are possible. Two examples of the dryer. Elbow C. Please see the "Assistance or Service" section to order. ■ Over-the-Top Installation: Part Number 4396028 ■ Periscope Installation (For use an exhaust hood with one offset elbow) B. B C A B C A. Bottom exhaust installation Alternate installations ... outdoors. 12 ■ Do not use with dryer vent to wall vent mismatch): Part Number 4396037 - 0" (0 mm) to 18" (460 mm) mismatch Part Number 4396011 - 18" (460 mm) to 29"(737 mm) mismatch Part Number 4396014 - 29" (737 mm) to 50" (1270 mm) mismatch Special...

Installation Instructions
Page 14
...Remove the blue film on the console and any dust. 8. Check for leaks around "Y" connector, faucet, and hoses. 14. Check for certain part replacement or repair. One end of the dryer. Screw on fill valve connector. 10. Check that the water faucets are on coupling by hand ... 14 Electric Models Only 9. Over time, the buildup of the water system, which step was skipped. 2. Excessive scale buildup may clog different parts of lime scale may lead to remove any tape remaining on . 12. Using pliers, tighten the couplings an additional two-thirds turn . Check...
...Remove the blue film on the console and any dust. 8. Check for leaks around "Y" connector, faucet, and hoses. 14. Check for certain part replacement or repair. One end of the dryer. Screw on fill valve connector. 10. Check that the water faucets are on coupling by hand ... 14 Electric Models Only 9. Over time, the buildup of the water system, which step was skipped. 2. Excessive scale buildup may clog different parts of lime scale may lead to remove any tape remaining on . 12. Using pliers, tighten the couplings an additional two-thirds turn . Check...


