Whirlpool WED4916F Support and Manuals
Get Help and Manuals for this Whirlpool item
View All Support Options Below
Free Whirlpool WED4916F manuals!
Problems with Whirlpool WED4916F?
Ask a Question
Free Whirlpool WED4916F manuals!
Problems with Whirlpool WED4916F?
Ask a Question
Popular Whirlpool WED4916F Manual Pages
Installation Instructions - Page 4
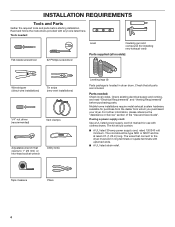
... whom you purchased your dryer. Mobile home installations require metal exhaust system hardware, available for installing new exhaust vent)
Parts supplied (all parts are included. Tools needed : Check local codes. The wires that all models):
Wire stripper (direct wire installations)
Tin snips (new vent installations)
1/4" nut driver (recommended)
Vent clamps
Adjustable wrench that...
Installation Instructions - Page 5
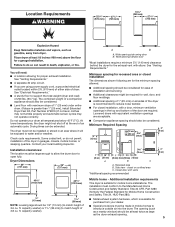
... servicing.
■■ Additional clearances might not shut off at the end of a companion appliance should be made in garages, closets, mobile homes, or sleeping quarters. The installation must be 1/2" (13 mm) (to introduce outside air into the dryer. The dryer must be considered. Check code requirements. Dryer Dimensions
29" (737 mm)
29...
Installation Instructions - Page 6
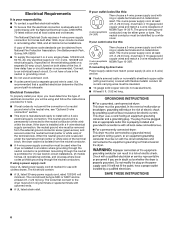
... looks like this :
4-wire receptacle (14-30R)
Then choose a 4-wire power supply cord with clothes dryers.
If using and follow the instructions provided for (1) new branch-circuit installations, (2) mobile homes, (3) recreational vehicles, and (4) areas where local codes prohibit grounding through the neutral conductor is prohibited. A time-delay fuse or circuit breaker is...
Installation Instructions - Page 7

... 3-wire receptacle (NEMA Type 10-30R): Go to Venting Requirements. NOTE: If local codes do not permit connection of cardboard from bottom of dryer. capacity washer) from dryer carton...for power supply cord strain relief: then steps 3-5 for 3-wire Direct Wire Connection section. Install Leveling Legs
Electrical Connection
Power Supply Cord
1. Screw in leveling legs
Using a wrench and ...
Installation Instructions - Page 10
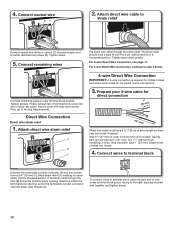
... hole (B) below . Shape ends of cable, leaving bare ground wire at 5" (127 mm). Tighten screw.
5. Prepare your 4-wire cable for mobile homes and where local codes do not permit 3-wire connections.
3. Strip insulation back 1" (25 mm). Reaching inside the terminal block opening .
For 3-wire Direct Wire Connection, see page 11. Secure...
Installation Instructions - Page 11

..., place hooked end of terminal block (B). Squeeze hooked ends together and tighten screws. Now, go to Venting Requirements.
3-wire Direct Wire Connection
Use where local codes permit connecting cabinet-ground conductor to connect neutral
ground wire and neutral wire
8. Remove center screw
B
Remove center terminal block screw (B). 11
Installation Instructions - Page 13
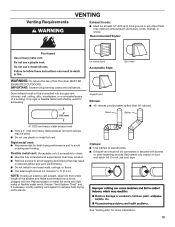
...lint. Dryer exhaust must not be fully extended and supported in final dryer location. ■■ Remove excess ...in reduced airflow and poor performance. ■■ Do not install in enclosed walls, ceilings, or floors. ■■ ...reduce the risk of duct and catch lint. Replace plastic or metal foil vents with screws or...codes and ordinances. Do not use plastic or metal foil vent.
Installation Instructions - Page 14

... Refer to connect elbows H. Plan Vent System
Recommended exhaust installations Typical installations vent the dryer from the rear of the dryer. A
A. Dryer B. Vent length necessary to the manufacturer's instructions.
Venting Kits
For more information, call 1-800-807-6777 or visit us at www.whirlpoolparts.ca. Part Number Descriptions
8171587RP 0-5" Metal vent periscope
4396037RP 0"-18...
Installation Instructions - Page 15
...elbows or making turns, allow as much room
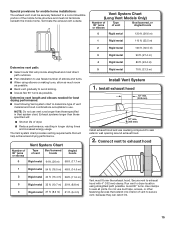
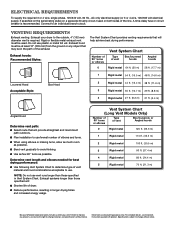
as possible. Vent System Chart (Long Vent Models Only)
Number of 90° turns or elbows
Type of dryer.
■■ Reduce...path:
■■ Select route that will provide straightest and most direct path outdoors.
■■ Plan installation to avoid kinking. ■■ Use as few 90° turns as possible. ■■ Bend ...
Installation Instructions - Page 16
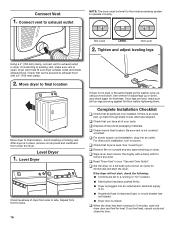
...Guide". Connect Vent
1. Tighten and adjust leveling legs
Using a 4" (102 mm) clamp, connect vent to
remove any tape remaining on a full heat cycle (not an air cycle) for the moisture sensing system to final location. After dryer is secured to side. Complete Installation...materials. Level Dryer
Check levelness of /recycle all parts are set in place, remove corner posts and cardboard from...
Installation Instructions - Page 17
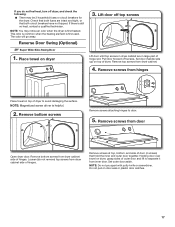
...NOTE: You may be 2 household fuses or circuit breakers for
the dryer. Set door (handle side up) on dryer
3. NOTE: Magnetized screw driver is first heated. Remove screws from inner door.
NOTE: Do not pry ...until top screws in dryer cabinet are intact and tight, or that both fuses are in large part of door (4 screws) that both circuit breakers have not tripped. Do not pull on top of...
Installation Instructions - Page 18
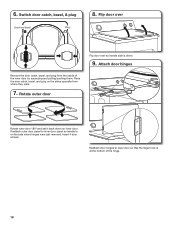
... door. Place the door catch, bezel, and plug on the side where hinges were just removed. Rotate outer door
Rotate outer door 180º and set it back down .
9. Reattach outer door panel to dryer door so that the larger hole is on the sides opposite from the inside of the...
Installation Instructions - Page 19
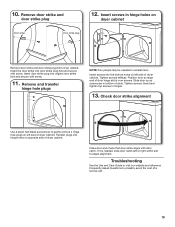
.... Close door and check that door strike aligns with screw.
11. Troubleshooting
See the Use and Care Guide or visit our website and reference Frequently Asked Questions to gently remove 4... hinge hole plugs on opposite side of dryer cabinet. Tighten screws halfway. Position door so large end of a service...
Dimension Guide - Page 1
... for ease of installation and servicing.
■■ Additional clearances might be required for the exhaust vent with elbow. capacity washer).
*Most installations require a minimum ...view - ft. Dryer Dimensions
29" (737 mm)
433/8" (1102 mm)
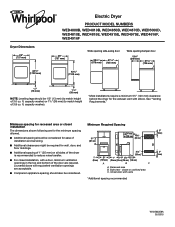
Electric Dryer
PRODUCT MODEL NUMBERS
WED4800B, WED4810B, WED4850B, WED4870B, WED5000D, WED4810E, WED4815E, WED4915E, WED4975E, WED4616F, WED4916F...
Dimension Guide - Page 2
...those specified will help achieve best drying performance. Specifications subject to change without notice. For complete details, see Installation Instructions packed with product. Exhaust hood must be in...A time-delay fuse or circuit breaker is required.
Vent System Chart (Long Vent Models Only)
Number of 90° turns or elbows
Type of the exhaust. ELECTRICAL REQUIREMENTS...
Whirlpool WED4916F Reviews
We have not received any reviews for Whirlpool yet.