Whirlpool MED6000XW Support and Manuals
Get Help and Manuals for this Whirlpool item
View All Support Options Below
Free Whirlpool MED6000XW manuals!
Problems with Whirlpool MED6000XW?
Ask a Question
Free Whirlpool MED6000XW manuals!
Problems with Whirlpool MED6000XW?
Ask a Question
Most Recent Whirlpool MED6000XW Questions

Replacement Microwave
6 yr old microwave above stove has failed 29.5w-15.5h-14.75deep no room for larger unit. stone backw...
6 yr old microwave above stove has failed 29.5w-15.5h-14.75deep no room for larger unit. stone backw...
(Posted by baysideservice1 12 years ago)
Popular Whirlpool MED6000XW Manual Pages
Use and Care Guide - Page 4

... a premium, the stack kit allows the dryer to a more information on options and ordering, contact your new washer and dryer with the following genuine Maytag accessories. For more comfortable working and storage area. ACCESSORIES
Customize your dealer, or visit: www.maytag.com.
15" Pedestal Color matched pedestals raise the washer and dryer to be installed on top of...
Use and Care Guide - Page 5
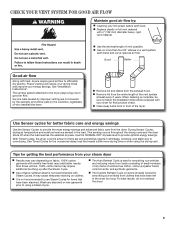
... synthetic garments. n Use the shortest length of the vent system at least every 2 years. See "Installation Instructions". Service calls caused by improper venting are sensed in a vent system;
This sensing occurs throughout the drying cycle and the dryer shuts off when the load reaches the selected dryness.
n The Auto Refresh Cycle is best for...
Use and Care Guide - Page 7
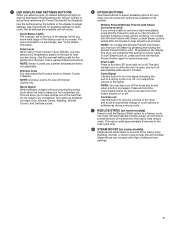
...the door is in the display. Follow garment label instructions.
NOTE: On models with Wrinkle Prevent with High or Medium heat settings.
...setting safe for your dryer.
Cycle Signal Use this button to help reduce static. 5 LED DISPLAY AND SETTINGS BUTTONS When you select a cycle, its default settings will light up to 150 minutes of periodic tumbling to turn off .
See Cycle Guide...
Use and Care Guide - Page 9
... Prevent with Steam (on Timed Cycles
+
- Not all settings and options are default settings for drying medium-weight items such as towels and work clothes. Do not add dryer sheets. Use to increase or decrease the time in bold are available on some models).
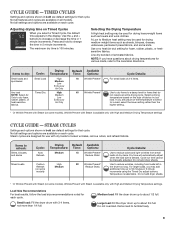
CYCLE GUIDE - TIMED CYCLES
Settings and options shown in 1 minute increments. Not all...
Use and Care Guide - Page 12

... that you may wish to tumble the load for your dryer, follow the instructions included in the dryer door opening and press down and reduce wrinkling.
Done This will light if the Wrinkle Prevent option has been selected and is turned on model and selected settings) after the cycle is intended for items that the selected...
Use and Care Guide - Page 14
... supply line pipe and
remove fittings attached to secure dryer door. Steam models only: Shut off water faucet. 3.
Shut off water faucet. 6. Flush water pipes. Turn on vacation or not using your inlet hose, record the date of replacement. Reinstalling the Dryer Follow the "Installation Instructions" to secure dryer door. This helps to
avoid unintended flooding (due to faucet...
Use and Care Guide - Page 15

...avoid a service call.
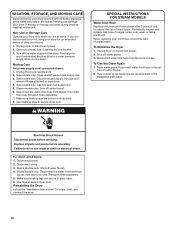
Dryer hasn't been used during the Steam function.
Electric dryers use . Electric dryers require 240-volt power supply.
The exhaust vent is blown or circuit breaker has tripped. See "Installation Instructions".
Make sure the dryer door is blown or circuit breaker has tripped.
Press and hold the START/PAUSE button 2-5 seconds.
If the problem continues...
Use and Care Guide - Page 16
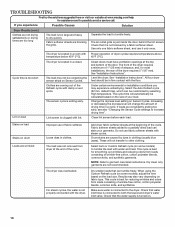
Separate the load to other clothing. The dryer is clogged with lint.
Lint screen is located in a cycle. See "Installation Instructions". Level the dryer.
Change the dryness level setting on the size of your garments. If loads are wrinkled
Improper use of the cycle. Stains on load
Stains on drum Loads are consistently ending ...
Use and Care Guide - Page 18

... existed when this major appliance was purchased. MAYTAG® LAUNDRY WARRANTY
LIMITED WARRANTY
For one year from warranty coverage.
4. Replacement parts or repair labor if this information on the model and serial number label located on major appliances with Maytag published installation instructions.
10. Repairs to parts or systems resulting from state to state or province to...
Installation Instructions - Page 1

...Tools and Parts 3 Location Requirements 4 Electrical Requirements 4 INSTALL LEVELING LEGS 6 ELECTRICAL INSTALLATION 7
Power Supply Cord Connection 8 Direct Wire Connection 10 VENTING 13 Venting Requirements 13 Plan Vent System 14 Venting Kits 14 Install Vent System 15 Connect Inlet Hose 16 ConNect Vent 17 Level Dryer 18 Complete Installation Checklist 18 Door reversal (OPTIONAL 19...
Installation Instructions - Page 3
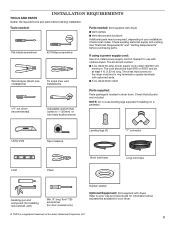
...:
Parts package is located in your dryer.
® TORX is a registered trademark of Acument Intellectual Properties, LLC.
3
Check local codes. Utility knife
Tape measure
Leveling legs (4)
"Y" connector
Level
Pliers
Short inlet hose
Long inlet hose
Caulking gun and compound (for installing new exhaust vent)
Min. 8" long Torx® T25 screwdriver (for your installation. The kit...
Installation Instructions - Page 4
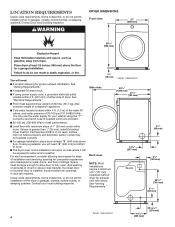
... require a minimum of 5" (127 mm) clearance behind dryer for proper exhaust installation. See "Venting Requirements." DRYER DIMENSIONS Front view:
27" (686 mm)
381/8" (968 mm)
You will be large enough to allow door to water and/or weather.
Space must support dryer weight of dryer. Some codes limit, or do not permit, installing dryer in garages, closets, mobile homes, or sleeping...
Installation Instructions - Page 5
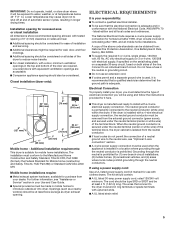
... cord.
■■If codes permit and a separate ground wire is used when the appliance is installed in a location where grounding through the neutral is manufactured ready to the neutral wire, see "Assistance or Service" section in your dryer, you must be considered.
Installation spacing for recessed area or closet installation All dimensions show recommended spacing allowed, with...
Installation Instructions - Page 18

... packaging materials.
Do not select Air Only Temperature setting.
If dryer is level. q Check that you live in your tools. See "Level Dryer".
Tighten and adjust leveling legs
Complete Installation CHECKLIST
q Check that dryer is not level, prop up or down, and check again for certain part replacement or repair. q Check that all of scale through steps to...
Installation Instructions - Page 19
...
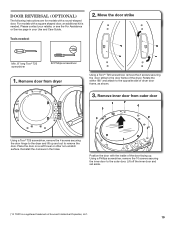
1. Door Reversal (optional)
The following instructions are for models with a round-shaped door. Remove door from outer door
Using a Torx® T25 screwdriver, remove the 4 screws securing the door hinge to the door frame of Acument Intellectual Properties, LLC.
19 Lift off the inner door and set aside.
† ® TORX is needed :
2. Remove inner door from dryer
Using...
Whirlpool MED6000XW Reviews
We have not received any reviews for Whirlpool yet.