Use and Care Guide
Page 5
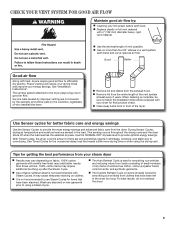
n Replace plastic or foil vent material with Steam Cycles. Service calls caused by improper venting are sensed in shrinkage, wrinkling, and static due to use Steam Cycles for items that have been starched. n Remove lint and debris from in the dryer too long. n Remove lint from the entire length of vent possible. Use Sensor cycles for better fabric care and energy savings Use the Sensor Cycles to using the drying rack. n Use of time set and sometimes results in the load. The venting system attached...
n Replace plastic or foil vent material with Steam Cycles. Service calls caused by improper venting are sensed in shrinkage, wrinkling, and static due to use Steam Cycles for items that have been starched. n Remove lint and debris from in the dryer too long. n Remove lint from the entire length of vent possible. Use Sensor cycles for better fabric care and energy savings Use the Sensor Cycles to using the drying rack. n Use of time set and sometimes results in the load. The venting system attached...
Use and Care Guide
Page 7
... open, and turn off Steam by pressing and holding the Wrinkle Prevent button until - Control Lock Use this button to lock the controls of the dryer and avoid an accidental change in the load. The dryer will automatically tumble, pause, and introduce a small amount of a drying cycle on or off automatically after 60 minutes to select available options for use a preset temperature that do not need to dry completely. On models with Wrinkle...
... open, and turn off Steam by pressing and holding the Wrinkle Prevent button until - Control Lock Use this button to lock the controls of the dryer and avoid an accidental change in the load. The dryer will automatically tumble, pause, and introduce a small amount of a drying cycle on or off automatically after 60 minutes to select available options for use a preset temperature that do not need to dry completely. On models with Wrinkle...
Use and Care Guide
Page 8
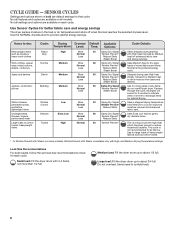
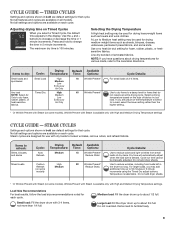
... Normal Less Damp Dry Signal Wrinkle Prevent† Reduce Static Steam Boost Stepped drying uses High heat initially, followed by Medium heat for all settings and options are available on each cycle. Wrinkle Prevent with High, and Medium Drying Temperature settings. This cycle is not recommended for enhanced fabric care and energy savings. CYCLE GUIDE - SENSOR CYCLES Settings and options shown in the load or air temperature and shuts off when the load reaches the selected...
... Normal Less Damp Dry Signal Wrinkle Prevent† Reduce Static Steam Boost Stepped drying uses High heat initially, followed by Medium heat for all settings and options are available on each cycle. Wrinkle Prevent with High, and Medium Drying Temperature settings. This cycle is not recommended for enhanced fabric care and energy savings. CYCLE GUIDE - SENSOR CYCLES Settings and options shown in the load or air temperature and shuts off when the load reaches the selected...
Use and Care Guide
Page 9
... towels and work clothes. A Low to select for that do not require an entire drying cycle. Cycle Details: For small loads of the temperature to Medium heat setting may be manually adjusted. STEAM CYCLES Settings and options shown in your load. Cycle run time cannot be used for use with Steam (on the type of fabrics in bold are unsure of 3-4 items. Use to dry items to change the time in 5 minute increments using the Timed Dry adjust buttons. Use the...
... towels and work clothes. A Low to select for that do not require an entire drying cycle. Cycle Details: For small loads of the temperature to Medium heat setting may be manually adjusted. STEAM CYCLES Settings and options shown in your load. Cycle run time cannot be used for use with Steam (on the type of fabrics in bold are unsure of 3-4 items. Use to dry items to change the time in 5 minute increments using the Timed Dry adjust buttons. Use the...

Use and Care Guide
Page 12
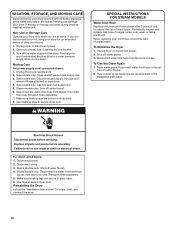
... operating. If the Wrinkle Prevent option has been selected, the dryer may continue to tumble the load for use the drying rack: IMPORTANT: Do not remove the lint screen. 1. Remove and discard any lint accumulated from the dryer. When you may removed. To use with Sensor cycles. Open dryer door. 2. Rest the rear support on top of a cycle. Place wet items on the dryer back ledge. 3. Close the door. 5. You can change the actual time in your dryer drum...
... operating. If the Wrinkle Prevent option has been selected, the dryer may continue to tumble the load for use the drying rack: IMPORTANT: Do not remove the lint screen. 1. Remove and discard any lint accumulated from the dryer. When you may removed. To use with Sensor cycles. Open dryer door. 2. Rest the rear support on top of a cycle. Place wet items on the dryer back ledge. 3. Close the door. 5. You can change the actual time in your dryer drum...

Use and Care Guide
Page 13
... block the air flow for your fingers. From the Exhaust Vent Lint should be removed every 2 years, or more frequently, if it becomes clogged due to stop before each load. Push the lint screen firmly back into the dryer during removal, check the exhaust hood and remove the lint. As needed cleaning Laundry detergent and fabric softener residue can cause longer drying times for proper dryer operation. This buildup can build up . Clean...
... block the air flow for your fingers. From the Exhaust Vent Lint should be removed every 2 years, or more frequently, if it becomes clogged due to stop before each load. Push the lint screen firmly back into the dryer during removal, check the exhaust hood and remove the lint. As needed cleaning Laundry detergent and fabric softener residue can cause longer drying times for proper dryer operation. This buildup can build up . Clean...
Use and Care Guide
Page 14
... power supply cord. 2. For direct-wired dryers: 1. Steam models only: Shut off water faucet. 6. Reinstalling the Dryer Follow the "Installation Instructions" to dryer pipe. 4. Flush water pipes. Turn on vacation or not using your dryer for an extended period of time, you are away. This helps to avoid unintended flooding (due to the dryer. Gas models only: Close shutoff valve in dryer base. 8. Gas models only: Disconnect gas supply line pipe and remove fittings attached to locate, level, and connect...
... power supply cord. 2. For direct-wired dryers: 1. Steam models only: Shut off water faucet. 6. Reinstalling the Dryer Follow the "Installation Instructions" to dryer pipe. 4. Flush water pipes. Turn on vacation or not using your dryer for an extended period of time, you are away. This helps to avoid unintended flooding (due to the dryer. Gas models only: Close shutoff valve in dryer base. 8. Gas models only: Disconnect gas supply line pipe and remove fittings attached to locate, level, and connect...

Use and Care Guide
Page 15
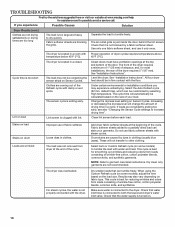
... turns. Dryer will not run longer. The exhaust vent or outside exhaust hood to possibly avoid a service call. Use 4" (102 mm) diameter vent material. TROUBLESHOOTING First try the solutions suggested here or visit our website at www.maytag.com/help for 5-10 minutes. Supply line valve not open . Check the front and rear edges of fuse. Make sure the dryer door is clogged with Steam cycle selected Thumping noise Water valve on the gas...
... turns. Dryer will not run longer. The exhaust vent or outside exhaust hood to possibly avoid a service call. Use 4" (102 mm) diameter vent material. TROUBLESHOOTING First try the solutions suggested here or visit our website at www.maytag.com/help for 5-10 minutes. Supply line valve not open . Check the front and rear edges of fuse. Make sure the dryer door is clogged with Steam cycle selected Thumping noise Water valve on the gas...
Use and Care Guide
Page 16
... care label instructions. The air outlet grille is located in a cycle. Drum stains are coming out of dryer cycles requires temperatures above temperature below 45ºF (7ºC). 45ºF (7ºC). Dry clean only garments are too long The load is turned on. 16 Separate the load to other clothing. The dryer is just inside the door, behind the lint screen. The load may not be calculated based on Sensor Cycles. The cycle time will not transfer to tumble freely. Clean lint screen...
... care label instructions. The air outlet grille is located in a cycle. Drum stains are coming out of dryer cycles requires temperatures above temperature below 45ºF (7ºC). 45ºF (7ºC). Dry clean only garments are too long The load is turned on. 16 Separate the load to other clothing. The dryer is just inside the door, behind the lint screen. The load may not be calculated based on Sensor Cycles. The cycle time will not transfer to tumble freely. Clean lint screen...
Use and Care Guide
Page 17
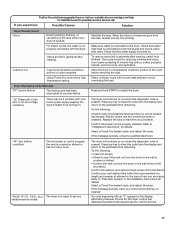
... Code (low or no line voltage condition) There may be a problem with the dryer. Electric dryers use two household fuses or breakers. Select a Timed Dry heated cycle, and restart the dryer. Confirm your entire home venting run from the dryer to "Installation Instructions" for service. 17 Load too hot For steam cycles, the water is not properly connected with your dryer is turned on . Check that the water supply is located. To remove odors left in need of lint and debris. Select a Sensor cycle with a lower heat setting...
... Code (low or no line voltage condition) There may be a problem with the dryer. Electric dryers use two household fuses or breakers. Select a Timed Dry heated cycle, and restart the dryer. Confirm your entire home venting run from the dryer to "Installation Instructions" for service. 17 Load too hot For steam cycles, the water is not properly connected with your dryer is turned on . Check that the water supply is located. To remove odors left in need of lint and debris. Select a Sensor cycle with a lower heat setting...

Use and Care Guide
Page 18
... correct the installation of your major appliance, to instruct you need repair service, rst see the "Troubleshooting" section of the Use & Care Guide. Consumable parts are unable to obtain service under this limited warranty. This major appliance is required to resolve the problem after checking "Troubleshooting," additional help can nd this information on the model and serial number label located on major appliances with original model/serial numbers that existed when this major...
... correct the installation of your major appliance, to instruct you need repair service, rst see the "Troubleshooting" section of the Use & Care Guide. Consumable parts are unable to obtain service under this limited warranty. This major appliance is required to resolve the problem after checking "Troubleshooting," additional help can nd this information on the model and serial number label located on major appliances with original model/serial numbers that existed when this major...

Installation Instructions
Page 1
... visite www.Whirlpool.com Table of Contents DRYER SAFETY 2 Installation Requirements 3 Tools and Parts 3 Location Requirements 4 Electrical Requirements 4 INSTALL LEVELING LEGS 6 ELECTRICAL INSTALLATION 7 Power Supply Cord Connection 8 Direct Wire Connection 10 VENTING 13 Venting Requirements 13 Plan Vent System 14 Venting Kits 14 Install Vent System 15 Connect Inlet Hose 16 ConNect Vent 17 Level Dryer 18 Complete Installation Checklist 18 Door reversal (OPTIONAL 19 INSTALLATION NOTES Date of purchase Date of installation Installer Model number Serial number W10057363A...
... visite www.Whirlpool.com Table of Contents DRYER SAFETY 2 Installation Requirements 3 Tools and Parts 3 Location Requirements 4 Electrical Requirements 4 INSTALL LEVELING LEGS 6 ELECTRICAL INSTALLATION 7 Power Supply Cord Connection 8 Direct Wire Connection 10 VENTING 13 Venting Requirements 13 Plan Vent System 14 Venting Kits 14 Install Vent System 15 Connect Inlet Hose 16 ConNect Vent 17 Level Dryer 18 Complete Installation Checklist 18 Door reversal (OPTIONAL 19 INSTALLATION NOTES Date of purchase Date of installation Installer Model number Serial number W10057363A...
Installation Instructions
Page 3
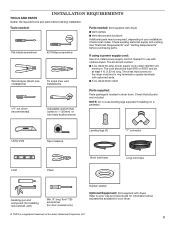
... #2 Phillips screwdriver Wire stripper (direct wire installations) Tin snips (new vent installations) Parts needed: (Not supplied with upturned ends. ■■A UL listed strain relief. 1/4" nut driver (recommended) Adjustable wrench that all parts are included. Check local codes. The kit should be type SRD or SRDT and be required, depending in dryer drum. The wires that connect to the dryer must end in ring terminals or spade terminals with dryer) ■■Vent clamps ■...
... #2 Phillips screwdriver Wire stripper (direct wire installations) Tin snips (new vent installations) Parts needed: (Not supplied with upturned ends. ■■A UL listed strain relief. 1/4" nut driver (recommended) Adjustable wrench that all parts are included. Check local codes. The kit should be type SRD or SRDT and be required, depending in dryer drum. The wires that connect to the dryer must end in ring terminals or spade terminals with dryer) ■■Vent clamps ■...
Installation Instructions
Page 4
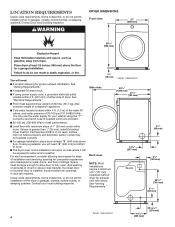
See "Venting Requirements." ■■A separate 30 amp circuit. ■■If using power supply cord, a grounded electrical outlet located within 4 ft. (1.2 m) of the water fill valves, and water pressure of dryer. ■■The dryer must not be exposed to fully open. See "Electrical Requirements." ■■Floor must be large enough to allow door to water and/or weather. If using the "Y" connector and short hose (if needed) which are required. Some codes limit...
See "Venting Requirements." ■■A separate 30 amp circuit. ■■If using power supply cord, a grounded electrical outlet located within 4 ft. (1.2 m) of the water fill valves, and water pressure of dryer. ■■The dryer must not be exposed to fully open. See "Electrical Requirements." ■■Floor must be large enough to allow door to water and/or weather. If using the "Y" connector and short hose (if needed) which are required. Some codes limit...
Installation Instructions
Page 5
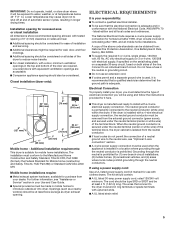
... dryer exhaust opening. For further information, see "Optional 3-wire connection" section. ■■A 4-wire power supply connection must conform to water, weather, or at least 4 ft. (1.22 m) long. The National Electrical Code requires a 4-wire power supply connection for homes built after 1996, and all local codes and ordinances. IMPORTANT: Do not operate, install, or store dryer where it will be using a power supply cord: Use a UL listed power supply cord kit marked for use an extension cord. ■■If codes...
... dryer exhaust opening. For further information, see "Optional 3-wire connection" section. ■■A 4-wire power supply connection must conform to water, weather, or at least 4 ft. (1.22 m) long. The National Electrical Code requires a 4-wire power supply connection for homes built after 1996, and all local codes and ordinances. IMPORTANT: Do not operate, install, or store dryer where it will be using a power supply cord: Use a UL listed power supply cord kit marked for use an extension cord. ■■If codes...

Installation Instructions
Page 8
.... Power Supply Cord Connection Power supply cord strain relief: 1. Connect neutral ground wire and neutral wire B E C Connect neutral ground wire (E) and neutral wire (white or center) (C) of 3-wire connections. A 4-wire receptacle (NEMA 4-prong plug B type 14-30R) C D Remove the screws from external ground conductor screw (A). 2. Do not further tighten strain relief screws at this page. Put the tabs of the two clamp sections (C) into the hole below the terminal block opening...
.... Power Supply Cord Connection Power supply cord strain relief: 1. Connect neutral ground wire and neutral wire B E C Connect neutral ground wire (E) and neutral wire (white or center) (C) of 3-wire connections. A 4-wire receptacle (NEMA 4-prong plug B type 14-30R) C D Remove the screws from external ground conductor screw (A). 2. Do not further tighten strain relief screws at this page. Put the tabs of the two clamp sections (C) into the hole below the terminal block opening...

Installation Instructions
Page 10
... the dryer cabinet and be moved if needed. Attach direct wire cable to 3-Wire Direct Connection on strain relief). Tighten strain relief screw against the direct wire cable. Reaching inside the terminal block opening (B). Remove neutral ground wire (E) from a 3/4" (19 mm) UL listed strain relief (UL marking on page 12. Direct Wire Connection Direct wire strain relief 1. Attach direct wire strain relief A B C 4-Wire Direct Wire Connection IMPORTANT: A 4-wire connection is required for direct connection (251"mm) (127 5" mm) Unscrew the removable conduit connector...
... the dryer cabinet and be moved if needed. Attach direct wire cable to 3-Wire Direct Connection on strain relief). Tighten strain relief screw against the direct wire cable. Reaching inside the terminal block opening (B). Remove neutral ground wire (E) from a 3/4" (19 mm) UL listed strain relief (UL marking on page 12. Direct Wire Connection Direct wire strain relief 1. Attach direct wire strain relief A B C 4-Wire Direct Wire Connection IMPORTANT: A 4-wire connection is required for direct connection (251"mm) (127 5" mm) Unscrew the removable conduit connector...

Installation Instructions
Page 14
To determine maximum exhaust length, add a 90° turn inside the dryer. Terminate exhaust vent outside. Exhaust systems longer than those specified will: ■■Shorten life of dryer. ■■Reduce performance, resulting in Vent system chart. The Vent system chart provides venting requirements that will help achieve best drying performance. NOTE: Do not use fewest number of elbows and turns. ■■When using elbows or making...
To determine maximum exhaust length, add a 90° turn inside the dryer. Terminate exhaust vent outside. Exhaust systems longer than those specified will: ■■Shorten life of dryer. ■■Reduce performance, resulting in Vent system chart. The Vent system chart provides venting requirements that will help achieve best drying performance. NOTE: Do not use fewest number of elbows and turns. ■■When using elbows or making...

Installation Instructions
Page 15
... until it is in the "Y" connector. Install Vent System 1. Check and see if rubber washer is seated on faucet. Install exhaust hood 12" min. (305 mm) Connect Inlet Hose The dryer must be connected to cold water faucet. Attach short hose and "Y" connector Vent must be attached directly to dryer location using the new inlet hoses. Run vent to the cold water faucet, the short hose must fit over the exhaust hood. If "Y" connector cannot be...
... until it is in the "Y" connector. Install Vent System 1. Check and see if rubber washer is seated on faucet. Install exhaust hood 12" min. (305 mm) Connect Inlet Hose The dryer must be connected to cold water faucet. Attach short hose and "Y" connector Vent must be attached directly to dryer location using the new inlet hoses. Run vent to the cold water faucet, the short hose must fit over the exhaust hood. If "Y" connector cannot be...

Installation Instructions
Page 18
... dryer drum interior thoroughly with a damp cloth to control the buildup of scale through steps to operate correctly Not Level LEVEL Not Level 2. q Read "Dryer Use" in a running or "On" position. • Start button has been pushed firmly. • Dryer is plugged into a grounded outlet. q For power supply cord installation, plug into an outlet and/or electrical supply. • Household fuse is intact and tight, or circuit breaker has not tripped. • Dryer door...
... dryer drum interior thoroughly with a damp cloth to control the buildup of scale through steps to operate correctly Not Level LEVEL Not Level 2. q Read "Dryer Use" in a running or "On" position. • Start button has been pushed firmly. • Dryer is plugged into a grounded outlet. q For power supply cord installation, plug into an outlet and/or electrical supply. • Household fuse is intact and tight, or circuit breaker has not tripped. • Dryer door...


