Whirlpool WED97HEDBD Support and Manuals
Get Help and Manuals for this Whirlpool item
View All Support Options Below
Free Whirlpool WED97HEDBD manuals!
Problems with Whirlpool WED97HEDBD?
Ask a Question
Free Whirlpool WED97HEDBD manuals!
Problems with Whirlpool WED97HEDBD?
Ask a Question
Popular Whirlpool WED97HEDBD Manual Pages
Use & Care Guide - Page 5
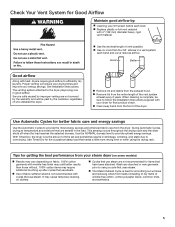
..., wrinkling, and static due to efficiently dry laundry. each load.
Proper venting will be sure to follow the Installation Instructions supplied with your energy savings.
n Remove lint from loads consisting of dry items of time set and sometimes results in the load. n Use of the vent system at least every 2 years. Wash any...
Use & Care Guide - Page 7
...models) Touch to manually reposition bulky loads midway through the cycle. This option adds approximately 8 minutes to pause it.
4 LED DISPLAY AND SETTINGS When you are available with Manual Cycles to selected Automatic cycles (see the "Cycle Guide... label instructions. Not all cycles and options are available on the type of load you select a cycle, its settings will automatically...
Use & Care Guide - Page 8
... for improved moisture removal and enhanced fabric care.
† On some models, you may select the "With Steam" setting to tumble freely.
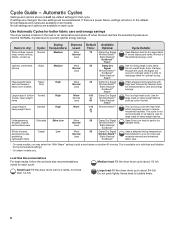
8 Use Automatic Cycles for large loads of heavyweight ...signal will be remembered.
Medium load: Fill the dryer drum up to about 1/2 full.
Cycle Guide - Use the NORMAL dryness level to about 3/4 full. do not overfill dryer drum. This cycle...
Use & Care Guide - Page 9
... settings. This is available only with High and Medium Drying Temperature settings.
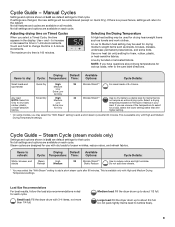
Manual Cycles
Settings and...Guide - Adjusting drying time on the type of the temperature to loosen wrinkles, reduce odors, and refresh fabrics. Use a no heat (air only) setting for use with 3-4 items, not more than the higher setting.
† On some knits. Steam Cycle (steam models only)
Settings...
Use & Care Guide - Page 11
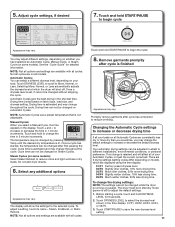
... you select a Manual Cycle, the time appears in the shortest time. Touch + and - Cycle time is off .
The display will affect all cycles. Touch and hold to different installations, environmental conditions, or personal preference. Touch DRYNESS LEVEL to scroll to begin cycle
Appearance may adjust different settings, depending on some models): Select Steam Refresh...
Use & Care Guide - Page 12
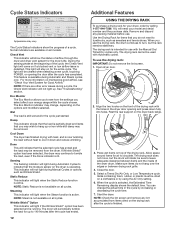
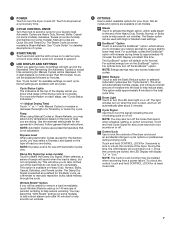
... Not all indicators are other error issues during Automatic Cycles to leave...settings you use with the Manual Dry/ Timed Dry cycles only. When you select affect your dryer, order by calling 1-877-944-7566. To use . Place wet items on the front of the dryer drum.
For more information on all models. See "Troubleshooting...door.
2. Rest the rear support on all cycles.
NOTE: ...
Use & Care Guide - Page 15
...replace exhaust vent with no water line connected. For optimal dry times, turn on .
See the Installation Instructions.
15
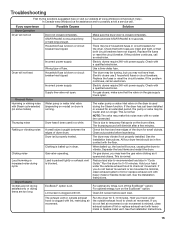
Touch and hold START/PAUSE 2-5 seconds. Dryer isn't properly leveled.
On gas dryers, you do not feel air movement or air movement is used in "Cycle Guide." Reduce load size to possibly avoid a service...line is running. Troubleshooting
First try the ...
Use & Care Guide - Page 16
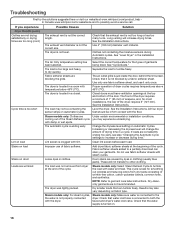
...vent is connected to possibly avoid a service call. Stains on load
Stains on ...clothes. See "Cycle Guide."
Lint on Automatic Cycles.
The Air Only temperature setting has been selected....models only: Clothes are consistently ending too early, see also "Changing the Automatic Cycle settings to tumble freely.
Loose dyes in the Installation Instructions.
Steam models...
Use & Care Guide - Page 17
... controls of vent you experience
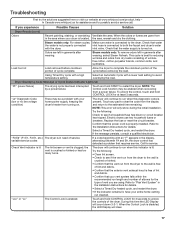
Possible Causes
Solution
Dryer Results (cont.)
Odors
Recent painting, staining, or varnishing Ventilate the area. variable service codes
If a code beginning with a high temperature setting. Refer to the Installation Instructions for 3 seconds to restart the dryer. "Loc" or "Lc"
The Control Lock is located. NOTE: The Control Lock function may be...
Use & Care Guide - Page 18

... servicer is installed, operated, and maintained according to instructions attached to review the Troubleshooting or Problem Solver section of repair or replacement under this major appliance, you . The cost of the Use and Care Guide, scan the QR code on the right to correct product damage or defects caused by a Whirlpool designated service company.
This warranty gives you specific...
Warranty Information - Page 1

... resulting from natural gas or L.P. This warranty gives you specific legal rights, and you . Please take a few minutes to review the Troubleshooting or Problem Solver section of the Use and Care Guide, scan the QR code on the duration of implied warranties of product replacement, your product requires repair. In the event of merchantability or fitness, so...
Installation Guide - Page 1
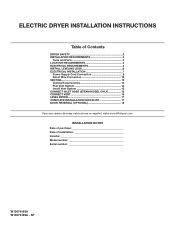
... DRYER INSTALLATION INSTRUCTIONS
Table of Contents
DRYER SAFETY 2 INSTALLATION REQUIREMENTS 3
Tools and Parts 3 LOCATION REQUIREMENTS 4 ELECTRICAL REQUIREMENTS 5 INSTALL LEVELING LEGS 6 ELECTRICAL INSTALLATION 7
Power Supply Cord Connection 8 Direct Wire Connection 10 VENTING 12 Venting Requirements 12 Plan Vent System 13 Install Vent System 15 CONNECT INLET HOSE (STEAM MODEL ONLY...
Installation Guide - Page 4
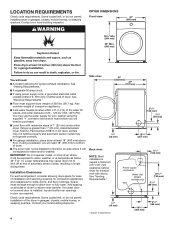
...support dryer weight of 20 - 120 psi (138 - 827 kPa). Installation Clearances
For each arrangement, consider allowing more space for exhaust vent with maximum slope of 1" (25 mm) under entire dryer.
Check code requirements. See "Venting Requirements."
3/4"* (18 mm)
* Approx. measurement.
4
61/2" (165 mm)
Power supply cord/cable
Vent
Water inlet (Steam
models...installation and servicing...
Installation Guide - Page 17

...set in your tools. If there is an extra part, go away.
See "Level Dryer."
Over time, the buildup of lime scale may clog different parts of your Use and Care Guide.
If dryer is closed.
q Check dryer's final location.
For direct wire installation... legs up or down, and check again for certain part replacement or repair. q Select a Time Dry heated cycle, and start...
Installation Guide - Page 18
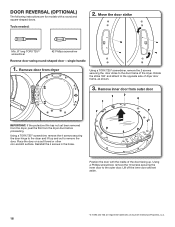
...-shaped door - Position the door with a round and square-shaped doors. DOOR REVERSAL (OPTIONAL)
The following instructions are registered trademarks of Acument Intellectual Properties, LLC.
18 Tools needed:
2. Using a TORX T25® screwdriver... holes. Lift off the inner door and set aside.
† ® TORX and T25 are for models with the inside of dryer door frame, as shown.
3.
Whirlpool WED97HEDBD Reviews
We have not received any reviews for Whirlpool yet.