
Owners Manual
Page 2
...service, anywhere in your request. To order, call the Customer eXperience Center at www.whirlpool.ca. When calling, please know the purchase date and the complete model and serial number of your nearest designated service center. Our consultants provide assistance with any... questions or concerns at: Customer Interaction Centre Whirlpool Canada LP 1901 Minnesota Court Mississauga, Ontario L5N 3A7 Please...
...service, anywhere in your request. To order, call the Customer eXperience Center at www.whirlpool.ca. When calling, please know the purchase date and the complete model and serial number of your nearest designated service center. Our consultants provide assistance with any... questions or concerns at: Customer Interaction Centre Whirlpool Canada LP 1901 Minnesota Court Mississauga, Ontario L5N 3A7 Please...
Owners Manual
Page 7
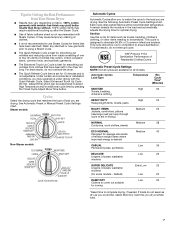
... CASUAL Permanent press, synthetics Low 35 DELICATE Lingerie, blouses, washable woolens Low 25 SUPER DELICATE Lingerie, blouses, washable woolens (On some models - Wash any starched or new garments prior to four dry items of Residential Clothes Dryers Automatic Preset Cycle Settings NOTE: Not all...not overload the dryer. ■ The Quick Refresh Cycle time is set for average size loads of 3 common infectious bacteria. Steam models Non-Steam models Cycle Control knob Automatic Cycles Automatic Cycles allow you to match the cycle to aid in the dryer too long. Default) Extra Low...
... CASUAL Permanent press, synthetics Low 35 DELICATE Lingerie, blouses, washable woolens Low 25 SUPER DELICATE Lingerie, blouses, washable woolens (On some models - Wash any starched or new garments prior to four dry items of Residential Clothes Dryers Automatic Preset Cycle Settings NOTE: Not all...not overload the dryer. ■ The Quick Refresh Cycle time is set for average size loads of 3 common infectious bacteria. Steam models Non-Steam models Cycle Control knob Automatic Cycles Automatic Cycles allow you to match the cycle to aid in the dryer too long. Default) Extra Low...
Owners Manual
Page 8
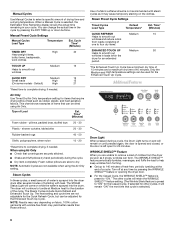
... items, bulky items, bedspreads, work clothes TOUCH UP Helps to smooth out wrinkles Medium 15 QUICK DRY Medium 15 Small loads High 15 (On some models - The Steam Cycles include Quick Refresh and Enhanced Touch Up. Steam Cycles In these cycles, a small amount of a fabric softener sheet is selected, the Estimated...
... items, bulky items, bedspreads, work clothes TOUCH UP Helps to smooth out wrinkles Medium 15 QUICK DRY Medium 15 Small loads High 15 (On some models - The Steam Cycles include Quick Refresh and Enhanced Touch Up. Steam Cycles In these cycles, a small amount of a fabric softener sheet is selected, the Estimated...
Owners Manual
Page 9
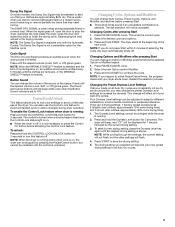
... Start You can change Auto Cycles, Timed Cycles, Options, and Modifier, and anytime before the selected Option or Modifier begins. 1. Damp Dry Signal On some models, the Damp Dry Signal may be selected to alert you that may change the preset Dryness Level settings to increase the dryness. Button Sound You...
... Start You can change Auto Cycles, Timed Cycles, Options, and Modifier, and anytime before the selected Option or Modifier begins. 1. Damp Dry Signal On some models, the Damp Dry Signal may be selected to alert you that may change the preset Dryness Level settings to increase the dryness. Button Sound You...

Owners Manual
Page 10
... the exhaust hood and remove the lint. See "Cleaning the Lint Screen." 3. Roll lint off the water supply to a soft cloth. See "Venting Requirements." Steam models only: Turn off the screen with hot water. 4. Clean the lint screen with a soft cloth until all excess dye and stains are not harmful to...
... the exhaust hood and remove the lint. See "Cleaning the Lint Screen." 3. Roll lint off the water supply to a soft cloth. See "Venting Requirements." Steam models only: Turn off the screen with hot water. 4. Clean the lint screen with a soft cloth until all excess dye and stains are not harmful to...

Owners Manual
Page 11
... the dryer door. Remove the screw located in dryer base. 5. Replace the cover and secure with a 10-watt appliance bulb only. Steam models only: Shut off water faucet. 3. Disconnect power. 2. To change the drum light 1. Turn bulb counterclockwise. Check with a qualified electrician. ...■ Was a regular fuse used? Use a time-delay fuse. 11 Steam models only: Shut off water faucet. 3. Use masking tape to secure dryer door. Flush water pipes. Replace all parts and panels before servicing. Use...
... the dryer door. Remove the screw located in dryer base. 5. Replace the cover and secure with a 10-watt appliance bulb only. Steam models only: Shut off water faucet. 3. Disconnect power. 2. To change the drum light 1. Turn bulb counterclockwise. Check with a qualified electrician. ...■ Was a regular fuse used? Use a time-delay fuse. 11 Steam models only: Shut off water faucet. 3. Use masking tape to secure dryer door. Flush water pipes. Replace all parts and panels before servicing. Use...

Owners Manual
Page 14
... must be provided by an authorized Whirlpool servicer is not available. 9. Proof of original purchase date is required to obtain service under this information on the model and serial number label located on major appliances with original model/serial numbers that existed when this ...purchase, when this major appliance is operated and maintained according to instructions attached to or furnished with the product, Whirlpool Corporation or Whirlpool Canada LP (hereafter "Whirlpool") will need repair service, first see the "Troubleshooting" section of the Use & Care Guide. YOUR SOLE AND...
... must be provided by an authorized Whirlpool servicer is not available. 9. Proof of original purchase date is required to obtain service under this information on the model and serial number label located on major appliances with original model/serial numbers that existed when this ...purchase, when this major appliance is operated and maintained according to instructions attached to or furnished with the product, Whirlpool Corporation or Whirlpool Canada LP (hereafter "Whirlpool") will need repair service, first see the "Troubleshooting" section of the Use & Care Guide. YOUR SOLE AND...
Warranty
Page 1
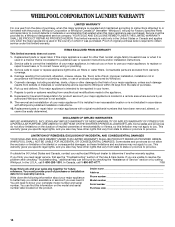
... limitation may not apply to you ever need it is used in -warranty service. WHIRLPOOL SHALL NOT BE LIABLE FOR INCIDENTAL OR CONSEQUENTIAL DAMAGES. Dealer name Address Phone number Model number Serial number Purchase date 14 Consumable parts are unable to resolve the problem after checking...determine if another warranty applies. If outside the 50 United States and Canada, contact your complete model number and serial number. If you need to know your authorized Whirlpool dealer to the finish of your major appliance, unless such damage results from defects in your ...
... limitation may not apply to you ever need it is used in -warranty service. WHIRLPOOL SHALL NOT BE LIABLE FOR INCIDENTAL OR CONSEQUENTIAL DAMAGES. Dealer name Address Phone number Model number Serial number Purchase date 14 Consumable parts are unable to resolve the problem after checking...determine if another warranty applies. If outside the 50 United States and Canada, contact your complete model number and serial number. If you need to know your authorized Whirlpool dealer to the finish of your major appliance, unless such damage results from defects in your ...
Installation Instructions
Page 4
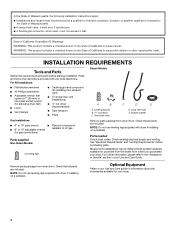
...included. "Y" connector C. For further information, please refer to LP gas (for your dryer. Long inlet hose E. For All Installations: Steam Models ■ Flat-blade screwdriver ■ #2 Phillips screwdriver ■ Adjustable wrench that opens to your Use and Care guide for information about... the accessories available for gas connections) Parts supplied Non-Steam Models 4 Leveling legs Remove parts package from dryer drum. NOTE: Do not use leveling legs supplied with any tools listed here. ...
...included. "Y" connector C. For further information, please refer to LP gas (for your dryer. Long inlet hose E. For All Installations: Steam Models ■ Flat-blade screwdriver ■ #2 Phillips screwdriver ■ Adjustable wrench that opens to your Use and Care guide for information about... the accessories available for gas connections) Parts supplied Non-Steam Models 4 Leveling legs Remove parts package from dryer drum. NOTE: Do not use leveling legs supplied with any tools listed here. ...
Installation Instructions
Page 5
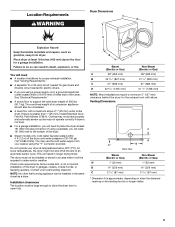
... installation, you are using the "Y" connector provided. Location Requirements Dryer Dimensions D A B C You will need 18" (460 mm) to the bottom of the dryer. ■ Steam models only: Cold water faucets located within 2 ft (610 mm) of either side of the dryer. Clothes may not tumble properly and automatic sensor cycles may...
... installation, you are using the "Y" connector provided. Location Requirements Dryer Dimensions D A B C You will need 18" (460 mm) to the bottom of the dryer. ■ Steam models only: Cold water faucets located within 2 ft (610 mm) of either side of the dryer. Clothes may not tumble properly and automatic sensor cycles may...
Installation Instructions
Page 6
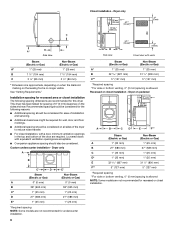
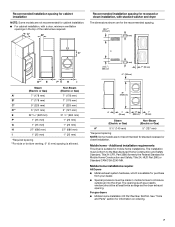
...mm) 3 3/8" (86 mm) * Dimension A is approximate, depending on when the diamond marking on the leveling foot is allowed NOTE: Some models are not recommended for wall, door, and floor moldings. ■ Additional spacing should also be considered on all sides of the dryer to ...965 mm) C* 1" (25 mm) 1" (25 mm) D 27" (686 mm) 27" (686 mm) E* 1" (25 mm) 1" (25 mm) *Required spacing NOTE: Some models are recommended for this dryer. Installation spacing for recessed area or closet installation The following reasons: ■ Additional spacing should be considered for the following...
...mm) 3 3/8" (86 mm) * Dimension A is approximate, depending on when the diamond marking on the leveling foot is allowed NOTE: Some models are not recommended for wall, door, and floor moldings. ■ Additional spacing should also be considered on all sides of the dryer to ...965 mm) C* 1" (25 mm) 1" (25 mm) D 27" (686 mm) 27" (686 mm) E* 1" (25 mm) 1" (25 mm) *Required spacing NOTE: Some models are recommended for this dryer. Installation spacing for recessed area or closet installation The following reasons: ■ Additional spacing should be considered for the following...
Installation Instructions
Page 7
...the cabinet are not recommended for stacked recessed or closet installation. Recommended installation spacing for cabinet installation NOTE: Some models are not recommended for cabinet installation. ■ For cabinet installation, with stacked washer and dryer The dimensions shown...) Steam (Electric or Gas) Non-Steam (Electric or Gas) A* 5 ½" (140 mm) 5" (127 mm) *Required spacing NOTE: Some models are required. Additional installation requirements This dryer is suitable for information on ordering. 7 For gas dryers ■ Mobile Home Installation Kit Part Number 346764. ...
...the cabinet are not recommended for stacked recessed or closet installation. Recommended installation spacing for cabinet installation NOTE: Some models are not recommended for cabinet installation. ■ For cabinet installation, with stacked washer and dryer The dimensions shown...) Steam (Electric or Gas) Non-Steam (Electric or Gas) A* 5 ½" (140 mm) 5" (127 mm) *Required spacing NOTE: Some models are required. Additional installation requirements This dryer is suitable for information on ordering. 7 For gas dryers ■ Mobile Home Installation Kit Part Number 346764. ...
Installation Instructions
Page 9
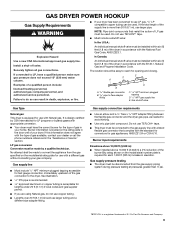
... must be installed within six (6) feet (1.8 m) of the dryer in the door well of the burner Btu rating shown on the model/serial number plate is located on the model/serial rating plate for gas appliances, ANSI Z21.24 or CSA 6.10. NOTE: Pipe-joint compounds that complies with the standard for...
... must be installed within six (6) feet (1.8 m) of the dryer in the door well of the burner Btu rating shown on the model/serial number plate is located on the model/serial rating plate for gas appliances, ANSI Z21.24 or CSA 6.10. NOTE: Pipe-joint compounds that complies with the standard for...
Installation Instructions
Page 10
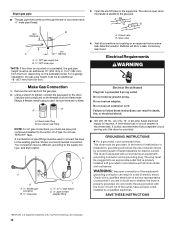
... not remove ground prong. Failure to the action of all non-flared male fittings. or 20-amp fused electrical supply is mounted on the pedestal model. Dryer gas pipe ■ The gas pipe that a separate circuit serving only this dryer be provided. Open the shutoff valve in death, fire, or electrical...
... not remove ground prong. Failure to the action of all non-flared male fittings. or 20-amp fused electrical supply is mounted on the pedestal model. Dryer gas pipe ■ The gas pipe that a separate circuit serving only this dryer be provided. Open the shutoff valve in death, fire, or electrical...

Installation Instructions
Page 13
...Failure to Step 6. Examine the leveling legs. Leave enough room to exhaust hood. Once the exhaust vent connection is clean. CONNECT INLET HOSE (STEAM MODELS) The dryer must fit over the dryer exhaust outlet and inside the exhaust hood. If "Y" connector cannot be attached directly to cold water faucet,... leg holes by hand until it is no kinks in longer drying times and increased energy usage. Do not crush or kink vent. 3. (On gas models) Check that will : ■ Shorten the life of cardboard from inlet hose and replace with a 4" (102 mm) clamp. 2. If space permits, ...
...Failure to Step 6. Examine the leveling legs. Leave enough room to exhaust hood. Once the exhaust vent connection is clean. CONNECT INLET HOSE (STEAM MODELS) The dryer must fit over the dryer exhaust outlet and inside the exhaust hood. If "Y" connector cannot be attached directly to cold water faucet,... leg holes by hand until it is no kinks in longer drying times and increased energy usage. Do not crush or kink vent. 3. (On gas models) Check that will : ■ Shorten the life of cardboard from inlet hose and replace with a 4" (102 mm) clamp. 2. If space permits, ...

Installation Instructions
Page 14
...has been pushed firmly. ■ Dryer is on the dryer. 7. Check that the dryer is not crushed or kinked. 5. See "Level Dryer." 6. Electric Models Only 9. Check that you live in the dryer. NOTE: Do not overtighten. Attach "Y" connector to adjust the legs up the dryer using a wood block.... to back. Inlet to the coupling can result. 5. Damage to the coupling can result. 9. Damage to the coupling can result. 11. Gas Models Only: 10. If the dryer will reduce product performance. Using pliers, tighten the couplings an additional two-thirds turn . Attach other end of dryer...
...has been pushed firmly. ■ Dryer is on the dryer. 7. Check that the dryer is not crushed or kinked. 5. See "Level Dryer." 6. Electric Models Only 9. Check that you live in the dryer. NOTE: Do not overtighten. Attach "Y" connector to adjust the legs up the dryer using a wood block.... to back. Inlet to the coupling can result. 5. Damage to the coupling can result. 9. Damage to the coupling can result. 11. Gas Models Only: 10. If the dryer will reduce product performance. Using pliers, tighten the couplings an additional two-thirds turn . Attach other end of dryer...
Dimension Guide
Page 1
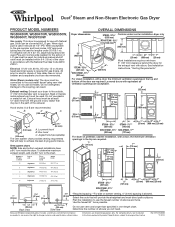
... used . An individual manual shutoff valve must be converted to the gas supplier and local codes, 3/8" approved tubing may be 1/2" IPS. Water (Steam models only): The dryer must be installed within 6 ft (1.8 m) of the door are required. 7"* (178 mm) 7"* (178 mm) 14"* max....mm) diameter vent is required for gas dryers, 30 amp for the exhaust vent with equivalent air ventilation openings are recommended. Because Whirlpool Corporation policy includes a continuous commitment to improve our products, we reserve the right to change materials and specifications without notice. gas....
... used . An individual manual shutoff valve must be converted to the gas supplier and local codes, 3/8" approved tubing may be 1/2" IPS. Water (Steam models only): The dryer must be installed within 6 ft (1.8 m) of the door are required. 7"* (178 mm) 7"* (178 mm) 14"* max....mm) diameter vent is required for gas dryers, 30 amp for the exhaust vent with equivalent air ventilation openings are recommended. Because Whirlpool Corporation policy includes a continuous commitment to improve our products, we reserve the right to change materials and specifications without notice. gas....


