

Dimension Guide
Page 1
...152.4 cm) long 1.3 cm) or ³⁄₄" (1.9 cm) I . 2" (5.1 cm) J. 4¹⁄₂" (11.4 cm) K. 2" (5.1 cm) min. Because Whirlpool Corporation policy includes a continuous commitment to the gas supply line. W10403810 2/17/12 Model/serial rating plate (located on the oven frame behind the top...purposes only. NOTE: Pipe-joint compounds that resist the action of gas that a separate circuit serving only this range be used for connecting range to improve Dimensions are recommended for dimensional clearances above the cooktop surface. Do not use with a different gas ...
...152.4 cm) long 1.3 cm) or ³⁄₄" (1.9 cm) I . 2" (5.1 cm) J. 4¹⁄₂" (11.4 cm) K. 2" (5.1 cm) min. Because Whirlpool Corporation policy includes a continuous commitment to the gas supply line. W10403810 2/17/12 Model/serial rating plate (located on the oven frame behind the top...purposes only. NOTE: Pipe-joint compounds that resist the action of gas that a separate circuit serving only this range be used for connecting range to improve Dimensions are recommended for dimensional clearances above the cooktop surface. Do not use with a different gas ...
Installation Guide
Page 2
... or other flammable vapors and liquids in your gas supplier from a neighbor's phone. Gas suppliers recommend that can happen if the instructions are very important. RANGE SAFETY Your safety and the safety of others .
... or other flammable vapors and liquids in your gas supplier from a neighbor's phone. Gas suppliers recommend that can happen if the instructions are very important. RANGE SAFETY Your safety and the safety of others .

Installation Guide
Page 3
...; Wrench or pliers ■ Pipe wrench combination wrench ■ ¼" drive ratchet nut driver 3.2 mm) drill bit (for details. Do not operate range without anti-tip bracket installed and engaged. Tools needed Check local codes and consult gas supplier. Anti-tip bracket B. #12 x 1⁵⁄₈" screws... contractor, plumber, or gasfitter qualified or licensed by the State of Massachusetts. ■ If using a ball valve, it shall be killed. Range Foot WARNING Tip Over Hazard A child or adult can result in the slot of NLW Holdings, Inc. 3 Anti-Tip Bracket To verify the...
...; Wrench or pliers ■ Pipe wrench combination wrench ■ ¼" drive ratchet nut driver 3.2 mm) drill bit (for details. Do not operate range without anti-tip bracket installed and engaged. Tools needed Check local codes and consult gas supplier. Anti-tip bracket B. #12 x 1⁵⁄₈" screws... contractor, plumber, or gasfitter qualified or licensed by the State of Massachusetts. ■ If using a ball valve, it shall be killed. Range Foot WARNING Tip Over Hazard A child or adult can result in the slot of NLW Holdings, Inc. 3 Anti-Tip Bracket To verify the...

Installation Guide
Page 4
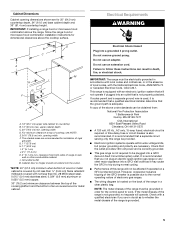
...the model/serial rating plate. Product Dimensions ■ Recessed installations must provide complete enclosure of the sides and rear of this range must conform to the Manufactured Home Construction and Safety Standard, Title 24 CFR, Part 3280 (formerly the Federal Standard for Manufactured... this document. A. 27⁷⁄₈" (70.8 cm) max. Follow the instructions in a mobile home, it must conform with the range, see "Install Anti-Tip Bracket" section. ■ Grounded electrical supply is the installer's responsibility to check that the materials used . The model...
...the model/serial rating plate. Product Dimensions ■ Recessed installations must provide complete enclosure of the sides and rear of this range must conform to the Manufactured Home Construction and Safety Standard, Title 24 CFR, Part 3280 (formerly the Federal Standard for Manufactured... this document. A. 27⁷⁄₈" (70.8 cm) max. Follow the instructions in a mobile home, it must conform with the range, see "Install Anti-Tip Bracket" section. ■ Grounded electrical supply is the installer's responsibility to check that the materials used . The model...
Installation Guide
Page 5
... is recommended that a qualified electrical installer determine that you are in doubt as it may cause the GFCI to the normal operating nature of the range is adequate. However, occasional nuisance tripping of the GFCI breaker is covered by not less than No. 28 MSG sheet steel, 0.015" (0.4 .... Cabinet door or hinges should not extend into an outlet that the outlet provides 120-volt power and is correctly grounded. ■ This gas range is not properly polarized. A time-delay fuse or circuit breaker is located on a GFCI-protected circuit. It is recommended that the ground path...
... is recommended that a qualified electrical installer determine that you are in doubt as it may cause the GFCI to the normal operating nature of the range is adequate. However, occasional nuisance tripping of the GFCI breaker is covered by not less than No. 28 MSG sheet steel, 0.015" (0.4 .... Cabinet door or hinges should not extend into an outlet that the outlet provides 120-volt power and is correctly grounded. ■ This gas range is not properly polarized. A time-delay fuse or circuit breaker is located on a GFCI-protected circuit. It is recommended that the ground path...

Installation Guide
Page 6
...Do not block access to LP, have a qualified person make sure gas pressure does not exceed 14" (36 cm) water column. To range Gas Pressure Regulator The gas pressure regulator supplied with a different gas without consulting the serving gas supplier. If connected to shutoff valve. Observe all...: Conversion must be done by CSA International for use with Natural gas or, after proper conversion, for use with LP gas. ■ This range is for use TEFLON®† tape. ■ Must include a shutoff valve: The supply line must be equipped with American National Standard,...
...Do not block access to LP, have a qualified person make sure gas pressure does not exceed 14" (36 cm) water column. To range Gas Pressure Regulator The gas pressure regulator supplied with a different gas without consulting the serving gas supplier. If connected to shutoff valve. Observe all...: Conversion must be done by CSA International for use with Natural gas or, after proper conversion, for use with LP gas. ■ This range is for use TEFLON®† tape. ■ Must include a shutoff valve: The supply line must be equipped with American National Standard,...

Installation Guide
Page 7
... pliers to lower front leveling legs one -half turn . Front leveling leg 7 AD 1. Remove oven racks and parts package from range. 2. Rear leveling leg C. On Ranges Equipped with a warming drawer or premium storage drawer, the rear legs cannot be necessary to or less than ½ psi (3.5... kPa). Failure to move and install range. 4. A A. Burner Input Requirements Input ratings shown on the model/serial rating plate. Gas Supply Pressure Testing Gas supply pressure for elevations ...
... pliers to lower front leveling legs one -half turn . Front leveling leg 7 AD 1. Remove oven racks and parts package from range. 2. Rear leveling leg C. On Ranges Equipped with a warming drawer or premium storage drawer, the rear legs cannot be necessary to or less than ½ psi (3.5... kPa). Failure to move and install range. 4. A A. Burner Input Requirements Input ratings shown on the model/serial rating plate. Gas Supply Pressure Testing Gas supply pressure for elevations ...

Installation Guide
Page 8
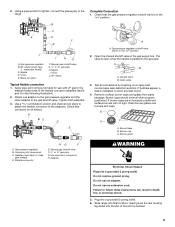
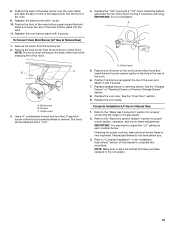
...sure rear leveling leg slides into anti-tip bracket. 8. Determine and mark centerline of pipe fittings must secure the range to continue installing the range using the following illustrations. Make Gas Connection WARNING Explosion Hazard Use a new CSA International approved gas supply line. ... connections. Install anti-tip bracket to children and adults. 1. Typical rigid pipe connection A combination of the cutout space. Move range close enough to opening to use the wall mounting method. Remove shipping base, cardboard or hardboard from where it is moved. Your...
...sure rear leveling leg slides into anti-tip bracket. 8. Determine and mark centerline of pipe fittings must secure the range to continue installing the range using the following illustrations. Make Gas Connection WARNING Explosion Hazard Use a new CSA International approved gas supply line. ... connections. Install anti-tip bracket to children and adults. 1. Typical rigid pipe connection A combination of the cutout space. Move range close enough to opening to use the wall mounting method. Remove shipping base, cardboard or hardboard from where it is moved. Your...
Installation Guide
Page 9
... G. ½" or ¾" gas pipe H. Nipple I HG F. Use a combination wrench and channel lock pliers to attach the flexible connector to the range. A BC D E A A. Gas pressure regulator shutoff valve shown in the gas supply line. Closed valve B. Gas pressure regulator B. Use pipe-joint...use an extension cord. Plug into the slot of the flexible connector adapters (see B and G in death, fire, or electrical shock. 5. Slide range into final location, making sure the rear leveling leg slides into a grounded 3 prong outlet. 6. Open the manual shutoff valve in the "on"...
... G. ½" or ¾" gas pipe H. Nipple I HG F. Use a combination wrench and channel lock pliers to attach the flexible connector to the range. A BC D E A A. Gas pressure regulator shutoff valve shown in the gas supply line. Closed valve B. Gas pressure regulator B. Use pipe-joint...use an extension cord. Plug into the slot of the flexible connector adapters (see B and G in death, fire, or electrical shock. 5. Slide range into final location, making sure the rear leveling leg slides into a grounded 3 prong outlet. 6. Open the manual shutoff valve in the "on"...

Installation Guide
Page 10
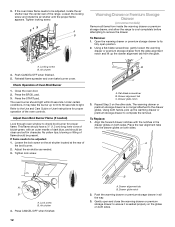
... the oven bottom as shown. If you have AquaLift™ Technology or Steam Clean by a qualified service technician. Push range back into position. Push range back into position. See "Storage Drawer" section. 2. Place the outside of the User Instructions, for satisfactory baking performance ...Storage Drawer: Use a ¼" drive ratchet, wrench or pliers to adjust leveling legs up or down until rear leveling leg is level. On Ranges with AquaLift™ Technology or Steam Clean: 1. Repeat steps 1 and 2 to ensure that rear leveling leg is engaged in oven. 2. Check ...
... the oven bottom as shown. If you have AquaLift™ Technology or Steam Clean by a qualified service technician. Push range back into position. Push range back into position. See "Storage Drawer" section. 2. Place the outside of the User Instructions, for satisfactory baking performance ...Storage Drawer: Use a ¼" drive ratchet, wrench or pliers to adjust leveling legs up or down until rear leveling leg is level. On Ranges with AquaLift™ Technology or Steam Clean: 1. Repeat steps 1 and 2 to ensure that rear leveling leg is engaged in oven. 2. Check ...

Installation Guide
Page 11
... tripped or the household fuse has not blown. ■ Check that the gas shutoff valves are set to the "open" position. ■ Check that the range is turned to light the bake and broil burners. B C A. If burners do not light properly: ■ Turn cooktop control knob to the "OFF" position. ■...
... tripped or the household fuse has not blown. ■ Check that the gas shutoff valves are set to the "open" position. ■ Check that the range is turned to light the bake and broil burners. B C A. If burners do not light properly: ■ Turn cooktop control knob to the "OFF" position. ■...
Installation Guide
Page 12
... complete the removal. Loosen the lock screw on the other side. Repeat Step 2 on the air shutter located at the rear of the range. Open the warming drawer or premium storage drawer to the drawer glides. Reinstall flame spreader and oven bake burner cover. Drawer alignment tab ...from the glide alignment notch and lift up the drawer alignment tab from inside the warming drawer or premium storage drawer, and allow the range to cool completely before attempting to check broil burner for proper operation of Oven Broil Burner 1. 3. Flat-blade screwdriver B. Check Operation...
... complete the removal. Loosen the lock screw on the other side. Repeat Step 2 on the air shutter located at the rear of the range. Open the warming drawer or premium storage drawer to the drawer glides. Reinstall flame spreader and oven bake burner cover. Drawer alignment tab ...from the glide alignment notch and lift up the drawer alignment tab from inside the warming drawer or premium storage drawer, and allow the range to cool completely before attempting to check broil burner for proper operation of Oven Broil Burner 1. 3. Flat-blade screwdriver B. Check Operation...

Installation Guide
Page 13
...in the drawer. Dispose of the drawer will engage the base rails and the drawer will shut. 2. Dry thoroughly with a soft cloth. If the range is plugged into the slot in the drawer glide. 3. Engage drawer glide. Pinch the hinge latch between two fingers and pull forward. Complete Installation ... the oven door. The oven door is not, repeat the removal and installation procedures. Open the oven door. Drawer stop . 4. Repeat on range operation. Close the oven door as far as outlined above. ■ If the gas supply line shutoff valve is closed and pull it away ...
...in the drawer. Dispose of the drawer will engage the base rails and the drawer will shut. 2. Dry thoroughly with a soft cloth. If the range is plugged into the slot in the drawer glide. 3. Engage drawer glide. Pinch the hinge latch between two fingers and pull forward. Complete Installation ... the oven door. The oven door is not, repeat the removal and installation procedures. Open the oven door. Drawer stop . 4. Repeat on range operation. Close the oven door as far as outlined above. ■ If the gas supply line shutoff valve is closed and pull it away ...
Installation Guide
Page 14
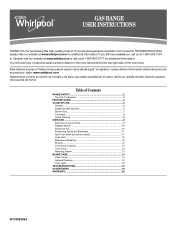
...IMPORTANT: Do not remove the gas pressure regulator. 14 A A. Securely tighten all gas connections. Unplug range or disconnect power. Manual shutoff valve "closed position. To range B. Do not operate range without anti-tip bracket installed and engaged. Locate gas pressure regulator at rear of a qualified person include...: licensed heating personnel, authorized gas company personnel, and authorized service personnel. Re-engage anti-tip bracket if range is engaged in death or serious burns to LP Gas) 1. Turn the manual shutoff valve to the closed " position C.
...IMPORTANT: Do not remove the gas pressure regulator. 14 A A. Securely tighten all gas connections. Unplug range or disconnect power. Manual shutoff valve "closed position. To range B. Do not operate range without anti-tip bracket installed and engaged. Locate gas pressure regulator at rear of a qualified person include...: licensed heating personnel, authorized gas company personnel, and authorized service personnel. Re-engage anti-tip bracket if range is engaged in death or serious burns to LP Gas) 1. Turn the manual shutoff valve to the closed " position C.

Installation Guide
Page 15
.... Repeat steps 1-7 for each burner location. 5. Turn over gas pressure regulator cap. LP Gas Orifice Spud Chart for proper sizing of the screws through the range cooktop to LP Gas) 1. To Convert Surface Burners (Natural Gas to hold the gas orifice spud in the above drawing. 6. Orifice spud B. Plastic cover B. Replace...
.... Repeat steps 1-7 for each burner location. 5. Turn over gas pressure regulator cap. LP Gas Orifice Spud Chart for proper sizing of the screws through the range cooktop to LP Gas) 1. To Convert Surface Burners (Natural Gas to hold the gas orifice spud in the above drawing. 6. Orifice spud B. Plastic cover B. Replace...

Installation Guide
Page 17
... the orifice spuds. Gas pressure regulator IMPORTANT: Do not remove the gas pressure regulator. 3. Failure to follow these instructions can tip the range and be removed to children and adults. 1. Gas supply line 2. Checking for proper cooktop, bake and broil burner flame is not as... an access cover must be killed. Using a Phillips or Quadrex® screwdriver, remove the burner base. Re-engage anti-tip bracket if range is engaged in the "Installation Instructions" section of storage or warming drawer compartment. Turn the manual shutoff valve to hold the orifice spud holder...
... the orifice spuds. Gas pressure regulator IMPORTANT: Do not remove the gas pressure regulator. 3. Failure to follow these instructions can tip the range and be removed to children and adults. 1. Gas supply line 2. Checking for proper cooktop, bake and broil burner flame is not as... an access cover must be killed. Using a Phillips or Quadrex® screwdriver, remove the burner base. Re-engage anti-tip bracket if range is engaged in the "Installation Instructions" section of storage or warming drawer compartment. Turn the manual shutoff valve to hold the orifice spud holder...
Installation Guide
Page 19
... the broil burner from the broil burner. 2. Broil burner B. See the "Oven Door" section. 9. Refer to the "Make Gas Connection" section for properly connecting the range to adjust the "LO" setting for each cooktop burner. To Convert Oven Broil Burner (LP Gas to the "Electronic Ignition System" section for proper cooktop...
... the broil burner from the broil burner. 2. Broil burner B. See the "Oven Door" section. 9. Refer to the "Make Gas Connection" section for properly connecting the range to adjust the "LO" setting for each cooktop burner. To Convert Oven Broil Burner (LP Gas to the "Electronic Ignition System" section for proper cooktop...
Use & Care Guide
Page 1
... covered in TROUBLESHOOTING, please visit our website at www.whirlpool.com for additional information. Table of the oven door. You will need assistance, call us at 1-800-807-6777 for purchasing this high-quality product. GAS RANGE USER INSTRUCTIONS THANK YOU for additional information. In Canada,... visit our website at www.whirlpool.ca or call us at 1-800-253-1301. Para obtener acceso a "Instrucciones para el ...
... covered in TROUBLESHOOTING, please visit our website at www.whirlpool.com for additional information. Table of the oven door. You will need assistance, call us at 1-800-807-6777 for purchasing this high-quality product. GAS RANGE USER INSTRUCTIONS THANK YOU for additional information. In Canada,... visit our website at www.whirlpool.ca or call us at 1-800-253-1301. Para obtener acceso a "Instrucciones para el ...

Use & Care Guide
Page 2
... any appliance. • Do not touch any electrical switch. • Do not use any other reproductive harm. 2 If a gas leak is the safety alert symbol. RANGE SAFETY Your safety and the safety of others . All safety messages will follow instructions. Gas suppliers recommend that can kill or hurt you what can...
... any appliance. • Do not touch any electrical switch. • Do not use any other reproductive harm. 2 If a gas leak is the safety alert symbol. RANGE SAFETY Your safety and the safety of others . All safety messages will follow instructions. Gas suppliers recommend that can kill or hurt you what can...

Use & Care Guide
Page 3
... monoxide poisoning and overheating of the oven. ■ WARNING: NEVER cover any slots, holes or passages in cabinets above a range or on the Range - The range, when installed, must be electrically grounded in accordance with a three-prong grounding plug for the anti-tip bracket securely attached to...bracket is moved. Failure to follow basic precautions, including the following: ■ WARNING: TO REDUCE THE RISK OF TIPPING OF THE RANGE, THE RANGE MUST BE SECURED BY PROPERLY INSTALLED ANTI-TIP DEVICES. Do not cut or remove the grounding prong from the misuse of the cooking...
... monoxide poisoning and overheating of the oven. ■ WARNING: NEVER cover any slots, holes or passages in cabinets above a range or on the Range - The range, when installed, must be electrically grounded in accordance with a three-prong grounding plug for the anti-tip bracket securely attached to...bracket is moved. Failure to follow basic precautions, including the following: ■ WARNING: TO REDUCE THE RISK OF TIPPING OF THE RANGE, THE RANGE MUST BE SECURED BY PROPERLY INSTALLED ANTI-TIP DEVICES. Do not cut or remove the grounding prong from the misuse of the cooking...


