Use & Care Guide
Page 1
In Canada, visit our website at www.whirlpool.ca or call us at www.whirlpool.com for additional information. If you still need your model and serial number, located on the oven frame behind the top right side of Contents RANGE SAFETY 2 The Anti-Tip Bracket 3 FEATURE GUIDE 4 COOKTOP USE ...Racks and Bakeware 10 Oven Vent 10 Baking and Roasting 10 Broiling 11 Convection Baking and Roasting 11 Cook Time (on some models 11 RANGE CARE 12 Clean Cycle 12 General Cleaning 13 Oven Light 13 TROUBLESHOOTING 14 ACCESSORIES 16 WARRANTY 16 W10392927A You will need assistance...
In Canada, visit our website at www.whirlpool.ca or call us at www.whirlpool.com for additional information. If you still need your model and serial number, located on the oven frame behind the top right side of Contents RANGE SAFETY 2 The Anti-Tip Bracket 3 FEATURE GUIDE 4 COOKTOP USE ...Racks and Bakeware 10 Oven Vent 10 Baking and Roasting 10 Broiling 11 Convection Baking and Roasting 11 Cook Time (on some models 11 RANGE CARE 12 Clean Cycle 12 General Cleaning 13 Oven Light 13 TROUBLESHOOTING 14 ACCESSORIES 16 WARRANTY 16 W10392927A You will need assistance...
Use & Care Guide
Page 4
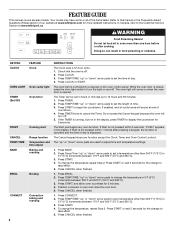
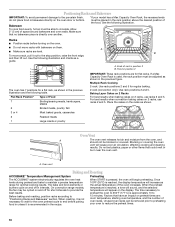
Your model may have some or all of our website at www.whirlpool.com for more than one hour before or after pressing a keypad...TIMER (Set/Off) START CANCEL TEMP/TIME BAKE BROIL CONVECT 4 FEATURE Clock Oven cavity light Oven timer Cooking start Range function Temperature and time adjust Baking and roasting Broiling Convection baking and roasting INSTRUCTIONS The Clock uses a 12-hour cycle... " or "down " arrow pads to the Customer Service Section at end of -cycle tones will sound at www.whirlpool.ca. The oven light is canceled and the time of time. 3. Refer to 12 hours and 59 minutes. ...
Your model may have some or all of our website at www.whirlpool.com for more than one hour before or after pressing a keypad...TIMER (Set/Off) START CANCEL TEMP/TIME BAKE BROIL CONVECT 4 FEATURE Clock Oven cavity light Oven timer Cooking start Range function Temperature and time adjust Baking and roasting Broiling Convection baking and roasting INSTRUCTIONS The Clock uses a 12-hour cycle... " or "down " arrow pads to the Customer Service Section at end of -cycle tones will sound at www.whirlpool.ca. The oven light is canceled and the time of time. 3. Refer to 12 hours and 59 minutes. ...
Use & Care Guide
Page 8
... include several noises that may be heard each time the range is heard when a Bake or Broil burner ignites Odors and smoke are audible signals, indicating the following options. IMPORTANT: The health of some models), repeating every 20 seconds after the end-of-cycle tones Three tones ...■ Invalid pad press Four tones ■ End of day is displayed, unless the range is heavily soiled. Indicator lights show the letters "ES" followed...
... include several noises that may be heard each time the range is heard when a Bake or Broil burner ignites Odors and smoke are audible signals, indicating the following options. IMPORTANT: The health of some models), repeating every 20 seconds after the end-of-cycle tones Three tones ...■ Invalid pad press Four tones ■ End of day is displayed, unless the range is heavily soiled. Indicator lights show the letters "ES" followed...
Use & Care Guide
Page 10
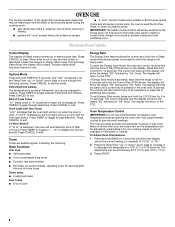
...174; Temperature Management System Preheating The ACCUBAKE® system electronically regulates the oven heat levels during preheat and bake to maintain a precise temperature range for regular baking. 2-rack (convection only): Use rack positions 2 and 5. A. Factors that could melt or burn near the oven vent.... Position racks before putting food in the rack position above the desired position of the food. On convection range models, the fan may be removed prior to preheating your model has a Max Capacity Oven Rack, the recessed ends must be placed in unless it out to the...
...174; Temperature Management System Preheating The ACCUBAKE® system electronically regulates the oven heat levels during preheat and bake to maintain a precise temperature range for regular baking. 2-rack (convection only): Use rack positions 2 and 5. A. Factors that could melt or burn near the oven vent.... Position racks before putting food in the rack position above the desired position of the food. On convection range models, the fan may be removed prior to preheating your model has a Max Capacity Oven Rack, the recessed ends must be placed in unless it out to the...
Use & Care Guide
Page 13
...in range or reconnect power. 13 General Cleaning IMPORTANT: Before cleaning, make sure all -purpose cleaner: Rinse with clean water and dry with porcelain and staining, etching, pitting or faint white spots can visit the Frequently Asked Questions (FAQs) section of our website at www.whirlpool.ca...Number W10355010 (not included): See the "Accessories" section for more information. Replace bulb, then bulb cover by turning clockwise. 5. On some models) Food spills containing acids, such as vinegar and tomato, should be cleaned as soon as the cooktop, grates and caps are cool. ...
...in range or reconnect power. 13 General Cleaning IMPORTANT: Before cleaning, make sure all -purpose cleaner: Rinse with clean water and dry with porcelain and staining, etching, pitting or faint white spots can visit the Frequently Asked Questions (FAQs) section of our website at www.whirlpool.ca...Number W10355010 (not included): See the "Accessories" section for more information. Replace bulb, then bulb cover by turning clockwise. 5. On some models) Food spills containing acids, such as vinegar and tomato, should be cleaned as soon as the cooktop, grates and caps are cool. ...
Use & Care Guide
Page 14
... specialist or see cover for more information. If propane gas is being used for display models in a showroom. See the Installation Instructions. Press and hold START TIME for 3 seconds... Control is blank. Ideal cookware should have been used , turn on the grate. Level the range. See "Electronic Oven Controls" section. 14 Electronic oven control set incorrectly SOLUTIONS Plug into a ... Do not remove ground prong. www.whirlpool.com In Canada, reference the Customer Service section at www.whirlpool.ca WARNING Electrical Shock Hazard Plug into a grounded 3 prong outlet...
... specialist or see cover for more information. If propane gas is being used for display models in a showroom. See the Installation Instructions. Press and hold START TIME for 3 seconds... Control is blank. Ideal cookware should have been used , turn on the grate. Level the range. See "Electronic Oven Controls" section. 14 Electronic oven control set incorrectly SOLUTIONS Plug into a ... Do not remove ground prong. www.whirlpool.com In Canada, reference the Customer Service section at www.whirlpool.ca WARNING Electrical Shock Hazard Plug into a grounded 3 prong outlet...
Use & Care Guide
Page 15
... CANCEL to cover the edge of the crust and/or reduce baking temperature. 15 It will turn off immediately. On some models, reset the clock, if needed. If it reappears, call for contact information. See cover for service. Use the AquaLift™ Technology Cleaning Kit...To remove deposits, use a cloth soaked with vinegar. Lower oven temperature 25°F (15°C) or move rack to exit Sabbath Mode. Level the range. Range is in the "Electronic Oven Controls" section. To remove deposits, use a cloth soaked with vinegar. Check that the bakeware does not keep the door ...
... CANCEL to cover the edge of the crust and/or reduce baking temperature. 15 It will turn off immediately. On some models, reset the clock, if needed. If it reappears, call for contact information. See cover for service. Use the AquaLift™ Technology Cleaning Kit...To remove deposits, use a cloth soaked with vinegar. Lower oven temperature 25°F (15°C) or move rack to exit Sabbath Mode. Level the range. Range is in the "Electronic Oven Controls" section. To remove deposits, use a cloth soaked with vinegar. Check that the bakeware does not keep the door ...
Use & Care Guide
Page 16
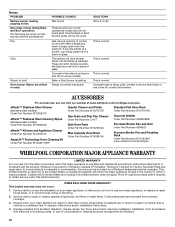
... It sounds similar to a suction cup being used for contact information. Range converted improperly This is normal. This is required to correct house wiring or plumbing. 2. These sounds are some models). Service must be heard each time the Bake or Broil burners ignite during...Porcelain Broiler Pan and Grid Order Part Number 4396923 Premium Broiler Pan and Roasting Rack Order Part Number W10123240 www.whirlpool.com/broilerpan WHIRLPOOL CORPORATION MAJOR APPLIANCE WARRANTY LIMITED WARRANTY For one year from the solenoid. Service calls to published user or operator...
... It sounds similar to a suction cup being used for contact information. Range converted improperly This is normal. This is required to correct house wiring or plumbing. 2. These sounds are some models). Service must be heard each time the Bake or Broil burners ignite during...Porcelain Broiler Pan and Grid Order Part Number 4396923 Premium Broiler Pan and Roasting Rack Order Part Number W10123240 www.whirlpool.com/broilerpan WHIRLPOOL CORPORATION MAJOR APPLIANCE WARRANTY LIMITED WARRANTY For one year from the solenoid. Service calls to published user or operator...
Warranty Information
Page 1
.... Proof of God, improper installation, installation not in accordance with the product, Whirlpool Corporation or Whirlpool Canada LP (hereafter "Whirlpool") will make a single pop when it is contrary to a suction cup being... this limited warranty does not apply. Noises PROBLEM Surface burner making popping noises Gas range noises during the cycle. Pop Click Woosh or poof Oven burner flames are yellow...POSSIBLE CAUSES Wet burner SOLUTIONS Allow it was purchased. These sounds are some models). The igniters will click several times until the flame is required to correct house ...
.... Proof of God, improper installation, installation not in accordance with the product, Whirlpool Corporation or Whirlpool Canada LP (hereafter "Whirlpool") will make a single pop when it is contrary to a suction cup being... this limited warranty does not apply. Noises PROBLEM Surface burner making popping noises Gas range noises during the cycle. Pop Click Woosh or poof Oven burner flames are yellow...POSSIBLE CAUSES Wet burner SOLUTIONS Allow it was purchased. These sounds are some models). The igniters will click several times until the flame is required to correct house ...

Dimension Guide
Page 1
... reserve the right to improve Dimensions are recommended for installation of rigid gas pipe. Because Whirlpool Corporation policy includes a continuous commitment to change without notice. All strains must be level with the range connection. Du Pont De Nemours and Company. CABINET OPENING DIMENSIONS D B C A E...depth. Ref. Model/serial rating plate (located on styling. Grounded outlet M. 30" (76.2 cm) Freestanding Gas Range PRODUCT MODEL NUMBERS PRODUCT DIMENSIONS WFG540H0A Type of Gas Natural Gas: WFG710H0A WFG714HLA WFG720H0A This range is design-...
... reserve the right to improve Dimensions are recommended for installation of rigid gas pipe. Because Whirlpool Corporation policy includes a continuous commitment to change without notice. All strains must be level with the range connection. Du Pont De Nemours and Company. CABINET OPENING DIMENSIONS D B C A E...depth. Ref. Model/serial rating plate (located on styling. Grounded outlet M. 30" (76.2 cm) Freestanding Gas Range PRODUCT MODEL NUMBERS PRODUCT DIMENSIONS WFG540H0A Type of Gas Natural Gas: WFG710H0A WFG714HLA WFG720H0A This range is design-...

Installation Guide
Page 4
... (located on the oven frame behind the top right side of the oven door. The model/serial rating plate is to be installed must be sealed. ■ Do not seal the range to front of range to the side cabinets. ■ Cabinet opening dimensions that are minimum clearances. ■.... Follow the instructions in this range must conform with the maximum allowable wood cabinet temperatures of UL and CSA International and complies with the current standards CAN/CSA-Z240 - Do not obstruct flow of door and drawer may extend farther forward, depending on the model/serial rating plate.
... (located on the oven frame behind the top right side of the oven door. The model/serial rating plate is to be installed must be sealed. ■ Do not seal the range to front of range to the side cabinets. ■ Cabinet opening dimensions that are minimum clearances. ■.... Follow the instructions in this range must conform with the maximum allowable wood cabinet temperatures of UL and CSA International and complies with the current standards CAN/CSA-Z240 - Do not obstruct flow of door and drawer may extend farther forward, depending on the model/serial rating plate.

Installation Guide
Page 6
...determine the size and materials used . B A C A. Install a shut-off gas to the range. IMPORTANT: Leak testing of LP gas must be level and in the same room but external to the range opening and closing. The model/serial rating plate located on the oven frame behind the top right side of... the oven door has information on the model/serial rating plate for proper operation: Natural gas: Minimum pressure: 5"...
...determine the size and materials used . B A C A. Install a shut-off gas to the range. IMPORTANT: Leak testing of LP gas must be level and in the same room but external to the range opening and closing. The model/serial rating plate located on the oven frame behind the top right side of... the oven door has information on the model/serial rating plate for proper operation: Natural gas: Minimum pressure: 5"...

Installation Guide
Page 7
... at a rate of 4% for each 1,000 ft (304.8 m) above the manifold pressure shown on the model/serial rating plate. Gas Supply Pressure Testing Gas supply pressure for testing regulator must be isolated from inside oven. 3. On Ranges Equipped with a warming drawer or premium storage drawer, the rear legs cannot be accessed by...
... at a rate of 4% for each 1,000 ft (304.8 m) above the manifold pressure shown on the model/serial rating plate. Gas Supply Pressure Testing Gas supply pressure for testing regulator must be isolated from inside oven. 3. On Ranges Equipped with a warming drawer or premium storage drawer, the rear legs cannot be accessed by...

Installation Guide
Page 11
... bottom 3. Insert a mirror to light because of standing pilots. Push the BAKE pad. 5. Electronic igniters are properly positioned on a covered surface. On models with a warming drawer, remove access cover plate (1 screw) located at this point, turn the screw located in character. Pliers 11 When the oven control... fuse has not blown. ■ Check that the gas shutoff valves are set to the "open" position. ■ Check that the range is turned to light the burner. This sparking continues, as long as the control knob is located directly underneath the control knob. Replace the...
... bottom 3. Insert a mirror to light because of standing pilots. Push the BAKE pad. 5. Electronic igniters are properly positioned on a covered surface. On models with a warming drawer, remove access cover plate (1 screw) located at this point, turn the screw located in character. Pliers 11 When the oven control... fuse has not blown. ■ Check that the gas shutoff valves are set to the "open" position. ■ Check that the range is turned to light the burner. This sparking continues, as long as the control knob is located directly underneath the control knob. Replace the...
Installation Guide
Page 12
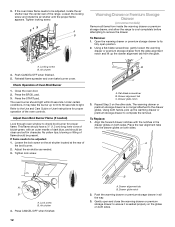
... the lock screw on both sides. Place the rear alignment tabs into the drawer glides on the air shutter located at the rear of the range. A A B A. To Remove: 1. Using a flat-blade screwdriver, gently loosen the warming drawer or premium storage drawer from the glide. The oven ...flame needs to complete the removal. Drawer alignment tab B. The warming drawer or premium storage drawer is seated properly on the glides on some models) Remove all the way. 3. Locking screw B. Using both sides. Align the forward drawer notches with an outer mantle of Oven Broil Burner ...
... the lock screw on both sides. Place the rear alignment tabs into the drawer glides on the air shutter located at the rear of the range. A A B A. To Remove: 1. Using a flat-blade screwdriver, gently loosen the warming drawer or premium storage drawer from the glide. The oven ...flame needs to complete the removal. Drawer alignment tab B. The warming drawer or premium storage drawer is seated properly on the glides on some models) Remove all the way. 3. Locking screw B. Using both sides. Align the forward drawer notches with an outer mantle of Oven Broil Burner ...

Installation Guide
Page 13
...9632; Household fuse is intact and tight, or circuit breaker has not tripped. ■ Range is plugged into place. 3. To Replace: 1. See "Level Range." 5. Dry thoroughly with a soft cloth. Turn on some models) The storage drawer can be removed. Continue to remove the oven door. Storage Drawer (...on surface burners and oven. Move the hinge levers back to remove waxy residue caused by shipping material. A A. When the range has been on for 5 minutes...
...9632; Household fuse is intact and tight, or circuit breaker has not tripped. ■ Range is plugged into place. 3. To Replace: 1. See "Level Range." 5. Dry thoroughly with a soft cloth. Turn on some models) The storage drawer can be removed. Continue to remove the oven door. Storage Drawer (...on surface burners and oven. Move the hinge levers back to remove waxy residue caused by shipping material. A A. When the range has been on for 5 minutes...
Installation Guide
Page 14
...pressure regulator at rear of a qualified person include: licensed heating personnel, authorized gas company personnel, and authorized service personnel. Slide range back so rear range foot is moved. See the "Storage Drawer" or "Warming Drawer or Premium Storage Drawer" section. 2. Install a shut-off... storage drawer or warming drawer. A A. If connected to children and adults. 1. Gas supply line 2. To range B. Manual shutoff valve "closed position. NOTE: On models with a warming drawer, an access cover must be killed. Gas pressure regulator IMPORTANT: Do not remove the gas...
...pressure regulator at rear of a qualified person include: licensed heating personnel, authorized gas company personnel, and authorized service personnel. Slide range back so rear range foot is moved. See the "Storage Drawer" or "Warming Drawer or Premium Storage Drawer" section. 2. Install a shut-off... storage drawer or warming drawer. A A. If connected to children and adults. 1. Gas supply line 2. To range B. Manual shutoff valve "closed position. NOTE: On models with a warming drawer, an access cover must be killed. Gas pressure regulator IMPORTANT: Do not remove the gas...

Installation Guide
Page 15
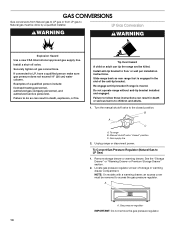
... LP C Side view after A. Gas pressure regulator cap with the correct LP gas orifice spud. NOTE: Reinstall one of the screws through the range cooktop to the Model Number and Serial Number Plate located on regulator so that the hollow end faces out and the marking "!LP" is facing the direction shown...
... LP C Side view after A. Gas pressure regulator cap with the correct LP gas orifice spud. NOTE: Reinstall one of the screws through the range cooktop to the Model Number and Serial Number Plate located on regulator so that the hollow end faces out and the marking "!LP" is facing the direction shown...

Installation Guide
Page 17
... removing and replacing the orifice spuds. Failure to follow these instructions can tip the range and be removed to ½" (1.3 cm) long. Gas supply line 2. NG" is moved. LP 17 NOTE: On models with solid end facing out D. Remove plastic cover from gas pressure regulator cap.... The small inner cone should have a slightly yellow tip. 3. Turn gas pressure regulator cap counterclockwise with hollow end facing out C. Do not operate range without anti-tip bracket installed and engaged. B D E NG NG C Side view after A. NOTE: Reinstall one of storage or warming drawer compartment...
... removing and replacing the orifice spuds. Failure to follow these instructions can tip the range and be removed to ½" (1.3 cm) long. Gas supply line 2. NG" is moved. LP 17 NOTE: On models with solid end facing out D. Remove plastic cover from gas pressure regulator cap.... The small inner cone should have a slightly yellow tip. 3. Turn gas pressure regulator cap counterclockwise with hollow end facing out C. Do not operate range without anti-tip bracket installed and engaged. B D E NG NG C Side view after A. NOTE: Reinstall one of storage or warming drawer compartment...


