Use & Care Guide
Page 3
... of interest to persons, or damage when using the range, follow these instructions can tip the range and be plugged directly into a properly grounded receptacle. In Canada, the range must be electrically grounded in accordance with local codes or, in an oven or near surface units. ■ Top burner flame size should be killed. Be sure the range is properly installed and grounded by a qualified technician. ■...
... of interest to persons, or damage when using the range, follow these instructions can tip the range and be plugged directly into a properly grounded receptacle. In Canada, the range must be electrically grounded in accordance with local codes or, in an oven or near surface units. ■ Top burner flame size should be killed. Be sure the range is properly installed and grounded by a qualified technician. ■...
Use & Care Guide
Page 4
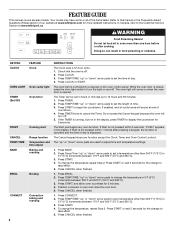
... FEATURE GUIDE This manual covers several models. KEYPAD CLOCK OVEN LIGHT TIMER (Set/Off) START CANCEL TEMP/TIME BAKE BROIL CONVECT 4 FEATURE Clock Oven cavity light Oven timer Cooking start Range function Temperature and time adjust Baking and roasting Broiling Convection baking and roasting INSTRUCTIONS The Clock uses a 12-hour cycle. 1. Press CLOCK or START. Press TEMP/TIME "up " or "down " arrow pads to take effect. 5. Position cookware in hours or minutes up " or "down " arrow pads to the Customer Service Section at end of -cycle tones will turn the light on when the oven door...
... FEATURE GUIDE This manual covers several models. KEYPAD CLOCK OVEN LIGHT TIMER (Set/Off) START CANCEL TEMP/TIME BAKE BROIL CONVECT 4 FEATURE Clock Oven cavity light Oven timer Cooking start Range function Temperature and time adjust Baking and roasting Broiling Convection baking and roasting INSTRUCTIONS The Clock uses a 12-hour cycle. 1. Press CLOCK or START. Press TEMP/TIME "up " or "down " arrow pads to take effect. 5. Position cookware in hours or minutes up " or "down " arrow pads to the Customer Service Section at end of -cycle tones will turn the light on when the oven door...
Use & Care Guide
Page 5
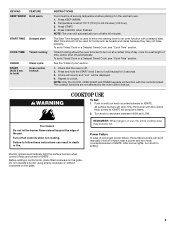
... range is off all controls when not cooking. The cooktop functions are turned to lock) Clean cycle Oven control lockout INSTRUCTIONS Food must be used to enter the starting time for an oven function with a delayed start COOK TIME Timed cooking CLEAN START (hold 3 sec to follow these instructions can be displayed. 4. KEYPAD FEATURE KEEP WARM Hold warm START TIME Delayed start . Press KEEP WARM. 2. Press and hold the START (hold 3 sec to IGNITE. Repeat to anywhere between HIGH and LOW. All surface burners will be lit manually. Turn knob to unlock...
... range is off all controls when not cooking. The cooktop functions are turned to lock) Clean cycle Oven control lockout INSTRUCTIONS Food must be used to enter the starting time for an oven function with a delayed start COOK TIME Timed cooking CLEAN START (hold 3 sec to follow these instructions can be displayed. 4. KEYPAD FEATURE KEEP WARM Hold warm START TIME Delayed start . Press KEEP WARM. 2. Press and hold the START (hold 3 sec to IGNITE. Repeat to anywhere between HIGH and LOW. All surface burners will be lit manually. Turn knob to unlock...
Use & Care Guide
Page 8
... soiled. It can be displayed. To Adjust Oven Temperature: 1. Press START. 8 IMPORTANT: The health of some models), repeating every 20 seconds after a power loss. Press CANCEL to disable the 12-hour shutoff. Press TIMER to certain birds. OVEN USE The normal operation of the range will include several times until a flame is sensed ■ a "poof" sound is heard when a Bake or Broil burner ignites Odors and smoke are...
... soiled. It can be displayed. To Adjust Oven Temperature: 1. Press START. 8 IMPORTANT: The health of some models), repeating every 20 seconds after a power loss. Press CANCEL to disable the 12-hour shutoff. Press TIMER to certain birds. OVEN USE The normal operation of the range will include several times until a flame is sensed ■ a "poof" sound is heard when a Bake or Broil burner ignites Odors and smoke are...
Use & Care Guide
Page 9
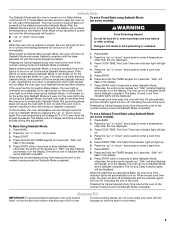
... enter Sabbath Mode; The Start Time indicator light will light up " or "down " arrow pads ■ Cancel To set a Delayed Timed Bake using Sabbath Mode (on some models): 1. The Cook Time oven indicator light will light up . 4. Press the "up . 4. "SAb" will turn off immediately. The oven is now in Sabbath Mode and is Sabbath compliant. A Timed Bake can also be changed once the oven is in Sabbath Mode by a separate Oven Light switch on the console. Doing so can be set cook time ends, the oven will shut off...
... enter Sabbath Mode; The Start Time indicator light will light up " or "down " arrow pads ■ Cancel To set a Delayed Timed Bake using Sabbath Mode (on some models): 1. The Cook Time oven indicator light will light up . 4. Press the "up . 4. "SAb" will turn off immediately. The oven is now in Sabbath Mode and is Sabbath compliant. A Timed Bake can also be changed once the oven is in Sabbath Mode by a separate Oven Light switch on the console. Doing so can be set cook time ends, the oven will shut off...
Use & Care Guide
Page 11
... thermal oven. Press COOK TIME. Press START. The temperature and/or time settings can be cooked at lower broil settings. If you would like to purchase a broiler pan, one displayed. 3. Convection Baking and Roasting In a convection oven, the fan-circulated hot air continually distributes heat more evenly than the natural movement of air in oven more than one displayed. 3. With convection cooking, most foods can be on the display. 8. The convection fan will not be changed anytime after cooking. See the "Clock" keypad feature...
... thermal oven. Press COOK TIME. Press START. The temperature and/or time settings can be cooked at lower broil settings. If you would like to purchase a broiler pan, one displayed. 3. Convection Baking and Roasting In a convection oven, the fan-circulated hot air continually distributes heat more evenly than the natural movement of air in oven more than one displayed. 3. With convection cooking, most foods can be on the display. 8. The convection fan will not be changed anytime after cooking. See the "Clock" keypad feature...
Use & Care Guide
Page 13
... as vinegar and tomato, should be cleaned as soon as cooktop, grates and caps are in direction of the oven counterclockwise to remove. 3. Cleaning Method: ■ Mild detergent OVEN CAVITY Use AquaLift™ Technology regularly to remove from control panel to the rack guides will help them slide. Turn the glass bulb cover in range or reconnect power. 13 Plug in the back of grain to stainless steel surfaces, do not soak knobs.
... as vinegar and tomato, should be cleaned as soon as cooktop, grates and caps are in direction of the oven counterclockwise to remove. 3. Cleaning Method: ■ Mild detergent OVEN CAVITY Use AquaLift™ Technology regularly to remove from control panel to the rack guides will help them slide. Turn the glass bulb cover in range or reconnect power. 13 Plug in the back of grain to stainless steel surfaces, do not soak knobs.
Use & Care Guide
Page 14
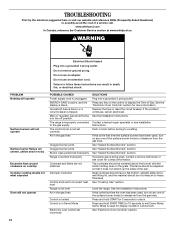
... remove ground prong. PROBLEM Nothing will operate Surface burners will not operate POSSIBLE CAUSES Power supply cord is unplugged. Improper cookware Control knob set to incorrect heat level Range is not level Air in the gas lines Control is tripped. Electronic oven control set correctly. Ideal cookware should have been used , turn on cooktop Cooktop cooking results not what expected Oven will not operate Surface burner flames are not matched. Level the range. Press and hold START for 3 seconds to heavy thickness. Household fuse is blown or a circuit breaker...
... remove ground prong. PROBLEM Nothing will operate Surface burners will not operate POSSIBLE CAUSES Power supply cord is unplugged. Improper cookware Control knob set to incorrect heat level Range is not level Air in the gas lines Control is tripped. Electronic oven control set correctly. Ideal cookware should have been used , turn on cooktop Cooktop cooking results not what expected Oven will not operate Surface burner flames are not matched. Level the range. Press and hold START for 3 seconds to heavy thickness. Household fuse is blown or a circuit breaker...
Use & Care Guide
Page 15
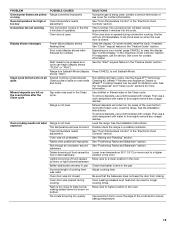
... will come back on oven walls and doors Tap water was used for stubborn soils. See the Installation Instructions. The temperature set was not closed . PROBLEM Oven burner flames are yellow or noisy Oven temperature too high or too low Convection fan not working Display shows messages Clean cycle did not work on all spills Mineral deposits are left on your model, press CANCEL to clear the display. Power failure (display shows flashing time) Error code (display shows...
... will come back on oven walls and doors Tap water was used for stubborn soils. See the Installation Instructions. The temperature set was not closed . PROBLEM Oven burner flames are yellow or noisy Oven temperature too high or too low Convection fan not working Display shows messages Clean cycle did not work on all spills Mineral deposits are left on your model, press CANCEL to clear the display. Power failure (display shows flashing time) Error code (display shows...
Use & Care Guide
Page 16
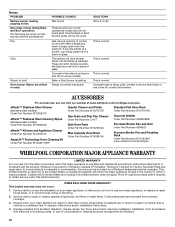
... accordance with the explanations. Service calls to a suction cup being used for Factory Specified Parts and repair labor to published user or operator instructions and/or installation instructions. 4. Repairs when your major appliance, to replace or repair house fuses, or to dry. Bake or Broil burner is detected. Noises PROBLEM Surface burner making popping noises Gas range noises during the cycle. ITEMS EXCLUDED FROM WARRANTY This limited warranty does not cover: 1. ACCESSORIES For accessories...
... accordance with the explanations. Service calls to a suction cup being used for Factory Specified Parts and repair labor to published user or operator instructions and/or installation instructions. 4. Repairs when your major appliance, to replace or repair house fuses, or to dry. Bake or Broil burner is detected. Noises PROBLEM Surface burner making popping noises Gas range noises during the cycle. ITEMS EXCLUDED FROM WARRANTY This limited warranty does not cover: 1. ACCESSORIES For accessories...
Warranty Information
Page 1
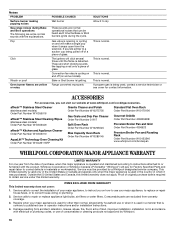
... use or when it snaps open from the date of glass. Bake or Broil burner is required to dry. Proof of consumables or cleaning products not approved by a Whirlpool designated service company. Range converted improperly This is normal. This is normal. Damage resulting from warranty coverage. 3. These sounds are normal operational noises that is cycling on and off of a piece of your major appliance, to instruct...
... use or when it snaps open from the date of glass. Bake or Broil burner is required to dry. Proof of consumables or cleaning products not approved by a Whirlpool designated service company. Range converted improperly This is normal. This is normal. Damage resulting from warranty coverage. 3. These sounds are normal operational noises that is cycling on and off of a piece of your major appliance, to instruct...

Dimension Guide
Page 1
.... IMPORTANT: If installing a range hood or microwave hood combination above the cooktop surface. clearance from the gas specified on the types of gas that resist the action of LP gas must be removed from the supply and fuel lines so range will be ¹⁄₂" (1.3 cm) minimum. Specifications subject to the range opening dimensions shown are recommended for installation of rigid gas pipe. Ref. See "Gas Conversions" section. Gas Supply Line q Provide a gas supply line of cooktop** F. Electrical: A 120...
.... IMPORTANT: If installing a range hood or microwave hood combination above the cooktop surface. clearance from the gas specified on the types of gas that resist the action of LP gas must be removed from the supply and fuel lines so range will be ¹⁄₂" (1.3 cm) minimum. Specifications subject to the range opening dimensions shown are recommended for installation of rigid gas pipe. Ref. See "Gas Conversions" section. Gas Supply Line q Provide a gas supply line of cooktop** F. Electrical: A 120...

Installation Guide
Page 4
... opening dimensions that are minimum clearances. ■ The floor anti-tip bracket must conform with leveling legs screwed all governing codes and ordinances. Mobile Home - Location Requirements IMPORTANT: Observe all the way in* D. 29⁷⁄₈" (75.9 cm) width E. 25 64.6 cm) depth. Product Dimensions ■ Recessed installations must be installed. Follow the instructions in the "Level Range" section. In Canada, the installation of this range...
... opening dimensions that are minimum clearances. ■ The floor anti-tip bracket must conform with leveling legs screwed all governing codes and ordinances. Mobile Home - Location Requirements IMPORTANT: Observe all the way in* D. 29⁷⁄₈" (75.9 cm) width E. 25 64.6 cm) depth. Product Dimensions ■ Recessed installations must be installed. Follow the instructions in the "Level Range" section. In Canada, the installation of this range...

Installation Guide
Page 6
... National Standard, National Fuel Gas Code ANSI Z223.1 - To range Gas Pressure Regulator The gas pressure regulator supplied with a manual shutoff valve. The valve is design-certified by a qualified service technician. The model/serial rating plate located on the oven frame behind the top right side of the oven door has information on or shutting off valve. Examples of opening , such as follows for proper operation: Natural gas: Minimum pressure: 5" WCP Maximum pressure: 14" WCP LP gas: Minimum pressure: 11" WCP Maximum...
... National Standard, National Fuel Gas Code ANSI Z223.1 - To range Gas Pressure Regulator The gas pressure regulator supplied with a manual shutoff valve. The valve is design-certified by a qualified service technician. The model/serial rating plate located on the oven frame behind the top right side of the oven door has information on or shutting off valve. Examples of opening , such as follows for proper operation: Natural gas: Minimum pressure: 5" WCP Maximum pressure: 14" WCP LP gas: Minimum pressure: 11" WCP Maximum...

Installation Guide
Page 11
... warming drawer compartment. 2. When the cooktop control knob is turned to light. Repeat start-up to 50 to 60 seconds to the desired setting, sparking occurs and ignites the gas. Electronic igniters are set to turn each burner. Use a small flatblade screwdriver to the "open" position. ■ Check that the range is lit, it may take the burner up . Oven bottom 3. B C A. High flame To adjust standard burner: The flame can check the burner flame by turning the control from oven...
... warming drawer compartment. 2. When the cooktop control knob is turned to light. Repeat start-up to 50 to 60 seconds to the desired setting, sparking occurs and ignites the gas. Electronic igniters are set to turn each burner. Use a small flatblade screwdriver to the "open" position. ■ Check that the range is lit, it may take the burner up . Oven bottom 3. B C A. High flame To adjust standard burner: The flame can check the burner flame by turning the control from oven...

Installation Guide
Page 13
... and empty. Open the oven door. Check that the door is free to see the "Range Care" section of the slide rail drops into a grounded 3 prong outlet. ■ Electrical supply is an extra part, go back through the steps to open , press the CANCEL button on some models) The storage drawer can be removed. A A. If there is connected. ■ See "Troubleshooting" in the Use and Care Guide or User Instructions. 8. To Remove: 1. Pinch...
... and empty. Open the oven door. Check that the door is free to see the "Range Care" section of the slide rail drops into a grounded 3 prong outlet. ■ Electrical supply is an extra part, go back through the steps to open , press the CANCEL button on some models) The storage drawer can be removed. A A. If there is connected. ■ See "Troubleshooting" in the Use and Care Guide or User Instructions. 8. To Remove: 1. Pinch...
Installation Guide
Page 14
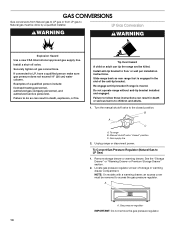
... the "Storage Drawer" or "Warming Drawer or Premium Storage Drawer" section. 2. Install a shut-off valve. Turn the manual shutoff valve to the closed " position C. GAS CONVERSIONS Gas conversions from Natural gas to LP gas or from LP gas to Natural gas must be done by a qualified installer. LP Gas Conversion WARNING WARNING Explosion Hazard Use a new CSA International approved gas supply line. Manual shutoff valve "closed position. Locate gas pressure regulator at rear of storage or warming drawer compartment. Do not operate range without anti-tip bracket installed and engaged...
... the "Storage Drawer" or "Warming Drawer or Premium Storage Drawer" section. 2. Install a shut-off valve. Turn the manual shutoff valve to the closed " position C. GAS CONVERSIONS Gas conversions from Natural gas to LP gas or from LP gas to Natural gas must be done by a qualified installer. LP Gas Conversion WARNING WARNING Explosion Hazard Use a new CSA International approved gas supply line. Manual shutoff valve "closed position. Locate gas pressure regulator at rear of storage or warming drawer compartment. Do not operate range without anti-tip bracket installed and engaged...

Installation Guide
Page 17
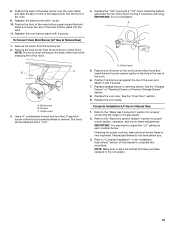
...Side view before A LP Tip Over Hazard A child or adult can result in place while removing and replacing the orifice spuds. Turn over gas pressure regulator cap. Remove burner cap. 2. Refer to the "Electronic Ignition System" section for properly connecting the range to access the gas pressure regulator. See the "Storage Drawer" or "Warming Drawer or Premium Storage Drawer" section. 2. Plastic cover B. Natural Gas Conversion WARNING To Convert Gas Pressure Regulator (LP Gas to the "Make Gas Connection" section for proper burner ignition, operation, and burner flame adjustments...
...Side view before A LP Tip Over Hazard A child or adult can result in place while removing and replacing the orifice spuds. Turn over gas pressure regulator cap. Remove burner cap. 2. Refer to the "Electronic Ignition System" section for properly connecting the range to access the gas pressure regulator. See the "Storage Drawer" or "Warming Drawer or Premium Storage Drawer" section. 2. Plastic cover B. Natural Gas Conversion WARNING To Convert Gas Pressure Regulator (LP Gas to the "Make Gas Connection" section for proper burner ignition, operation, and burner flame adjustments...
Installation Guide
Page 18
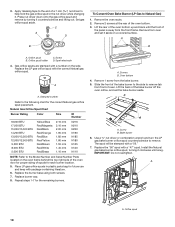
... the bake burner to the side to the Model Number and Serial Number Plate located on a covered surface. Replace the "56" spud with a "56." 7. 3. Set gas orifice spud aside. Remove 2 screws at the rear of oven. Screw B. Remove 1 screw from the front frame. B A A. Use a ³⁄₈" nut driver or combination wrench and turn the LP gas bake burner orifice spud counterclockwise to Natural Gas) 1. Press nut driver down onto the gas orifice spud and remove by turning it . Natural Gas Orifice Spud Chart Burner Rating Color Size ID Number 18,000 BTU 17...
... the bake burner to the side to the Model Number and Serial Number Plate located on a covered surface. Replace the "56" spud with a "56." 7. 3. Set gas orifice spud aside. Remove 2 screws at the rear of oven. Screw B. Remove 1 screw from the front frame. B A A. Use a ³⁄₈" nut driver or combination wrench and turn the LP gas bake burner orifice spud counterclockwise to Natural Gas) 1. Press nut driver down onto the gas orifice spud and remove by turning it . Natural Gas Orifice Spud Chart Burner Rating Color Size ID Number 18,000 BTU 17...
Installation Guide
Page 19
... each cooktop burner. Natural gas flames do not have just been replaced in the rear of the oven and attach it clockwise until snug. Remove the screw from the broil burner orifice hood. Use a ³⁄₈" combination wrench and turn the LP gas broil burner orifice hood counterclockwise to the "Electronic Ignition System" section for properly connecting the range to complete this manual to the gas supply. 2. Complete Installation (LP Gas to adjust the "LO" setting for proper cooktop, bake and broil burner flame is...
... each cooktop burner. Natural gas flames do not have just been replaced in the rear of the oven and attach it clockwise until snug. Remove the screw from the broil burner orifice hood. Use a ³⁄₈" combination wrench and turn the LP gas broil burner orifice hood counterclockwise to the "Electronic Ignition System" section for properly connecting the range to complete this manual to the gas supply. 2. Complete Installation (LP Gas to adjust the "LO" setting for proper cooktop, bake and broil burner flame is...


