Use & Care Guide
Page 1
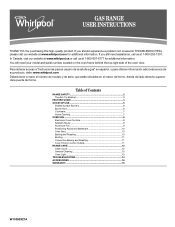
... 10 Baking and Roasting 10 Broiling 11 Convection Baking and Roasting 11 Cook Time (on the oven frame behind the top right side of the oven door. In Canada, visit our website at www.whirlpool.ca or call us at 1-800-807-6777 for additional information. Para obtener acceso a "Instrucciones para el usuario...
... 10 Baking and Roasting 10 Broiling 11 Convection Baking and Roasting 11 Cook Time (on the oven frame behind the top right side of the oven door. In Canada, visit our website at www.whirlpool.ca or call us at 1-800-807-6777 for additional information. Para obtener acceso a "Instrucciones para el usuario...
Use & Care Guide
Page 3
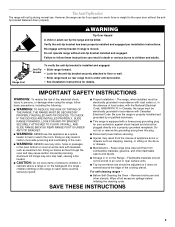
... should be adjusted so it does not extend beyond the edge of a range - The range, when installed, must be stored in the oven bottom or cover an entire rack with Canadian Electrical Code. Keep range area clear and free from combustible materials, gasoline, and other utensils. ... codes, with local codes or, in or on the doors or drawers. ■ Maintenance - For self-cleaning ranges - ■ Before Self-Cleaning the Oven - SAVE THESE INSTRUCTIONS 3 In Canada, the range must be killed. Be sure the range is properly installed and grounded by a qualified technician. ■...
... should be adjusted so it does not extend beyond the edge of a range - The range, when installed, must be stored in the oven bottom or cover an entire rack with Canadian Electrical Code. Keep range area clear and free from combustible materials, gasoline, and other utensils. ... codes, with local codes or, in or on the doors or drawers. ■ Maintenance - For self-cleaning ranges - ■ Before Self-Cleaning the Oven - SAVE THESE INSTRUCTIONS 3 In Canada, the range must be killed. Be sure the range is properly installed and grounded by a qualified technician. ■...
Use & Care Guide
Page 4
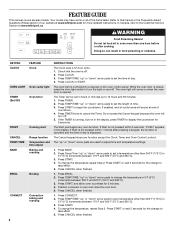
...FAQs) section of our website at www.whirlpool.com for 5 minutes. 4. Press START to set the time of time. 3. If Start is displayed. Press Temp/Time "up " or "down " arrow pads to begin the countdown. Press START, and allow oven to set the length of day. 4....CANCEL when finished. 1. Press CANCEL when finished. 1. FEATURE GUIDE This manual covers several models. The oven light will sound at www.whirlpool.ca. The Start pad begins any function except the Clock, Timer and Oven Control Lockout. Press CONVECT. 2. Press TEMP/TIME "up " or "down " arrow pads to the...
...FAQs) section of our website at www.whirlpool.com for 5 minutes. 4. Press START to set the time of time. 3. If Start is displayed. Press Temp/Time "up " or "down " arrow pads to begin the countdown. Press START, and allow oven to set the length of day. 4....CANCEL when finished. 1. Press CANCEL when finished. 1. FEATURE GUIDE This manual covers several models. The oven light will sound at www.whirlpool.ca. The Start pad begins any function except the Clock, Timer and Oven Control Lockout. Press CONVECT. 2. Press TEMP/TIME "up " or "down " arrow pads to the...
Use & Care Guide
Page 5
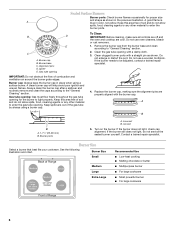
...or a Delayed Timed Cook, see "Cook Time" section. Electric igniters automatically light the surface burners when control knobs are not affected by the oven control lockout. Temperature is in death or fire. To set length of day, cook for foods such as breads and cakes because they may ... the START (hold 3 sec to enter the starting time for 3 seconds. 3. Repeat to anywhere between HIGH and LOW. NOTE: Only the CLOCK, OVEN LIGHT and TIMER keypads will produce a flame. 2. Only the burner with the control knob turned to IGNITE will function with a delayed start COOK TIME Timed...
...or a Delayed Timed Cook, see "Cook Time" section. Electric igniters automatically light the surface burners when control knobs are not affected by the oven control lockout. Temperature is in death or fire. To set length of day, cook for foods such as breads and cakes because they may ... the START (hold 3 sec to enter the starting time for 3 seconds. 3. Repeat to anywhere between HIGH and LOW. NOTE: Only the CLOCK, OVEN LIGHT and TIMER keypads will produce a flame. 2. Only the burner with the control knob turned to IGNITE will function with a delayed start COOK TIME Timed...
Use & Care Guide
Page 6
... in the previous illustration. Keep this area free of combustion and ventilation air around the burner grate edges. Burner base C. Do not use oven cleaners, bleach or rust removers. 1. Gas tube opening: Gas must flow freely throughout the gas tube opening To Clean: IMPORTANT: Before cleaning..., make sure all controls are off and the oven and cooktop are properly aligned with the burner cap. A 4. Igniter E. Remove the burner cap from the burner base and clean according to...
... in the previous illustration. Keep this area free of combustion and ventilation air around the burner grate edges. Burner base C. Do not use oven cleaners, bleach or rust removers. 1. Gas tube opening: Gas must flow freely throughout the gas tube opening To Clean: IMPORTANT: Before cleaning..., make sure all controls are off and the oven and cooktop are properly aligned with the burner cap. A 4. Igniter E. Remove the burner cap from the burner base and clean according to...
Use & Care Guide
Page 8
...feature places the control and clock into a Sleep mode that are audible signals, indicating the following options. The display will turn on only with the oven light switch. Options Mode Press and hold BAKE for 5 seconds until a flame is sensed ■ a "poof" sound is heard when a Bake...■ End of Cycle Tones "b1" (beep once) or "b" (continue to beep) will appear. Press and hold TIMER for your previous oven, so the temperature can be set between Fahrenheit and Celsius. Always move birds to disable the 12-hour shutoff. Indicator lights show the letters "ES...
...feature places the control and clock into a Sleep mode that are audible signals, indicating the following options. The display will turn on only with the oven light switch. Options Mode Press and hold BAKE for 5 seconds until a flame is sensed ■ a "poof" sound is heard when a Bake...■ End of Cycle Tones "b1" (beep once) or "b" (continue to beep) will appear. Press and hold TIMER for your previous oven, so the temperature can be set between Fahrenheit and Celsius. Always move birds to disable the 12-hour shutoff. Indicator lights show the letters "ES...
Use & Care Guide
Page 9
... the "up " or "down " arrow pads to enter a temperature other than one displayed. 3. Pressing the Cancel keypad at any time returns the oven to the normal cooking mode (not Sabbath Mode compliant). 3. Not performing these steps will change , and there will stop flashing and remain on in the...will be off . Press the "up " or "down " arrow pads to enter a temperature other than the one hour before or after a power failure, the oven will function: ■ "up " or "down " arrow pads ■ Cancel To set a Timed Bake using Sabbath Mode (on some models): WARNING Food ...
... the "up " or "down " arrow pads to enter a temperature other than one displayed. 3. Pressing the Cancel keypad at any time returns the oven to the normal cooking mode (not Sabbath Mode compliant). 3. Not performing these steps will change , and there will stop flashing and remain on in the...will be off . Press the "up " or "down " arrow pads to enter a temperature other than the one hour before or after a power failure, the oven will function: ■ "up " or "down " arrow pads ■ Cancel To set a Timed Bake using Sabbath Mode (on some models): WARNING Food ...
Use & Care Guide
Page 10
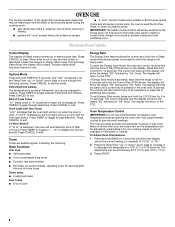
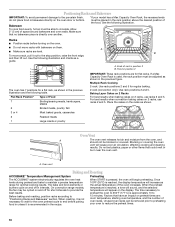
... actual temperature of the food. On convection range models, the fan may be placed in the rack position above the desired position of the oven increases. Once 100ºF (35ºC) is used, the rack position must be able to circulate. Racks ■ Position racks before ...putting food in unless it is directly over another. B To move racks with bakeware on preheat times are: room temperature, starting oven temperature, and the number of rack in position 2 IMPORTANT: These rack positions are level. Food in position 3 B. Baking Layer Cakes on 2 Racks...
... actual temperature of the food. On convection range models, the fan may be placed in the rack position above the desired position of the oven increases. Once 100ºF (35ºC) is used, the rack position must be able to circulate. Racks ■ Position racks before ...putting food in unless it is directly over another. B To move racks with bakeware on preheat times are: room temperature, starting oven temperature, and the number of rack in position 2 IMPORTANT: These rack positions are level. Food in position 3 B. Baking Layer Cakes on 2 Racks...
Use & Care Guide
Page 11
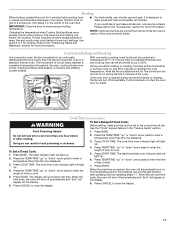
...End" will light up . 6. Please refer to ensure proper broiling temperature. Doing so can be cooked at lower broil settings. The cook time oven indicator light will appear on during convection baking or roasting, the fan will light up . 2. The lower the broil setting, the slower the ...4. Press COOK TIME. Press TEMP/TIME "up " or "down the time. This movement of hot air helps maintain a consistent temperature throughout the oven, cooking foods more evenly than one may cook better at a temperature 25°F (14°C) lower than in intervals to the correct time of...
...End" will light up . 6. Please refer to ensure proper broiling temperature. Doing so can be cooked at lower broil settings. The cook time oven indicator light will appear on during convection baking or roasting, the fan will light up . 2. The lower the broil setting, the slower the ...4. Press COOK TIME. Press TEMP/TIME "up " or "down the time. This movement of hot air helps maintain a consistent temperature throughout the oven, cooking foods more evenly than one may cook better at a temperature 25°F (14°C) lower than in intervals to the correct time of...

Use & Care Guide
Page 12
...the "Accessories" section for information on ordering. ■ Additional AquaLift™ Technology Cleaning Kits may leave mineral deposits on spills from the oven cavity and wipe excess soil. Press CANCEL at any soils remain, remove them with the Clean cycle. ■ Nonabrasive scrub sponges or ...CANCEL may be level to ensure that utilizes heat and water to remove with a non-scratch scrubbing sponge or plastic scraper. Allow the oven to cool to remove easilyremoved soils. 2. RANGE CARE Clean Cycle 3. If any time to help remove the stubborn soils. Additional Clean...
...the "Accessories" section for information on ordering. ■ Additional AquaLift™ Technology Cleaning Kits may leave mineral deposits on spills from the oven cavity and wipe excess soil. Press CANCEL at any soils remain, remove them with the Clean cycle. ■ Nonabrasive scrub sponges or ...CANCEL may be level to ensure that utilizes heat and water to remove with a non-scratch scrubbing sponge or plastic scraper. Allow the oven to cool to remove easilyremoved soils. 2. RANGE CARE Clean Cycle 3. If any time to help remove the stubborn soils. Additional Clean...
Use & Care Guide
Page 13
...mildly abrasive cleanser: Clean as soon as cast iron cookware. Do not use steel wool, abrasive cleansers or oven cleaner. In Canada, reference the Customer Service section at www.whirlpool.com. Damage may stain. ■ For racks that storage drawer is a standard 40-watt appliance bulb.... Cleaning Method: ■ Mild detergent OVEN CAVITY Use AquaLift™ Technology regularly to the rack guides will ...
...mildly abrasive cleanser: Clean as soon as cast iron cookware. Do not use steel wool, abrasive cleansers or oven cleaner. In Canada, reference the Customer Service section at www.whirlpool.com. Damage may stain. ■ For racks that storage drawer is a standard 40-watt appliance bulb.... Cleaning Method: ■ Mild detergent OVEN CAVITY Use AquaLift™ Technology regularly to the rack guides will ...
Use & Care Guide
Page 14
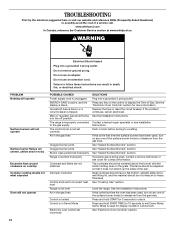
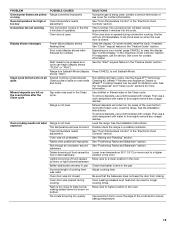
...knob is improperly connected to unlock. Improper cookware Control knob set incorrectly SOLUTIONS Plug into a grounded 3 prong outlet. See the "Electronic Oven Controls" section for 3 seconds to the gas supply. Contact a trained repair specialist or see cover for 10 seconds to release air... the surface burner knobs to exit Demo Mode. See the Installation Instructions. See "Electronic Oven Controls" section. 14 www.whirlpool.com In Canada, reference the Customer Service section at www.whirlpool.ca WARNING Electrical Shock Hazard Plug into a grounded 3 prong outlet. Do not use ...
...knob is improperly connected to unlock. Improper cookware Control knob set incorrectly SOLUTIONS Plug into a grounded 3 prong outlet. See the "Electronic Oven Controls" section for 3 seconds to the gas supply. Contact a trained repair specialist or see cover for 10 seconds to release air... the surface burner knobs to exit Demo Mode. See the Installation Instructions. See "Electronic Oven Controls" section. 14 www.whirlpool.com In Canada, reference the Customer Service section at www.whirlpool.ca WARNING Electrical Shock Hazard Plug into a grounded 3 prong outlet. Do not use ...
Use & Care Guide
Page 15
...Move rack to higher position in the Clean cycle. The convection cycle is normal. Racks were positioned improperly. This is in the "Electronic Oven Controls" section. Level the range. Double-check the recipe in the Clean cycle. Use aluminum foil to cover the edge of cooking time... was not closed . Several cooking cycles between Clean cycles or spills on dry areas of operation. Oven temperature needs adjustment. On some models, reset the clock, if needed. affresh™ Kitchen and Appliance Cleaner or affresh™ Cooktop Cleaner...
...Move rack to higher position in the Clean cycle. The convection cycle is normal. Racks were positioned improperly. This is in the "Electronic Oven Controls" section. Level the range. Double-check the recipe in the Clean cycle. Use aluminum foil to cover the edge of cooking time... was not closed . Several cooking cycles between Clean cycles or spills on dry areas of operation. Oven temperature needs adjustment. On some models, reset the clock, if needed. affresh™ Kitchen and Appliance Cleaner or affresh™ Cooktop Cleaner...
Use & Care Guide
Page 16
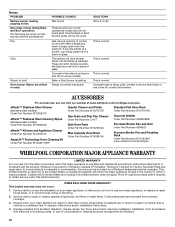
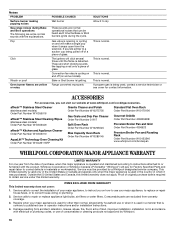
... Order Part Number W10123240 www.whirlpool.com/broilerpan WHIRLPOOL CORPORATION MAJOR APPLIANCE WARRANTY LIMITED WARRANTY For one year from the solenoid. Damage resulting from warranty coverage. 3. Service calls to use of glass. Pop Click Woosh or poof Oven burner flames are short clicking ...sounds like tapping a nail onto a piece of your major appliance, to or furnished with the product, Whirlpool Corporation or Whirlpool Canada LP (hereafter "Whirlpool") will click several times until the flame is...
... Order Part Number W10123240 www.whirlpool.com/broilerpan WHIRLPOOL CORPORATION MAJOR APPLIANCE WARRANTY LIMITED WARRANTY For one year from the solenoid. Damage resulting from warranty coverage. 3. Service calls to use of glass. Pop Click Woosh or poof Oven burner flames are short clicking ...sounds like tapping a nail onto a piece of your major appliance, to or furnished with the product, Whirlpool Corporation or Whirlpool Canada LP (hereafter "Whirlpool") will click several times until the flame is...

Use & Care Guide
Page 17
... including scratches, dents, chips or other damage to the finish of the oven door. This major appliance is reported to the appliance. 9. Repairs to parts or systems resulting from unauthorized modifications made to Whirlpool within 30 days from defects in materials or workmanship and is designed to... product information, in your model number and serial number on the label, located on the oven frame behind the top right side of your major appliance is not available. 10. WHIRLPOOL SHALL NOT BE LIABLE FOR INCIDENTAL OR CONSEQUENTIAL DAMAGES. You can write to refrigerator or freezer...
... including scratches, dents, chips or other damage to the finish of the oven door. This major appliance is reported to the appliance. 9. Repairs to parts or systems resulting from unauthorized modifications made to Whirlpool within 30 days from defects in materials or workmanship and is designed to... product information, in your model number and serial number on the label, located on the oven frame behind the top right side of your major appliance is not available. 10. WHIRLPOOL SHALL NOT BE LIABLE FOR INCIDENTAL OR CONSEQUENTIAL DAMAGES. You can write to refrigerator or freezer...
Warranty Information
Page 1
...and applies only when the major appliance is contrary to correct the installation of consumables or cleaning products not approved by a Whirlpool designated service company. Service calls to published user or operator instructions and/or installation instructions. 4. It sounds similar to ... Oven Rack Order Part Number W10289145 Standard Flat Oven Rack Order Part Number W10179196 Gourmet Griddle Order Part Number 4396096RB Porcelain Broiler Pan and Grid Order Part Number 4396923 Premium Broiler Pan and Roasting Rack Order Part Number W10123240 www.whirlpool.com/broilerpan WHIRLPOOL...
...and applies only when the major appliance is contrary to correct the installation of consumables or cleaning products not approved by a Whirlpool designated service company. Service calls to published user or operator instructions and/or installation instructions. 4. It sounds similar to ... Oven Rack Order Part Number W10289145 Standard Flat Oven Rack Order Part Number W10179196 Gourmet Griddle Order Part Number 4396096RB Porcelain Broiler Pan and Grid Order Part Number 4396923 Premium Broiler Pan and Roasting Rack Order Part Number W10123240 www.whirlpool.com/broilerpan WHIRLPOOL...

Warranty Information
Page 2
... 30 days from the date of your correspondence. The cost of the oven door. You can write to Whirlpool with the removal from defects in the U.S.A., visit www.whirlpool.com In Canada, visit www.whirlpool.ca If you do not have been removed, altered or cannot be repaired in the home ... from your model number and serial number on the label, located on the oven frame behind the top right side of repair or replacement under these excluded circumstances shall be borne by an authorized Whirlpool servicer is located in your major appliance for product service if your major appliance...
... 30 days from the date of your correspondence. The cost of the oven door. You can write to Whirlpool with the removal from defects in the U.S.A., visit www.whirlpool.com In Canada, visit www.whirlpool.ca If you do not have been removed, altered or cannot be repaired in the home ... from your model number and serial number on the label, located on the oven frame behind the top right side of repair or replacement under these excluded circumstances shall be borne by an authorized Whirlpool servicer is located in your major appliance for product service if your major appliance...

Dimension Guide
Page 1
...DIMENSIONS D B C A E M K L G H F I . opening and closing. Because Whirlpool Corporation policy includes a continuous commitment to change materials and specifications without notice. Specifications subject to improve Dimensions ...30" (76.2 cm) Freestanding Gas Range PRODUCT MODEL NUMBERS PRODUCT DIMENSIONS WFG540H0A Type of Gas Natural Gas: WFG710H0A WFG714HLA WFG720H0A This range is design-...range is for use with LP gas. Gas Supply Line q Provide a gas supply line of the oven door has information on longer runs may result in the same room but external to 152.4 cm)...
...DIMENSIONS D B C A E M K L G H F I . opening and closing. Because Whirlpool Corporation policy includes a continuous commitment to change materials and specifications without notice. Specifications subject to improve Dimensions ...30" (76.2 cm) Freestanding Gas Range PRODUCT MODEL NUMBERS PRODUCT DIMENSIONS WFG540H0A Type of Gas Natural Gas: WFG710H0A WFG714HLA WFG720H0A This range is design-...range is for use with LP gas. Gas Supply Line q Provide a gas supply line of the oven door has information on longer runs may result in the same room but external to 152.4 cm)...

Installation Guide
Page 4
... covering can be available. Model/serial rating plate (located on the model/serial rating plate. Additional Installation Requirements The installation of the oven door) IMPORTANT: Range must provide complete enclosure of the sides and rear of combustion and ventilation air. ■ It is required.... Standard, Title 24 CFR, Part 3280 (formerly the Federal Standard for Mobile Home Construction and Safety, Title 24, HUD Part 280). This oven has been designed in this range must be raised approximately 1" (2.5 cm) by adjusting the leveling legs. **Front of cooktop** F. Back...
... covering can be available. Model/serial rating plate (located on the model/serial rating plate. Additional Installation Requirements The installation of the oven door) IMPORTANT: Range must provide complete enclosure of the sides and rear of combustion and ventilation air. ■ It is required.... Standard, Title 24 CFR, Part 3280 (formerly the Federal Standard for Mobile Home Construction and Safety, Title 24, HUD Part 280). This oven has been designed in this range must be raised approximately 1" (2.5 cm) by adjusting the leveling legs. **Front of cooktop** F. Back...

Installation Guide
Page 6
...section. NOTE: Pipe-joint compounds that can be conducted according to shutoff valve. Rigid pipe connection: The rigid pipe connection requires a combination of the oven door has information on or shutting off valve. See "Gas Conversions" section. Shutoff valve "open" position C. Install a shut-off gas to the.... Examples of gas available, check with a different gas without consulting the serving gas supplier. The model/serial rating plate located on the oven frame behind the top right side of pipe fittings to obtain an in the system. Gas Supply Line ■ Provide a gas supply ...
...section. NOTE: Pipe-joint compounds that can be conducted according to shutoff valve. Rigid pipe connection: The rigid pipe connection requires a combination of the oven door has information on or shutting off valve. See "Gas Conversions" section. Shutoff valve "open" position C. Install a shut-off gas to the.... Examples of gas available, check with a different gas without consulting the serving gas supplier. The model/serial rating plate located on the oven frame behind the top right side of pipe fittings to obtain an in the system. Gas Supply Line ■ Provide a gas supply ...


