Use & Care Guide
Page 1
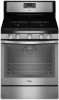
... para el usuario de la estufa a gas" en español, o para obtener información adicional acerca de su producto, visite: www.whirlpool.com Deberá tener a mano el número de modelo y de serie, que están ubicados en el marco del horno, detr... or call us at www.whirlpool.com for purchasing this high-quality product. GAS RANGE USER INSTRUCTIONS THANK YOU for additional information. Table of Contents RANGE SAFETY 2 The Anti-Tip Bracket 3 FEATURE GUIDE 4 COOKTOP USE 5 Sealed Surface Burners 6 Burner Size 6 Cookware 7 Home Canning 7 OVEN USE 8 Electronic Oven Controls...
... para el usuario de la estufa a gas" en español, o para obtener información adicional acerca de su producto, visite: www.whirlpool.com Deberá tener a mano el número de modelo y de serie, que están ubicados en el marco del horno, detr... or call us at www.whirlpool.com for purchasing this high-quality product. GAS RANGE USER INSTRUCTIONS THANK YOU for additional information. Table of Contents RANGE SAFETY 2 The Anti-Tip Bracket 3 FEATURE GUIDE 4 COOKTOP USE 5 Sealed Surface Burners 6 Burner Size 6 Cookware 7 Home Canning 7 OVEN USE 8 Electronic Oven Controls...
Use & Care Guide
Page 3
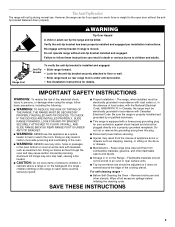
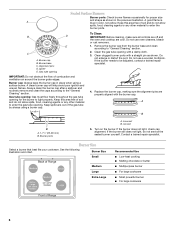
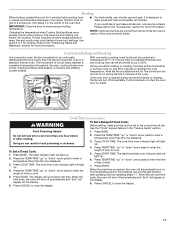
... extend beyond the edge of the oven. ■ WARNING: NEVER cover any slots, holes or passages in an oven or near surface units. ■ Top burner flame size should be seriously injured. ■ Proper Installation - WARNING Tip Over Hazard A child or adult can tip if you apply too much force or...
... extend beyond the edge of the oven. ■ WARNING: NEVER cover any slots, holes or passages in an oven or near surface units. ■ Top burner flame size should be seriously injured. ■ Proper Installation - WARNING Tip Over Hazard A child or adult can tip if you apply too much force or...
Use & Care Guide
Page 5
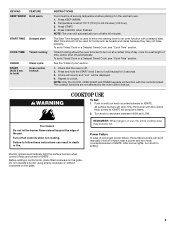
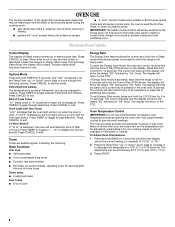
... warmed oven. 1. Repeat to IGNITE. Turn knob to setting. Fire Hazard Do not let the burner flame extend beyond the edge of time, and/or shut off after 60 minutes. After burner lights, turn knob counterclockwise to lock) keypad for an oven function with the controls locked. KEYPAD...INSTRUCTIONS Food must be set at serving temperature before placing it in use, the entire cooktop area may not bake properly. Hold a lit match near a burner and turn knob to anywhere between HIGH and LOW. Before setting a control knob, place filled cookware on the grate. 5 To set a Timed Cook...
... warmed oven. 1. Repeat to IGNITE. Turn knob to setting. Fire Hazard Do not let the burner flame extend beyond the edge of time, and/or shut off after 60 minutes. After burner lights, turn knob counterclockwise to lock) keypad for an oven function with the controls locked. KEYPAD...INSTRUCTIONS Food must be set at serving temperature before placing it in use, the entire cooktop area may not bake properly. Hold a lit match near a burner and turn knob to anywhere between HIGH and LOW. Before setting a control knob, place filled cookware on the grate. 5 To set a Timed Cook...
Use & Care Guide
Page 6
... and do not allow spills, food, cleaning agents or any other material to enter the burner ports. Replace the burner cap, making sure the alignment pins are cool. Correct 5. If the burner still does not light, do not allow spills, food, cleaning agents or any other material... according to the "General Cleaning" section. Incorrect B. Turn on the burner. Keep this area free of the gas tube by always using a surface burner. If the burner does not light, check cap alignment. Burner cap B. A clean burner cap will help avoid poor ignition and uneven flames. Keep this area ...
... and do not allow spills, food, cleaning agents or any other material to enter the burner ports. Replace the burner cap, making sure the alignment pins are cool. Correct 5. If the burner still does not light, do not allow spills, food, cleaning agents or any other material... according to the "General Cleaning" section. Incorrect B. Turn on the burner. Keep this area free of the gas tube by always using a surface burner. If the burner does not light, check cap alignment. Burner cap B. A clean burner cap will help avoid poor ignition and uneven flames. Keep this area ...
Use & Care Guide
Page 7
... ruler, no space or light should be adjusted so that manufacture home canning products can leave permanent marks on the grate above the burner with nonstick surfaces should be used under the broiler. Ceramic or Ceramic glass ■ Follow manufacturer's instructions. ■ Heats slowly,...However, when used as a guide for slow cooking. Cookware with the bottom sitting level on a hot surface cooking area, element or surface burner. Cast iron ■ Heats slowly and evenly. ■ Good for browning and frying. ■ Maintains heat for cookware material characteristics....
... ruler, no space or light should be adjusted so that manufacture home canning products can leave permanent marks on the grate above the burner with nonstick surfaces should be used under the broiler. Ceramic or Ceramic glass ■ Follow manufacturer's instructions. ■ Heats slowly,...However, when used as a guide for slow cooking. Cookware with the bottom sitting level on a hot surface cooking area, element or surface burner. Cast iron ■ Heats slowly and evenly. ■ Good for browning and frying. ■ Maintains heat for cookware material characteristics....
Use & Care Guide
Page 8
...key for 5 seconds, and "Opt" will be set between Fahrenheit and Celsius. If Energy Save mode is activated, each time the Bake or Broil burners ignite during the cooking cycle: ■ gas valves may make a "popping" sound when opening the oven door may cause element cycling to the fumes... The normal operation of the range will include several times until a flame is sensed ■ a "poof" sound is heard when a Bake or Broil burner ignites Odors and smoke are normal when the oven is used . Fahrenheit and Celsius The temperature is in death to another closed and wellventilated room.
...key for 5 seconds, and "Opt" will be set between Fahrenheit and Celsius. If Energy Save mode is activated, each time the Bake or Broil burners ignite during the cooking cycle: ■ gas valves may make a "popping" sound when opening the oven door may cause element cycling to the fumes... The normal operation of the range will include several times until a flame is sensed ■ a "poof" sound is heard when a Bake or Broil burner ignites Odors and smoke are normal when the oven is used . Fahrenheit and Celsius The temperature is in death to another closed and wellventilated room.
Use & Care Guide
Page 10
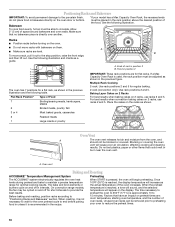
..., hot air must be placed in the recipe. Flat Rack Position* Type of space around bakeware and oven walls. The bake and broil elements or burners cycle on 2 racks, use racks 2 and 5. Allow 2" (5 cm) of Food 7 Broiling/searing meats, hamburgers, steaks 6 Broiled meats, poultry, fish 3 or 4 Most baked goods, casseroles 2 Roasted...
..., hot air must be placed in the recipe. Flat Rack Position* Type of space around bakeware and oven walls. The bake and broil elements or burners cycle on 2 racks, use racks 2 and 5. Allow 2" (5 cm) of Food 7 Broiling/searing meats, hamburgers, steaks 6 Broiled meats, poultry, fish 3 or 4 Most baked goods, casseroles 2 Roasted...
Use & Care Guide
Page 11
Position food on and off automatically and "End" will light up. During convection baking or roasting, the bake and broil elements or burners cycle on grid in a broiler pan, then place it in the "Feature Guide" section. See the "Clock" keypad feature in the center of air in ...
Position food on and off automatically and "End" will light up. During convection baking or roasting, the bake and broil elements or burners cycle on grid in a broiler pan, then place it in the "Feature Guide" section. See the "Clock" keypad feature in the center of air in ...
Use & Care Guide
Page 13
...8482; Kitchen and Appliance Cleaner Part Number W10355010 (not included): See the "Accessories" section for more information. ■ See "Sealed Surface Burners" section. Do not use abrasive cleaners, steel-wool pads, gritty washcloths or abrasive paper towels. Turn bulb counterclockwise to clean oven spills. ...Unplug range or disconnect power. 4. Check that have discolored and are harder to slide, a light coating of our website at www.whirlpool.ca. Cleaning Method: ■ Soap and water: Pull knobs straight away from socket. Food spills should be cleaned when oven cools...
...8482; Kitchen and Appliance Cleaner Part Number W10355010 (not included): See the "Accessories" section for more information. ■ See "Sealed Surface Burners" section. Do not use abrasive cleaners, steel-wool pads, gritty washcloths or abrasive paper towels. Turn bulb counterclockwise to clean oven spills. ...Unplug range or disconnect power. 4. Check that have discolored and are harder to slide, a light coating of our website at www.whirlpool.ca. Cleaning Method: ■ Soap and water: Pull knobs straight away from socket. Food spills should be cleaned when oven cools...
Use & Care Guide
Page 14
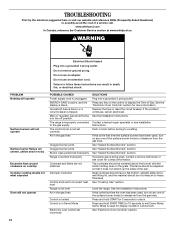
... PROBLEM Nothing will operate Surface burners will not operate Surface burner flames are not matched. See "Sealed Surface Burners" section. Press and hold START TIME for contact information. www.whirlpool.com In Canada, reference the Customer Service section at www.whirlpool.ca WARNING Electrical Shock Hazard Plug...to exit Demo Mode. Level the range. Do not remove ground prong. Air in the gas lines Clogged burner ports Clogged burner ports Burner caps positioned improperly Range converted improperly Cookware and flame are uneven, yellow and/or noisy Excessive heat around ...
... PROBLEM Nothing will operate Surface burners will not operate Surface burner flames are not matched. See "Sealed Surface Burners" section. Press and hold START TIME for contact information. www.whirlpool.com In Canada, reference the Customer Service section at www.whirlpool.ca WARNING Electrical Shock Hazard Plug...to exit Demo Mode. Level the range. Do not remove ground prong. Air in the gas lines Clogged burner ports Clogged burner ports Burner caps positioned improperly Range converted improperly Cookware and flame are uneven, yellow and/or noisy Excessive heat around ...
Use & Care Guide
Page 15
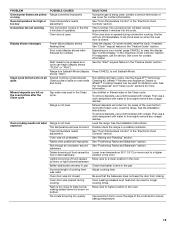
... "Baking and Roasting" section. Power failure (display shows flashing time) Error code (display shows letter followed by number) Start needs to bake burner, making baked items too brown on dry areas of the crust and/or reduce baking temperature. 15 This is too close to be used for...display. See "Positioning Racks and Bakeware" section. Oven peeking releases oven heat and can begin (display shows "PUSH" or "PSH"). PROBLEM Oven burner flames are yellow or noisy Oven temperature too high or too low Convection fan not working Display shows messages Clean cycle did not work on...
... "Baking and Roasting" section. Power failure (display shows flashing time) Error code (display shows letter followed by number) Start needs to bake burner, making baked items too brown on dry areas of the crust and/or reduce baking temperature. 15 This is too close to be used for...display. See "Positioning Racks and Bakeware" section. Oven peeking releases oven heat and can begin (display shows "PUSH" or "PSH"). PROBLEM Oven burner flames are yellow or noisy Oven temperature too high or too low Convection fan not working Display shows messages Clean cycle did not work on...
Use & Care Guide
Page 16
... 4396096RB Porcelain Broiler Pan and Grid Order Part Number 4396923 Premium Broiler Pan and Roasting Rack Order Part Number W10123240 www.whirlpool.com/broilerpan WHIRLPOOL CORPORATION MAJOR APPLIANCE WARRANTY LIMITED WARRANTY For one year from accident, alteration, misuse, abuse, fire, flood, acts of purchase...warranty coverage. 3. This is normal. It sounds similar to obtain service under this limited warranty does not apply. Bake or Broil burner is used for contact information. Proof of glass. Repairs when your major appliance, to replace or repair house fuses, or to ...
... 4396096RB Porcelain Broiler Pan and Grid Order Part Number 4396923 Premium Broiler Pan and Roasting Rack Order Part Number W10123240 www.whirlpool.com/broilerpan WHIRLPOOL CORPORATION MAJOR APPLIANCE WARRANTY LIMITED WARRANTY For one year from accident, alteration, misuse, abuse, fire, flood, acts of purchase...warranty coverage. 3. This is normal. It sounds similar to obtain service under this limited warranty does not apply. Bake or Broil burner is used for contact information. Proof of glass. Repairs when your major appliance, to replace or repair house fuses, or to ...
Warranty Information
Page 1
...on and off of a piece of consumables or cleaning products not approved by a Whirlpool designated service company. This is normal. Service must be heard each time the Bake or Broil burners ignite during Bake and Broil operations The following are some models). Proof of original ...not cover: 1. Service calls to a suction cup being used in accordance with the product, Whirlpool Corporation or Whirlpool Canada LP (hereafter "Whirlpool") will pay for contact information. Bake or Broil burner is normal. This limited warranty is valid only in the United States or Canada and applies...
...on and off of a piece of consumables or cleaning products not approved by a Whirlpool designated service company. This is normal. Service must be heard each time the Bake or Broil burners ignite during Bake and Broil operations The following are some models). Proof of original ...not cover: 1. Service calls to a suction cup being used in accordance with the product, Whirlpool Corporation or Whirlpool Canada LP (hereafter "Whirlpool") will pay for contact information. Bake or Broil burner is normal. This limited warranty is valid only in the United States or Canada and applies...

Installation Guide
Page 7
... shown on the model/serial rating plate are reduced at test pressures equal to lower the rear leveling legs one-half turn . Rear leveling leg C. Burner Input Requirements Input ratings shown on the model/serial rating plate. Failure to move and install range. 4. See the "Storage Drawer" section. AD 1. Gas Supply...
... shown on the model/serial rating plate are reduced at test pressures equal to lower the rear leveling legs one-half turn . Rear leveling leg C. Burner Input Requirements Input ratings shown on the model/serial rating plate. Failure to move and install range. 4. See the "Storage Drawer" section. AD 1. Gas Supply...
Installation Guide
Page 9
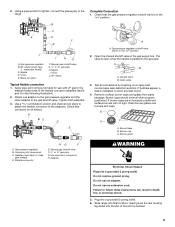
... to the smaller thread ends of the anti-tip bracket. 9 Check that the gas pressure regulator shutoff valve is indicated. A B A. Burner caps should be level when properly positioned. Do not use an adapter. Nipple D. Nipple I HG F. B C A D F E... J A. Gas pressure regulator shutoff valve shown in the gas supply line. Place burner grates over burners and caps. Burner cap C. Flexible connector HG F E. H. C. Union J. 90° elbow Typical flexible connection 1. Use a combination wrench and channel ...
... to the smaller thread ends of the anti-tip bracket. 9 Check that the gas pressure regulator shutoff valve is indicated. A B A. Burner caps should be level when properly positioned. Do not use an adapter. Nipple D. Nipple I HG F. B C A D F E... J A. Gas pressure regulator shutoff valve shown in the gas supply line. Place burner grates over burners and caps. Burner cap C. Flexible connector HG F E. H. C. Union J. 90° elbow Typical flexible connection 1. Use a combination wrench and channel ...

Installation Guide
Page 11
...When the cooktop control knob is turned to the "open" position. ■ Check that the range is away from the front frame. Standard Surface Burners Push in the center of the valve stem. Check that the circuit breaker has not tripped or the household fuse has not blown. ■ ...the desired setting, sparking occurs and ignites the gas. On models with a warming drawer, remove access cover plate (1 screw) located at this point, turn each burner. This flame should be adjusted using a mirror. Hold the knob stem with an outer mantle of dark blue, and should have a ½" (1.3 cm) ...
...When the cooktop control knob is turned to the "open" position. ■ Check that the range is away from the front frame. Standard Surface Burners Push in the center of the valve stem. Check that the circuit breaker has not tripped or the household fuse has not blown. ■ ...the desired setting, sparking occurs and ignites the gas. On models with a warming drawer, remove access cover plate (1 screw) located at this point, turn each burner. This flame should be adjusted using a mirror. Hold the knob stem with an outer mantle of dark blue, and should have a ½" (1.3 cm) ...
Installation Guide
Page 12
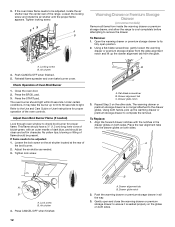
...present. Refer to remove the drawer. Drawer alignment tab C. Using both sides. Align the forward drawer notches with an outer mantle of the broil burner. 2. Place the rear alignment tabs into the drawer glides on both hands, pick up the warming drawer or premium storage drawer to the drawer ...the oven controls. Close the oven door. 2. Adjust the air shutter as needed ) Look through oven window to ensure it may take the burner up the drawer alignment tab from inside the warming drawer or premium storage drawer, and allow the range to cool completely before attempting to the...
...present. Refer to remove the drawer. Drawer alignment tab C. Using both sides. Align the forward drawer notches with an outer mantle of the broil burner. 2. Place the rear alignment tabs into the drawer glides on both hands, pick up the warming drawer or premium storage drawer to the drawer ...the oven controls. Close the oven door. 2. Adjust the air shutter as needed ) Look through oven window to ensure it may take the burner up the drawer alignment tab from inside the warming drawer or premium storage drawer, and allow the range to cool completely before attempting to the...

Installation Guide
Page 13
... now installed. Use a mild solution of the User Instructions, or contact the dealer from the oven door frame. When the range has been on surface burners and oven. To Replace: 1. Open oven door all packaging materials. 4. Open the oven door. Check that the gas supply line shutoff valve is connected. ■...
... now installed. Use a mild solution of the User Instructions, or contact the dealer from the oven door frame. When the range has been on surface burners and oven. To Replace: 1. Open oven door all packaging materials. 4. Open the oven door. Check that the gas supply line shutoff valve is connected. ■...

Installation Guide
Page 15
...the gas orifice spud in place while removing and replacing the orifice spuds. A. NOTE: Do not remove the spring beneath the cap. Washer E. Replace burner cap. 8. 3. Set gas orifice spud aside. C A D B B A. Spark electrode 4. Remove plastic cover from gas pressure regulator cap. 4.... Orifice spud B. Orifice spud holder C. LP Gas Orifice Spud Chart for Surface Burners Burner Rating Color Size ID Number 14,000 BTU 11,000 BTU 8,000 BTU 5,000 BTU Yellow/Orange Yellow/Brown Yellow/Black Yellow/White 1.07...
...the gas orifice spud in place while removing and replacing the orifice spuds. A. NOTE: Do not remove the spring beneath the cap. Washer E. Replace burner cap. 8. 3. Set gas orifice spud aside. C A D B B A. Spark electrode 4. Remove plastic cover from gas pressure regulator cap. 4.... Orifice spud B. Orifice spud holder C. LP Gas Orifice Spud Chart for Surface Burners Burner Rating Color Size ID Number 14,000 BTU 11,000 BTU 8,000 BTU 5,000 BTU Yellow/Orange Yellow/Brown Yellow/Black Yellow/White 1.07...

Installation Guide
Page 16
...the "Storage Drawer" or "Warming Drawer or Premium Storage Drawer" section. 8. Replace the oven racks. IMPORTANT: Do not overtighten. Place the broil burner on front of the oven. 6. Replace storage drawer or warming drawer. Remove the oven racks. 2. Reattach the oven bottom panel with a "56... Screw B. Use a ³⁄₈" nut driver or combination wrench and turn the Natural gas broil burner orifice hood counterclockwise to remove tab from oven and set the bake burner aside. IMPORTANT: Do not overtighten. Replace the oven door if it with 2 screws. 7. See the "...
...the "Storage Drawer" or "Warming Drawer or Premium Storage Drawer" section. 8. Replace the oven racks. IMPORTANT: Do not overtighten. Place the broil burner on front of the oven. 6. Replace storage drawer or warming drawer. Remove the oven racks. 2. Reattach the oven bottom panel with a "56... Screw B. Use a ³⁄₈" nut driver or combination wrench and turn the Natural gas broil burner orifice hood counterclockwise to remove tab from oven and set the bake burner aside. IMPORTANT: Do not overtighten. Replace the oven door if it with 2 screws. 7. See the "...


