Whirlpool WFG361LVQ Support Question
Whirlpool WFG361LVQ Support Question
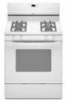
Find answers below for this question about Whirlpool WFG361LVQ - 30 Inch Gas Range.Need a Whirlpool WFG361LVQ manual? We have 4 online manuals for this item!
Question posted by yohum on January 1st, 2012
Replacement Burner Drip Trays
Do they sale replacement burner drip trays?
Current Answers
Answer #1: Posted by freginold on January 4th, 2012 4:08 AM
freginold

Member since:
December 20th, 2011 Points: 23,253,885

Member since:
December 20th, 2011 Points: 23,253,885
If you mean the actual tray that sits on the cooktop at the burner, it doesn't appear to be sold as an individual part -- it looks like it can only be replaced as the entire cooktop. However, you can look at the diagrams yourself to make sure we're talking about the same thing; just choose your model from the four listed here, and then you can scan the diagrams to see the available parts:
http://www.searspartsdirect.com/partsdirect/part-model/WFG361LVQ?searchModPar=WFG361LVQ&pathTaken=modelSearch&prst=0&shdMod=WFG361LVQ
http://www.searspartsdirect.com/partsdirect/part-model/WFG361LVQ?searchModPar=WFG361LVQ&pathTaken=modelSearch&prst=0&shdMod=WFG361LVQ
Related Whirlpool WFG361LVQ Manual Pages
Dimension Guide - Page 1

...189;" (13.0 mm) minimum.
IMPORTANT: If installing a range hood or microwave hood combination above the range, follow the range hood or microwave hood combination installation instructions for installation of range to the range location. opening width D.
W10196161E 1/27/11 ®
30" (76.2 cm) Freestanding Gas Range
PRODUCT MODEL NUMBERS
PRODUCT DIMENSIONS
GFG464LV GFG471LV
WFG361LV...
Owners Manual - Page 1

... 5
Sealed Surface Burners 5 OVEN USE 6
Electronic Oven Controls 6 Aluminum Foil 7 Positioning Racks and Bakeware 7 Oven Vent 7 Baking and Roasting 7 Broiling 7 Timed Cooking (on some models 8 RANGE CARE 8 Self...WARRANTY 12
W10196153B
Para obtener acceso a "Instrucciones para el usuario de la estufa a gas" en español, o para obtener información adicional acerca de su producto...
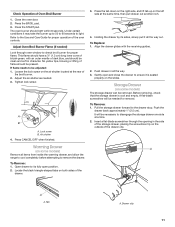
Owners Manual - Page 5

... start. Hold a lit match near a burner and turn knob counterclockwise to light properly. B
D
E
C
A. Gas tube opening: Gas must flow freely throughout the gas tube opening for foods such as shown above... material to enter the burner ports.
5
A clean burner cap will click.
Keep this area free of the pan. Push in the display.
REMEMBER: When range is displayed. KEYPAD COOK...
Owners Manual - Page 6

... the TEMP/TIME keys to be set between 30°F (15°C) and -30°F (-15°C).
3. Oven Light with... to "- Do not enlarge or distort the port. Replace the burner cap, making sure the alignment pins are cool. A...burner ports with the burner cap. however, it is displayed. Do not use . If the burner still does not light, do not service the sealed burner yourself. Clean the gas...
Owners Manual - Page 9

...Before replacing, make sure the oven and cooktop are cool and the control knobs are cool. Unplug range or disconnect power.
4. Plug in the OFF position. Always follow label instructions on burners while...tomato, should be cleaned as soon as the entire range is cool and empty before going into a dishwasher.
■ Gas Grate and Drip Pan Cleaner Part Number 31617: See cover for contact...
Owners Manual - Page 10

Do not use an adapter. See Installation Instructions.
■ Is the range properly connected to the proper heat level?
Surface burner flames are the burner caps positioned
properly?
Contact a service technician or see cover for contact information. Gas range noises during Bake and Broil operations Noises that may be heard during the Bake and Broil operations...
Owners Manual - Page 11

...the pan.
■ Is the proper length of the crust and/or reduce baking temperature. Level the range. Double-check the recipe in the pan? See "Positioning Racks and Bakeware" section.
■ Is ... models) Order Part Number 31462
All-Purpose Appliance Cleaner Order Part Number 31682
Gas Grate and Drip Pan Cleaner Order Part Number 31617
ACCESSORIES
Split-Rack with Removable Insert Order Part...
Installation Guide - Page 1

... reduce the chance of others . INSTALLATION INSTRUCTIONS 30" (76.2 CM) FREESTANDING GAS RANGES
Table of Contents
RANGE SAFETY 1 INSTALLATION REQUIREMENTS 3
Tools and Parts 3 Location Requirements 3 Electrical Requirements 5 Gas Supply Requirements 5 INSTALLATION INSTRUCTIONS 6 Unpack Range 6 Install Anti-Tip Bracket 7 Make Gas Connection 8 Verify Anti-Tip Bracket Location 9 Level...
Installation Guide - Page 5

... the outlet provides 120-volt power and is correctly grounded.
■ This gas range is adequate. Do not use an extension cord.
Observe all gas connections. Type of Gas
Natural gas: This range is located on the types of gas that resist the action of electronic gas ranges.
■ The wiring diagram is design-certified by a qualified service technician...
Installation Guide - Page 6

... and parts package from range. 2. Gas supply line B. The inlet pressure to the regulator should be as an adjacent cabinet.
Rear leveling leg C. Rigid pipe connection: The rigid pipe connection requires a combination of 4% for each 1,000 ft (304.8 m) above the manifold pressure shown on the model/serial rating plate. Burner Input Requirements
Input...
Installation Guide - Page 8

...(see B and G in death, explosion, or fire.
Union E. A B
A. If burner caps are not properly positioned, surface burners will not light. WARNING
Make Gas Connection
3.
Flexible connector
HG
F
E. B
C
A
D
F
E
J
A. Black iron pipe
I . Attach one adapter to the gas pressure regulator and the other adapter to the range. Open the manual shutoff valve in the "on an...
Installation Guide - Page 9

... blown.
■ Check that the gas shutoff valves are set to floor. ■ Slide range back so rear range foot is level.
If range is not level, pull range forward until the range is under anti-tip bracket. On Ranges Equipped with a storage drawer, remove the storage drawer.
The cooktop "low" burner flame should light within 4 seconds. High...
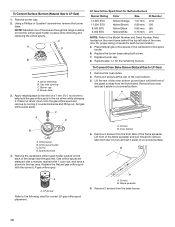
Installation Guide - Page 10

... side of the range. Tighten locking screw. Lift front of the flame spreader and pull forward to remove tabs from rear of Oven Bake Burner
1.
Reinstall flame spreader and oven bake burner cover.
10 If... from "LO" to "HI,"
checking the flame at each burner. Look into the mirror to light the bake and broil burners. Pliers
1. Replace the control knob. 4. Mirror B. Locking screw B. The valve...
Installation Guide - Page 11
...from inside the warming drawer, and allow the range to cool completely before attempting to check broil burner for proper operation of Oven Broil Burner
1. Under certain conditions it all the way... cone of
the broil burner. 2. Locate the black triangle-shaped tabs on the air shutter located at the same time, then pull drawer out another inch.
4. To Replace: 1. Before removing, check...
Installation Guide - Page 12

... and replacing the storage drawer, a slight push may be needed to a level position. 3. If there is level. Turn on the storage drawer until the
drawer side rails engage with a soft cloth.
Continue to open , press the CANCEL button on range operation. You should hear a "click" as outlined above.
■ If the gas supply...
Installation Guide - Page 13

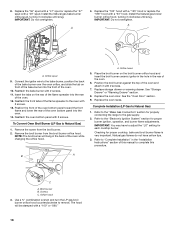
... can result in death, explosion, or fire. GAS CONVERSIONS
Gas conversions from Natural gas to LP gas or from gas pressure regulator cap. 4. WARNING
To Convert Gas Pressure Regulator (Natural Gas to do so can result in the above drawing.
6. Install a shut-off valve.
Washer E. Replace plastic cover over the gas pressure regulator cap and reinstall on regulator so...
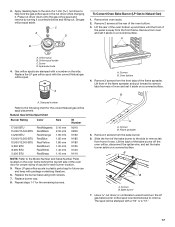
Installation Guide - Page 14
... spud in place while removing and replacing the orifice spuds. Press nut driver down onto the gas orifice spud and remove by turning it . Screws B. Remove 2 screws from the front tabs of the screws through the range cooktop to the end of the oven bottom. 3.
Burner cap D. Screw D. Remove 2 screws at the rear of...
Installation Guide - Page 16

... range B.
NOTE: Do not remove the spring beneath the cap. Gas supply line
2. Using a Phillips or Quadrex® screwdriver, remove the burner
base. Remove burner cap. 2. The outer cone is moved.
Refer to the "Make Gas Connection" section for proper cooktop, bake and broil burner flame is facing the direction shown in place while removing and replacing...
Installation Guide - Page 17
... the flame spreader. Spark electrode
4.
Screws B. Remove 2 screws at the rear of the bake burner off the oven orifice, disconnect the igniter wire, and set it counterclockwise and lifting out. A
A. Replace burner cap.
8. The spud will be stamped with the correct Natural gas orifice spud. Screw D. Remove 2 screws from oven and set the bake...
Installation Guide - Page 18
...;⁄₈" combination wrench and turn the LP gas broil burner orifice hood counterclockwise to Natural Gas)
1.
To Convert Oven Broil Burner (LP Gas to remove. Orifice hood
3. Replace the "56" spud with a "47" spud or replace the "57" spud with 2 screws. 11. Replace the oven door. Refer to the "Make Gas Connection" section for proper cooktop, bake and...
Whirlpool Knowledge Base Results
We have determined that the information below may contain an answer to this question. If you find an answer, please remember to return to this page and add it here using the "I KNOW THE ANSWER!" button above. It's that easy to earn points!-
What are the control panel features on my 30-inch gas modular downdraft cooktop?
To help you find information on my 30-inch gas modular downdraft cooktop? Use it to become familiar with the location and appearance of your Use & Below is a captioned... of all parts and features. Care Guide are the control panel features on specific parts and features quickly, page references from your 30-inch modular downdraft cooktop control panel. What are included. -
What are the parts and features on the control panel of my freestanding ceramic glass electric range?
... not match those of your model. What are the parts and features on the control panel of the parts and features listed. My range is the Control Lockout or Lockout on my 30-inch gas modular downdraft cooktop? Ordering replacement parts or accessories What is not working at all of my electric drop-in... -
How do I broil using my electric range?
...;F (150°C and 275°C). Display shows F25 or F06 - Drippings will bake on grid in the broiler pan, and then place ...stop position. The broil range can be turned. How do I broil using my gas range? For best results, use with electric range Broil burner/element is not heating ...replacement parts or accessories Broiling uses direct radiant heat to cook food.
Similar Questions

I Have This Whirlpool Gas Range Oven. I Know It Can Be Converted From Mat To Lp.
I just need instructions on what to buy and how to convert the stove from nat to lp??
I just need instructions on what to buy and how to convert the stove from nat to lp??
(Posted by Sheweychristine2 4 years ago)

Can Whirlpool 30' Gas Range Wfg110avq0 Be Converted To Lp?
Can Whirlpool 30" Gas Range WFG110AVQ0 be converted to LP?
Can Whirlpool 30" Gas Range WFG110AVQ0 be converted to LP?
(Posted by thompsoncory88 8 years ago)

Whirlpool Gas Range Burners Won't Light
(Posted by RPGspsnauw 10 years ago)

Wfg361lvq Gas Range Diy Trouble Shooting
Intermittent shut down will not always stay baking. it will stop gas flow and cool down. what needs ...
Intermittent shut down will not always stay baking. it will stop gas flow and cool down. what needs ...
(Posted by sfcgoltz 10 years ago)

Is This A Natural Gas Range Or Propane
(Posted by donnalmccann 11 years ago)