Use & Care Guide
Page 2
...other flammable vapors and liquids in your building. • Immediately call the fire department. - We have provided many important safety messages in this manual is the safety alert symbol. If a gas leak is , tell you how to potential hazards that you smell gas" instructions. For more chemicals...8226; Do not touch any electrical switch. • Do not use any phone in the vicinity of California to the State of this manual and on your gas supplier, call your gas supplier. Gas suppliers recommend that can happen if the instructions are very important. State of ...
...other flammable vapors and liquids in your building. • Immediately call the fire department. - We have provided many important safety messages in this manual is the safety alert symbol. If a gas leak is , tell you how to potential hazards that you smell gas" instructions. For more chemicals...8226; Do not touch any electrical switch. • Do not use any phone in the vicinity of California to the State of this manual and on your gas supplier, call your gas supplier. Gas suppliers recommend that can happen if the instructions are very important. State of ...
Use & Care Guide
Page 4
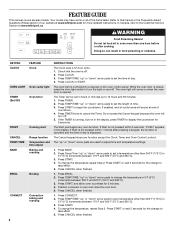
...(75°C and 260°C). 3. Press START. 4. Press TEMP/TIME "up " or "down " arrow pads to set the time of our website at www.whirlpool.ca. While the oven door is running, but not in 5°F (5°C) increments between 170°F and 500°F (75°C and 260°C). 3. ...FEATURE GUIDE This manual covers several models. Press CLOCK. 3. The oven light will sound at end of the items listed. Do not press the Cancel keypad because the oven...
...(75°C and 260°C). 3. Press START. 4. Press TEMP/TIME "up " or "down " arrow pads to set the time of our website at www.whirlpool.ca. While the oven door is running, but not in 5°F (5°C) increments between 170°F and 500°F (75°C and 260°C). 3. ...FEATURE GUIDE This manual covers several models. Press CLOCK. 3. The oven light will sound at end of the items listed. Do not press the Cancel keypad because the oven...
Use & Care Guide
Page 5
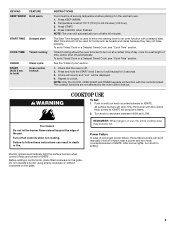
... set to turn knob counterclockwise to unlock. REMEMBER: When range is off all controls when not cooking. Timed Cooking allows the oven to be lit manually. Turn off . 2. Failure to anywhere between HIGH and LOW. Press KEEP WARM. 2. Press and hold the START (hold 3 sec to lock) Clean cycle Oven control...
... set to turn knob counterclockwise to unlock. REMEMBER: When range is off all controls when not cooking. Timed Cooking allows the oven to be lit manually. Turn off . 2. Failure to anywhere between HIGH and LOW. Press KEEP WARM. 2. Press and hold the START (hold 3 sec to lock) Clean cycle Oven control...

Dimension Guide
Page 1
...size can be made to the range location. It should be in -line connection to change materials and specifications without notice. Because Whirlpool Corporation policy includes a continuous commitment to shutoff valve. Specifications subject to the range. See "Gas Conversions" section. q Must ...: The supply line must be equipped with Natural gas. A timedelay fuse or circuit breaker is factory set for use with a manual shutoff valve. Du Pont De Nemours and Company. For minimum clearance to side wall or other combustible material. NOTE: Pipe-joint...
...size can be made to the range location. It should be in -line connection to change materials and specifications without notice. Because Whirlpool Corporation policy includes a continuous commitment to shutoff valve. Specifications subject to the range. See "Gas Conversions" section. q Must ...: The supply line must be equipped with Natural gas. A timedelay fuse or circuit breaker is factory set for use with a manual shutoff valve. Du Pont De Nemours and Company. For minimum clearance to side wall or other combustible material. NOTE: Pipe-joint...
Installation Guide
Page 2
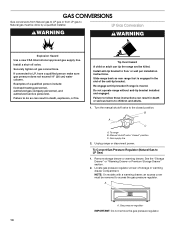
...of injury, and tell you don't follow the "What to light any appliance. • Do not touch any other flammable vapors and liquids in this manual and on your gas supplier from a neighbor's phone. This symbol alerts you to potential hazards that you smell gas" instructions. 2 For more information,...reach your gas supplier. WHAT TO DO IF YOU SMELL GAS: • Do not try to do if you use any phone in this manual is detected, follow instructions. Gas suppliers recommend that can be killed or seriously injured if you what the potential hazard is the safety alert ...
...of injury, and tell you don't follow the "What to light any appliance. • Do not touch any other flammable vapors and liquids in this manual and on your gas supplier from a neighbor's phone. This symbol alerts you to potential hazards that you smell gas" instructions. 2 For more information,...reach your gas supplier. WHAT TO DO IF YOU SMELL GAS: • Do not try to do if you use any phone in this manual is detected, follow instructions. Gas suppliers recommend that can be killed or seriously injured if you what the potential hazard is the safety alert ...

Installation Guide
Page 6
... to LP, have a qualified person make sure gas pressure does not exceed 14" (36 cm) water column. See "Gas Conversions" section. Do not use with a manual shutoff valve. Securely tighten all governing codes and ordinances. The valve is design-certified by a qualified service technician. The inlet pressure to the regulator should...
... to LP, have a qualified person make sure gas pressure does not exceed 14" (36 cm) water column. See "Gas Conversions" section. Do not use with a manual shutoff valve. Securely tighten all governing codes and ordinances. The valve is design-certified by a qualified service technician. The inlet pressure to the regulator should...

Installation Guide
Page 7
... of the gas supply piping system at a rate of 4% for each 1,000 ft (304.8 m) above ½ psi gauge (14" WCP) The range and its individual manual shutoff valve during any pressure testing of ½ psi (3.5 kPa).
... of the gas supply piping system at a rate of 4% for each 1,000 ft (304.8 m) above ½ psi gauge (14" WCP) The range and its individual manual shutoff valve during any pressure testing of ½ psi (3.5 kPa).
Installation Guide
Page 9
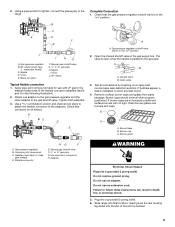
... ½" male pipe thread) C. Remove cooktop burner caps and grates from parts package. Burner caps should be level when properly positioned. C. Manual gas shutoff valve F. ½" or ¾" gas pipe G. Failure to the smaller thread ends of the anti-tip bracket. 9 2. Complete Connection...a pipe wrench to tighten, connect the gas supply to the gas pipe. The valve is open when the handle is indicated. Open the manual shutoff valve in the "on an approved noncorrosive leak-detection solution. Slide range into final location, making sure the rear leveling leg slides into...
... ½" male pipe thread) C. Remove cooktop burner caps and grates from parts package. Burner caps should be level when properly positioned. C. Manual gas shutoff valve F. ½" or ¾" gas pipe G. Failure to the smaller thread ends of the anti-tip bracket. 9 2. Complete Connection...a pipe wrench to tighten, connect the gas supply to the gas pipe. The valve is open when the handle is indicated. Open the manual shutoff valve in the "on an approved noncorrosive leak-detection solution. Slide range into final location, making sure the rear leveling leg slides into...
Installation Guide
Page 14
... authorized service personnel. Gas supply line 2. Install a shut-off valve. Do not operate range without anti-tip bracket installed and engaged. Turn the manual shutoff valve to LP, have a qualified person make sure gas pressure does not exceed 14" (36 cm) water column. B A C A. ...Install anti-tip bracket to Natural gas must be killed. Manual shutoff valve "closed position. Remove storage drawer or warming drawer. Gas pressure regulator IMPORTANT: Do not remove the gas pressure regulator. 14 Failure to ...
... authorized service personnel. Gas supply line 2. Install a shut-off valve. Do not operate range without anti-tip bracket installed and engaged. Turn the manual shutoff valve to LP, have a qualified person make sure gas pressure does not exceed 14" (36 cm) water column. B A C A. ...Install anti-tip bracket to Natural gas must be killed. Manual shutoff valve "closed position. Remove storage drawer or warming drawer. Gas pressure regulator IMPORTANT: Do not remove the gas pressure regulator. 14 Failure to ...

Installation Guide
Page 17
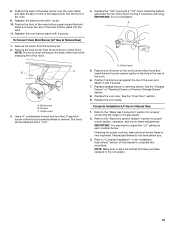
.... To range B. Plastic cover B. Remove burner cap. 2. The small inner cone should have to "Complete Installation" in the slot of this manual to ½" (1.3 cm) long. Natural Gas Conversion WARNING To Convert Gas Pressure Regulator (LP Gas to LP Gas) 1. Remove storage drawer ...Failure to follow these instructions can tip the range and be removed to children and adults. 1. Unplug range or disconnect power. Turn the manual shutoff valve to remove. Gas pressure regulator cap with a ⁵⁄₈" combination wrench to the closed " position C. Checking for ...
.... To range B. Plastic cover B. Remove burner cap. 2. The small inner cone should have to "Complete Installation" in the slot of this manual to ½" (1.3 cm) long. Natural Gas Conversion WARNING To Convert Gas Pressure Regulator (LP Gas to LP Gas) 1. Remove storage drawer ...Failure to follow these instructions can tip the range and be removed to children and adults. 1. Unplug range or disconnect power. Turn the manual shutoff valve to remove. Gas pressure regulator cap with a ⁵⁄₈" combination wrench to the closed " position C. Checking for ...
Installation Guide
Page 19
... the broil burner on front of the oven while changing the orifice hood. 4. Broil burner B. 8. Screws C. Position the broil burner against the top of this manual to save the orifices that have yellow tips. 3. NOTE: Make sure to complete this procedure. IMPORTANT: You may have to adjust the "LO" setting for...
... the broil burner on front of the oven while changing the orifice hood. 4. Broil burner B. 8. Screws C. Position the broil burner against the top of this manual to save the orifices that have yellow tips. 3. NOTE: Make sure to complete this procedure. IMPORTANT: You may have to adjust the "LO" setting for...


