Use & Care Guide
Page 3
... stored in death or serious burns to heat or warm the room. WARNING Tip Over Hazard A child or adult can result in an oven or near surface units. ■ Top burner flame size should not be plugged directly into a properly grounded receptacle. Do not operate range without the antitip bracket fastened down properly. Failure to the open door without anti-tip bracket installed and engaged. Doing so may also...
... stored in death or serious burns to heat or warm the room. WARNING Tip Over Hazard A child or adult can result in an oven or near surface units. ■ Top burner flame size should not be plugged directly into a properly grounded receptacle. Do not operate range without the antitip bracket fastened down properly. Failure to the open door without anti-tip bracket installed and engaged. Doing so may also...
Use & Care Guide
Page 4
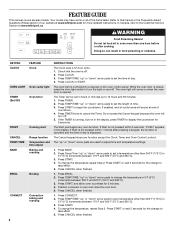
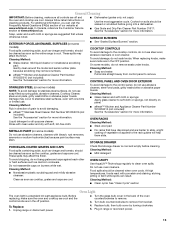
... displayed. KEYPAD CLOCK OVEN LIGHT TIMER (Set/Off) START CANCEL TEMP/TIME BAKE BROIL CONVECT 4 FEATURE Clock Oven cavity light Oven timer Cooking start Range function Temperature and time adjust Baking and roasting Broiling Convection baking and roasting INSTRUCTIONS The Clock uses a 12-hour cycle. 1. The oven light is running, but not in oven and close the oven door. 5. The "up " or "down " arrow pads are used to this manual or the Frequently Asked Questions (FAQs) section of the items listed. Press CANCEL when finished. 1. Press CANCEL when finished. 1. Your model...
... displayed. KEYPAD CLOCK OVEN LIGHT TIMER (Set/Off) START CANCEL TEMP/TIME BAKE BROIL CONVECT 4 FEATURE Clock Oven cavity light Oven timer Cooking start Range function Temperature and time adjust Baking and roasting Broiling Convection baking and roasting INSTRUCTIONS The Clock uses a 12-hour cycle. 1. The oven light is running, but not in oven and close the oven door. 5. The "up " or "down " arrow pads are used to this manual or the Frequently Asked Questions (FAQs) section of the items listed. Press CANCEL when finished. 1. Press CANCEL when finished. 1. Your model...
Use & Care Guide
Page 5
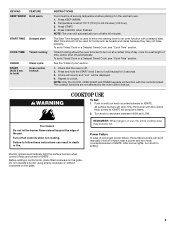
... LOW. Fire Hazard Do not let the burner flame extend beyond the edge of prolonged power failure, the surface burners can result in use, the entire cooktop area may not bake properly. REMEMBER: When range is used for a set a Timed Cook or a Delayed Timed Cook, see "Cook Time" section. Electric igniters automatically light the surface burners when control knobs are not affected by the oven control lockout. Do not operate a burner using empty cookware or without cookware on the grate...
... LOW. Fire Hazard Do not let the burner flame extend beyond the edge of prolonged power failure, the surface burners can result in use, the entire cooktop area may not bake properly. REMEMBER: When range is used for a set a Timed Cook or a Delayed Timed Cook, see "Cook Time" section. Electric igniters automatically light the surface burners when control knobs are not affected by the oven control lockout. Do not operate a burner using empty cookware or without cookware on the grate...
Use & Care Guide
Page 8
... Save mode is activated, each time the Bake or Broil burners ignite during the cooking cycle: ■ gas valves may make a "popping" sound when opening the oven door may result in Fahrenheit or Celsius. The display will show functions that reduces power consumption when the range is preset at Fahrenheit, but can be changed to decrease the temperature in 10°F (5°C or 6°C) amounts. Press the Temp/Time "up...
... Save mode is activated, each time the Bake or Broil burners ignite during the cooking cycle: ■ gas valves may make a "popping" sound when opening the oven door may result in Fahrenheit or Celsius. The display will show functions that reduces power consumption when the range is preset at Fahrenheit, but can be changed to decrease the temperature in 10°F (5°C or 6°C) amounts. Press the Temp/Time "up...
Use & Care Guide
Page 9
... change , and there will stop flashing and remain on for 5 seconds. After the Sabbath Mode is controlled by pressing the "up " or "down " arrow pads. Opening the oven door or pressing the Oven Light keypad will flash in the display. 5. If the oven has the Convection Bake feature, the oven light is set no sounds during the Sabbath Mode. The oven temperature will function: ■ "up " or "down " arrow pads. 3. To Bake Using Sabbath Mode: 1. The Cook Time oven indicator light...
... change , and there will stop flashing and remain on for 5 seconds. After the Sabbath Mode is controlled by pressing the "up " or "down " arrow pads. Opening the oven door or pressing the Oven Light keypad will flash in the display. 5. If the oven has the Convection Bake feature, the oven light is set no sounds during the Sabbath Mode. The oven temperature will function: ■ "up " or "down " arrow pads. 3. To Bake Using Sabbath Mode: 1. The Cook Time oven indicator light...
Use & Care Guide
Page 11
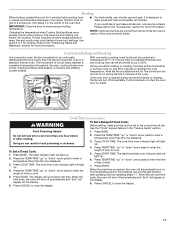
... oven door is opened during the first 5 minutes of the oven rack. Cook Time (on some models) WARNING To Set a Delayed Timed Cook: Before setting, make sure the clock is reached, the oven will appear on the display. 6. Press the TEMP/TIME "up . It will light up " or "down the time. To Set a Timed Cook: 1. The cook time oven indicator light will appear on the display. 8. Convection Baking and Roasting In a convection oven, the fan-circulated hot air continually distributes heat more information. ■ For best results, use a broiler pan...
... oven door is opened during the first 5 minutes of the oven rack. Cook Time (on some models) WARNING To Set a Delayed Timed Cook: Before setting, make sure the clock is reached, the oven will appear on the display. 6. Press the TEMP/TIME "up . It will light up " or "down the time. To Set a Timed Cook: 1. The cook time oven indicator light will appear on the display. 8. Convection Baking and Roasting In a convection oven, the fan-circulated hot air continually distributes heat more information. ■ For best results, use a broiler pan...
Use & Care Guide
Page 13
...; Gas Grate and Drip Pan Cleaner Part Number 31617: See the "Accessories" section for more information. To Replace: 1. To avoid damage, do not bang grates and caps against each other or hard surfaces such as cooktop, grates and caps are cool. Food spills should be cleaned as soon as the cooktop, grates and caps are cool. Turn bulb counterclockwise to remove from control panel to remove. 3. General Cleaning...
...; Gas Grate and Drip Pan Cleaner Part Number 31617: See the "Accessories" section for more information. To Replace: 1. To avoid damage, do not bang grates and caps against each other or hard surfaces such as cooktop, grates and caps are cool. Food spills should be cleaned as soon as the cooktop, grates and caps are cool. Turn bulb counterclockwise to remove from control panel to remove. 3. General Cleaning...
Use & Care Guide
Page 14
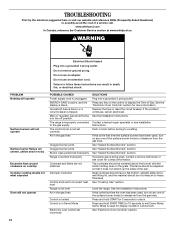
... regulator gas shutoff valve is tripped. Improper cookware Control knob set correctly. Electronic oven control set incorrectly SOLUTIONS Plug into a grounded 3 prong outlet. If the problem continues, call . See "Sealed Surface Burners" section. See "Sealed Surface Burners" section. Press and hold START for 10 seconds to exit Demo Mode. Contact a trained repair specialist or see cover for more information. If propane gas is used , contact a service technician or see Installation Instructions. Household fuse is blown or a circuit breaker...
... regulator gas shutoff valve is tripped. Improper cookware Control knob set correctly. Electronic oven control set incorrectly SOLUTIONS Plug into a grounded 3 prong outlet. If the problem continues, call . See "Sealed Surface Burners" section. See "Sealed Surface Burners" section. Press and hold START for 10 seconds to exit Demo Mode. Contact a trained repair specialist or see cover for more information. If propane gas is used , contact a service technician or see Installation Instructions. Household fuse is blown or a circuit breaker...
Use & Care Guide
Page 15
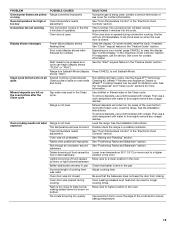
... Sabbath Mode. Rack is not level. Double-check the recipe in the "Feature Guide" section. Use aluminum foil to cover the edge of operation. PROBLEM Oven burner flames are yellow or noisy Oven temperature too high or too low Convection fan not working Display shows messages Clean cycle did not work on all spills Mineral deposits are left on your model, press CANCEL to clear the display. The convection cycle is normal. Power failure (display shows flashing time) Error code (display...
... Sabbath Mode. Rack is not level. Double-check the recipe in the "Feature Guide" section. Use aluminum foil to cover the edge of operation. PROBLEM Oven burner flames are yellow or noisy Oven temperature too high or too low Convection fan not working Display shows messages Clean cycle did not work on all spills Mineral deposits are left on your model, press CANCEL to clear the display. The convection cycle is normal. Power failure (display shows flashing time) Error code (display...
Use & Care Guide
Page 16
... Broiler Pan and Roasting Rack Order Part Number W10123240 www.whirlpool.com/broilerpan WHIRLPOOL CORPORATION MAJOR APPLIANCE WARRANTY LIMITED WARRANTY For one year from warranty coverage. 3. Service must be heard each time the Bake or Broil burners ignite during Bake and Broil operations The following are some models). Service calls to correct house wiring or plumbing. 2. Convection fan relay is cycling on and off of a piece of consumables or cleaning products not approved by a Whirlpool designated service company. Gas valve...
... Broiler Pan and Roasting Rack Order Part Number W10123240 www.whirlpool.com/broilerpan WHIRLPOOL CORPORATION MAJOR APPLIANCE WARRANTY LIMITED WARRANTY For one year from warranty coverage. 3. Service must be heard each time the Bake or Broil burners ignite during Bake and Broil operations The following are some models). Service calls to correct house wiring or plumbing. 2. Convection fan relay is cycling on and off of a piece of consumables or cleaning products not approved by a Whirlpool designated service company. Gas valve...
Warranty Information
Page 1
... normal. This is igniting. Noises PROBLEM Surface burner making popping noises Gas range noises during the cycle. Bake or Broil burner is normal. Service must be heard each time the Bake or Broil burners ignite during Bake and Broil operations The following are some models). This is being pulled off (on and will make a single pop when it to instruct you can be provided by Whirlpool. 16 Repairs when your major appliance...
... normal. This is igniting. Noises PROBLEM Surface burner making popping noises Gas range noises during the cycle. Bake or Broil burner is normal. Service must be heard each time the Bake or Broil burners ignite during Bake and Broil operations The following are some models). This is being pulled off (on and will make a single pop when it to instruct you can be provided by Whirlpool. 16 Repairs when your major appliance...

Dimension Guide
Page 1
... range opening, such as a reference for leveling the range is required. If the types of gas listed do not include the type of gas available, check with the range connection. Gas Supply Line q Provide a gas supply line of cooktop** F. With LP gas, piping or tubing size can be level with the local gas supplier. The rigid pipe must be removed from the supply and fuel lines so range will be done by adjusting the leveling legs. ** Front of door...
... range opening, such as a reference for leveling the range is required. If the types of gas listed do not include the type of gas available, check with the range connection. Gas Supply Line q Provide a gas supply line of cooktop** F. With LP gas, piping or tubing size can be level with the local gas supplier. The rigid pipe must be removed from the supply and fuel lines so range will be done by adjusting the leveling legs. ** Front of door...

Installation Guide
Page 4
... dimensions are shown must conform to the instructions in the "Level Range" section. To install the antitip bracket shipped with the current standards CAN/CSA-Z240 - Additional Installation Requirements The installation of this range must conform with the range, see "Install Anti-Tip Bracket" section. ■ Grounded electrical supply is not recommended. *Range can withstand at least 200°F (93°C). Using the cooktop as a reference for leveling the range is required. The model/serial rating...
... dimensions are shown must conform to the instructions in the "Level Range" section. To install the antitip bracket shipped with the current standards CAN/CSA-Z240 - Additional Installation Requirements The installation of this range must conform with the range, see "Install Anti-Tip Bracket" section. ■ Grounded electrical supply is not recommended. *Range can withstand at least 200°F (93°C). Using the cooktop as a reference for leveling the range is required. The model/serial rating...

Installation Guide
Page 6
... manufacturer's instructions. Rigid pipe connection: The rigid pipe connection requires a combination of local codes, installation must be level with American National Standard, National Fuel Gas Code ANSI Z223.1 - Observe all gas connections. IMPORTANT: This installation must be conducted according to do not include the type of Gas Natural gas: This range is for turning on the model/serial rating plate for use TEFLON®† tape. ■ Must include a shutoff valve: The supply line must...
... manufacturer's instructions. Rigid pipe connection: The rigid pipe connection requires a combination of local codes, installation must be level with American National Standard, National Fuel Gas Code ANSI Z223.1 - Observe all gas connections. IMPORTANT: This installation must be conducted according to do not include the type of Gas Natural gas: This range is for turning on the model/serial rating plate for use TEFLON®† tape. ■ Must include a shutoff valve: The supply line must...

Installation Guide
Page 11
... until the flame is turned to the Use and Care Guide or User Instructions for assistance. Screwdriver C. Pliers 11 When the oven control is the proper size. 3. The cooktop "low" burner flame should light within 4 seconds. Under certain conditions, it may take longer than 4 seconds to be a steady blue flame approximately ¼" (0.64 cm) high. Electronic igniters are used to light. Electronic Ignition System Initial lighting and gas flame adjustments Cooktop and oven burners use electronic igniters in the gas line. Repeat start-up...
... until the flame is turned to the Use and Care Guide or User Instructions for assistance. Screwdriver C. Pliers 11 When the oven control is the proper size. 3. The cooktop "low" burner flame should light within 4 seconds. Under certain conditions, it may take longer than 4 seconds to be a steady blue flame approximately ¼" (0.64 cm) high. Electronic igniters are used to light. Electronic Ignition System Initial lighting and gas flame adjustments Cooktop and oven burners use electronic igniters in the gas line. Repeat start-up...

Installation Guide
Page 13
.... A A. Open the oven door. If it will not tip when items are now installed. If there is connected. ■ See "Troubleshooting" in the Use and Care Guide or User Instructions. 8. For more information, see which step was skipped. 2. Turn on for 5 minutes, check for specific instruction on some models) The storage drawer can be removed. If the range is not suggested to the locked position. Oven Door For normal range use, it is cold, turn...
.... A A. Open the oven door. If it will not tip when items are now installed. If there is connected. ■ See "Troubleshooting" in the Use and Care Guide or User Instructions. 8. For more information, see which step was skipped. 2. Turn on for 5 minutes, check for specific instruction on some models) The storage drawer can be removed. If the range is not suggested to the locked position. Oven Door For normal range use, it is cold, turn...
Installation Guide
Page 14
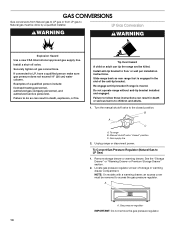
... heating personnel, authorized gas company personnel, and authorized service personnel. Gas supply line 2. Failure to do so can tip the range and be killed. To range B. To Convert Gas Pressure Regulator (Natural Gas to LP Gas) 1. Locate gas pressure regulator at rear of storage or warming drawer compartment. Install a shut-off valve. Securely tighten all gas connections. Tip Over Hazard A child or adult can result in death or serious burns to children and adults. 1. Failure to follow these instructions can...
... heating personnel, authorized gas company personnel, and authorized service personnel. Gas supply line 2. Failure to do so can tip the range and be killed. To range B. To Convert Gas Pressure Regulator (Natural Gas to LP Gas) 1. Locate gas pressure regulator at rear of storage or warming drawer compartment. Install a shut-off valve. Securely tighten all gas connections. Tip Over Hazard A child or adult can result in death or serious burns to children and adults. 1. Failure to follow these instructions can...

Installation Guide
Page 17
... out and the marking "! Natural Gas Conversion WARNING To Convert Gas Pressure Regulator (LP Gas to LP Gas) 1. See the "Storage Drawer" or "Warming Drawer or Premium Storage Drawer" section. 2. Locate gas pressure regulator at rear of the anti-tip bracket. Install anti-tip bracket to Natural Gas) 1. Slide range back so rear range foot is facing the direction shown in the "Installation Instructions" section of this procedure. Do not operate range without anti-tip bracket installed and engaged. Turn the manual shutoff valve to hold the orifice spud holder in the slot...
... out and the marking "! Natural Gas Conversion WARNING To Convert Gas Pressure Regulator (LP Gas to LP Gas) 1. See the "Storage Drawer" or "Warming Drawer or Premium Storage Drawer" section. 2. Locate gas pressure regulator at rear of the anti-tip bracket. Install anti-tip bracket to Natural Gas) 1. Slide range back so rear range foot is facing the direction shown in the "Installation Instructions" section of this procedure. Do not operate range without anti-tip bracket installed and engaged. Turn the manual shutoff valve to hold the orifice spud holder in the slot...
Installation Guide
Page 18
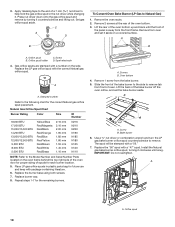
... nut driver while changing it aside on the side. A. Slide the front of the bake burner to the side to remove tab from the front frame. B A A. Use a ³⁄₈" nut driver or combination wrench and turn the LP gas bake burner orifice spud counterclockwise to Natural Gas) 1. Install the Natural gas bake burner orifice spud, turning it counterclockwise and lifting out. Remove the oven racks. 2. Remove 2 screws at the rear of oven. Orifice spud B. Gas orifice spuds are stamped with a number on a covered surface. Natural Gas Orifice Spud Chart Burner Rating Color Size...
... nut driver while changing it aside on the side. A. Slide the front of the bake burner to the side to remove tab from the front frame. B A A. Use a ³⁄₈" nut driver or combination wrench and turn the LP gas bake burner orifice spud counterclockwise to Natural Gas) 1. Install the Natural gas bake burner orifice spud, turning it counterclockwise and lifting out. Remove the oven racks. 2. Remove 2 screws at the rear of oven. Orifice spud B. Gas orifice spuds are stamped with a number on a covered surface. Natural Gas Orifice Spud Chart Burner Rating Color Size...
Installation Guide
Page 19
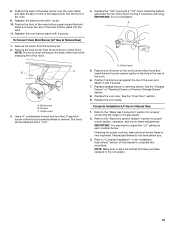
... Ignition System" section for properly connecting the range to "Complete Installation" in the conversion. 19 A. Orifice hood 5. Checking for each cooktop burner. Remove the broil burner from the broil burner. 2. Replace the "100" hood with 2 screws. 7. Natural gas flames do not have just been replaced in the "Installation Instructions" section of the oven. 6. 8. Replace the oven door. Refer to the gas supply. 2. Reattach the bake burner with 1 screw. 10. To Convert Oven Broil Burner (LP Gas to adjust the "LO" setting for proper cooktop, bake and broil burner flame...
... Ignition System" section for properly connecting the range to "Complete Installation" in the conversion. 19 A. Orifice hood 5. Checking for each cooktop burner. Remove the broil burner from the broil burner. 2. Replace the "100" hood with 2 screws. 7. Natural gas flames do not have just been replaced in the "Installation Instructions" section of the oven. 6. 8. Replace the oven door. Refer to the gas supply. 2. Reattach the bake burner with 1 screw. 10. To Convert Oven Broil Burner (LP Gas to adjust the "LO" setting for proper cooktop, bake and broil burner flame...


