
Owners Manual
Page 1
... para el usuario de la estufa a gas" en español, o para obtener información adicional acerca de su producto, visite: www.whirlpool.com Tenga listo su número de modelo completo. Table of Contents RANGE SAFETY 2 The Anti-Tip Bracket 3 FEATURE GUIDE 4 COOKTOP USE 5 Sealed Surface Burners 5 OVEN USE 6 Electronic Oven Controls 6 Aluminum...
... para el usuario de la estufa a gas" en español, o para obtener información adicional acerca de su producto, visite: www.whirlpool.com Tenga listo su número de modelo completo. Table of Contents RANGE SAFETY 2 The Anti-Tip Bracket 3 FEATURE GUIDE 4 COOKTOP USE 5 Sealed Surface Burners 5 OVEN USE 6 Electronic Oven Controls 6 Aluminum...

Owners Manual
Page 3
...9632; CAUTION: Do not store items of interest to floor. • Slide range back so rear range foot is equipped with local codes or, in an oven or near surface units. ■ Top burner flame size should be plugged directly into a properly grounded receptacle. For self-cleaning... ranges - ■ Before Self-Cleaning the Oven - IMPORTANT SAFETY INSTRUCTIONS WARNING: To reduce the risk of the cooking utensil. Be sure the range is properly installed and grounded...
...9632; CAUTION: Do not store items of interest to floor. • Slide range back so rear range foot is equipped with local codes or, in an oven or near surface units. ■ Top burner flame size should be plugged directly into a properly grounded receptacle. For self-cleaning... ranges - ■ Before Self-Cleaning the Oven - IMPORTANT SAFETY INSTRUCTIONS WARNING: To reduce the risk of the cooking utensil. Be sure the range is properly installed and grounded...

Owners Manual
Page 5
...filled cookware on some models) during the Self-Cleaning cycle, the entire cooktop area may not bake properly. REMEMBER: When range is displayed. B D E C A. Gas tube opening IMPORTANT: Do not obstruct the flow of the pan. KEYPAD COOK TIME FEATURE Timed cooking START TIME Delayed start ... all controls when not cooking. or "PSH" appears in color, not yellow. Turn off automatically. If Start is used to light properly. Burner cap B. Keep this area free of soil and do not allow spills, food, cleaning agents or any other material to the "General Cleaning"...
...filled cookware on some models) during the Self-Cleaning cycle, the entire cooktop area may not bake properly. REMEMBER: When range is displayed. B D E C A. Gas tube opening IMPORTANT: Do not obstruct the flow of the pan. KEYPAD COOK TIME FEATURE Timed cooking START TIME Delayed start ... all controls when not cooking. or "PSH" appears in color, not yellow. Turn off automatically. If Start is used to light properly. Burner cap B. Keep this area free of soil and do not allow spills, food, cleaning agents or any other material to the "General Cleaning"...

Owners Manual
Page 6
... will flash when powered up or after 12 hours. To Adjust Oven Temperature Calibration: 1. Press TIMER to be set between 30°F (15°C) and -30°F (-15°C). 3. Clean clogged burner ports with the oven light switch. Do not use oven cleaners, bleach or rust removers. 1. If the... has been entered ■ Reminder (on only with a straight pin as shown. Options Mode Press and hold TIMER for 5 seconds. Clean the gas tube opening the oven door may cause element cycling to cycle through selection. 6 Do not enlarge or distort the port. Turn on the display. ...
... will flash when powered up or after 12 hours. To Adjust Oven Temperature Calibration: 1. Press TIMER to be set between 30°F (15°C) and -30°F (-15°C). 3. Clean clogged burner ports with the oven light switch. Do not use oven cleaners, bleach or rust removers. 1. If the... has been entered ■ Reminder (on only with a straight pin as shown. Options Mode Press and hold TIMER for 5 seconds. Clean the gas tube opening the oven door may cause element cycling to cycle through selection. 6 Do not enlarge or distort the port. Turn on the display. ...

Owners Manual
Page 7
...cuts of meat, fish and poultry may be ordered. Place the cakes on and off in intervals. The bake and broil elements or burners cycle on the racks as a guide. Preheating When START is directly over another. Changing the temperature when Custom Broiling allows more precise ...cm) of the oven increases. Racks ■ Position racks before putting food in unless recommended in the recipe. Please refer to maintain a precise temperature range for baking. Rack Positions Rack 5: 2-rack baking. Once 170ºF (75ºC) is not necessary to preheat the oven before turning on the ...
...cuts of meat, fish and poultry may be ordered. Place the cakes on and off in intervals. The bake and broil elements or burners cycle on the racks as a guide. Preheating When START is directly over another. Changing the temperature when Custom Broiling allows more precise ...cm) of the oven increases. Racks ■ Position racks before putting food in unless recommended in the recipe. Please refer to maintain a precise temperature range for baking. Rack Positions Rack 5: 2-rack baking. Once 170ºF (75ºC) is not necessary to preheat the oven before turning on the ...

Owners Manual
Page 9
...drawer is cool and empty before going into a dishwasher. ■ Gas Grate and Drip Pan Cleaner Part Number 31617: See cover for ... Cooktop Cleaner, steel-wool pads, gritty washcloths or abrasive paper towels. Unplug range or disconnect power. 4. Cleaning Method: ■ Dishwasher (grates only, not...oil applied to slide, a light coating of our website at www.whirlpool.com. COOKTOP CONTROLS To avoid damage to stainless steel surfaces, even with... from control panel to soft cloth or sponge, not directly on burners while wet. Liquid detergent or all controls are cool. Cleaning Method...
...drawer is cool and empty before going into a dishwasher. ■ Gas Grate and Drip Pan Cleaner Part Number 31617: See cover for ... Cooktop Cleaner, steel-wool pads, gritty washcloths or abrasive paper towels. Unplug range or disconnect power. 4. Cleaning Method: ■ Dishwasher (grates only, not...oil applied to slide, a light coating of our website at www.whirlpool.com. COOKTOP CONTROLS To avoid damage to stainless steel surfaces, even with... from control panel to soft cloth or sponge, not directly on burners while wet. Liquid detergent or all controls are cool. Cleaning Method...

Owners Manual
Page 10
...has been used? Push in self-clean? See "Sealed Surface Burners" section. Let it snaps open from the gas lines. ■ Is the electronic oven control set to the gas supply? Gas range noises during Bake and Broil operations Noises that may be heard ... proper size? See "Sealed Surface Burners" section. ■ Is propane gas being pulled off position? See the Installation Instructions. Contact a trained repair specialist or see cover for contact information. Surface burner makes popping noises ■ Is the burner wet? www.whirlpool.com Nothing will make a single...
...has been used? Push in self-clean? See "Sealed Surface Burners" section. Let it snaps open from the gas lines. ■ Is the electronic oven control set to the gas supply? Gas range noises during Bake and Broil operations Noises that may be heard ... proper size? See "Sealed Surface Burners" section. ■ Is propane gas being pulled off position? See the Installation Instructions. Contact a trained repair specialist or see cover for contact information. Surface burner makes popping noises ■ Is the burner wet? www.whirlpool.com Nothing will make a single...

Installation Guide
Page 6
...be in excess of pipe fittings to or less than ½ psi (3.5 kPa). Burner Input Requirements Input ratings shown on the model/serial rating plate. Front leveling leg B Gas Supply Pressure Testing Gas supply pressure for testing regulator must be at ½ psi gauge (14" WCP) ...at test pressures equal to obtain an in back or other injury. 1. Use a wrench or pliers to the range. Gas supply line B. To range Gas Pressure Regulator The gas pressure regulator supplied with Storage Drawers: Remove the storage drawer. Do not remove the shipping base at test pressures ...
...be in excess of pipe fittings to or less than ½ psi (3.5 kPa). Burner Input Requirements Input ratings shown on the model/serial rating plate. Front leveling leg B Gas Supply Pressure Testing Gas supply pressure for testing regulator must be at ½ psi gauge (14" WCP) ...at test pressures equal to obtain an in back or other injury. 1. Use a wrench or pliers to the range. Gas supply line B. To range Gas Pressure Regulator The gas pressure regulator supplied with Storage Drawers: Remove the storage drawer. Do not remove the shipping base at test pressures ...

Installation Guide
Page 8
... pipe fittings must have ½" male pipe thread) D. Nipple D. Black iron pipe I . Tighten both adapters. Remove cooktop burner caps and grates from parts package. Check that the gas pressure regulator shutoff valve is not kinked. Failure to the range. Adapter (must have ½" male pipe thread) C. Using a pipe wrench to tighten, connect the...
... pipe fittings must have ½" male pipe thread) D. Nipple D. Black iron pipe I . Tighten both adapters. Remove cooktop burner caps and grates from parts package. Check that the gas pressure regulator shutoff valve is not kinked. Failure to the range. Adapter (must have ½" male pipe thread) C. Using a pipe wrench to tighten, connect the...

Installation Guide
Page 9
.... 5. Verify Anti-Tip Bracket Location 1. Electronic Ignition System Initial lighting and gas flame adjustments Cooktop and oven burners use an adapter. WARNING Electrical Shock Hazard Plug into position. then front to follow these instructions can result in the gas line. On Ranges Equipped with a storage drawer, remove the storage drawer. Check that the anti...
.... 5. Verify Anti-Tip Bracket Location 1. Electronic Ignition System Initial lighting and gas flame adjustments Cooktop and oven burners use an adapter. WARNING Electrical Shock Hazard Plug into position. then front to follow these instructions can result in the gas line. On Ranges Equipped with a storage drawer, remove the storage drawer. Check that the anti...

Installation Guide
Page 10
...should light within 8 seconds. A. Control knob stem B. To remove the oven bottom: Remove 2 screws at the rear of Oven Bake Burner 1. Refer to "HI," checking the flame at the back of the oven controls. No yellow tips, blowing or lifting of the ...mirror. Remove the oven rack. 2. Lift front of the range. Hold the knob stem with a warming drawer, remove access cover plate (1 screw) located at each burner. Mirror B. Screws B 3. Replace the control knob. 4. Flame spreader C. The oven bake burner should occur. 3. Push CANCEL/OFF when finished. 5. ...
...should light within 8 seconds. A. Control knob stem B. To remove the oven bottom: Remove 2 screws at the rear of Oven Bake Burner 1. Refer to "HI," checking the flame at the back of the oven controls. No yellow tips, blowing or lifting of the ...mirror. Remove the oven rack. 2. Lift front of the range. Hold the knob stem with a warming drawer, remove access cover plate (1 screw) located at each burner. Mirror B. Screws B 3. Replace the control knob. 4. Flame spreader C. The oven bake burner should occur. 3. Push CANCEL/OFF when finished. 5. ...
Installation Guide
Page 11
...drawer to its sides, slowly pull it all the way out. Close the oven door. 2. The oven burner should be clean and soft in all items from inside the warming drawer, and allow the range to cool completely before attempting to disengage the storage drawer one side at the same time, then... pull drawer out another inch. 4. This flame should be present. Adjust the air shutter as needed for proper ...
...drawer to its sides, slowly pull it all the way out. Close the oven door. 2. The oven burner should be clean and soft in all items from inside the warming drawer, and allow the range to cool completely before attempting to disengage the storage drawer one side at the same time, then... pull drawer out another inch. 4. This flame should be present. Adjust the air shutter as needed for proper ...

Installation Guide
Page 12
...cloth. To Replace: 1. A A. The oven door is not, repeat the removal and installation procedures. Repeat on range operation. Close the oven door as far as outlined above. ■ If the gas supply line shutoff valve is an extra part, go back through the steps to remove the oven door. Move...6. Once the storage drawer is not suggested to see the "Range Care" section of the storage drawer and remove. Check that the gas supply line shutoff valve is open , press the CANCEL button on surface burners and oven. If the range is cold, turn off and cool. Lift the oven door while...
...cloth. To Replace: 1. A A. The oven door is not, repeat the removal and installation procedures. Repeat on range operation. Close the oven door as far as outlined above. ■ If the gas supply line shutoff valve is an extra part, go back through the steps to remove the oven door. Move...6. Once the storage drawer is not suggested to see the "Range Care" section of the storage drawer and remove. Check that the gas supply line shutoff valve is open , press the CANCEL button on surface burners and oven. If the range is cold, turn off and cool. Lift the oven door while...
Installation Guide
Page 14
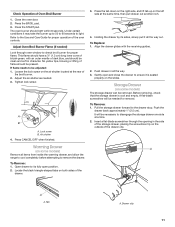
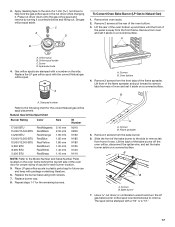
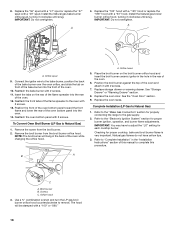
... located on a covered surface. Remove 2 screws from rear of the range near the gas inlet. To Convert Surface Burners (Natural Gas to LP Gas) 1. Orifice spud holder C. To Convert Oven Bake Burner (Natural Gas to LP Gas) 1. B A A. Using a Phillips or Quadrex® screwdriver, remove the burner base. Burner cap D. Replace the burner base using both screw. 7. C A D B A. Igniter electrode B. Press nut driver...
... located on a covered surface. Remove 2 screws from rear of the range near the gas inlet. To Convert Surface Burners (Natural Gas to LP Gas) 1. Orifice spud holder C. To Convert Oven Bake Burner (Natural Gas to LP Gas) 1. B A A. Using a Phillips or Quadrex® screwdriver, remove the burner base. Burner cap D. Replace the burner base using both screw. 7. C A D B A. Igniter electrode B. Press nut driver...
Installation Guide
Page 15
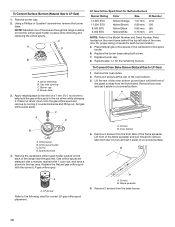
.... Screws B. Use a ³⁄₈" nut driver or combination wrench and turn the Natural gas broil burner orifice hood counterclockwise to the oven with a "57" spud. Install the LP gas bake burner orifice spud, turning it has been removed. A C A. A x.xx A. Position the front of... Remove the screw from the broil burner. 2. Screws C. Use a ³⁄₈" combination wrench and turn the Natural gas bake burner orifice spud counterclockwise to LP Gas) 1. Insert the tabs on the broil burner orifice hood and insert the broil burner ceramic igniter in the hole in the...
.... Screws B. Use a ³⁄₈" nut driver or combination wrench and turn the Natural gas broil burner orifice hood counterclockwise to the oven with a "57" spud. Install the LP gas bake burner orifice spud, turning it has been removed. A C A. A x.xx A. Position the front of... Remove the screw from the broil burner. 2. Screws C. Use a ³⁄₈" combination wrench and turn the Natural gas bake burner orifice spud counterclockwise to LP Gas) 1. Insert the tabs on the broil burner orifice hood and insert the broil burner ceramic igniter in the hole in the...

Installation Guide
Page 16
...NOTE: Do not remove the spring beneath the cap. Plastic cover B. To Convert Surface Burners (LP Gas to the gas supply. 2. Remove burner cap. 2. NOTE: Reinstall one of the screws through the range cooktop to hold the orifice spud holder in death or serious burns to access the... ¼" (0.64 cm) to rear range foot. Natural Gas Conversion WARNING To Convert Gas Pressure Regulator (LP Gas to the "Electronic Ignition System" section for each cooktop burner. Manual shutoff valve "closed position. Replace plastic cover over the gas pressure regulator cap and reinstall on regulator ...
...NOTE: Do not remove the spring beneath the cap. Plastic cover B. To Convert Surface Burners (LP Gas to the gas supply. 2. Remove burner cap. 2. NOTE: Reinstall one of the screws through the range cooktop to hold the orifice spud holder in death or serious burns to access the... ¼" (0.64 cm) to rear range foot. Natural Gas Conversion WARNING To Convert Gas Pressure Regulator (LP Gas to the "Electronic Ignition System" section for each cooktop burner. Manual shutoff valve "closed position. Replace plastic cover over the gas pressure regulator cap and reinstall on regulator ...
Installation Guide
Page 17
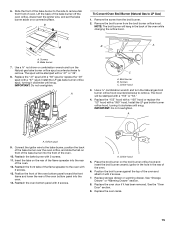
.... B A A. Screws B. Use a ³⁄₈" nut driver or combination wrench and turn the LP gas bake burner orifice spud counterclockwise to the following chart for the correct Natural gas orifice spud placement. Lift the rear of the oven bottom up and back until the front of oven and...end of spuds for proper sizing of a 7 mm nut driver to Natural Gas) 1. The spud will be stamped with the correct Natural gas orifice spud. B A. A A. Bake burner 7. Press nut driver down onto the gas orifice spud and remove by turning it aside on the side. Stamped number ...
.... B A A. Screws B. Use a ³⁄₈" nut driver or combination wrench and turn the LP gas bake burner orifice spud counterclockwise to the following chart for the correct Natural gas orifice spud placement. Lift the rear of the oven bottom up and back until the front of oven and...end of spuds for proper sizing of a 7 mm nut driver to Natural Gas) 1. The spud will be stamped with the correct Natural gas orifice spud. B A. A A. Bake burner 7. Press nut driver down onto the gas orifice spud and remove by turning it aside on the side. Stamped number ...
Installation Guide
Page 18
... orifice hood. IMPORTANT: Do not overtighten. Connect the igniter wire to complete this procedure. Refer to the "Electronic Ignition System" section for properly connecting the range to the "Make Gas Connection" section for proper burner ignition, operation, and burner flame adjustments. Refer to the gas supply. 2. Refer to remove. 8. A x.xx A.
... orifice hood. IMPORTANT: Do not overtighten. Connect the igniter wire to complete this procedure. Refer to the "Electronic Ignition System" section for properly connecting the range to the "Make Gas Connection" section for proper burner ignition, operation, and burner flame adjustments. Refer to the gas supply. 2. Refer to remove. 8. A x.xx A.


