Installation Guide
Page 10
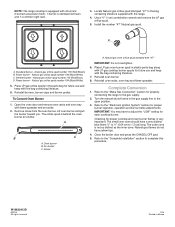
...stop tilting the range and lower it gently back to 0.95 cm) high. 10 Place a standard flat rack in the bracket. Low Med Electronic Ignition System Initial lighting and gas flame adjustments Cooktop and oven burners use electronic igniters in the anti-tip bracket. When ...of standing pilots. A. Slide the range forward and determine if there is turned to the desired setting, a hot surface igniter heats to the "LOW" position after burner lights. 4. Level Range 1. Place level on while the burner operates. Check each cooktop burner for contact information. 6. The small...
...stop tilting the range and lower it gently back to 0.95 cm) high. 10 Place a standard flat rack in the bracket. Low Med Electronic Ignition System Initial lighting and gas flame adjustments Cooktop and oven burners use electronic igniters in the anti-tip bracket. When ...of standing pilots. A. Slide the range forward and determine if there is turned to the desired setting, a hot surface igniter heats to the "LOW" position after burner lights. 4. Level Range 1. Place level on while the burner operates. Check each cooktop burner for contact information. 6. The small...
Installation Guide
Page 11
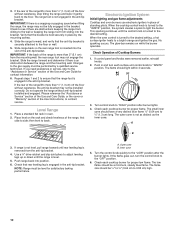
If the low flame needs adjusting: 1. Turn control knob to decrease flame height. If the flame needs adjusting: 1. Replace control knob. Open broiler door...until flame is still not properly adjusted, turn the oven off , wait for the oven burner to cool down. 7. Turn right to the "LOW" setting and remove control knob. 2. Turn the oven off to preheat the oven for the burner to cool down . 2. Valve stem 3. ... START/ENTER pad. ■ The "TEMP" and "ON" indicators will appear. ■ The display will open and allow gas to "LOW." Turn the oven back on some models): 1.
If the low flame needs adjusting: 1. Turn control knob to decrease flame height. If the flame needs adjusting: 1. Replace control knob. Open broiler door...until flame is still not properly adjusted, turn the oven off , wait for the oven burner to cool down. 7. Turn right to the "LOW" setting and remove control knob. 2. Turn the oven off to preheat the oven for the burner to cool down . 2. Valve stem 3. ... START/ENTER pad. ■ The "TEMP" and "ON" indicators will appear. ■ The display will open and allow gas to "LOW." Turn the oven back on some models): 1.
Installation Guide
Page 14
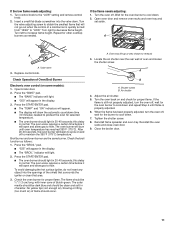
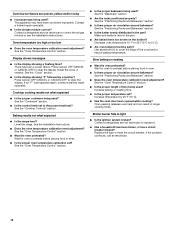
... gas orifice spud. 5. Install the number "56" LP gas spud. Complete Conversion 1. Turn the manual shutoff valve in death or serious burns to adjust the "LOW" setting for properly connecting the range to floor or wall per installation instructions. Refer to the "Complete Installation" section to the open position. 3. Re-engage...
... gas orifice spud. 5. Install the number "56" LP gas spud. Complete Conversion 1. Turn the manual shutoff valve in death or serious burns to adjust the "LOW" setting for properly connecting the range to floor or wall per installation instructions. Refer to the "Complete Installation" section to the open position. 3. Re-engage...
Installation Guide
Page 16
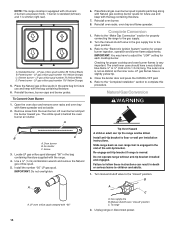
... Conversion 1. Refer to the "Electronic Ignition System" section for future use and keep with the bag containing literature. 7. IMPORTANT: You may have to adjust the "LOW" setting for properly connecting the range to 1.3 cm) long. The outer cone is simmer (right rear). 3. Natural gas flames do not have a very distinct blue...
... Conversion 1. Refer to the "Electronic Ignition System" section for future use and keep with the bag containing literature. 7. IMPORTANT: You may have to adjust the "LOW" setting for properly connecting the range to 1.3 cm) long. The outer cone is simmer (right rear). 3. Natural gas flames do not have a very distinct blue...

Use & Care Guide
Page 5
... a burner using a surface burner. Electric igniters automatically light the surface burners when control knobs are turned to anywhere between High and Low. Right rear burner control knob SETTING Med (medium) Low RECOMMENDED USE ■ Hold a rapid boil. ■ Quickly brown or sear food. ■ Fry or sauté foods. ■ Cook soups...
... a burner using a surface burner. Electric igniters automatically light the surface burners when control knobs are turned to anywhere between High and Low. Right rear burner control knob SETTING Med (medium) Low RECOMMENDED USE ■ Hold a rapid boil. ■ Quickly brown or sear food. ■ Fry or sauté foods. ■ Cook soups...

Use & Care Guide
Page 6
...still does not light, do not allow spills, food, cleaning agents or any other material to cool. ■ Center the canner on low heat settings. This allows time for the most cooking tasks. Cookware IMPORTANT: Do not leave empty cookware on the properties of soil and ... department. Keep spillovers out of surface burners between batches. To Clean: IMPORTANT: Before cleaning, make sure all types of aluminum or copper on low to -heavy thickness. Clean clogged burner ports with nonstick surfaces should be used areas to enter the burner ports. A B A. Aluminum and ...
...still does not light, do not allow spills, food, cleaning agents or any other material to cool. ■ Center the canner on low heat settings. This allows time for the most cooking tasks. Cookware IMPORTANT: Do not leave empty cookware on the properties of soil and ... department. Keep spillovers out of surface burners between batches. To Clean: IMPORTANT: Before cleaning, make sure all types of aluminum or copper on low to -heavy thickness. Clean clogged burner ports with nonstick surfaces should be used areas to enter the burner ports. A B A. Aluminum and ...
Use & Care Guide
Page 14
..., contact a trained repair specialist. Oven burner flames are uneven, yellow and/or noisy ■ Is propane gas being used? Oven temperature too high or too low ■ Does the oven temperature calibration need adjustment? Press Cancel, OFF/CANCEL or CANCEL/OFF to cover the edge of time being used? Make sure...
..., contact a trained repair specialist. Oven burner flames are uneven, yellow and/or noisy ■ Is propane gas being used? Oven temperature too high or too low ■ Does the oven temperature calibration need adjustment? Press Cancel, OFF/CANCEL or CANCEL/OFF to cover the edge of time being used? Make sure...

