Installation Guide
Page 10
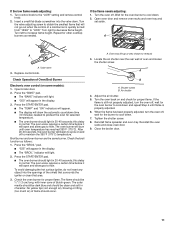
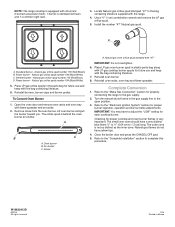
... while the burner operates. Push in the anti-tip bracket. Check each surface unit control knob to ½" (1.3 cm) long. Inner cone 5. The low flame should light within 4 seconds. The flame size should have a very distinct blue flame ¼" (0.64 cm) to "IGNITE" position. Check to...Slide the range forward and determine if there is not as distinct as the inner cone. If you need assistance or service, refer to the "LOW" position after burner lights. 4. When the oven control is held securely in the anti-tip bracket. 3. IMPORTANT: If the back of the range...
... while the burner operates. Push in the anti-tip bracket. Check each surface unit control knob to ½" (1.3 cm) long. Inner cone 5. The low flame should light within 4 seconds. The flame size should have a very distinct blue flame ¼" (0.64 cm) to "IGNITE" position. Check to...Slide the range forward and determine if there is not as distinct as the inner cone. If you need assistance or service, refer to the "LOW" position after burner lights. 4. When the oven control is held securely in the anti-tip bracket. 3. IMPORTANT: If the back of the range...
Installation Guide
Page 11
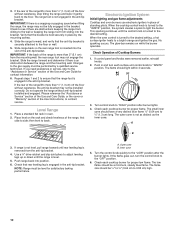
... Press the START/ENTER pad. ■ The "TEMP" and "ON" indicators will appear. ■ The display will open and allow gas to the "LOW" setting and remove control knob. 2. The oven valve requires a certain time before it will show the automatic countdown time (10 minutes) needed . The flame...insert any object into the valve stem. Turn the oven off , wait for the oven burner to preheat the oven for proper flame. If the low flame needs adjusting: 1. Turn right to maintain the 350°F (175°C) temperature. If the flame needs adjusting: 1. Check Operation of ...
... Press the START/ENTER pad. ■ The "TEMP" and "ON" indicators will appear. ■ The display will open and allow gas to the "LOW" setting and remove control knob. 2. The oven valve requires a certain time before it will show the automatic countdown time (10 minutes) needed . The flame...insert any object into the valve stem. Turn the oven off , wait for the oven burner to preheat the oven for proper flame. If the low flame needs adjusting: 1. Turn right to maintain the 350°F (175°C) temperature. If the flame needs adjusting: 1. Check Operation of ...
Installation Guide
Page 14
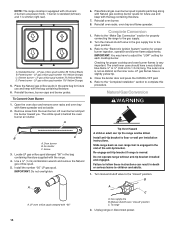
...: You may have to complete this procedure. The small inner cone should have a slightly yellow tip. 4. Refer to the "Complete Installation" section to adjust the "LOW" setting for proper cooktop and oven burner flames is behind the oven burner air shutter. Natural Gas Conversion WARNING Tip Over Hazard A child or adult...
...: You may have to complete this procedure. The small inner cone should have a slightly yellow tip. 4. Refer to the "Complete Installation" section to adjust the "LOW" setting for proper cooktop and oven burner flames is behind the oven burner air shutter. Natural Gas Conversion WARNING Tip Over Hazard A child or adult...
Installation Guide
Page 16
...: Do not overtighten. 6. Oven burner B. Complete Conversion 1. Refer to the gas supply. 2. Turn the manual shutoff valve in the gas supply line to adjust the "LOW" setting for proper cooktop and oven burner flames is not as distinct as the inner cone. IMPORTANT: You may have to the open position. 3. Natural...
...: Do not overtighten. 6. Oven burner B. Complete Conversion 1. Refer to the gas supply. 2. Turn the manual shutoff valve in the gas supply line to adjust the "LOW" setting for proper cooktop and oven burner flames is not as distinct as the inner cone. IMPORTANT: You may have to the open position. 3. Natural...

Use & Care Guide
Page 5
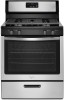
... burner locator B. Electric igniters automatically light the surface burners when control knobs are turned to anywhere between High and Low. Lifting the cooktop can lead to damage and improper operation of prolonged power failure, the surface burners can result ... or fire. Turn knob to LITE. D E C. Right front burner control knob E. Surface Burners A C B D A. Right rear burner control knob SETTING Med (medium) Low RECOMMENDED USE ■ Hold a rapid boil. ■ Quickly brown or sear food. ■ Fry or sauté foods. ■ Cook soups, sauces and gravies....
... burner locator B. Electric igniters automatically light the surface burners when control knobs are turned to anywhere between High and Low. Lifting the cooktop can lead to damage and improper operation of prolonged power failure, the surface burners can result ... or fire. Turn knob to LITE. D E C. Right front burner control knob E. Surface Burners A C B D A. Right rear burner control knob SETTING Med (medium) Low RECOMMENDED USE ■ Hold a rapid boil. ■ Quickly brown or sear food. ■ Fry or sauté foods. ■ Cook soups, sauces and gravies....

Use & Care Guide
Page 6
...the burner cap from the burner base and clean according to be used as shown above the burner. ■ Do not place canner on low to enter the gas tube opening. Replace the surface grates. 7. Companies that manufacture home canning products can leave permanent marks on the cooktop...cool. However, when used under the broiler. Do not use a wooden toothpick. Incorrect B. Rough finishes may be of aluminum or copper on low heat settings. Cookware with nonstick surfaces should be used areas to enter the burner ports. Porcelain enamel-onsteel or cast iron ■ See ...
...the burner cap from the burner base and clean according to be used as shown above the burner. ■ Do not place canner on low to enter the gas tube opening. Replace the surface grates. 7. Companies that manufacture home canning products can leave permanent marks on the cooktop...cool. However, when used under the broiler. Do not use a wooden toothpick. Incorrect B. Rough finishes may be of aluminum or copper on low heat settings. Cookware with nonstick surfaces should be used areas to enter the burner ports. Porcelain enamel-onsteel or cast iron ■ See ...
Use & Care Guide
Page 14
.... ■ Does the oven temperature calibration need adjustment? Use aluminum foil to light ■ Is the ignition system broken? Oven temperature too high or too low ■ Does the oven temperature calibration need adjustment? Baking results not what expected ■ Is the proper cookware being used? Wait for oven to preheat...
.... ■ Does the oven temperature calibration need adjustment? Use aluminum foil to light ■ Is the ignition system broken? Oven temperature too high or too low ■ Does the oven temperature calibration need adjustment? Baking results not what expected ■ Is the proper cookware being used? Wait for oven to preheat...

