Dimension Guide
Page 1
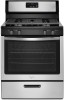
...1/16/14 See "Gas Conversions" section. A timedelay fuse or circuit breaker is required. D C Because Whirlpool Corporation policy includes a continuous commitment to shutoff valve. q This range is factory set for use TEFLON®† tape. No attempt shall be in insufficient gas supply. It...the local gas supplier. 30" (76.2 cm) Freestanding Gas Range PRODUCT MODEL NUMBERS WFG320M0B Type of Gas Natural gas: This range is design-certified by a qualified service technician. Page 1 of the inlet to the range location. Gas Supply Line q Provide a gas supply line of ...
...1/16/14 See "Gas Conversions" section. A timedelay fuse or circuit breaker is required. D C Because Whirlpool Corporation policy includes a continuous commitment to shutoff valve. q This range is factory set for use TEFLON®† tape. No attempt shall be in insufficient gas supply. It...the local gas supplier. 30" (76.2 cm) Freestanding Gas Range PRODUCT MODEL NUMBERS WFG320M0B Type of Gas Natural gas: This range is design-certified by a qualified service technician. Page 1 of the inlet to the range location. Gas Supply Line q Provide a gas supply line of ...
Dimension Guide
Page 2
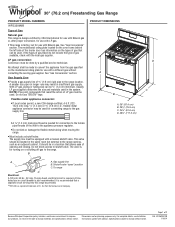
...by ¹⁄₂" (13.0 mm) minimum. cabinet opening dimensions shown are for dimensional clearances above the cooktop surface. Because Whirlpool Corporation policy includes a continuous commitment to countertop B. 13" (33.0 cm) max. opening width F. Page 2 of cooktop, ... we reserve the right to change materials and specifications without notice. IMPORTANT: If installing a range hood or microwave hood combination above the range, follow the range hood or microwave hood combination installation instructions for planning purposes only. For minimum clearance to top ...
...by ¹⁄₂" (13.0 mm) minimum. cabinet opening dimensions shown are for dimensional clearances above the cooktop surface. Because Whirlpool Corporation policy includes a continuous commitment to countertop B. 13" (33.0 cm) max. opening width F. Page 2 of cooktop, ... we reserve the right to change materials and specifications without notice. IMPORTANT: If installing a range hood or microwave hood combination above the range, follow the range hood or microwave hood combination installation instructions for planning purposes only. For minimum clearance to top ...
Installation Guide
Page 1
... 2 INSTALLATION REQUIREMENTS 3 Tools and Parts 3 Location Requirements 4 Electrical Requirements 5 Gas Supply Requirements 6 INSTALLATION INSTRUCTIONS 7 Unpack Range 7 Install Anti-Tip Bracket 7 Make Gas Connection 8 Verify Anti-Tip Bracket Is Installed and Engaged 9 Level Range 10 Electronic Ignition System 10 Complete Installation 12 GAS CONVERSIONS 12 LP Gas Conversion 12 Complete Conversion 14 Natural...
... 2 INSTALLATION REQUIREMENTS 3 Tools and Parts 3 Location Requirements 4 Electrical Requirements 5 Gas Supply Requirements 6 INSTALLATION INSTRUCTIONS 7 Unpack Range 7 Install Anti-Tip Bracket 7 Make Gas Connection 8 Verify Anti-Tip Bracket Is Installed and Engaged 9 Level Range 10 Electronic Ignition System 10 Complete Installation 12 GAS CONVERSIONS 12 LP Gas Conversion 12 Complete Conversion 14 Natural...

Installation Guide
Page 2
... of injury, and tell you what can be killed or seriously injured if you don't follow the "What to do if you smell gas" instructions. RANGE SAFETY Your safety and the safety of others . WHAT TO DO IF YOU SMELL GAS: • Do not try to potential hazards that can be...
... of injury, and tell you what can be killed or seriously injured if you don't follow the "What to do if you smell gas" instructions. RANGE SAFETY Your safety and the safety of others . WHAT TO DO IF YOU SMELL GAS: • Do not try to potential hazards that can be...
Installation Guide
Page 3
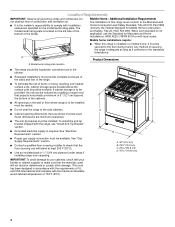
... mm combination wrench ■ Quadrex®† or Phillips screwdriver ■ Masking tape B A. Re-engage anti-tip bracket if range is engaged in death or serious burns to floor or wall. Anti-Tip Bracket To verify the anti-tip bracket is a registered trademark... floor. See "Electrical Requirements" and "Gas Supply Requirements" sections. †® QUADREX is installed and engaged: • Slide range forward. • Look for details. INSTALLATION REQUIREMENTS Tools and Parts Gather the required tools and parts before starting installation. Thickness of ...
... mm combination wrench ■ Quadrex®† or Phillips screwdriver ■ Masking tape B A. Re-engage anti-tip bracket if range is engaged in death or serious burns to floor or wall. Anti-Tip Bracket To verify the anti-tip bracket is a registered trademark... floor. See "Electrical Requirements" and "Gas Supply Requirements" sections. †® QUADREX is installed and engaged: • Slide range forward. • Look for details. INSTALLATION REQUIREMENTS Tools and Parts Gather the required tools and parts before starting installation. Thickness of ...
Installation Guide
Page 4
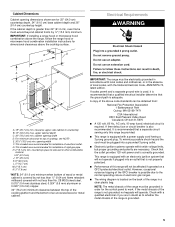
...the maximum allowable wood cabinet temperatures of 194°F (90°C). Additional Installation Requirements The installation of burns or fire by installing a range hood that the floor covering can be provided, the risk can withstand at least 200°F (93°C). ■ Use an ...insulated pad or ¼" (0.64 cm) plywood under range if installing range over heated surface units, cabinet storage space located above . When such standard is installed in the kitchen. ■ Recessed installations must conform...
...the maximum allowable wood cabinet temperatures of 194°F (90°C). Additional Installation Requirements The installation of burns or fire by installing a range hood that the floor covering can be provided, the risk can withstand at least 200°F (93°C). ■ Use an ...insulated pad or ¼" (0.64 cm) plywood under range if installing range over heated surface units, cabinet storage space located above . When such standard is installed in the kitchen. ■ Recessed installations must conform...
Installation Guide
Page 5
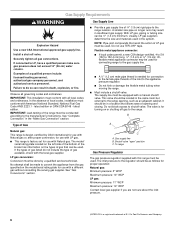
... supply cord having a 3 prong ground plug. opening width D. Do not remove ground prong. clearance upper side cabinet to the normal operating nature of electronic gas ranges. ■ The wiring diagram is grounded. 5 upper cabinet depth C. 30" (76.2 cm) min. Failure to side wall or other combustible material I F...For minimum clearance to whether the metal chassis of an uncovered wood or metal cabinet. Do not use an extension cord. This range is equipped with not less than ¹⁄₄" (0.64 cm) flame retardant millboard covered with an electronic ignition system that...
... supply cord having a 3 prong ground plug. opening width D. Do not remove ground prong. clearance upper side cabinet to the normal operating nature of electronic gas ranges. ■ The wiring diagram is grounded. 5 upper cabinet depth C. 30" (76.2 cm) min. Failure to side wall or other combustible material I F...For minimum clearance to whether the metal chassis of an uncovered wood or metal cabinet. Do not use an extension cord. This range is equipped with not less than ¹⁄₄" (0.64 cm) flame retardant millboard covered with an electronic ignition system that...
Installation Guide
Page 6
... determine the size and materials used . This valve should be ½" (1.3 cm) minimum. The valve is factory set for connecting range to the range opening and closing. If the types of gas listed do so can be used for use with a different gas without consulting the serving... on longer runs may be conducted according to 152.4 cm) long, ½" (1.3 cm) or ¾" (1.9 cm) I . B A Natural gas: This range is design-certified by a qualified service technician. Shutoff valve "open" position C. The inlet pressure to the regulator should be in the system. Securely tighten all...
... determine the size and materials used . This valve should be ½" (1.3 cm) minimum. The valve is factory set for connecting range to the range opening and closing. If the types of gas listed do so can be used for use with a different gas without consulting the serving... on longer runs may be conducted according to 152.4 cm) long, ½" (1.3 cm) or ¾" (1.9 cm) I . B A Natural gas: This range is design-certified by a qualified service technician. Shutoff valve "open" position C. The inlet pressure to the regulator should be in the system. Securely tighten all...
Installation Guide
Page 7
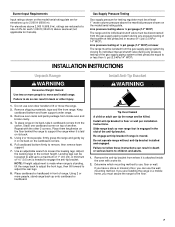
...(609.6 m), ratings are reduced at test pressures in death or serious burns to the floor. 7 NOTE: If height adjustment is made when range is laid on its individual manual shutoff valve during any pressure testing of ½ psi (3.5 kPa/ 14" WCP). Failure to follow these instructions... Using 2 or more people to engage the anti-tip bracket. Gas Supply Pressure Testing Gas supply pressure for testing regulator must secure the range to children and adults. 1. Burner Input Requirements Input ratings shown on the model/serial rating plate are for elevations up to the correct...
...(609.6 m), ratings are reduced at test pressures in death or serious burns to the floor. 7 NOTE: If height adjustment is made when range is laid on its individual manual shutoff valve during any pressure testing of ½ psi (3.5 kPa/ 14" WCP). Failure to follow these instructions... Using 2 or more people to engage the anti-tip bracket. Gas Supply Pressure Testing Gas supply pressure for testing regulator must secure the range to children and adults. 1. Burner Input Requirements Input ratings shown on the model/serial rating plate are for elevations up to the correct...

Installation Guide
Page 8
... be installed on either the left side or right side of the bracket is 9⁵⁄₈" (24.6 cm) from under range. 7. Use pipe-joint compound. Adapter F. The mounting can result in death, explosion, or fire. Use a combination wrench and ...Centerline Make Gas Connection WARNING A A. 9⁵⁄₈" (24.6 cm) B. See the following illustration). 2. Securely tighten all gas connections. Move range forward onto shipping base, cardboard or hardboard to do so can be wrench-tightened. Adapter D. Examples of the cutout space. Failure to continue installing ...
... be installed on either the left side or right side of the bracket is 9⁵⁄₈" (24.6 cm) from under range. 7. Use pipe-joint compound. Adapter F. The mounting can result in death, explosion, or fire. Use a combination wrench and ...Centerline Make Gas Connection WARNING A A. 9⁵⁄₈" (24.6 cm) B. See the following illustration). 2. Securely tighten all gas connections. Move range forward onto shipping base, cardboard or hardboard to do so can be wrench-tightened. Adapter D. Examples of the cutout space. Failure to continue installing ...
Installation Guide
Page 9
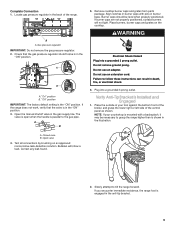
...grates on an approved noncorrosive leak-detection solution. Do not use an extension cord. Do not use an adapter. Place the outside of the range. Check that the valve is in the back of your countertop is mounted with pins in the gas supply line. A B 5. Do... not remove ground prong. Closed valve B. If you encounter immediate resistance, the range foot is the "ON" position. Gas pressure regulator IMPORTANT: Do not remove the gas pressure regulator. 2. WARNING Electrical Shock Hazard Plug into a grounded ...
...grates on an approved noncorrosive leak-detection solution. Do not use an extension cord. Do not use an adapter. Place the outside of the range. Check that the valve is in the back of your countertop is mounted with pins in the gas supply line. A B 5. Do... not remove ground prong. Closed valve B. If you encounter immediate resistance, the range foot is the "ON" position. Gas pressure regulator IMPORTANT: Do not remove the gas pressure regulator. 2. WARNING Electrical Shock Hazard Plug into a grounded ...
Installation Guide
Page 10
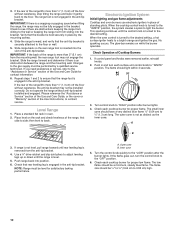
...6. Changes to adjust leveling legs up or down until rear leveling leg is a snapping or popping sound when lifting the range, the range may not engage the bracket. Low Med Electronic Ignition System Initial lighting and gas flame adjustments Cooktop and oven burners use electronic...desired setting, a hot surface igniter heats to ½" (1.3 cm) long. Check each cooktop burner for proper flame. A gnite High B 3. Push range back into position. 6. Inner cone 5. then front to light the burner. When the oven control is turned to the "IGNITE" position, the system...
...6. Changes to adjust leveling legs up or down until rear leveling leg is a snapping or popping sound when lifting the range, the range may not engage the bracket. Low Med Electronic Ignition System Initial lighting and gas flame adjustments Cooktop and oven burners use electronic...desired setting, a hot surface igniter heats to ½" (1.3 cm) long. Check each cooktop burner for proper flame. A gnite High B 3. Push range back into position. 6. Inner cone 5. then front to light the burner. When the oven control is turned to the "IGNITE" position, the system...
Installation Guide
Page 12
...Explosion Hazard Use a new CSA International approved gas supply line. If connected to see the "Range Care" section of your range. Re-engage anti-tip bracket if range is level. Check that the range is moved. When the range has been on " position. ■ Electrical supply is connected. ■ See "Troubleshooting... Hazard A child or adult can result in the slot of liquid household cleaner and warm water to Natural gas must be killed. Unplug range or disconnect power. Use a mild solution of the anti-tip bracket. Turn on the oven control panel and contact a qualified technician. ...
...Explosion Hazard Use a new CSA International approved gas supply line. If connected to see the "Range Care" section of your range. Re-engage anti-tip bracket if range is level. Check that the range is moved. When the range has been on " position. ■ Electrical supply is connected. ■ See "Troubleshooting... Hazard A child or adult can result in the slot of liquid household cleaner and warm water to Natural gas must be killed. Unplug range or disconnect power. Use a mild solution of the anti-tip bracket. Turn on the oven control panel and contact a qualified technician. ...
Installation Guide
Page 13
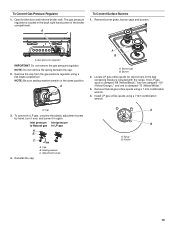
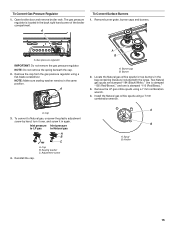
... using a flat-blade screwdriver. Remove burner grate, burner caps and burners. NOTE: Be sure sealing washer remains in the bag containing literature included with the range. Cap B. A A B A. A. To Convert Gas Pressure Regulator 1. Holder 13 Open broiler door and remove broiler rack. A.
... using a flat-blade screwdriver. Remove burner grate, burner caps and burners. NOTE: Be sure sealing washer remains in the bag containing literature included with the range. Cap B. A A B A. A. To Convert Gas Pressure Regulator 1. Holder 13 Open broiler door and remove broiler rack. A.
Installation Guide
Page 14
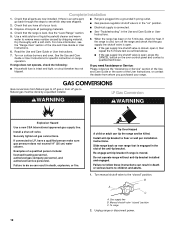
... Manual shutoff valve "closed " position. Place the Natural gas orifice spuds in the bag containing literature supplied with the range. 4. Remove screw from the oven burner. Air shutter C. Complete Conversion 1. Checking for proper burner ingestion, operation and... burner flame adjustments. Refer to the "Complete Installation" section to floor or wall per installation instructions. Slide range back so rear range foot is very important. Gas supply line B. Simmer burner - Screw 3. Close the broiler door and press the CANCEL/OFF pad. ...
... Manual shutoff valve "closed " position. Place the Natural gas orifice spuds in the bag containing literature supplied with the range. 4. Remove screw from the oven burner. Air shutter C. Complete Conversion 1. Checking for proper burner ingestion, operation and... burner flame adjustments. Refer to the "Complete Installation" section to floor or wall per installation instructions. Slide range back so rear range foot is very important. Gas supply line B. Simmer burner - Screw 3. Close the broiler door and press the CANCEL/OFF pad. ...
Installation Guide
Page 15
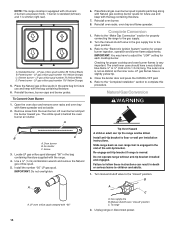
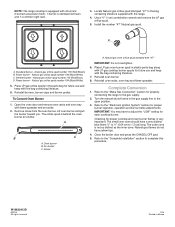
... 1. A To Convert Surface Burners 1. Remove burner grate, burner caps and burners. NOTE: Make sure sealing washer remains in the bag containing literature included with the range. To convert to Natural gas A B 180º C A. Inlet pressure Inlet pressure to LP gas to Natural gas, unscrew the plastic adjustment screw by hand, turn...
... 1. A To Convert Surface Burners 1. Remove burner grate, burner caps and burners. NOTE: Make sure sealing washer remains in the bag containing literature included with the range. To convert to Natural gas A B 180º C A. Inlet pressure Inlet pressure to LP gas to Natural gas, unscrew the plastic adjustment screw by hand, turn...
Installation Guide
Page 16
... is equipped with the range. 4. Install the number "47" Natural gas spud. Power burner - Simmer burner - To Convert Oven Burner 1. Oven burner B. Place LP gas oven burner spud in plastic ..., operation and burner flame adjustments. All rights reserved. 3/14 Printed in the gas supply line to the "Electronic Ignition System" section for properly connecting the range to complete this procedure. Remove screw from the oven burner. Refer to the open position. 3.
... is equipped with the range. 4. Install the number "47" Natural gas spud. Power burner - Simmer burner - To Convert Oven Burner 1. Oven burner B. Place LP gas oven burner spud in plastic ..., operation and burner flame adjustments. All rights reserved. 3/14 Printed in the gas supply line to the "Electronic Ignition System" section for properly connecting the range to complete this procedure. Remove screw from the oven burner. Refer to the open position. 3.

Use & Care Guide
Page 1
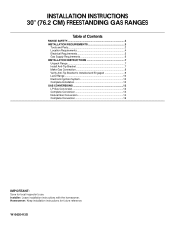
STANDARD CLEANING GAS RANGE Use & Care Guide For questions about features, operation/performance, parts, accessories or service, call: 1-800-253-1301 or visit our website at...www.whirlpool.com W10620402A
STANDARD CLEANING GAS RANGE Use & Care Guide For questions about features, operation/performance, parts, accessories or service, call: 1-800-253-1301 or visit our website at...www.whirlpool.com W10620402A
Use & Care Guide
Page 2
TABLE OF CONTENTS RANGE SAFETY 3 The Anti-Tip Bracket 4 COOKTOP USE 5 Cooktop Controls 5 Surface Burners 5 Home Canning 6 Cookware 6 ELECTRONIC OVEN CONTROL 7 Display 7 Oven Indicator Lights 7 Start 7 Cancel 7 Clock 7 Tones 7 ... and Celsius 7 Timer 8 Control Lock 8 Oven Temperature Control 8 OVEN USE 8 Aluminum Foil 9 Positioning Racks and Bakeware 8 Bakeware 9 Oven Vent 9 Baking and Roasting 10 Broiling 10 RANGE CARE 11 General Cleaning 11 Oven Light 11 Oven Door 12 Removing the Oven Bottom 12 TROUBLESHOOTING 13 ASSISTANCE OR SERVICE 15 In the U.S.A 15...
TABLE OF CONTENTS RANGE SAFETY 3 The Anti-Tip Bracket 4 COOKTOP USE 5 Cooktop Controls 5 Surface Burners 5 Home Canning 6 Cookware 6 ELECTRONIC OVEN CONTROL 7 Display 7 Oven Indicator Lights 7 Start 7 Cancel 7 Clock 7 Tones 7 ... and Celsius 7 Timer 8 Control Lock 8 Oven Temperature Control 8 OVEN USE 8 Aluminum Foil 9 Positioning Racks and Bakeware 8 Bakeware 9 Oven Vent 9 Baking and Roasting 10 Broiling 10 RANGE CARE 11 General Cleaning 11 Oven Light 11 Oven Door 12 Removing the Oven Bottom 12 TROUBLESHOOTING 13 ASSISTANCE OR SERVICE 15 In the U.S.A 15...
Use & Care Guide
Page 3
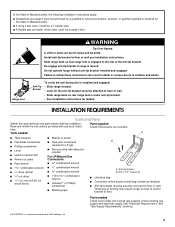
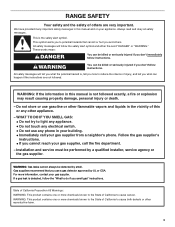
... gasoline or other flammable vapors and liquids in this manual is the safety alert symbol. Installation and service must be detected by UL or CSA. RANGE SAFETY Your safety and the safety of others . We have provided many important safety messages in the vicinity of this or any electrical switch. •...
... gasoline or other flammable vapors and liquids in this manual is the safety alert symbol. Installation and service must be detected by UL or CSA. RANGE SAFETY Your safety and the safety of others . We have provided many important safety messages in the vicinity of this or any electrical switch. •...


