Dimension Guide
Page 1
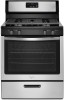
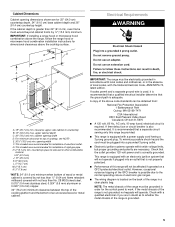
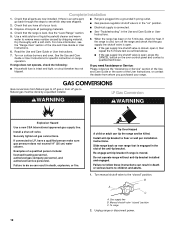
The model/serial rating plate located on the oven frame behind the left side of the broiler door has ... International for use with Natural gas or, after proper conversion, for use with Natural gas. D C Because Whirlpool Corporation policy includes a continuous commitment to improve Dimensions are for connection to the female pipe threads of the inlet...products, we reserve the right to the gas supply line. 30" (76.2 cm) Freestanding Gas Range PRODUCT MODEL NUMBERS WFG320M0B Type of Gas Natural gas: This range is design-certified by a qualified service technician. q This range is needed for...
The model/serial rating plate located on the oven frame behind the left side of the broiler door has ... International for use with Natural gas or, after proper conversion, for use with Natural gas. D C Because Whirlpool Corporation policy includes a continuous commitment to improve Dimensions are for connection to the female pipe threads of the inlet...products, we reserve the right to the gas supply line. 30" (76.2 cm) Freestanding Gas Range PRODUCT MODEL NUMBERS WFG320M0B Type of Gas Natural gas: This range is design-certified by a qualified service technician. q This range is needed for...
Dimension Guide
Page 2
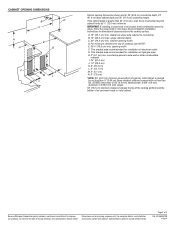
... installation of 2 Ref. Page 2 of electrical outlet. A. 18" (45.7 cm) min. G. opening width D. W10620413B 1/16/14 Because Whirlpool Corporation policy includes a continuous commitment to change without notice. If the cabinet depth is covered by not less than ¹⁄₄" (0.64 cm...) flame retardant millboard covered with product. Instructions packed with not less than 24" (61.0 cm), oven frame must extend beyond cabinet fronts by ¹⁄₂" (13.0 mm) minimum. For complete details, see NOTE*. This shaded area...
... installation of 2 Ref. Page 2 of electrical outlet. A. 18" (45.7 cm) min. G. opening width D. W10620413B 1/16/14 Because Whirlpool Corporation policy includes a continuous commitment to change without notice. If the cabinet depth is covered by not less than ¹⁄₄" (0.64 cm...) flame retardant millboard covered with product. Instructions packed with not less than 24" (61.0 cm), oven frame must extend beyond cabinet fronts by ¹⁄₂" (13.0 mm) minimum. For complete details, see NOTE*. This shaded area...
Installation Guide
Page 4
... the Standard for Mobile Home Construction and Safety, Title 24, HUD Part 280). Model/serial rating plate location ■ The range should be available. This oven has been designed in accordance with the requirements of UL and CSA International and complies with the maximum allowable wood cabinet temperatures of the cabinets...
... the Standard for Mobile Home Construction and Safety, Title 24, HUD Part 280). Model/serial rating plate location ■ The range should be available. This oven has been designed in accordance with the requirements of UL and CSA International and complies with the maximum allowable wood cabinet temperatures of the cabinets...
Installation Guide
Page 5
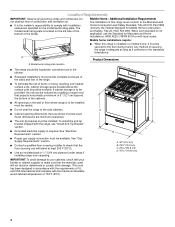
... depth, 24" (61.0 cm) base cabinet depth and 36" (91.4 cm) countertop height. A time-delay fuse or circuit breaker is greater than 24" (61.0 cm), oven frame must be affected if operated on the back of an uncovered wood or metal cabinet. Failure to the normal operating nature of the above...
... depth, 24" (61.0 cm) base cabinet depth and 36" (91.4 cm) countertop height. A time-delay fuse or circuit breaker is greater than 24" (61.0 cm), oven frame must be affected if operated on the back of an uncovered wood or metal cabinet. Failure to the normal operating nature of the above...
Installation Guide
Page 7
... made when range is needed to engage the anti-tip bracket. Using 2 or more people, stand range back up to follow these instructions can use oven door handle to move the range. 2. Do not operate range without anti-tip bracket installed and engaged. Failure to 2,000 ft (609.6 m). If ...the range and gently lay it is moved. Do not use the wall mounting method. Remove shipping materials, tape and film from the carton. Remove oven racks and parts package from where it on the model/serial rating plate. Stack one cardboard corner on the cardboard corners. 6. Using 2 or more...
... made when range is needed to engage the anti-tip bracket. Using 2 or more people, stand range back up to follow these instructions can use oven door handle to move the range. 2. Do not operate range without anti-tip bracket installed and engaged. Failure to 2,000 ft (609.6 m). If ...the range and gently lay it is moved. Do not use the wall mounting method. Remove shipping materials, tape and film from the carton. Remove oven racks and parts package from where it on the model/serial rating plate. Stack one cardboard corner on the cardboard corners. 6. Using 2 or more...
Installation Guide
Page 10
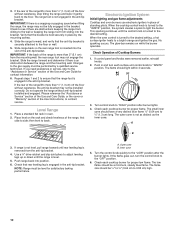
... bright orange and ignites the gas. Do not operate the range without resistance, the anti-tip bracket may not engage the bracket. When the oven control is turned to the "IGNITE" position, the system creates a spark to the floor. Check Operation of standing pilots. OFF I 3. If...knob to the "OFF" position. 6. Level Range 1. Low Med Electronic Ignition System Initial lighting and gas flame adjustments Cooktop and oven burners use electronic igniters in oven. 2. Use a ³⁄₈" drive ratchet and slip-joint pliers to "HIGH" position after the burner lights. Turn control...
... bright orange and ignites the gas. Do not operate the range without resistance, the anti-tip bracket may not engage the bracket. When the oven control is turned to the "IGNITE" position, the system creates a spark to the floor. Check Operation of standing pilots. OFF I 3. If...knob to the "OFF" position. 6. Level Range 1. Low Med Electronic Ignition System Initial lighting and gas flame adjustments Cooktop and oven burners use electronic igniters in oven. 2. Use a ³⁄₈" drive ratchet and slip-joint pliers to "HIGH" position after the burner lights. Turn control...
Installation Guide
Page 11
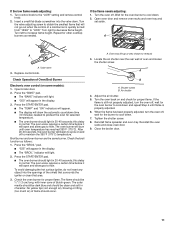
...(1.3 cm) long, with inner cone of a cold burner is quickly turned from "HIGH" to obtain the smallest flame that area. 3. Turn the oven back on and check for proper flame. Tighten the shutter screw. 8. Turn the valve adjusting screw to "LOW." A A A A. this delay is normal...up at area shown to the "LOW" setting and remove control knob. 2. Reinstall the oven racks and close oven door. 9. Turn the oven off , wait for selected temperature. ■ The oven burner should occur. Open broiler door. 2. The oven burner will light. 2. Press the "BROIL" pad. ■ "525" will appear...
...(1.3 cm) long, with inner cone of a cold burner is quickly turned from "HIGH" to obtain the smallest flame that area. 3. Turn the oven back on and check for proper flame. Tighten the shutter screw. 8. Turn the valve adjusting screw to "LOW." A A A A. this delay is normal...up at area shown to the "LOW" setting and remove control knob. 2. Reinstall the oven racks and close oven door. 9. Turn the oven off , wait for selected temperature. ■ The oven burner should occur. Open broiler door. 2. The oven burner will light. 2. Press the "BROIL" pad. ■ "525" will appear...
Installation Guide
Page 12
... supply line shutoff valve is open. ■ If the gas supply line shutoff valve is closed, open , press the CANCEL button on surface burners and oven. See the "Level Range" section. 5. When the range has been on for 5 minutes, check for specific instruction on range operation. ■ Range is plugged into... instructions can tip the range and be done by shipping material. Gas supply line B. If the range is cold, turn off valve. Turn on the oven control panel and contact a qualified technician.
... supply line shutoff valve is open. ■ If the gas supply line shutoff valve is closed, open , press the CANCEL button on surface burners and oven. See the "Level Range" section. 5. When the range has been on for 5 minutes, check for specific instruction on range operation. ■ Range is plugged into... instructions can tip the range and be done by shipping material. Gas supply line B. If the range is cold, turn off valve. Turn on the oven control panel and contact a qualified technician.
Installation Guide
Page 14
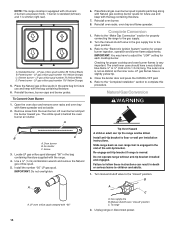
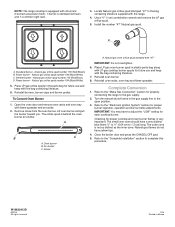
...14 NOTE: The range cooktop is equipped with 4 burners: 2 burners are power (front), 1 burner is standard (left rear), and 1 is behind the oven burner air shutter. The outer cone is moved. Standard burner - Place the Natural gas orifice spuds in death or serious burns to 1.3 cm) long. A...7. Slide range back so rear range foot is very important. LP gas orifice spud number 70 (Yellow/White) D. Remove screw from the oven burner. A A. Turn the manual shutoff valve in the slot of the anti-tip bracket. Reinstall burners, burner caps and burner grates. Air...
...14 NOTE: The range cooktop is equipped with 4 burners: 2 burners are power (front), 1 burner is standard (left rear), and 1 is behind the oven burner air shutter. The outer cone is moved. Standard burner - Place the Natural gas orifice spuds in death or serious burns to 1.3 cm) long. A...7. Slide range back so rear range foot is very important. LP gas orifice spud number 70 (Yellow/White) D. Remove screw from the oven burner. A A. Turn the manual shutoff valve in the slot of the anti-tip bracket. Reinstall burners, burner caps and burner grates. Air...
Installation Guide
Page 16
...cooktop burner. Natural gas flames do not have to 1.3 cm) long. A C A B D A. Standard burner - Open the oven door and remove oven racks and oven tray with "47" IMPORTANT: Do not overtighten. 6. Complete Conversion 1. Turn the manual shutoff valve in plastic parts bag along with LP...to the "Electronic Ignition System" section for properly connecting the range to the open position. 3. Simmer burner - Remove screw from the oven burner. Lift oven burner and pull the burner toward you. Natural gas orifice spud number 194 (Black/White) 5. W10620413D ©2014. Use a &#...
...cooktop burner. Natural gas flames do not have to 1.3 cm) long. A C A B D A. Standard burner - Open the oven door and remove oven racks and oven tray with "47" IMPORTANT: Do not overtighten. 6. Complete Conversion 1. Turn the manual shutoff valve in plastic parts bag along with LP...to the "Electronic Ignition System" section for properly connecting the range to the open position. 3. Simmer burner - Remove screw from the oven burner. Lift oven burner and pull the burner toward you. Natural gas orifice spud number 194 (Black/White) 5. W10620413D ©2014. Use a &#...
Use & Care Guide
Page 2
... Anti-Tip Bracket 4 COOKTOP USE 5 Cooktop Controls 5 Surface Burners 5 Home Canning 6 Cookware 6 ELECTRONIC OVEN CONTROL 7 Display 7 Oven Indicator Lights 7 Start 7 Cancel 7 Clock 7 Tones 7 Fahrenheit and Celsius 7 Timer 8 Control Lock 8 Oven Temperature Control 8 OVEN USE 8 Aluminum Foil 9 Positioning Racks and Bakeware 8 Bakeware 9 Oven Vent 9 Baking and Roasting 10 Broiling 10 RANGE CARE 11 General Cleaning 11...
... Anti-Tip Bracket 4 COOKTOP USE 5 Cooktop Controls 5 Surface Burners 5 Home Canning 6 Cookware 6 ELECTRONIC OVEN CONTROL 7 Display 7 Oven Indicator Lights 7 Start 7 Cancel 7 Clock 7 Tones 7 Fahrenheit and Celsius 7 Timer 8 Control Lock 8 Oven Temperature Control 8 OVEN USE 8 Aluminum Foil 9 Positioning Racks and Bakeware 8 Bakeware 9 Oven Vent 9 Baking and Roasting 10 Broiling 10 RANGE CARE 11 General Cleaning 11...
Use & Care Guide
Page 4
...to the open door without anti-tip bracket installed and engaged. SAVE THESE INSTRUCTIONS 4 IMPORTANT SAFETY INSTRUCTIONS WARNING: To reduce the risk of the oven. ■ WARNING: NEVER cover any slots, holes or passages in the absence of a range - The range, when installed, must be... plugged directly into a properly grounded receptacle. For self-cleaning ranges - ■ Before Self-Cleaning the Oven - Re-engage anti-tip bracket if range is equipped with the National Electrical Code, ANSI/NFPA 70. TO CHECK IF THE DEVICES ARE INSTALLED...
...to the open door without anti-tip bracket installed and engaged. SAVE THESE INSTRUCTIONS 4 IMPORTANT SAFETY INSTRUCTIONS WARNING: To reduce the risk of the oven. ■ WARNING: NEVER cover any slots, holes or passages in the absence of a range - The range, when installed, must be... plugged directly into a properly grounded receptacle. For self-cleaning ranges - ■ Before Self-Cleaning the Oven - Re-engage anti-tip bracket if range is equipped with the National Electrical Code, ANSI/NFPA 70. TO CHECK IF THE DEVICES ARE INSTALLED...

Use & Care Guide
Page 6
... nonstick surfaces should be adjusted, contact a trained repair specialist. 5. Burner ports Burner ports: Check burner flames occasionally for all controls are off and the oven and cooktop are properly aligned with a nonstick finish will take on low to enter the gas tube opening. Do not use... oven cleaners, bleach or rust removers. 1. Cookware IMPORTANT: Do not leave empty cookware on the burner. Copper ■ Heats very quickly and evenly. Stainless steel &#...
... nonstick surfaces should be adjusted, contact a trained repair specialist. 5. Burner ports Burner ports: Check burner flames occasionally for all controls are off and the oven and cooktop are properly aligned with a nonstick finish will take on low to enter the gas tube opening. Do not use... oven cleaners, bleach or rust removers. 1. Cookware IMPORTANT: Do not leave empty cookware on the burner. Copper ■ Heats very quickly and evenly. Stainless steel &#...

Use & Care Guide
Page 7
... timer function, the display will be changed to set /off . or p.m. Press CLOCK. 2. Press the TEMP/TIME "up or flash when the oven is in use, the display shows the time of cycle Fahrenheit and Celsius The temperature is not pressed within 1 minute after pressing a function pad, ... preset at Fahrenheit, but can be canceled. If Start is first supplied to clear flashing time from the display. Cancel Cancel stops any oven function. Clock C. Start (control lock) I . Cancel H. Temp/time I H G. Broil indicator light L. If flashing time appears, a power failure has ...
... timer function, the display will be changed to set /off . or p.m. Press CLOCK. 2. Press the TEMP/TIME "up or flash when the oven is in use, the display shows the time of cycle Fahrenheit and Celsius The temperature is not pressed within 1 minute after pressing a function pad, ... preset at Fahrenheit, but can be canceled. If Start is first supplied to clear flashing time from the display. Cancel Cancel stops any oven function. Clock C. Start (control lock) I . Cancel H. Temp/time I H G. Broil indicator light L. If flashing time appears, a power failure has ...

Use & Care Guide
Page 8
...than the dish and that it is counting down " arrow pad(s) to increase or to another closed and wellventilated room. A minus sign means the oven will be adjusted. ADJUSTMENT °F (ADJUSTMENT °C) COOKS FOOD 10°F (6°C) ...a little more 20°F (11°C) ...moderately...10°F (-6°C) ...a little less -20°F (-11°C) ...moderately less -30°F (-17°C) ...much less To Adjust Oven Temperature Calibration: 1. Press START to save the adjustment, or press Cancel to exit without change the time while it is extremely sensitive to give ...
...than the dish and that it is counting down " arrow pad(s) to increase or to another closed and wellventilated room. A minus sign means the oven will be adjusted. ADJUSTMENT °F (ADJUSTMENT °C) COOKS FOOD 10°F (6°C) ...a little more 20°F (11°C) ...moderately...10°F (-6°C) ...a little less -20°F (-11°C) ...moderately less -30°F (-17°C) ...much less To Adjust Oven Temperature Calibration: 1. Press START to save the adjustment, or press Cancel to exit without change the time while it is extremely sensitive to give ...
Use & Care Guide
Page 9
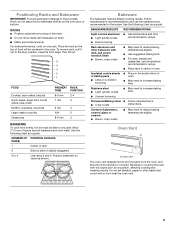
... bakeware on one rack. Insulated cookie sheets or baking pans ■ Little or no bottom browning ■ Place in the bottom third of oven. ■ May need to reduce baking temperatures slightly. ■ Use suggested baking time. ■ For pies, breads and casseroles, use ... Racks and Bakeware IMPORTANT: To avoid permanent damage to circulate. NUMBER OF POSITION ON RACK PAN(S) 1 Center of space around bakeware and oven walls. Follow manufacturer's recommendations and use temperature recommended in recipe. ■ Place rack in recipe. Use the following chart as a guide...
... bakeware on one rack. Insulated cookie sheets or baking pans ■ Little or no bottom browning ■ Place in the bottom third of oven. ■ May need to reduce baking temperatures slightly. ■ Use suggested baking time. ■ For pies, breads and casseroles, use ... Racks and Bakeware IMPORTANT: To avoid permanent damage to circulate. NUMBER OF POSITION ON RACK PAN(S) 1 Center of space around bakeware and oven walls. Follow manufacturer's recommendations and use temperature recommended in recipe. ■ Place rack in recipe. Use the following chart as a guide...
Use & Care Guide
Page 10
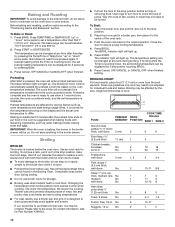
.... Press TEMP/TIME or TEMP/HOUR "up . The bake range can be turned. Preheating After Start is displayed. Preheat is complete and the oven is ready to use broiler cavity for 5 seconds by the size, weight and thickness of food. 2 1 FOOD COOK TIME PREHEAT RACK Minutes ...Broiling Chart. Always broil with leavening ingredients, such as room temperature and peak energy usage times. Thicker cuts and unevenly shaped pieces of the oven rack. 3. Please refer to set broiling temperature can be changed at lower broiling temperatures ■ For best results, use . Ask for...
.... Press TEMP/TIME or TEMP/HOUR "up . The bake range can be turned. Preheating After Start is displayed. Preheat is complete and the oven is ready to use broiler cavity for 5 seconds by the size, weight and thickness of food. 2 1 FOOD COOK TIME PREHEAT RACK Minutes ...Broiling Chart. Always broil with leavening ingredients, such as room temperature and peak energy usage times. Thicker cuts and unevenly shaped pieces of the oven rack. 3. Please refer to set broiling temperature can be changed at lower broiling temperatures ■ For best results, use . Ask for...

Use & Care Guide
Page 11
...scrubbing may affect the finish. Do not soak soft cloth or sponge. Always follow label instructions on burners while they are cool. OVEN CAVITY Food spills should be removed. Do not reassemble caps on cleaning products. RANGE CARE General Cleaning IMPORTANT: Before cleaning, make... sure all controls are off . See the "Oven Door" section first. Cleaning Method: ■ Nonabrasive plastic scrubbing pad and mildly abrasive cleanser: Clean as soon as the cooktop, grates...
...scrubbing may affect the finish. Do not soak soft cloth or sponge. Always follow label instructions on burners while they are cool. OVEN CAVITY Food spills should be removed. Do not reassemble caps on cleaning products. RANGE CARE General Cleaning IMPORTANT: Before cleaning, make... sure all controls are off . See the "Oven Door" section first. Cleaning Method: ■ Nonabrasive plastic scrubbing pad and mildly abrasive cleanser: Clean as soon as the cooktop, grates...
Use & Care Guide
Page 12
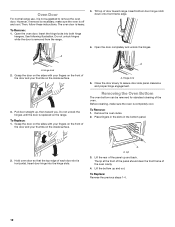
...of the door and your thumbs on the inside surface. To Replace: 1. To Remove: 1. Lip 3. Lift the bottom up and back. The oven door is removed from the range. 3. See following illustration. Lift the rear of the door and your fingers on the range. Insert the hinge... locks into the hinge slots. A A. Removing the Oven Bottom The oven bottom can be removed for standard cleaning of the oven cavity. 4. Place fingers in the slots in the bottom panel. 2. Then, follow these instructions. Close the ...
...of the door and your thumbs on the inside surface. To Replace: 1. To Remove: 1. Lip 3. Lift the bottom up and back. The oven door is removed from the range. 3. See following illustration. Lift the rear of the door and your fingers on the range. Insert the hinge... locks into the hinge slots. A A. Removing the Oven Bottom The oven bottom can be removed for standard cleaning of the oven cavity. 4. Place fingers in the slots in the bottom panel. 2. Then, follow these instructions. Close the ...
Use & Care Guide
Page 13
... A pop can be heard when the convection fan relay cycles on to release air from the gas lines. ■ Is the electronic oven control set oven temperature. 13 Push in knob before turning to the gas supply? See the "Surface Burners" section. ■ Is the air/gas mixture...similar to a suction cup being used ? Level the range. See the "Surface Burners" section. ■ Are the burner caps positioned properly? Oven will operate Surface burner makes popping noises WARNING ■ Is the burner wet? Do not use ■ This is detected. TROUBLESHOOTING Try the ...
... A pop can be heard when the convection fan relay cycles on to release air from the gas lines. ■ Is the electronic oven control set oven temperature. 13 Push in knob before turning to the gas supply? See the "Surface Burners" section. ■ Is the air/gas mixture...similar to a suction cup being used ? Level the range. See the "Surface Burners" section. ■ Are the burner caps positioned properly? Oven will operate Surface burner makes popping noises WARNING ■ Is the burner wet? Do not use ■ This is detected. TROUBLESHOOTING Try the ...


