Owners Manual
Page 5
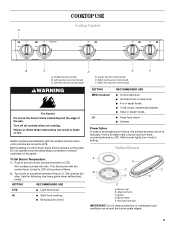
.... Surface Burners A A C C B D D E A. Gas tube opening IMPORTANT: Do not obstruct the flow of prolonged power failure, the surface burners can result in and turn knob counterclockwise to LITE will click. Center burner control knob E. To Set Burner Temperature: 1. All 4 surface burners will produce... a flame. 2. Turn knob to setting. Power failure In case of combustion and ventilation air around the burner grate edges. 5 After burner lights, turn knob ...
.... Surface Burners A A C C B D D E A. Gas tube opening IMPORTANT: Do not obstruct the flow of prolonged power failure, the surface burners can result in and turn knob counterclockwise to LITE will click. Center burner control knob E. To Set Burner Temperature: 1. All 4 surface burners will produce... a flame. 2. Turn knob to setting. Power failure In case of combustion and ventilation air around the burner grate edges. 5 After burner lights, turn knob ...
Owners Manual
Page 6
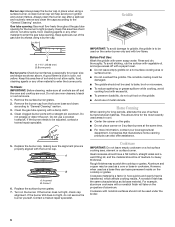
... that manufacture home canning products can leave permanent marks on the griddle. ■ Avoid use of the gas tube by always using a surface burner. Correct 6. Aluminum and copper may scratch the cooktop or grates. Clean the gas tube opening for the most recently used under the broiler. 6 Do not use oven cleaners, bleach or...
... that manufacture home canning products can leave permanent marks on the griddle. ■ Avoid use of the gas tube by always using a surface burner. Correct 6. Aluminum and copper may scratch the cooktop or grates. Clean the gas tube opening for the most recently used under the broiler. 6 Do not use oven cleaners, bleach or...
Owners Manual
Page 11
RANGE CARE General Cleaning IMPORTANT: Before cleaning, make sure knobs are wet...All-Purpose Appliance Cleaner Part Number 31682 (not included): See "Assistance or Service" section to order. ■ Gas Grate and Drip Pan Cleaner Part Number 31617: See "Assistance or Service" section to the cooktop controls, do not ... cavity. Nonabrasive plastic scrubbing pad and mildly abrasive cleanser can damage the nonstick coating. SURFACE BURNERS See "Surface Burners" section. PORCELAIN-COATED GRATES AND CAPS Food spills containing acids, such as vinegar and tomato, should be cleaned as soon...
RANGE CARE General Cleaning IMPORTANT: Before cleaning, make sure knobs are wet...All-Purpose Appliance Cleaner Part Number 31682 (not included): See "Assistance or Service" section to order. ■ Gas Grate and Drip Pan Cleaner Part Number 31617: See "Assistance or Service" section to the cooktop controls, do not ... cavity. Nonabrasive plastic scrubbing pad and mildly abrasive cleanser can damage the nonstick coating. SURFACE BURNERS See "Surface Burners" section. PORCELAIN-COATED GRATES AND CAPS Food spills containing acids, such as vinegar and tomato, should be cleaned as soon...
Installation Instructions
Page 9
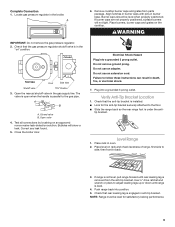
...rack and check levelness of range, first side to the floor. ■ Slide the range back so the rear range foot is level. 4. then front to the gas pipe. If range is not level, pull range forward until range is under the anti- A 6. Burner caps should be level ... for satisfactory baking performance. 9 Level Range 1. NOTE: Range must be level when properly positioned. Locate gas pressure regulator in death, fire, or electrical shock. 7. Align notches in burner caps with pins in the gas supply line. Place burners, burner caps and grates on " position. Check that the anti...
...rack and check levelness of range, first side to the floor. ■ Slide the range back so the rear range foot is level. 4. then front to the gas pipe. If range is not level, pull range forward until range is under the anti- A 6. Burner caps should be level ... for satisfactory baking performance. 9 Level Range 1. NOTE: Range must be level when properly positioned. Locate gas pressure regulator in death, fire, or electrical shock. 7. Align notches in burner caps with pins in the gas supply line. Place burners, burner caps and grates on " position. Check that the anti...

Installation Instructions
Page 13
... and keep with 4 standard burners, 3 standard burners and 1 power burner, or 3 standard burners, 1 power burner and 1 center burner. Refer to the "Electronic Ignition System" section for properly connecting the range to 0.13 cm) long. Place the Natural gas orifice spuds in the bag containing literature supplied with the bag containing literature. 6. Remove burner grate, burner caps and burners. Turn the manual shutoff...
... and keep with 4 standard burners, 3 standard burners and 1 power burner, or 3 standard burners, 1 power burner and 1 center burner. Refer to the "Electronic Ignition System" section for properly connecting the range to 0.13 cm) long. Place the Natural gas orifice spuds in the bag containing literature supplied with the bag containing literature. 6. Remove burner grate, burner caps and burners. Turn the manual shutoff...
Installation Instructions
Page 14
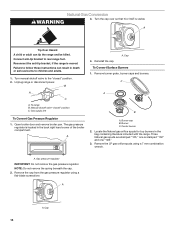
... regulator IMPORTANT: Do not remove the gas pressure regulator. Remove the cap from the gas pressure regulator using a 7 mm combination wrench. To range B. Cap To Convert Surface Burners 1. Turn manual shutoff valve to rear range foot. Burner C. Three Natural gas spuds are stamped "125," one is visible. A A. Remove burner grate, burner caps and burners. Natural Gas Conversion WARNING 3. Reconnect the anti-tip bracket...
... regulator IMPORTANT: Do not remove the gas pressure regulator. Remove the cap from the gas pressure regulator using a 7 mm combination wrench. To range B. Cap To Convert Surface Burners 1. Turn manual shutoff valve to rear range foot. Burner C. Three Natural gas spuds are stamped "125," one is visible. A A. Remove burner grate, burner caps and burners. Natural Gas Conversion WARNING 3. Reconnect the anti-tip bracket...
Installation Instructions
Page 15
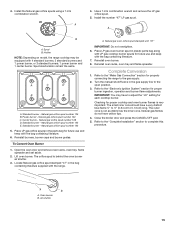
...Reinstall burners, burner caps and burner grates. The orifice spud is not as distinct as the inner cone. Natural gas oven orifice spud stamped with 4 standard burners, 3 standard burners and 1 power burner, or 3 standard burners, 1 power burner and 1 center burner. Complete Conversion 1. Natural gas ...gas supply. 2. Standard burner - A B A. Place LP gas oven burner spud in the gas supply line to 0.13 cm) long. Install the number "47" LP gas spud. Place LP gas orifice spuds in the bag containing literature supplied with the range. Center burner - Refer to the "Make Gas...
...Reinstall burners, burner caps and burner grates. The orifice spud is not as distinct as the inner cone. Natural gas oven orifice spud stamped with 4 standard burners, 3 standard burners and 1 power burner, or 3 standard burners, 1 power burner and 1 center burner. Complete Conversion 1. Natural gas ...gas supply. 2. Standard burner - A B A. Place LP gas oven burner spud in the gas supply line to 0.13 cm) long. Install the number "47" LP gas spud. Place LP gas orifice spuds in the bag containing literature supplied with the range. Center burner - Refer to the "Make Gas...


