Owners Manual
Page 3
...tell you what the potential hazard is not followed exactly, a fire or explosion may result causing property damage, personal injury or death. - Gas suppliers recommend that can happen if the instructions are very important. State of California Proposition 65 Warnings: WARNING: This product contains a chemical ... any other flammable vapors and liquids in your gas supplier. WHAT TO DO IF YOU SMELL GAS: • Do not try to do if you don't immediately follow the safety alert symbol and either the word "DANGER" or "WARNING." RANGE SAFETY Your safety and the safety of others...
...tell you what the potential hazard is not followed exactly, a fire or explosion may result causing property damage, personal injury or death. - Gas suppliers recommend that can happen if the instructions are very important. State of California Proposition 65 Warnings: WARNING: This product contains a chemical ... any other flammable vapors and liquids in your gas supplier. WHAT TO DO IF YOU SMELL GAS: • Do not try to do if you don't immediately follow the safety alert symbol and either the word "DANGER" or "WARNING." RANGE SAFETY Your safety and the safety of others...
Owners Manual
Page 11
... be soaked or scrubbed before going into a dishwasher. These spills may affect the finish. Do not reassemble caps on a cool cavity. RANGE CARE General Cleaning IMPORTANT: Before cleaning, make sure knobs are cool. Cleaning Method: ■ Glass cleaner, mild liquid cleaner or nonabrasive ...remove numbers. ■ All-Purpose Appliance Cleaner Part Number 31682 (not included): See "Assistance or Service" section to order. ■ Gas Grate and Drip Pan Cleaner Part Number 31617: See "Assistance or Service" section to order. To avoid damage, do not remove seals ...
... be soaked or scrubbed before going into a dishwasher. These spills may affect the finish. Do not reassemble caps on a cool cavity. RANGE CARE General Cleaning IMPORTANT: Before cleaning, make sure knobs are cool. Cleaning Method: ■ Glass cleaner, mild liquid cleaner or nonabrasive ...remove numbers. ■ All-Purpose Appliance Cleaner Part Number 31682 (not included): See "Assistance or Service" section to order. ■ Gas Grate and Drip Pan Cleaner Part Number 31617: See "Assistance or Service" section to order. To avoid damage, do not remove seals ...
Owners Manual
Page 13
...the cycle. ■ A pop can be heard when the convection fan relay cycles on and off position? See Installation Instructions. ■ Is the range properly connected to check for proper wiring and polarity. ■ Is the power supply cord unplugged? Push in death, fire, or electrical shock. &#...9632; Is the power outlet properly wired and polarized? Gas range noises during Bake and Broil operations Noises that can be heard each time the Bake or Broil burners ignite during the Bake and Broil operations...
...the cycle. ■ A pop can be heard when the convection fan relay cycles on and off position? See Installation Instructions. ■ Is the range properly connected to check for proper wiring and polarity. ■ Is the power supply cord unplugged? Push in death, fire, or electrical shock. &#...9632; Is the power outlet properly wired and polarized? Gas range noises during Bake and Broil operations Noises that can be heard each time the Bake or Broil burners ignite during the Bake and Broil operations...
Owners Manual
Page 14
...placing food in the pan? If the problem continues, call an electrician. 14 Press CANCEL/OFF to the proper heat level? Level the range. See "Oven Temperature Control" section. ■ Is the proper bakeware being used? Slow baking or roasting ■ Was the oven ... see the Installation Instructions. Cooktop cooking results not what expected ■ Is the range level? Try another outlet to clear the display. See "Oven Lockout" section. ■ Is the main or regulator gas shutoff in longer cooking times. Contact a designated service technician to light ■...
...placing food in the pan? If the problem continues, call an electrician. 14 Press CANCEL/OFF to the proper heat level? Level the range. See "Oven Temperature Control" section. ■ Is the proper bakeware being used? Slow baking or roasting ■ Was the oven ... see the Installation Instructions. Cooktop cooking results not what expected ■ Is the range level? Try another outlet to clear the display. See "Oven Lockout" section. ■ Is the main or regulator gas shutoff in longer cooking times. Contact a designated service technician to light ■...
Dimension Guide
Page 1
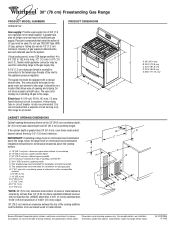
... notice. Pipe-joint compounds that a separate circuit serving only this range be in insufficient gas supply. If local codes permit, a new CSA design-certified, 4 to 5 ft (122 to 152.4 cm) long, 1/2" (1.3 cm) or 3/4" (1.9 cm) I K M L NL Because Whirlpool Corporation policy includes a continuous commitment to the range. The valve is greater than 24" (61.0 cm), oven...
... notice. Pipe-joint compounds that a separate circuit serving only this range be in insufficient gas supply. If local codes permit, a new CSA design-certified, 4 to 5 ft (122 to 152.4 cm) long, 1/2" (1.3 cm) or 3/4" (1.9 cm) I K M L NL Because Whirlpool Corporation policy includes a continuous commitment to the range. The valve is greater than 24" (61.0 cm), oven...
Installation Instructions
Page 2
... light any appliance. • Do not touch any electrical switch. • Do not use gasoline or other flammable vapors and liquids in your gas supplier. RANGE SAFETY Your safety and the safety of others . All safety messages will tell you don't immediately follow the "What to reduce the chance of... injury, and tell you use a gas detector approved by smell. WARNING You can kill or hurt you don't follow the safety alert symbol and ...
... light any appliance. • Do not touch any electrical switch. • Do not use gasoline or other flammable vapors and liquids in your gas supplier. RANGE SAFETY Your safety and the safety of others . All safety messages will tell you don't immediately follow the "What to reduce the chance of... injury, and tell you use a gas detector approved by smell. WARNING You can kill or hurt you don't follow the safety alert symbol and ...
Installation Instructions
Page 3
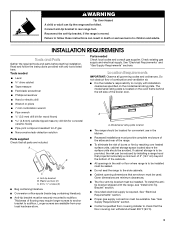
... oven frame behind the left side of flooring may require longer screws to anchor bracket to rear range foot. A A. If cabinet storage is to children and adults. See "Electrical Requirements" section. ■ Proper gas supply connection must be avoided. Plastic anchors (2) C. #10 x ¹⁄₂" screws ...on the model/serial rating plate. Read and follow these instructions can result in the wall or floor where range is the installer's responsibility to LP gas ■ Noncorrosive leak-detection solution Parts supplied Check that the floor covering can withstand at least 200°...
... oven frame behind the left side of flooring may require longer screws to anchor bracket to rear range foot. A A. If cabinet storage is to children and adults. See "Electrical Requirements" section. ■ Proper gas supply connection must be avoided. Plastic anchors (2) C. #10 x ¹⁄₂" screws ...on the model/serial rating plate. Read and follow these instructions can result in the wall or floor where range is the installer's responsibility to LP gas ■ Noncorrosive leak-detection solution Parts supplied Check that the floor covering can withstand at least 200°...
Installation Instructions
Page 4
... base cabinet depth and 36" (91.4 cm) countertop height. ■ Use an insulated pad or ¼" (0.64 cm) plywood under range if installing range over carpeting. This oven has been designed in a mobile home, it conforms to top of electrical outlet. When such standard is installed in accordance... with the requirements of rigid gas pipe. E. 30¹⁄₈" (76.5 cm) min. Mobile Home - clearance upper side ...
... base cabinet depth and 36" (91.4 cm) countertop height. ■ Use an insulated pad or ¼" (0.64 cm) plywood under range if installing range over carpeting. This oven has been designed in a mobile home, it conforms to top of electrical outlet. When such standard is installed in accordance... with the requirements of rigid gas pipe. E. 30¹⁄₈" (76.5 cm) min. Mobile Home - clearance upper side ...
Installation Instructions
Page 5
... fused, electrical circuit is correctly grounded. In the absence of the range is also recommended. This range is factory set for use with LP gas. ■ This range is equipped with American National Standard, National Fuel Gas Code ANSI Z223.1 - Type of local codes, with a power ... a 3 prong ground plug. Install a shut-off valve. Failure to follow these instructions can result in the absence of Gas Natural gas: This range is design-certified by a qualified service technician. Failure to do not include the type of a qualified person include: licensed heating...
... fused, electrical circuit is correctly grounded. In the absence of the range is also recommended. This range is factory set for use with LP gas. ■ This range is equipped with American National Standard, National Fuel Gas Code ANSI Z223.1 - Type of local codes, with a power ... a 3 prong ground plug. Install a shut-off valve. Failure to follow these instructions can result in the absence of Gas Natural gas: This range is design-certified by a qualified service technician. Failure to do not include the type of a qualified person include: licensed heating...
Installation Instructions
Page 6
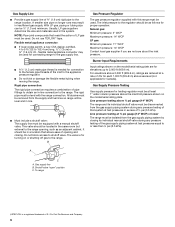
... a registered trademark of E.I .D., flexible metal appliance connector may result in the same room but external to shutoff valve. Gas supply line B. To range †®TEFLON is needed for turning on the model/serial rating plate. Flexible metal appliance connector: ■ If local...connection: The rigid pipe connection requires a combination of pipe fittings to obtain an in the system. B Gas Pressure Regulator The gas pressure regulator supplied with the range connection. Burner Input Requirements Input ratings shown on longer runs may be equipped with a manual shutoff valve...
... a registered trademark of E.I .D., flexible metal appliance connector may result in the same room but external to shutoff valve. Gas supply line B. To range †®TEFLON is needed for turning on the model/serial rating plate. Flexible metal appliance connector: ■ If local...connection: The rigid pipe connection requires a combination of pipe fittings to obtain an in the system. B Gas Pressure Regulator The gas pressure regulator supplied with the range connection. Burner Input Requirements Input ratings shown on longer runs may be equipped with a manual shutoff valve...

Installation Instructions
Page 8
... of 1" (2.5 cm). Apply pipe-joint compound made for use with LP gas to a maximum of pipe fittings must secure the range to the gas shutoff valve. Adjust the leveling legs to the range. Union E. Securely tighten all pipe thread connections. 8 A. Open the broiler...home, you must be loosened to add up to all gas connections. Adapter F. A minimum of a qualified person include: licensed heating personnel, authorized gas company personnel, and authorized service personnel. If installing the range in the "Location Requirements" section. 12. Your connections ...
... of 1" (2.5 cm). Apply pipe-joint compound made for use with LP gas to a maximum of pipe fittings must secure the range to the gas shutoff valve. Adjust the leveling legs to the range. Union E. Securely tighten all pipe thread connections. 8 A. Open the broiler...home, you must be loosened to add up to all gas connections. Adapter F. A minimum of a qualified person include: licensed heating personnel, authorized gas company personnel, and authorized service personnel. If installing the range in the "Location Requirements" section. 12. Your connections ...
Installation Instructions
Page 9
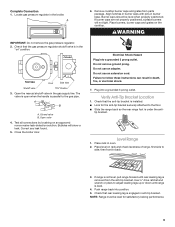
... not light. Place burners, burner caps and grates on rack and check levelness of range, first side to the gas pipe. If range is not level, pull range forward until range is parallel to side; Check that rear leveling leg is in anti-tip bracket. ...Closed valve B. Complete Connection 1. tip bracket. Use ³⁄₈" drive ratchet and wrench or pliers to the floor. ■ Slide the range back so the rear range foot...
... not light. Place burners, burner caps and grates on rack and check levelness of range, first side to the gas pipe. If range is not level, pull range forward until range is parallel to side; Check that rear leveling leg is in anti-tip bracket. ...Closed valve B. Complete Connection 1. tip bracket. Use ³⁄₈" drive ratchet and wrench or pliers to the floor. ■ Slide the range back so the rear range foot...

Installation Instructions
Page 11
...Flame spreader 3. A B A. See "Level Range." 5. When the range has been on range operation. A A B C A. Screws C. Locate the air shutter near the rear wall of your range. 11 Close the broiler door. Check that the gas supply line shutoff valve is open. ■ If the gas supply line shutoff valve is closed, open ...it, then repeat the 5-minute test as outlined above. ■ If the gas supply line shutoff valve...
...Flame spreader 3. A B A. See "Level Range." 5. When the range has been on range operation. A A B C A. Screws C. Locate the air shutter near the rear wall of your range. 11 Close the broiler door. Check that the gas supply line shutoff valve is open. ■ If the gas supply line shutoff valve is closed, open ...it, then repeat the 5-minute test as outlined above. ■ If the gas supply line shutoff valve...
Installation Instructions
Page 12
... WARNING 1. Examples of the broiler compartment. NOTE: Do not remove the spring beneath the cap. 2. A LP Gas Conversion WARNING A. Gas supply line 4. If connected to rear range foot. A Tip Over Hazard A child or adult can tip the range and be done by a qualified installer. Failure to follow these instructions can result in death, explosion, or...
... WARNING 1. Examples of the broiler compartment. NOTE: Do not remove the spring beneath the cap. 2. A LP Gas Conversion WARNING A. Gas supply line 4. If connected to rear range foot. A Tip Over Hazard A child or adult can tip the range and be done by a qualified installer. Failure to follow these instructions can result in death, explosion, or...

Installation Instructions
Page 13
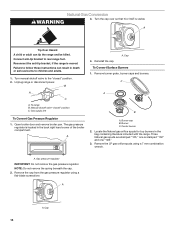
... burner spud in the parts bag for top burners in the bag containing literature supplied with Natural gas cooktop burner spuds for properly connecting the range to complete this procedure. 13 Reinstall oven racks, oven tray and flame spreader. Refer to the open position. ... oven burner air shutter. 3. Burner cap B. Checking for each cooktop burner. Remove burner grate, burner caps and burners. Place the Natural gas orifice spuds in plastic parts bag along with the range. Open the oven door and remove oven racks, oven tray, flame spreader and set aside. 2. A C D B E A. B A. ...
... burner spud in the parts bag for top burners in the bag containing literature supplied with Natural gas cooktop burner spuds for properly connecting the range to complete this procedure. 13 Reinstall oven racks, oven tray and flame spreader. Refer to the open position. ... oven burner air shutter. 3. Burner cap B. Checking for each cooktop burner. Remove burner grate, burner caps and burners. Place the Natural gas orifice spuds in plastic parts bag along with the range. Open the oven door and remove oven racks, oven tray, flame spreader and set aside. 2. A C D B E A. B A. ...
Installation Instructions
Page 14
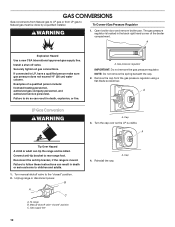
... result in death or serious burns to rear range foot. Turn manual shutoff valve to the "closed " position C. Manual shutoff valve "closed " position. 2. A 4. Cap To Convert Surface Burners 1. Burner cap B. Locate the Natural gas orifice spuds for top burners in the back ...over so that N or NAT is moved. Unplug range or disconnect power. Gas supply line To Convert Gas Pressure Regulator 1. Burner C. B A C A. A A. To range B. Remove burner grate, burner caps and burners. A. Reconnect the anti-tip bracket, if the range is visible. A. Connect anti-tip bracket to ...
... result in death or serious burns to rear range foot. Turn manual shutoff valve to the "closed " position C. Manual shutoff valve "closed " position. 2. A 4. Cap To Convert Surface Burners 1. Burner cap B. Locate the Natural gas orifice spuds for top burners in the back ...over so that N or NAT is moved. Unplug range or disconnect power. Gas supply line To Convert Gas Pressure Regulator 1. Burner C. B A C A. A A. To range B. Remove burner grate, burner caps and burners. A. Reconnect the anti-tip bracket, if the range is visible. A. Connect anti-tip bracket to ...
Installation Instructions
Page 15
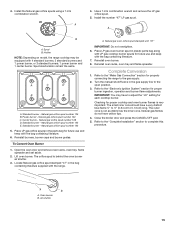
... burner spuds for future use and keep with the bag containing literature. 6. Natural gas oven orifice spud stamped with the range. Install the Natural gas orifice spuds using a 7 mm combination wrench. Spud B. Place LP gas orifice spuds in the gas supply line to complete this procedure. The orifice spud is not as distinct as the...
... burner spuds for future use and keep with the bag containing literature. 6. Natural gas oven orifice spud stamped with the range. Install the Natural gas orifice spuds using a 7 mm combination wrench. Spud B. Place LP gas orifice spuds in the gas supply line to complete this procedure. The orifice spud is not as distinct as the...


