Owners Manual
Page 5
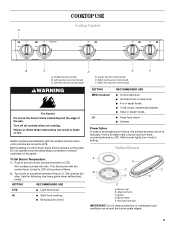
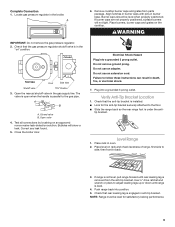
...food warm. ■ Simmer. Burner cap B. Gas tube opening IMPORTANT: Do not obstruct the flow of the pan. Left front burner control knob D. Electric igniters automatically light the surface burners when control knobs are turned to LITE. Left rear burner control knob C. Turn off ...LITE will produce a flame. 2. Right front burner control knob WARNING Fire Hazard Do not let the burner flame extend beyond the edge of combustion and ventilation air around the burner grate edges. 5 To Set Burner Temperature: 1. Only the burner with the control knob turned to a boil...
...food warm. ■ Simmer. Burner cap B. Gas tube opening IMPORTANT: Do not obstruct the flow of the pan. Left front burner control knob D. Electric igniters automatically light the surface burners when control knobs are turned to LITE. Left rear burner control knob C. Turn off ...LITE will produce a flame. 2. Right front burner control knob WARNING Fire Hazard Do not let the burner flame extend beyond the edge of combustion and ventilation air around the burner grate edges. 5 To Set Burner Temperature: 1. Only the burner with the control knob turned to a boil...
Owners Manual
Page 6
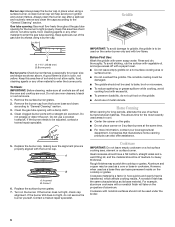
... of soil and do not service the burner yourself. Correct 6. Replace the surface burner grates. 7. Ideal cookware should have a flat bottom, straight sides and a well-fitting lid, and the material should not be of the gas tube by always using a surface burner. Gas tube opening: Gas must flow freely throughout the gas tube opening for long periods, alternate...
... of soil and do not service the burner yourself. Correct 6. Replace the surface burner grates. 7. Ideal cookware should have a flat bottom, straight sides and a well-fitting lid, and the material should not be of the gas tube by always using a surface burner. Gas tube opening: Gas must flow freely throughout the gas tube opening for long periods, alternate...
Owners Manual
Page 11
... spills may remove numbers. ■ All-Purpose Appliance Cleaner Part Number 31682 (not included): See "Assistance or Service" section to order. ■ Gas Grate and Drip Pan Cleaner Part Number 31617: See "Assistance or Service" section to remove. OVEN DOOR EXTERIOR Cleaning Method: ■ Glass cleaner and ... "Surface Burners" section. On some models) Oil or food residue should be cleaned as soon as the cooktop and the griddle are wet. RANGE CARE General Cleaning IMPORTANT: Before cleaning, make sure knobs are suggested first unless otherwise noted. Do not allow grease to...
... spills may remove numbers. ■ All-Purpose Appliance Cleaner Part Number 31682 (not included): See "Assistance or Service" section to order. ■ Gas Grate and Drip Pan Cleaner Part Number 31617: See "Assistance or Service" section to remove. OVEN DOOR EXTERIOR Cleaning Method: ■ Glass cleaner and ... "Surface Burners" section. On some models) Oil or food residue should be cleaned as soon as the cooktop and the griddle are wet. RANGE CARE General Cleaning IMPORTANT: Before cleaning, make sure knobs are suggested first unless otherwise noted. Do not allow grease to...
Installation Instructions
Page 9
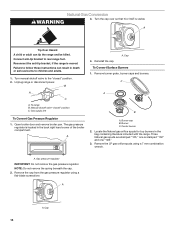
... then front to side; NOTE: Range must be level when properly positioned. Locate gas pressure regulator in the gas supply line. Check that the gas pressure regulator shutoff valve is parallel to the floor. ■ Slide the range back so the rear range foot is level. 4. The valve is... result in anti-tip bracket. Remove cooktop burner caps and grates from the anti-tip bracket. Burner caps should be level for the anti-tip bracket securely attached to the gas pipe. Electrical Shock Hazard Plug into position. 5. Push range back into a grounded 3 prong outlet. Bubbles...
... then front to side; NOTE: Range must be level when properly positioned. Locate gas pressure regulator in the gas supply line. Check that the gas pressure regulator shutoff valve is parallel to the floor. ■ Slide the range back so the rear range foot is level. 4. The valve is... result in anti-tip bracket. Remove cooktop burner caps and grates from the anti-tip bracket. Burner caps should be level for the anti-tip bracket securely attached to the gas pipe. Electrical Shock Hazard Plug into position. 5. Push range back into a grounded 3 prong outlet. Bubbles...

Installation Instructions
Page 13
... a 7 mm combination wrench. 4. Power burner - Standard burner - LP oven orifice spud stamped with the range. Refer to the "Complete Installation" section to the open position. 3. Burner cap B. Center burner 2. A A B A. Standard burner - Refer to 0.13 cm) long. Remove burner grate, burner caps and burners. A B A. Install the number "56" LP gas spud. Standard burner - LP gas orifice spud number 78 B. LP gas orifice spud number 78...
... a 7 mm combination wrench. 4. Power burner - Standard burner - LP oven orifice spud stamped with the range. Refer to the "Complete Installation" section to the open position. 3. Burner cap B. Center burner 2. A A B A. Standard burner - Refer to 0.13 cm) long. Remove burner grate, burner caps and burners. A B A. Install the number "56" LP gas spud. Standard burner - LP gas orifice spud number 78 B. LP gas orifice spud number 78...
Installation Instructions
Page 14
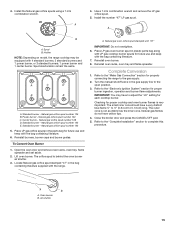
...burner grate, burner caps and burners. Locate the Natural gas orifice spuds for top burners in death or serious burns to follow these instructions can tip the range and be killed. A. Gas pressure regulator IMPORTANT: Do not remove the gas pressure regulator. Reconnect the anti-tip bracket, if the range... adult can result in the bag containing literature included with the range. Failure to children and adults. 1. Center burner 2. A A. Natural Gas Conversion WARNING 3. Turn manual shutoff valve to rear range foot. The gas pressure regulator is visible.
...burner grate, burner caps and burners. Locate the Natural gas orifice spuds for top burners in death or serious burns to follow these instructions can tip the range and be killed. A. Gas pressure regulator IMPORTANT: Do not remove the gas pressure regulator. Reconnect the anti-tip bracket, if the range... adult can result in the bag containing literature included with the range. Failure to children and adults. 1. Center burner 2. A A. Natural Gas Conversion WARNING 3. Turn manual shutoff valve to rear range foot. The gas pressure regulator is visible.
Installation Instructions
Page 15
.../OFF pad. 5. Air shutter 15 A B A. Spud size/location remain the same. Power burner - Natural gas orifice spud number 132 C. Standard burner - Standard burner - Place LP gas orifice spuds in the bag containing literature supplied with "47" IMPORTANT: Do not overtighten. 6. Reinstall burners, burner caps and burner grates. Locate Natural gas orifice spud stamped "47" in the parts bag for proper...
.../OFF pad. 5. Air shutter 15 A B A. Spud size/location remain the same. Power burner - Natural gas orifice spud number 132 C. Standard burner - Standard burner - Place LP gas orifice spuds in the bag containing literature supplied with "47" IMPORTANT: Do not overtighten. 6. Reinstall burners, burner caps and burner grates. Locate Natural gas orifice spud stamped "47" in the parts bag for proper...


