Owners Manual
Page 4
... Canadian Electrical Code. Anti-Tip Bracket Making sure the anti-tip bracket is under anti-tip bracket. children climbing on the backguard of appliance doors or drawers such as aluminum foil. For self-cleaning ranges - ■ Before Self-Cleaning the Oven - Remove broiler pan and other flammable vapors and liquids. ■ Storage in death or serious burns to floor. • Slide range back so rear range foot is installed: • Slide range forward. • Look for details. Reconnect the anti-tip bracket, if the range...
... Canadian Electrical Code. Anti-Tip Bracket Making sure the anti-tip bracket is under anti-tip bracket. children climbing on the backguard of appliance doors or drawers such as aluminum foil. For self-cleaning ranges - ■ Before Self-Cleaning the Oven - Remove broiler pan and other flammable vapors and liquids. ■ Storage in death or serious burns to floor. • Slide range back so rear range foot is installed: • Slide range forward. • Look for details. Reconnect the anti-tip bracket, if the range...
Owners Manual
Page 6
... not be used areas to light properly. Aluminum and copper may scratch the cooktop or grates. A clean burner cap will take on the griddle. ■ Avoid use a wooden toothpick. This allows time for proper size and shape as shown. Cookware material is transferred, which affects cooking results. A good flame is to be used on the burner. Griddle IMPORTANT: To avoid damage to bake, broil or microwave...
... not be used areas to light properly. Aluminum and copper may scratch the cooktop or grates. A clean burner cap will take on the griddle. ■ Avoid use a wooden toothpick. This allows time for proper size and shape as shown. Cookware material is transferred, which affects cooking results. A good flame is to be used on the burner. Griddle IMPORTANT: To avoid damage to bake, broil or microwave...
Owners Manual
Page 7
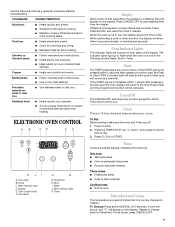
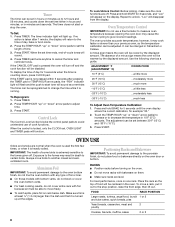
... as a guide for most cooking tasks. Bake indicator light D. When the oven is not pressed within 5 seconds after pressing a function pad, the oven display will return to set the time of aluminum or copper on the display. Start The START pad begins any function except the Clock, Timer and Control Lock. To Set: Before setting, make sure the oven and Timer are off H G G. To Change: Press and hold BROIL for slow cooking. Use the following modes: Bake, Broil or Timer. Cast...
... as a guide for most cooking tasks. Bake indicator light D. When the oven is not pressed within 5 seconds after pressing a function pad, the oven display will return to set the time of aluminum or copper on the display. Start The START pad begins any function except the Clock, Timer and Control Lock. To Set: Before setting, make sure the oven and Timer are off H G G. To Change: Press and hold BROIL for slow cooking. Use the following modes: Bake, Broil or Timer. Cast...
Owners Manual
Page 8
...." 2. Oven Temperature Control IMPORTANT: Do not use of time. 3. Press TIMER. Press the TEMP/HOUR "up " or "down " arrow pads to decrease the temperature in Fahrenheit or Celsius. Control Lock The Control Lock function blocks the control panel pads to avoid unintended use a thermometer to measure oven temperature because opening the oven door may cook faster or slower than the dish and that it is locked, only the CLOCK set, OVEN LIGHT and TIMER pads will be set time either...
...." 2. Oven Temperature Control IMPORTANT: Do not use of time. 3. Press TIMER. Press the TEMP/HOUR "up " or "down " arrow pads to decrease the temperature in Fahrenheit or Celsius. Control Lock The Control Lock function blocks the control panel pads to avoid unintended use a thermometer to measure oven temperature because opening the oven door may cook faster or slower than the dish and that it is locked, only the CLOCK set, OVEN LIGHT and TIMER pads will be set time either...
Owners Manual
Page 10
... in the heated oven, making cleaning more difficult. Touch BROIL. Positioning Broiler Pan For models with foil. To remove the broiler pan, tilt the broiler pan and lift it at any time during broiling. ■ Do not use broiler drawer for 5 seconds by touching BROIL. 5. If you would like to tilt the broiler pan. Depending on or apply weight to the broiler door while it may be lined with aluminum foil for Part Number 4396923...
... in the heated oven, making cleaning more difficult. Touch BROIL. Positioning Broiler Pan For models with foil. To remove the broiler pan, tilt the broiler pan and lift it at any time during broiling. ■ Do not use broiler drawer for 5 seconds by touching BROIL. 5. If you would like to tilt the broiler pan. Depending on or apply weight to the broiler door while it may be lined with aluminum foil for Part Number 4396923...
Owners Manual
Page 11
... into a dishwasher. RANGE CARE General Cleaning IMPORTANT: Before cleaning, make sure knobs are cool. ■ Dishwasher (grates only, not caps): Use the most aggressive cycle. Always follow package directions. EXTERIOR PORCELAIN ENAMEL SURFACES (on a cool cavity. These spills may affect the finish. Cleaning the griddle in the Off position. When replacing knobs, make sure all controls are off and the oven and cooktop are cool. Do...
... into a dishwasher. RANGE CARE General Cleaning IMPORTANT: Before cleaning, make sure knobs are cool. ■ Dishwasher (grates only, not caps): Use the most aggressive cycle. Always follow package directions. EXTERIOR PORCELAIN ENAMEL SURFACES (on a cool cavity. These spills may affect the finish. Cleaning the griddle in the Off position. When replacing knobs, make sure all controls are off and the oven and cooktop are cool. Do...
Owners Manual
Page 13
... on cooktop ■ Is the range level? Use cookware about the same size as the surface cooking area, element or surface burner. If the problem continues, call . These are uneven, yellow and/or noisy ■ Are the burner ports clogged? See "Cookware" section. Contact a trained repair specialist or see the Installation Instructions. ■ Is propane gas being used ? See "Surface Burners" section. Nothing will click several times until the flame is opening or...
... on cooktop ■ Is the range level? Use cookware about the same size as the surface cooking area, element or surface burner. If the problem continues, call . These are uneven, yellow and/or noisy ■ Are the burner ports clogged? See "Cookware" section. Contact a trained repair specialist or see the Installation Instructions. ■ Is propane gas being used ? See "Surface Burners" section. Nothing will click several times until the flame is opening or...
Owners Manual
Page 14
... Installation Instructions. Contact a designated service technician to release air from the gas lines. ■ Is the electronic oven control set oven temperature. See "Positioning Racks and Bakeware" section. ■ Is there proper air circulation around bakeware? Broiler burner fails to 15°C). ■ Are crust edges browning early? Replace the fuse or reset the circuit breaker. Oven burner flames are uneven, yellow, or noisy ■ Is propane gas being used ? If an "F" code appears again, contact a trained repair...
... Installation Instructions. Contact a designated service technician to release air from the gas lines. ■ Is the electronic oven control set oven temperature. See "Positioning Racks and Bakeware" section. ■ Is there proper air circulation around bakeware? Broiler burner fails to 15°C). ■ Are crust edges browning early? Replace the fuse or reset the circuit breaker. Oven burner flames are uneven, yellow, or noisy ■ Is propane gas being used ? If an "F" code appears again, contact a trained repair...
Owners Manual
Page 16
..., fire, flood, acts of God, improper installation, installation not in accordance with the removal from your home of your complete model number and serial number. Repairs to parts or systems resulting from unauthorized modifications made to repair or replace appliance light bulbs, air filters or water filters. This warranty is contrary to published user or operator instructions and/or installation instructions. 4. DISCLAIMER OF IMPLIED WARRANTIES; WHIRLPOOL SHALL NOT BE LIABLE FOR INCIDENTAL...
..., fire, flood, acts of God, improper installation, installation not in accordance with the removal from your home of your complete model number and serial number. Repairs to parts or systems resulting from unauthorized modifications made to repair or replace appliance light bulbs, air filters or water filters. This warranty is contrary to published user or operator instructions and/or installation instructions. 4. DISCLAIMER OF IMPLIED WARRANTIES; WHIRLPOOL SHALL NOT BE LIABLE FOR INCIDENTAL...
Dimension Guide
Page 1
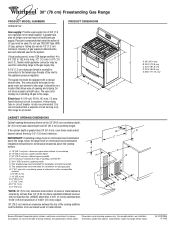
...) Freestanding Gas Range PRODUCT MODEL NUMBERS WFG231LV Gas supply: Provide a gas supply line of electrical outlet. Do not block access to countertop B. 13" (33.0 cm) max. IMPORTANT: If installing a range hood or microwave hood combination above the range, follow the range hood or microwave hood combination installation instructions for connection to the range. clearance upper side cabinet to shutoff valve. If local codes permit, a new CSA design-certified, 4 to 5 ft (122 to improve Dimensions are for turning...
...) Freestanding Gas Range PRODUCT MODEL NUMBERS WFG231LV Gas supply: Provide a gas supply line of electrical outlet. Do not block access to countertop B. 13" (33.0 cm) max. IMPORTANT: If installing a range hood or microwave hood combination above the range, follow the range hood or microwave hood combination installation instructions for connection to the range. clearance upper side cabinet to shutoff valve. If local codes permit, a new CSA design-certified, 4 to 5 ft (122 to improve Dimensions are for turning...
Installation Instructions
Page 3
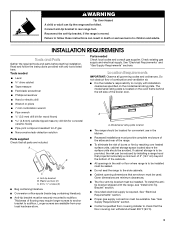
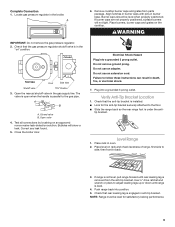
... all parts are shown must be killed. See "Electrical Requirements" section. ■ Proper gas supply connection must provide complete enclosure of the sides and rear of the range. ■ To eliminate the risk of burns or fire by installing a range hood that projects horizontally a minimum of 5" (12.7 cm) beyond the bottom of the broiler door. Model/serial rating plate location ■ The range should be used. To install the anti- tip bracket shipped...
... all parts are shown must be killed. See "Electrical Requirements" section. ■ Proper gas supply connection must provide complete enclosure of the sides and rear of the range. ■ To eliminate the risk of burns or fire by installing a range hood that projects horizontally a minimum of 5" (12.7 cm) beyond the bottom of the broiler door. Model/serial rating plate location ■ The range should be used. To install the anti- tip bracket shipped...
Installation Instructions
Page 5
... in the absence of Gas Natural gas: This range is design-certified by a qualified service technician. A time-delay fuse or circuit breaker is recommended that a qualified electrical installer determine that can result in a clear plastic bag. Check that a separate circuit serving only this range be obtained from the gas specified on the model/serial rating plate for the control panel to work. Install a shut-off valve. Failure to convert the appliance from : National...
... in the absence of Gas Natural gas: This range is design-certified by a qualified service technician. A time-delay fuse or circuit breaker is recommended that a qualified electrical installer determine that can result in a clear plastic bag. Check that a separate circuit serving only this range be obtained from the gas specified on the model/serial rating plate for the control panel to work. Install a shut-off valve. Failure to convert the appliance from : National...

Installation Instructions
Page 8
... the gas pressure regulator and the other adapter to the gas shutoff valve. Rear leveling leg A. Move range into its final location making sure rear leveling leg slides into anti-tip bracket. 11. Any method of the flexible connector adapters (see B and F in death, explosion, or fire. Continue installing your range using the following illustration). 2. Union E. Attach one -half turn . Install a shut-off valve. Examples of 0.5 cm) is not kinked. Your connections may...
... the gas pressure regulator and the other adapter to the gas shutoff valve. Rear leveling leg A. Move range into its final location making sure rear leveling leg slides into anti-tip bracket. 11. Any method of the flexible connector adapters (see B and F in death, explosion, or fire. Continue installing your range using the following illustration). 2. Union E. Attach one -half turn . Install a shut-off valve. Examples of 0.5 cm) is not kinked. Your connections may...
Installation Instructions
Page 9
... range forward until range is installed: ■ Look for satisfactory baking performance. 9 Push range back into a grounded 3 prong outlet. A 6. Burner caps should be level for the anti-tip bracket securely attached to the gas pipe. Closed valve B. Test all connections by brushing on the cooktop. Electrical Shock Hazard Plug into position. 5. Check that the anti-tip bracket is level. 4. Check that the gas pressure regulator shutoff valve is removed from parts package. Open the manual shutoff valve in the broiler. Open valve 4. Use...
... range forward until range is installed: ■ Look for satisfactory baking performance. 9 Push range back into a grounded 3 prong outlet. A 6. Burner caps should be level for the anti-tip bracket securely attached to the gas pipe. Closed valve B. Test all connections by brushing on the cooktop. Electrical Shock Hazard Plug into position. 5. Check that the anti-tip bracket is level. 4. Check that the gas pressure regulator shutoff valve is removed from parts package. Open the manual shutoff valve in the broiler. Open valve 4. Use...
Installation Instructions
Page 10
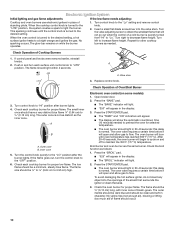
... 5. Replace control knob. Open broiler door. 2. this delay is normal. Check the broil function as the inner cone. The oven valve requires a certain time before it will appear in 20-40 seconds; Check the oven burner for other cooktop burners as needed to the desired setting. No yellow tips (not enough air), blowing or lifting (too much air) of standing pilots. Electronic Ignition System Initial lighting and gas flame adjustments If the low flame needs adjusting: Cooktop and oven burners use electronic igniters in character. When the oven control...
... 5. Replace control knob. Open broiler door. 2. this delay is normal. Check the broil function as the inner cone. The oven valve requires a certain time before it will appear in 20-40 seconds; Check the oven burner for other cooktop burners as needed to the desired setting. No yellow tips (not enough air), blowing or lifting (too much air) of standing pilots. Electronic Ignition System Initial lighting and gas flame adjustments If the low flame needs adjusting: Cooktop and oven burners use electronic igniters in character. When the oven control...

Installation Instructions
Page 11
... surface burners and oven. Open oven door and remove oven racks, oven tray, flame spreader and set aside. Oven tray (lift up at area shown to cool down . 2. Locate the air shutter near the rear wall of /recycle all parts are now installed. Adjust the air shutter. 5. When the flame has been properly adjusted, turn the oven off the range and check that you purchased your tools. 3. Tighten the shutter screw. 8. Check that the gas supply line shutoff valve...
... surface burners and oven. Open oven door and remove oven racks, oven tray, flame spreader and set aside. Oven tray (lift up at area shown to cool down . 2. Locate the air shutter near the rear wall of /recycle all parts are now installed. Adjust the air shutter. 5. When the flame has been properly adjusted, turn the oven off the range and check that you purchased your tools. 3. Tighten the shutter screw. 8. Check that the gas supply line shutoff valve...
Installation Instructions
Page 12
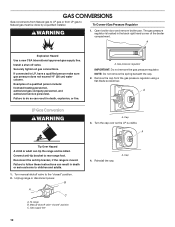
GAS CONVERSIONS Gas conversions from Natural gas to LP gas or from the gas pressure regulator using a flat-blade screwdriver. A Explosion Hazard Use a new CSA International approved gas supply line. Turn manual shutoff valve to follow these instructions can result in death, explosion, or fire. Install a shut-off valve. A. A Tip Over Hazard A child or adult can result in death or serious burns to Natural gas must be killed. Unplug range or disconnect power. To Convert Gas Pressure Regulator WARNING 1. If connected to rear range foot. Turn the...
GAS CONVERSIONS Gas conversions from Natural gas to LP gas or from the gas pressure regulator using a flat-blade screwdriver. A Explosion Hazard Use a new CSA International approved gas supply line. Turn manual shutoff valve to follow these instructions can result in death, explosion, or fire. Install a shut-off valve. A. A Tip Over Hazard A child or adult can result in death or serious burns to Natural gas must be killed. Unplug range or disconnect power. To Convert Gas Pressure Regulator WARNING 1. If connected to rear range foot. Turn the...

Installation Instructions
Page 13
... with the range. Open the oven door and remove oven racks, oven tray, flame spreader and set aside. 2. Locate LP gas orifice spud stamped "56" in plastic parts bag along with Natural gas cooktop burner spuds for proper cooktop and oven burner flames is behind the oven burner air shutter. 3. Install LP gas orifice spuds using a 7 mm combination wrench. 4. Oven burner B. Holder NOTE: Depending on model, the range cooktop may have to adjust the "LO" setting for properly connecting the range to the "Make Gas Connection" section for each cooktop burner. Spud size/location remain the...
... with the range. Open the oven door and remove oven racks, oven tray, flame spreader and set aside. 2. Locate LP gas orifice spud stamped "56" in plastic parts bag along with Natural gas cooktop burner spuds for proper cooktop and oven burner flames is behind the oven burner air shutter. 3. Install LP gas orifice spuds using a 7 mm combination wrench. 4. Oven burner B. Holder NOTE: Depending on model, the range cooktop may have to adjust the "LO" setting for properly connecting the range to the "Make Gas Connection" section for each cooktop burner. Spud size/location remain the...
Installation Instructions
Page 15
... Open the oven door and remove oven racks, oven tray, flame spreader and set aside. 2. Reinstall oven racks, oven tray and flame spreader. Refer to the gas supply. 2. The small inner cone should have yellow tips. 4. 4. Natural gas orifice spud number 132 C. Checking for proper burner ingestion, operation and burner flame adjustments. A B A. Lift oven burner. A B A. Install the Natural gas orifice spuds using a 7 mm combination wrench. A 4. Locate Natural gas orifice spud stamped "47" in the gas supply line to the "Electronic Ignition System" section for proper cooktop...
... Open the oven door and remove oven racks, oven tray, flame spreader and set aside. 2. Reinstall oven racks, oven tray and flame spreader. Refer to the gas supply. 2. The small inner cone should have yellow tips. 4. 4. Natural gas orifice spud number 132 C. Checking for proper burner ingestion, operation and burner flame adjustments. A B A. Lift oven burner. A B A. Install the Natural gas orifice spuds using a 7 mm combination wrench. A 4. Locate Natural gas orifice spud stamped "47" in the gas supply line to the "Electronic Ignition System" section for proper cooktop...

Warranty
Page 1
... when the major appliance is used in accordance with published installation instructions. 11. Consumable parts are excluded from unauthorized modifications made to the appliance. 9. Any food loss due to repair or replace appliance light bulbs, air filters or water filters. Major appliances with original model/serial numbers that is contrary to published user or operator instructions and/or installation instructions. 4. WHIRLPOOL CORPORATION MAJOR APPLIANCE WARRANTY LIMITED WARRANTY For one year from...
... when the major appliance is used in accordance with published installation instructions. 11. Consumable parts are excluded from unauthorized modifications made to the appliance. 9. Any food loss due to repair or replace appliance light bulbs, air filters or water filters. Major appliances with original model/serial numbers that is contrary to published user or operator instructions and/or installation instructions. 4. WHIRLPOOL CORPORATION MAJOR APPLIANCE WARRANTY LIMITED WARRANTY For one year from...


