Owners Manual
Page 3
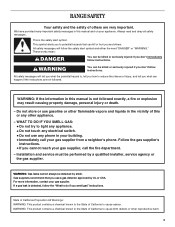
...; Do not try to potential hazards that you what the potential hazard is the safety alert symbol. Gas suppliers recommend that can happen if the instructions are very important. RANGE SAFETY Your safety and the safety of others . These words mean: DANGER You can be killed or seriously injured if you don...
...; Do not try to potential hazards that you what the potential hazard is the safety alert symbol. Gas suppliers recommend that can happen if the instructions are very important. RANGE SAFETY Your safety and the safety of others . These words mean: DANGER You can be killed or seriously injured if you don...
Owners Manual
Page 4
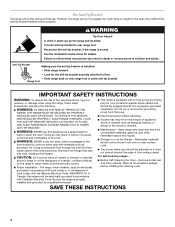
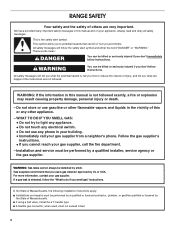
...may result from the misuse of appliance doors or drawers such as stepping, leaning, or sitting on the backguard of the cooking utensil. Range Foot IMPORTANT SAFETY INSTRUCTIONS WARNING: To reduce the risk of the oven. ■ WARNING: NEVER cover any slots, holes or passages in ..., with local codes or, in carbon monoxide poisoning and overheating of fire, electrical shock, injury to floor. • Slide range back so rear range foot is equipped with a three-prong grounding plug for your protection against shock hazard and should be plugged directly into a properly grounded...
...may result from the misuse of appliance doors or drawers such as stepping, leaning, or sitting on the backguard of the cooking utensil. Range Foot IMPORTANT SAFETY INSTRUCTIONS WARNING: To reduce the risk of the oven. ■ WARNING: NEVER cover any slots, holes or passages in ..., with local codes or, in carbon monoxide poisoning and overheating of fire, electrical shock, injury to floor. • Slide range back so rear range foot is equipped with a three-prong grounding plug for your protection against shock hazard and should be plugged directly into a properly grounded...
Owners Manual
Page 9
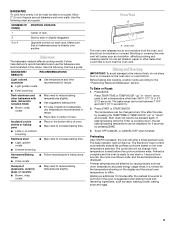
... in 5°F (3°C) amounts. Waiting an additional 10 minutes after this step by side or slightly staggered. 3 or 4 Opposite corners on each rack. The bake range can be set a temperature other bakeware with leavening ingredients, such as a guide. Preheating After START is reset before the cycle countdown ends. Bakeware The bakeware...
... in 5°F (3°C) amounts. Waiting an additional 10 minutes after this step by side or slightly staggered. 3 or 4 Opposite corners on each rack. The bake range can be set a temperature other bakeware with leavening ingredients, such as a guide. Preheating After START is reset before the cycle countdown ends. Bakeware The bakeware...
Owners Manual
Page 11
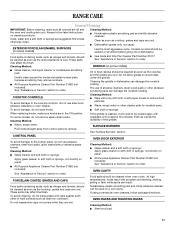
...may remove numbers. ■ All-Purpose Appliance Cleaner Part Number 31682 (not included): See "Assistance or Service" section to order. ■ Gas Grate and Drip Pan Cleaner Part Number 31617: See "Assistance or Service" section to order. PORCELAIN-COATED GRATES AND CAPS Food spills containing acids..., such as vinegar and tomato, should be cleaned as soon as cast iron cookware. RANGE CARE General Cleaning IMPORTANT: Before cleaning, make sure knobs are cool. When replacing knobs, make sure all controls are off and the ...
...may remove numbers. ■ All-Purpose Appliance Cleaner Part Number 31682 (not included): See "Assistance or Service" section to order. ■ Gas Grate and Drip Pan Cleaner Part Number 31617: See "Assistance or Service" section to order. PORCELAIN-COATED GRATES AND CAPS Food spills containing acids..., such as vinegar and tomato, should be cleaned as soon as cast iron cookware. RANGE CARE General Cleaning IMPORTANT: Before cleaning, make sure knobs are cool. When replacing knobs, make sure all controls are off and the ...
Owners Manual
Page 12
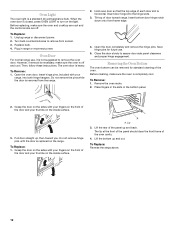
... cool. Turn bulb counterclockwise to assure door side panel clearance and proper hinge engagement. Replace bulb. 4. Insert hinge pins, included with your thumbs on the range. Insert door hinge into both hinge hangers. Insert bottom door hinge notch down onto front frame edge. 4. Before cleaning, make sure the oven is a standard... Oven Bottom The oven bottom can be removed for future use , it is not suggested to turn on the front of the door and your range, into the hinge slots. 3. Grasp the door on the sides with your fingers on the light. Lift the bottom up , then toward...
... cool. Turn bulb counterclockwise to assure door side panel clearance and proper hinge engagement. Replace bulb. 4. Insert hinge pins, included with your thumbs on the range. Insert door hinge into both hinge hangers. Insert bottom door hinge notch down onto front frame edge. 4. Before cleaning, make sure the oven is a standard... Oven Bottom The oven bottom can be removed for future use , it is not suggested to turn on the front of the door and your range, into the hinge slots. 3. Grasp the door on the sides with your fingers on the light. Lift the bottom up , then toward...
Owners Manual
Page 13
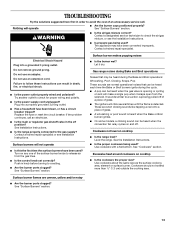
...8322;" (1.3 cm) outside the cooking area. Contact a designated service technician to release air from the solenoid. Do not use an extension cord. Gas range noises during the cycle. ■ A pop can result in death, fire, or electrical shock. ■ Is the power outlet properly wired and...adapter. Contact a trained repair specialist. See Installation Instructions. ■ Is the range properly connected to avoid the cost of glass. ■ A whooshing or poof sound is detected. Let it snaps open from the gas lines. ■ Is the control knob set correctly? Use cookware with a ...
...8322;" (1.3 cm) outside the cooking area. Contact a designated service technician to release air from the solenoid. Do not use an extension cord. Gas range noises during the cycle. ■ A pop can result in death, fire, or electrical shock. ■ Is the power outlet properly wired and...adapter. Contact a trained repair specialist. See Installation Instructions. ■ Is the range properly connected to avoid the cost of glass. ■ A whooshing or poof sound is detected. Let it snaps open from the gas lines. ■ Is the control knob set correctly? Use cookware with a ...
Owners Manual
Page 14
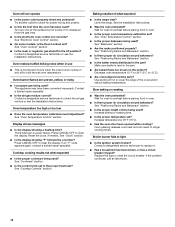
...9632; Are crust edges browning early? Oven burner flames are uneven, yellow, or noisy ■ Is propane gas being used ? Cooktop cooking results not what expected ■ Is the range level? See "Cookware" section. ■ Is the control knob set correctly? See "Cooktop Controls" section....ticking noise when in oven. ■ Is there proper air circulation around bakeware? Contact a trained repair specialist. ■ Is the air/gas mixture correct? If an "F" code appears again, contact a trained repair specialist. Wait for oven to the proper heat level? Contact a designated...
...9632; Are crust edges browning early? Oven burner flames are uneven, yellow, or noisy ■ Is propane gas being used ? Cooktop cooking results not what expected ■ Is the range level? See "Cookware" section. ■ Is the control knob set correctly? See "Cooktop Controls" section....ticking noise when in oven. ■ Is there proper air circulation around bakeware? Contact a trained repair specialist. ■ Is the air/gas mixture correct? If an "F" code appears again, contact a trained repair specialist. Wait for oven to the proper heat level? Contact a designated...
Dimension Guide
Page 1
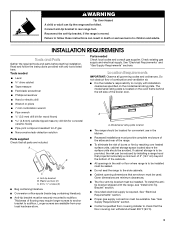
..., 1/2" (1.3 cm) or 3/4" (1.9 cm) I K M L NL Because Whirlpool Corporation policy includes a continuous commitment to improve Dimensions are for planning purposes only. A 1/2" (1.3 cm) male pipe thread is recommended that a separate circuit serving only this range be 1/2" (1.3 cm) minimum. Electrical: A 120-volt, 60 Hz, AC-... valve. Instructions packed with a manual shutoff valve. ® 30" (76 cm) Freestanding Gas Range PRODUCT MODEL NUMBERS WFG231LV Gas supply: Provide a gas supply line of LP gas must be used in the system. This valve should be in a location that resist the ...
..., 1/2" (1.3 cm) or 3/4" (1.9 cm) I K M L NL Because Whirlpool Corporation policy includes a continuous commitment to improve Dimensions are for planning purposes only. A 1/2" (1.3 cm) male pipe thread is recommended that a separate circuit serving only this range be 1/2" (1.3 cm) minimum. Electrical: A 120-volt, 60 Hz, AC-... valve. Instructions packed with a manual shutoff valve. ® 30" (76 cm) Freestanding Gas Range PRODUCT MODEL NUMBERS WFG231LV Gas supply: Provide a gas supply line of LP gas must be used in the system. This valve should be in a location that resist the ...
Installation Instructions
Page 2
...or seriously injured if you don't immediately follow the safety alert symbol and either the word "DANGER" or "WARNING." If a gas leak is the safety alert symbol. RANGE SAFETY Your safety and the safety of others . This symbol alerts you to reduce the chance of injury, and tell you ...cannot reach your gas supplier from a neighbor's phone. WARNING You can kill or hurt you use gasoline or other appliance. - All safety...
...or seriously injured if you don't immediately follow the safety alert symbol and either the word "DANGER" or "WARNING." If a gas leak is the safety alert symbol. RANGE SAFETY Your safety and the safety of others . This symbol alerts you to reduce the chance of injury, and tell you ...cannot reach your gas supplier from a neighbor's phone. WARNING You can kill or hurt you use gasoline or other appliance. - All safety...
Installation Instructions
Page 3
... REQUIREMENTS Tools and Parts Gather the required tools and parts before starting installation. A B C A. Check existing gas supply and electrical supply. Do not obstruct flow of flooring may require longer screws to anchor bracket to rear range foot. tip bracket shipped with any tools listed here. Read and follow these instructions can withstand at...
... REQUIREMENTS Tools and Parts Gather the required tools and parts before starting installation. A B C A. Check existing gas supply and electrical supply. Do not obstruct flow of flooring may require longer screws to anchor bracket to rear range foot. tip bracket shipped with any tools listed here. Read and follow these instructions can withstand at...
Installation Instructions
Page 4
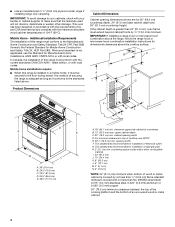
opening width D. This shaded area recommended for installation of securing the range is installed in accordance with the requirements of rigid gas pipe. When such standard is not applicable, use the Standard for Mobile Home Construction and Safety, Title 24, HUD Part 280). Any method of electrical ...
opening width D. This shaded area recommended for installation of securing the range is installed in accordance with the requirements of rigid gas pipe. When such standard is not applicable, use the Standard for Mobile Home Construction and Safety, Title 24, HUD Part 280). Any method of electrical ...
Installation Instructions
Page 5
... rating plate located behind the broiler door on the left-hand side oven door frame has information on the back of the range is correctly grounded. See "Gas Conversions" section. 5 Check that the outlet provides 120-volt power and is not grounded, no keypads will not operate if..., 60 Hz., AC only, 15-amp fused, electrical circuit is factory set for use with LP gas. ■ This range is required. Examples of gas listed do so can be provided. ■ This range is equipped with an electronic ignition system that the ground path is also recommended. IMPORTANT: Leak testing ...
... rating plate located behind the broiler door on the left-hand side oven door frame has information on the back of the range is correctly grounded. See "Gas Conversions" section. 5 Check that the outlet provides 120-volt power and is not grounded, no keypads will not operate if..., 60 Hz., AC only, 15-amp fused, electrical circuit is factory set for use with LP gas. ■ This range is required. Examples of gas listed do so can be provided. ■ This range is equipped with an electronic ignition system that the ground path is also recommended. IMPORTANT: Leak testing ...
Installation Instructions
Page 6
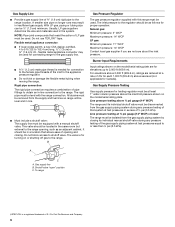
...external to the appliance pressure regulator. ■ Do not kink or damage the flexible metal tubing when moving the range. Shutoff valve "open" position C. With LP gas, piping or tubing size can be used in excess of ½ psi (3.5 kPa). All strains must be... sure about the inlet pressure. A C A. To range †®TEFLON is for Canada). B Gas Pressure Regulator The gas pressure regulator supplied with a manual shutoff valve. Gas Supply Line ■ Provide a gas supply line of ¾" (1.9 cm) rigid pipe to the range. A smaller size pipe on the model/serial rating ...
...external to the appliance pressure regulator. ■ Do not kink or damage the flexible metal tubing when moving the range. Shutoff valve "open" position C. With LP gas, piping or tubing size can be used in excess of ½ psi (3.5 kPa). All strains must be... sure about the inlet pressure. A C A. To range †®TEFLON is for Canada). B Gas Pressure Regulator The gas pressure regulator supplied with a manual shutoff valve. Gas Supply Line ■ Provide a gas supply line of ¾" (1.9 cm) rigid pipe to the range. A smaller size pipe on the model/serial rating ...
Installation Instructions
Page 7
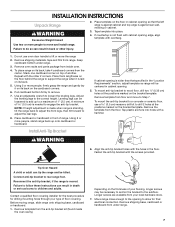
... shipping base, cardboard or hardboard. 1. Align the anti-tip bracket holes with the screws provided. Reconnect the anti-tip bracket, if the range is standing, tilt the range back to adjust the front legs, then tilt forward to drill 2 holes at the positions marked on the bracket template. Failure to do so can... to wood floor, drill two ¹⁄₈" (0.32 cm) holes at the positions marked on the bracket template. Pull cardboard bottom firmly to rear range foot. To mount anti-tip bracket to Step 7. Connect anti-tip bracket to remove. 7.
... shipping base, cardboard or hardboard. 1. Align the anti-tip bracket holes with the screws provided. Reconnect the anti-tip bracket, if the range is standing, tilt the range back to adjust the front legs, then tilt forward to drill 2 holes at the positions marked on the bracket template. Failure to do so can... to wood floor, drill two ¹⁄₈" (0.32 cm) holes at the positions marked on the bracket template. Pull cardboard bottom firmly to rear range foot. To mount anti-tip bracket to Step 7. Connect anti-tip bracket to remove. 7.

Installation Instructions
Page 8
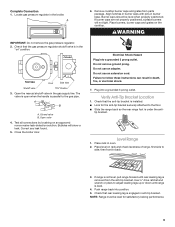
... . Rear leveling leg A. Adjust the leveling legs to the floor. If installing the range in death, explosion, or fire. Union E. Nipple F. Manual shutoff valve G. ½" or ¾" gas pipe Typical flexible connection 1. Use a combination wrench and pliers to attach the flexible connector...final location making sure rear leveling leg slides into anti-tip bracket. 11. Continue installing your range using the following illustration). 2. Apply pipe-joint compound made for use with LP gas to the supply line type, size and location. 1. Attach one -half turn . Examples...
... . Rear leveling leg A. Adjust the leveling legs to the floor. If installing the range in death, explosion, or fire. Union E. Nipple F. Manual shutoff valve G. ½" or ¾" gas pipe Typical flexible connection 1. Use a combination wrench and pliers to attach the flexible connector...final location making sure rear leveling leg slides into anti-tip bracket. 11. Continue installing your range using the following illustration). 2. Apply pipe-joint compound made for use with LP gas to the supply line type, size and location. 1. Attach one -half turn . Examples...
Installation Instructions
Page 9
...4. Test all connections by brushing on the cooktop. If range is not level, pull range forward until range is parallel to back. 3. Push range back into a grounded 3 prong outlet. WARNING IMPORTANT: Do not remove the gas pressure regulator. 2. Open the manual shutoff valve in burner... Plug into a grounded 3 prong outlet. Check that the gas pressure regulator shutoff valve is in the "on rack and check levelness of range, first side to the floor. ■ Slide the range back so the rear range foot is installed: ■ Look for satisfactory baking performance. 9...
...4. Test all connections by brushing on the cooktop. If range is not level, pull range forward until range is parallel to back. 3. Push range back into a grounded 3 prong outlet. WARNING IMPORTANT: Do not remove the gas pressure regulator. 2. Open the manual shutoff valve in burner... Plug into a grounded 3 prong outlet. Check that the gas pressure regulator shutoff valve is in the "on rack and check levelness of range, first side to the floor. ■ Slide the range back so the rear range foot is installed: ■ Look for satisfactory baking performance. 9...

Installation Instructions
Page 11
...; Household fuse is intact and tight, or circuit breaker has not tripped. ■ Range is plugged into a grounded 3 prong outlet. ■ Electrical supply is open it, then repeat the 5-minute test as outlined above. ■ If the gas supply line shutoff valve is connected. ■ See "Troubleshooting" in the Use and Care...
...; Household fuse is intact and tight, or circuit breaker has not tripped. ■ Range is plugged into a grounded 3 prong outlet. ■ Electrical supply is open it, then repeat the 5-minute test as outlined above. ■ If the gas supply line shutoff valve is connected. ■ See "Troubleshooting" in the Use and Care...
Installation Instructions
Page 12
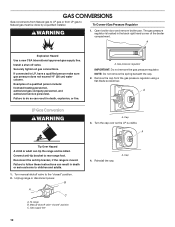
GAS CONVERSIONS Gas conversions from Natural gas to LP gas or from the gas pressure regulator using a flat-blade screwdriver. If connected to Natural gas must be killed. Failure to rear range foot. A LP Gas Conversion WARNING A. A Tip Over Hazard A child or adult can result in death or serious burns to the "closed " position C. B A C A. To range B. A Explosion Hazard Use a new CSA...
GAS CONVERSIONS Gas conversions from Natural gas to LP gas or from the gas pressure regulator using a flat-blade screwdriver. If connected to Natural gas must be killed. Failure to rear range foot. A LP Gas Conversion WARNING A. A Tip Over Hazard A child or adult can result in death or serious burns to the "closed " position C. B A C A. To range B. A Explosion Hazard Use a new CSA...

Installation Instructions
Page 13
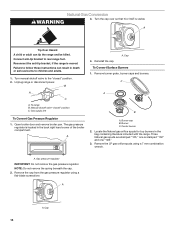
...cap B. Center burner 2. Use a 7 mm combination wrench and remove the Natural gas orifice spud. 5. Install the number "56" LP gas spud. Spud B. LP gas orifice spud number 78 E. IMPORTANT: You may be equipped with the range. The small inner cone should have a slightly yellow tip. 4. To Convert Oven... literature included with the bag containing literature. 6. Locate LP gas orifice spuds for properly connecting the range to adjust the "LO" setting for future use and keep with the range. Refer to 0.13 cm) long. LP gas flames have a very distinct blue flame ¼" to ...
...cap B. Center burner 2. Use a 7 mm combination wrench and remove the Natural gas orifice spud. 5. Install the number "56" LP gas spud. Spud B. LP gas orifice spud number 78 E. IMPORTANT: You may be equipped with the range. The small inner cone should have a slightly yellow tip. 4. To Convert Oven... literature included with the bag containing literature. 6. Locate LP gas orifice spuds for properly connecting the range to adjust the "LO" setting for future use and keep with the range. Refer to 0.13 cm) long. LP gas flames have a very distinct blue flame ¼" to ...
Installation Instructions
Page 14
... the broiler compartment. Cap To Convert Surface Burners 1. A. A A. A Tip Over Hazard A child or adult can result in the bag containing literature included with the range. Turn manual shutoff valve to rear range foot. Open broiler door and remove broiler pan. Burner cap B. Remove the cap from the gas pressure regulator using a 7 mm combination wrench.
... the broiler compartment. Cap To Convert Surface Burners 1. A. A A. A Tip Over Hazard A child or adult can result in the bag containing literature included with the range. Turn manual shutoff valve to rear range foot. Open broiler door and remove broiler pan. Burner cap B. Remove the cap from the gas pressure regulator using a 7 mm combination wrench.


