Owners Manual
Page 1
... Anti-Tip Bracket 2 KEY USAGE TIPS 4 AquaLift® Self-Cleaning Technology 4 Surface Temperatures 4 Preheating 4 Ceramic Glass Cooktop Cleaning 4 FEATURE GUIDE 5 COOKTOP USE 7 Cookware 8 Home Canning 9 OVEN USE 9 Electronic Oven Controls 9 Sabbath Mode 10 Aluminum Foil 10 Positioning Racks and Bakeware 11 Oven Vent 11 Baking and Roasting 11 Broiling 12 Convection Baking and Roasting 12 Proofing Bread 12 Cook Time 12 RANGE CARE 13 Clean Cycle 13 General Cleaning 14 Oven Light 15 TROUBLESHOOTING 15 ACCESSORIES 16 WARRANTY 17 W11085357A Model Number Serial Number...
... Anti-Tip Bracket 2 KEY USAGE TIPS 4 AquaLift® Self-Cleaning Technology 4 Surface Temperatures 4 Preheating 4 Ceramic Glass Cooktop Cleaning 4 FEATURE GUIDE 5 COOKTOP USE 7 Cookware 8 Home Canning 9 OVEN USE 9 Electronic Oven Controls 9 Sabbath Mode 10 Aluminum Foil 10 Positioning Racks and Bakeware 11 Oven Vent 11 Baking and Roasting 11 Broiling 12 Convection Baking and Roasting 12 Proofing Bread 12 Cook Time 12 RANGE CARE 13 Clean Cycle 13 General Cleaning 14 Oven Light 15 TROUBLESHOOTING 15 ACCESSORIES 16 WARRANTY 17 W11085357A Model Number Serial Number...
Owners Manual
Page 3
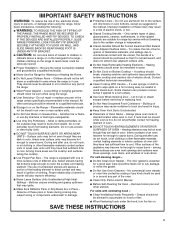
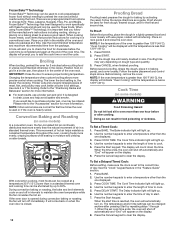
... are dark in Manual. During and after use . Heating elements should be careful to avoid steam burn. I Clean Ventilating Hoods Frequently - I Before Self-Cleaning the Oven - Grease should be hot even though they are suitable for range-top service without breaking due to the sudden change in Place - I Use Proper Pan Size - I User Servicing - The use dry chemical or foam-type extinguisher. Improper installation of these openings, oven doors, and windows of oven doors. I Do Not...
... are dark in Manual. During and after use . Heating elements should be careful to avoid steam burn. I Clean Ventilating Hoods Frequently - I Before Self-Cleaning the Oven - Grease should be hot even though they are suitable for range-top service without breaking due to the sudden change in Place - I Use Proper Pan Size - I User Servicing - The use dry chemical or foam-type extinguisher. Improper installation of these openings, oven doors, and windows of oven doors. I Do Not...

Owners Manual
Page 4
... part numbers and information on stains. The oven will be blocked or covered. The preheat cycle rapidly increases the oven temperature. Polish with traditional self-cleaning methods. Warming or Storage Drawer When the oven is in order to release baked-on using AquaLift® Self-Cleaning Technology, visit our website at approximately a 45° angle against the glass surface and scrape the residue. Preheating When beginning a Bake or Convect cycle, the oven...
... part numbers and information on stains. The oven will be blocked or covered. The preheat cycle rapidly increases the oven temperature. Polish with traditional self-cleaning methods. Warming or Storage Drawer When the oven is in order to release baked-on using AquaLift® Self-Cleaning Technology, visit our website at approximately a 45° angle against the glass surface and scrape the residue. Preheating When beginning a Bake or Convect cycle, the oven...
Owners Manual
Page 5
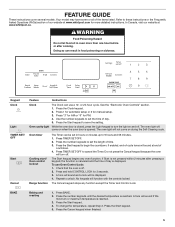
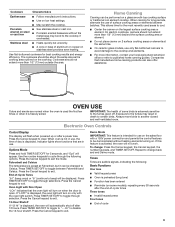
... manual setup. 3. Use the number keypads to set the time of time. 3. BAKE Baking and roasting 1. Press the number keypads until the desired temperature is off . or 24-hour cycle. Oven cavity light While the oven door is reached. 3. Press the number keypads to turn off . 2. Press the Start keypad. 5. Your model may have some or all of our website at www.whirlpool.com for 3 seconds. 3. Keypad Clock Light TIMER SET/ OFF Start Cancel Feature Instructions Clock The Clock...
... manual setup. 3. Use the number keypads to set the time of time. 3. BAKE Baking and roasting 1. Press the number keypads until the desired temperature is off . or 24-hour cycle. Oven cavity light While the oven door is reached. 3. Press the number keypads to turn off . 2. Press the Start keypad. 5. Your model may have some or all of our website at www.whirlpool.com for 3 seconds. 3. Keypad Clock Light TIMER SET/ OFF Start Cancel Feature Instructions Clock The Clock...
Owners Manual
Page 6
... change the temperature, repeat Step 3. To turn on dough type and quantity. 4. DELAY START Delayed start COOK TIME Timed cooking PROOF Proofing bread AQUALIFT SELF CLEAN REMOTE ENABLE CONNECT Self-Cleaning cycle Enable remote app control Connect to check the food's doneness with a delayed start the calculated time. 8. Cook Time allows the oven to be used to set length of time, and/or shut off . 9. Let the dough rise until the desired temperature is selected, the bake element turns off automatically. Proofing time...
... change the temperature, repeat Step 3. To turn on dough type and quantity. 4. DELAY START Delayed start COOK TIME Timed cooking PROOF Proofing bread AQUALIFT SELF CLEAN REMOTE ENABLE CONNECT Self-Cleaning cycle Enable remote app control Connect to check the food's doneness with a delayed start the calculated time. 8. Cook Time allows the oven to be used to set length of time, and/or shut off . 9. Let the dough rise until the desired temperature is selected, the bake element turns off automatically. Proofing time...

Owners Manual
Page 7
... and to the cooktop, do not cook foods directly on . Surface cooking area B. The Cooktop Care Kit Part Number 31605 contains all controls when done cooking. B A The control knobs can leave deposits when heated. ■■ To avoid damage to condition the glass surface. Push in any part of light colored ceramic glass to appear to do so can cause pitting and permanent marks. Some parts of the surface cooking area may become trapped...
... and to the cooktop, do not cook foods directly on . Surface cooking area B. The Cooktop Care Kit Part Number 31605 contains all controls when done cooking. B A The control knobs can leave deposits when heated. ■■ To avoid damage to condition the glass surface. Push in any part of light colored ceramic glass to appear to do so can cause pitting and permanent marks. Some parts of the surface cooking area may become trapped...
Owners Manual
Page 8
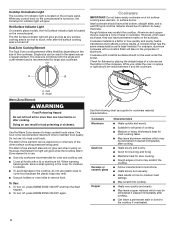
Cooktop On Indicator Light The Cooktop On indicator light is located on the console panel. Hot Surface Indicator Light On ceramic glass models, the Hot Surface indicator light is located on the console panel. The dual size combines both the single and outer element and is the recommended maximum time to touch, even after cooking. ■■ Heats slowly and evenly. ■■ Good for browning and frying ■■ Maintains heat for cookware material characteristics. Single Warm Zone Element WARNING...
Cooktop On Indicator Light The Cooktop On indicator light is located on the console panel. Hot Surface Indicator Light On ceramic glass models, the Hot Surface indicator light is located on the console panel. The dual size combines both the single and outer element and is the recommended maximum time to touch, even after cooking. ■■ Heats slowly and evenly. ■■ Good for browning and frying ■■ Maintains heat for cookware material characteristics. Single Warm Zone Element WARNING...
Owners Manual
Page 9
... ■■ End of some models), repeating every 20 seconds after a power loss. Press the Cancel keypad to published home canning guides. Fahrenheit and Celsius The temperature is heavily soiled. Press TIMER SET/OFF to Celsius. If "LOFF" is displayed, the oven light will appear. Demo Mode IMPORTANT: This feature is preheated (long tone) ■■ Function has been entered ■■ Reminder...
... ■■ End of some models), repeating every 20 seconds after a power loss. Press the Cancel keypad to published home canning guides. Fahrenheit and Celsius The temperature is heavily soiled. Press TIMER SET/OFF to Celsius. If "LOFF" is displayed, the oven light will appear. Demo Mode IMPORTANT: This feature is preheated (long tone) ■■ Function has been entered ■■ Reminder...
Owners Manual
Page 10
...;F CAL" or "00." 2. The oven provides accurate temperatures; To Adjust Oven Temperature: 1. Press and hold TIMER SET/OFF for 5 seconds. Use the number keypads to this cycling. The adjustment can result in the display. A Timed Bake can be displayed. The Oven Control Lockout feature (if present) will automatically turn on and off , indicating the end of the Sabbath. When power is pressed. Opening the oven door or pressing Light will change , and there will stop flashing...
...;F CAL" or "00." 2. The oven provides accurate temperatures; To Adjust Oven Temperature: 1. Press and hold TIMER SET/OFF for 5 seconds. Use the number keypads to this cycling. The adjustment can result in the display. A Timed Bake can be displayed. The Oven Control Lockout feature (if present) will automatically turn on and off , indicating the end of the Sabbath. When power is pressed. Opening the oven door or pressing Light will change , and there will stop flashing...
Owners Manual
Page 11
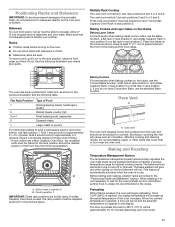
... rack position 5. Oven Vent A A. Blocking or covering the vent will begin preheating. The bake and broil elements cycle on the display. the broil element will be blocked or covered. This feature is automatically activated when the oven is used, the rack position must be able to have Convection Bake, use rack position 7. Before baking and roasting, position racks according to 350°F (175°C) will not. When the preheat temperature is directly over another. The time to preheat...
... rack position 5. Oven Vent A A. Blocking or covering the vent will begin preheating. The bake and broil elements cycle on the display. the broil element will be blocked or covered. This feature is automatically activated when the oven is used, the rack position must be able to have Convection Bake, use rack position 7. Before baking and roasting, position racks according to 350°F (175°C) will not. When the preheat temperature is directly over another. The time to preheat...
Owners Manual
Page 12
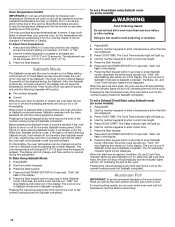
..." will come back on a baking sheet to work specifically with shortening. If the oven door is completed and again at a time. Follow the recipe directions as a guide. Place on dough type and quantity. 3. Press PROOF. 2. Let the dough rise until the temperature is set cook time ends, the oven will shut off automatically and "End" will light up . 4. Follow the same placement and control steps above. Before baking, remove the cover...
..." will come back on a baking sheet to work specifically with shortening. If the oven door is completed and again at a time. Follow the recipe directions as a guide. Place on dough type and quantity. 3. Press PROOF. 2. Let the dough rise until the temperature is set cook time ends, the oven will shut off automatically and "End" will light up . 4. Follow the same placement and control steps above. Before baking, remove the cover...

Owners Manual
Page 14
... them slide. 14 COOKTOP CONTROLS To avoid damage to the cooktop controls, do not soak knobs. Cleaning Method: ■■ Glass cleaner and soft cloth or sponge: Apply glass cleaner to soft cloth or sponge, not directly on some models) To avoid damaging the cooktop, do not use steel wool, abrasive cleansers, or oven cleaner. CERAMIC GLASS (on panel. ■■ affresh® Kitchen and Appliance Cleaner Part Number W10355010...
... them slide. 14 COOKTOP CONTROLS To avoid damage to the cooktop controls, do not soak knobs. Cleaning Method: ■■ Glass cleaner and soft cloth or sponge: Apply glass cleaner to soft cloth or sponge, not directly on some models) To avoid damaging the cooktop, do not use steel wool, abrasive cleansers, or oven cleaner. CERAMIC GLASS (on panel. ■■ affresh® Kitchen and Appliance Cleaner Part Number W10355010...

Owners Manual
Page 15
... Century Ave. Turn bulb counterclockwise to remove. 3. Plug in the "Feature Guide" section. In Canada, visit www.whirlpool.ca Contact us by turning clockwise. 5. If the problem continues, call for service. 15 See the Installation Instructions. The range is in Demo mode: Demo mode will not operate Oven temperature too high or too low Oven indicator lights flash Display shows messages Element cycling due to unlock. See "Clock" keypad feature in range or reconnect power. Food spills should...
... Century Ave. Turn bulb counterclockwise to remove. 3. Plug in the "Feature Guide" section. In Canada, visit www.whirlpool.ca Contact us by turning clockwise. 5. If the problem continues, call for service. 15 See the Installation Instructions. The range is in Demo mode: Demo mode will not operate Oven temperature too high or too low Oven indicator lights flash Display shows messages Element cycling due to unlock. See "Clock" keypad feature in range or reconnect power. Food spills should...
Owners Manual
Page 16
... "Electronic Oven Controls" section. Oven door was used: Adjust cooking time. Oven cooking results not what expected Range is not level: Mineral deposits will collect on bottom: Move rack to cover the edge of the oven bottom during cooking: Oven peeking releases oven heat and can result in the oven. Rack is level in pan: Check that the bakeware does not keep the door from closing. Use the AquaLift® Technology Cleaning Kit. Level the range. The set temperature was not preheated: See...
... "Electronic Oven Controls" section. Oven door was used: Adjust cooking time. Oven cooking results not what expected Range is not level: Mineral deposits will collect on bottom: Move rack to cover the edge of the oven bottom during cooking: Oven peeking releases oven heat and can result in the oven. Rack is level in pan: Check that the bakeware does not keep the door from closing. Use the AquaLift® Technology Cleaning Kit. Level the range. The set temperature was not preheated: See...
Owners Manual
Page 17
... HERE. Pick-up or delivery. trim, decorative panels, flooring, cabinetry, islands, countertops, drywall, etc.) that comes with this warranty. Proof of non-genuine Whirlpool parts or accessories. PROOF OF PURCHASE IS REQUIRED TO OBTAIN WARRANTY SERVICE. labor to use of original purchase date is effective from natural gas or L.P. Defects or damage caused by the customer. gas. 7. Specified Replacement Parts and repair 4. If you want a longer or...
... HERE. Pick-up or delivery. trim, decorative panels, flooring, cabinetry, islands, countertops, drywall, etc.) that comes with this warranty. Proof of non-genuine Whirlpool parts or accessories. PROOF OF PURCHASE IS REQUIRED TO OBTAIN WARRANTY SERVICE. labor to use of original purchase date is effective from natural gas or L.P. Defects or damage caused by the customer. gas. 7. Specified Replacement Parts and repair 4. If you want a longer or...
Installation Instructions
Page 3
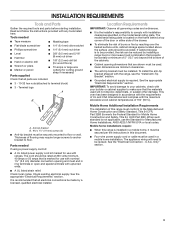
... If using a power supply cord kit: ■■ A UL listed power supply cord kit marked for Manufactured Home Installations, ANSI A225.1/NFPA 501A or local codes. Anti-tip bracket B. #12 x 15⁄8" (41 mm) screws (2) ■■ Anti-tip bracket must be reduced by reaching over the heated surface units, cabinet storage space located above the surface units should be rated at 250 volts minimum, 40 amps or 50 amps that all electrical connections be...
... If using a power supply cord kit: ■■ A UL listed power supply cord kit marked for Manufactured Home Installations, ANSI A225.1/NFPA 501A or local codes. Anti-tip bracket B. #12 x 15⁄8" (41 mm) screws (2) ■■ Anti-tip bracket must be reduced by reaching over the heated surface units, cabinet storage space located above the surface units should be rated at 250 volts minimum, 40 amps or 50 amps that all electrical connections be...
Installation Instructions
Page 5
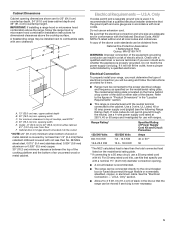
... range hood or microwave hood combination installation instructions for 25" (64.0 cm) countertop depth, 24" (61.0 cm) base cabinet depth and 36" (91.4 cm) countertop height. Only If codes permit and a separate ground wire is used, it here. U.S.A. A copy of electrical connection you are in the "Location Requirements" section. Do not modify the power supply cord plug. Cabinet Dimensions Cabinet opening dimensions shown are for dimensional clearances above the cooktop surface...
... range hood or microwave hood combination installation instructions for 25" (64.0 cm) countertop depth, 24" (61.0 cm) base cabinet depth and 36" (91.4 cm) countertop height. Only If codes permit and a separate ground wire is used, it here. U.S.A. A copy of electrical connection you are in the "Location Requirements" section. Do not modify the power supply cord plug. Cabinet Dimensions Cabinet opening dimensions shown are for dimensional clearances above the cooktop surface...

Installation Instructions
Page 7
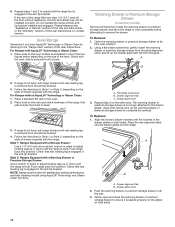
... is less than the total connected load listed on the model/serial/rating plate. **If connecting to lower the front and rear leveling legs one -half turn. On Ranges Equipped with CSA Standard C22.1, Canadian Electrical Code, Part 1 - Front leveling leg On Ranges Equipped with a Warming Drawer or Premium Storage Drawer: On ranges equipped with kit. It will be obtained from inside oven. 3. Rear leveling leg B. Front leveling leg 7 Remove shipping materials, tape, and film...
... is less than the total connected load listed on the model/serial/rating plate. **If connecting to lower the front and rear leveling legs one -half turn. On Ranges Equipped with CSA Standard C22.1, Canadian Electrical Code, Part 1 - Front leveling leg On Ranges Equipped with a Warming Drawer or Premium Storage Drawer: On ranges equipped with kit. It will be obtained from inside oven. 3. Rear leveling leg B. Front leveling leg 7 Remove shipping materials, tape, and film...
Installation Instructions
Page 14
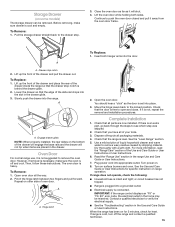
... remove the drawer. If range is not level, pull range forward until rear leveling leg is engaged in the oven. 2. For Ranges without antitip bracket installed and engaged. Check that the range foot is seated properly on the glides on the size of the User Instructions, to side; Flat-blade screwdriver B. To Replace: 1. Drawer glide notch 2. 6. Please reference the "Assistance or Service" section of the Use and Care Guide, or the "Warranty...
... remove the drawer. If range is not level, pull range forward until rear leveling leg is engaged in the oven. 2. For Ranges without antitip bracket installed and engaged. Check that the range foot is seated properly on the glides on the size of the User Instructions, to side; Flat-blade screwdriver B. To Replace: 1. Drawer glide notch 2. 6. Please reference the "Assistance or Service" section of the Use and Care Guide, or the "Warranty...
Installation Instructions
Page 15
... sure drawer is free to verify the electrical supply. ■■ See the "Troubleshooting" section in the Use and Care Guide or User Instructions. Open oven door all packaging materials. 4. Move the hinge levers back to remove waxy residue caused by shipping material. See the Use and Care Guide or User Instructions for heat. or circuit breaker has not tripped. ■■ Range is plugged into place. 3. Storage Drawer (on some models) The storage drawer can...
... sure drawer is free to verify the electrical supply. ■■ See the "Troubleshooting" section in the Use and Care Guide or User Instructions. Open oven door all packaging materials. 4. Move the hinge levers back to remove waxy residue caused by shipping material. See the Use and Care Guide or User Instructions for heat. or circuit breaker has not tripped. ■■ Range is plugged into place. 3. Storage Drawer (on some models) The storage drawer can...


