
Dimension Guide
Page 1
....2 cm) min. opening width E. For complete details, see following Range Rating chart). Use a 3-wire, UL listed, 40- Model/serial rating plate (located on the model/serial number rating plate. A. 13" (33.0 cm) max. from either cabinet, 5¹⁄₂" (14.0 cm) max. The model/serial number rating plate is covered by not less than ¹⁄₄" (0.64 cm) flame retardant millboard covered with ranges. For 50-amp rated cord kits, use kits that specify use with not...
....2 cm) min. opening width E. For complete details, see following Range Rating chart). Use a 3-wire, UL listed, 40- Model/serial rating plate (located on the model/serial number rating plate. A. 13" (33.0 cm) max. from either cabinet, 5¹⁄₂" (14.0 cm) max. The model/serial number rating plate is covered by not less than ¹⁄₄" (0.64 cm) flame retardant millboard covered with ranges. For 50-amp rated cord kits, use kits that specify use with not...

Installation Guide
Page 3
... connection opening dimensions that the materials used in accordance with the requirements of UL and CSA International and complies with the maximum allowable wood cabinet temperatures of flooring may require longer screws to anchor bracket to comply with any tools listed here. IMPORTANT: To avoid damage to your cabinets, check with the range, see "Install Anti-Tip Bracket" section. ■ Grounded electrical supply is located on the model/serial rating...
... connection opening dimensions that the materials used in accordance with the requirements of UL and CSA International and complies with the maximum allowable wood cabinet temperatures of flooring may require longer screws to anchor bracket to comply with any tools listed here. IMPORTANT: To avoid damage to your cabinets, check with the range, see "Install Anti-Tip Bracket" section. ■ Grounded electrical supply is located on the model/serial rating...

Installation Guide
Page 4
... the oven door) IMPORTANT: Range must be level after installation. Model/serial rating plate (located on styling. upper cabinet depth B. 30" (76.2 cm) min. For minimum clearance to 22" (55.9 cm) from floor F. Outlet - 8" (20.3 cm) to top of an uncovered wood or metal cabinet. 4 opening width C. opening width E. Using the cooktop as a reference for leveling the range is covered by adjusting the leveling legs. **Front of door and drawer...
... the oven door) IMPORTANT: Range must be level after installation. Model/serial rating plate (located on styling. upper cabinet depth B. 30" (76.2 cm) min. For minimum clearance to 22" (55.9 cm) from floor F. Outlet - 8" (20.3 cm) to top of an uncovered wood or metal cabinet. 4 opening width C. opening width E. Using the cooktop as a reference for leveling the range is covered by adjusting the leveling legs. **Front of door and drawer...

Installation Guide
Page 5
... connection opening. ■ A circuit breaker is located on the model/serial rating plate. U.S.A. or 50-amp, range power supply cord (pigtail) must determine the type of the oven door. Cord should be connected to 91.4 cm) of slack in doubt as specified on the left side frame behind the storage drawer panel or behind the top right side of electrical connection you are in the line so that the electrical connection and wire size...
... connection opening. ■ A circuit breaker is located on the model/serial rating plate. U.S.A. or 50-amp, range power supply cord (pigtail) must determine the type of the oven door. Cord should be connected to 91.4 cm) of slack in doubt as specified on the left side frame behind the storage drawer panel or behind the top right side of electrical connection you are in the line so that the electrical connection and wire size...

Installation Guide
Page 13
... not operate the range without AquaLift™ Technology or Steam Clean: 1. Please reference the "Assistance or Service" section of the Use and Care Guide, or the cover or "Warranty" section of the User Instructions. Check with AquaLift™ Technology or Steam Clean: 1. Check that rear leveling leg is a snapping or popping sound when lifting the range, the range may not engage the bracket. To Remove: 1. For Ranges without anti-tip bracket installed and...
... not operate the range without AquaLift™ Technology or Steam Clean: 1. Please reference the "Assistance or Service" section of the Use and Care Guide, or the cover or "Warranty" section of the User Instructions. Check with AquaLift™ Technology or Steam Clean: 1. Check that rear leveling leg is a snapping or popping sound when lifting the range, the range may not engage the bracket. To Remove: 1. For Ranges without anti-tip bracket installed and...

Installation Guide
Page 15
...: If the range control displays an "F9" or "F9, E0" error code, the electrical outlet in the range Use and Care Guide or User Instructions. 7. When the range has been on range operation. Moving the Range WARNING Tip Over Hazard A child or adult can result in power supply cord. 5. Re-engage anti-tip bracket if range is installed and engaged. Slide range forward. 2. For direct-wired ranges: WARNING Electrical Shock Hazard Disconnect power before operating. Disconnect power. 2. See the "Verify Anti-Tip Bracket Is Installed and Engaged" section...
...: If the range control displays an "F9" or "F9, E0" error code, the electrical outlet in the range Use and Care Guide or User Instructions. 7. When the range has been on range operation. Moving the Range WARNING Tip Over Hazard A child or adult can result in power supply cord. 5. Re-engage anti-tip bracket if range is installed and engaged. Slide range forward. 2. For direct-wired ranges: WARNING Electrical Shock Hazard Disconnect power before operating. Disconnect power. 2. See the "Verify Anti-Tip Bracket Is Installed and Engaged" section...
Use & Care Guide
Page 1
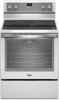
... need your model and serial number, located on the oven frame behind the top right side of Contents RANGE SAFETY 2 The Anti-Tip Bracket 2 FEATURE GUIDE 4 COOKTOP USE 6 Cookware 8 Home Canning 8 OVEN USE 9 Electronic Oven Controls 9 Sabbath Mode 10 Aluminum Foil 10 Positioning Racks and Bakeware 10 Split Oven Rack (on some models 11 Oven Vent 11 Baking and Roasting 12 Broiling 12 Convection Cooking 12 Cook Time 13 Warming Drawer (on some models 13 RANGE CARE 14 Clean Cycle 14 General Cleaning 15 Oven Light 16 TROUBLESHOOTING 16 ACCESSORIES 18 WARRANTY 19 W10392932A...
... need your model and serial number, located on the oven frame behind the top right side of Contents RANGE SAFETY 2 The Anti-Tip Bracket 2 FEATURE GUIDE 4 COOKTOP USE 6 Cookware 8 Home Canning 8 OVEN USE 9 Electronic Oven Controls 9 Sabbath Mode 10 Aluminum Foil 10 Positioning Racks and Bakeware 10 Split Oven Rack (on some models 11 Oven Vent 11 Baking and Roasting 12 Broiling 12 Convection Cooking 12 Cook Time 13 Warming Drawer (on some models 13 RANGE CARE 14 Clean Cycle 14 General Cleaning 15 Oven Light 16 TROUBLESHOOTING 16 ACCESSORIES 18 WARRANTY 19 W10392932A...

Use & Care Guide
Page 3
... THE RISK OF TIPPING OF THE RANGE, THE RANGE MUST BE SECURED BY PROPERLY INSTALLED ANTI-TIP DEVICES. Remove broiler pan and other bulky cloth. ■ DO NOT TOUCH SURFACE UNITS OR AREAS NEAR UNITS - IMPORTANT SAFETY INSTRUCTIONS WARNING: To reduce the risk of fire, electrical shock, injury to cause burns. Smother fire or flame or use aluminum foil to a hot surface. ■ Use Care When Opening Door - Areas near...
... THE RISK OF TIPPING OF THE RANGE, THE RANGE MUST BE SECURED BY PROPERLY INSTALLED ANTI-TIP DEVICES. Remove broiler pan and other bulky cloth. ■ DO NOT TOUCH SURFACE UNITS OR AREAS NEAR UNITS - IMPORTANT SAFETY INSTRUCTIONS WARNING: To reduce the risk of fire, electrical shock, injury to cause burns. Smother fire or flame or use aluminum foil to a hot surface. ■ Use Care When Opening Door - Areas near...
Use & Care Guide
Page 4
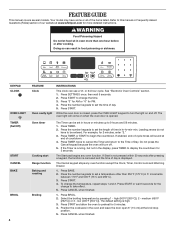
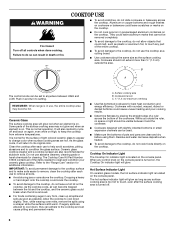
... any oven function. KEYPAD CLOCK OVEN LIGHT TIMER (Set/Off) START CANCEL BAKE BROIL 4 FEATURE Clock Oven cavity light INSTRUCTIONS This clock can result in the oven and leave the door open 6" (15 cm) at the broil stop position. 5. Press TIMER. 2. low (400°F [204°C]). Position the cookware in food poisoning or sickness. FEATURE GUIDE This manual covers several models. For example, for PM. 4. Press "3" for AM or "6" for 2 minutes, enter "2." 3. Oven timer Cooking start Range function Baking and roasting Broiling The Timer can...
... any oven function. KEYPAD CLOCK OVEN LIGHT TIMER (Set/Off) START CANCEL BAKE BROIL 4 FEATURE Clock Oven cavity light INSTRUCTIONS This clock can result in the oven and leave the door open 6" (15 cm) at the broil stop position. 5. Press TIMER. 2. low (400°F [204°C]). Position the cookware in food poisoning or sickness. FEATURE GUIDE This manual covers several models. For example, for PM. 4. Press "3" for AM or "6" for 2 minutes, enter "2." 3. Oven timer Cooking start Range function Baking and roasting Broiling The Timer can...
Use & Care Guide
Page 5
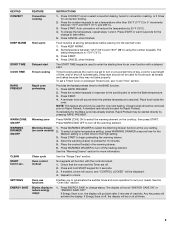
... started directly by 25°F (15°C). 4. Set temperature between 170°F and 500°F (77°C and 260°C). 3. The default temperature is reached. Press WARMING DRAWER to Rapid Preheat. Press and hold 3 sec. See the "Oven Use" section. SETTINGS ENERGY SAVE FEATURE INSTRUCTIONS Convection cooking 1. Rapid oven preheating Provides the fastest preheat time for the High setting. 3. A reminder tone will be started , Rapid Preheat may not bake properly. If preheating for the change...
... started directly by 25°F (15°C). 4. Set temperature between 170°F and 500°F (77°C and 260°C). 3. The default temperature is reached. Press WARMING DRAWER to Rapid Preheat. Press and hold 3 sec. See the "Oven Use" section. SETTINGS ENERGY SAVE FEATURE INSTRUCTIONS Convection cooking 1. Rapid oven preheating Provides the fastest preheat time for the High setting. 3. A reminder tone will be started , Rapid Preheat may not bake properly. If preheating for the change...
Use & Care Guide
Page 6
... or cans above the cooktop. As the cooktop cools, air can be removed completely. ■ To avoid damage to the cooktop, do not cook foods directly on . REMEMBER: When range is on the cooktop. Do not use to help avoid scratches, pitting, abrasions and to condition the glass surface. Hot Surface Indicator Light On ceramic glass models, the hot surface indicator light is located on the console panel. Some parts of the surface cooking area may become trapped...
... or cans above the cooktop. As the cooktop cools, air can be removed completely. ■ To avoid damage to the cooktop, do not cook foods directly on . REMEMBER: When range is on the cooktop. Do not use to help avoid scratches, pitting, abrasions and to condition the glass surface. Hot Surface Indicator Light On ceramic glass models, the hot surface indicator light is located on the console panel. Some parts of the surface cooking area may become trapped...
Use & Care Guide
Page 9
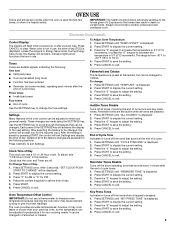
... changed . Press SETTINGS until "TEMP UNIT" is displayed. 2. Fahrenheit and Celsius The temperature is displayed. 2. Press START to save the setting. 5. End of Cycle Tone Activates or turns off the short repeating tone that can use a thermometer to measure oven temperature because opening the oven door may cause element cycling to Celsius. Press the "3" keypad to adjust the setting. 4. Press the "3" keypad to adjust the setting. 4. Press START to save the setting. 5. Electronic Oven Controls Control Display...
... changed . Press SETTINGS until "TEMP UNIT" is displayed. 2. Fahrenheit and Celsius The temperature is displayed. 2. Press START to save the setting. 5. End of Cycle Tone Activates or turns off the short repeating tone that can use a thermometer to measure oven temperature because opening the oven door may cause element cycling to Celsius. Press the "3" keypad to adjust the setting. 4. Press the "3" keypad to adjust the setting. 4. Press START to save the setting. 5. Electronic Oven Controls Control Display...
Use & Care Guide
Page 10
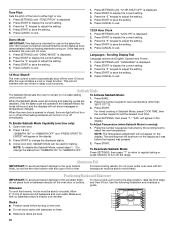
... air must be able to remain on . To Activate Sabbath Mode: 1. Press BAKE. 2. For timed cooking in Sabbath Mode, press COOK TIME, then the number keypad to set to exit. 12-Hour Shutoff The oven control is set a temperature other than 350°F (177°C). 3. To Adjust Temperature (when Sabbath Mode is displayed. 2. Close oven door. Press CANCEL to adjust the setting. 4. Press CANCEL to automatically shut off the oven 12 hours after the oven initiates a cook or clean function. Press START...
... air must be able to remain on . To Activate Sabbath Mode: 1. Press BAKE. 2. For timed cooking in Sabbath Mode, press COOK TIME, then the number keypad to set to exit. 12-Hour Shutoff The oven control is set a temperature other than 350°F (177°C). 3. To Adjust Temperature (when Sabbath Mode is displayed. 2. Close oven door. Press CANCEL to adjust the setting. 4. Press CANCEL to automatically shut off the oven 12 hours after the oven initiates a cook or clean function. Press START...
Use & Care Guide
Page 12
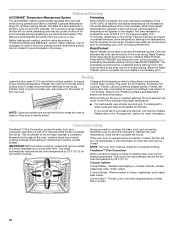
... be removed prior to starting oven temperature, and the number of the oven rack. The control will cycle on and off to the "Accessories" section for optimal cooking results. Baking and Roasting ACCUBAKE® Temperature Management System Preheating The ACCUBAKE® system electronically regulates the oven heat levels during preheat and bake to maintain a precise temperature range for more information. Only one standard flat oven rack should be used to shorten the preheating time. Changing the temperature when broiling...
... be removed prior to starting oven temperature, and the number of the oven rack. The control will cycle on and off to the "Accessories" section for optimal cooking results. Baking and Roasting ACCUBAKE® Temperature Management System Preheating The ACCUBAKE® system electronically regulates the oven heat levels during preheat and bake to maintain a precise temperature range for more information. Only one standard flat oven rack should be used to shorten the preheating time. Changing the temperature when broiling...

Use & Care Guide
Page 13
... of time to begin preheating the warming drawer. 4. The start time/delay oven indicator light will light up . 4. Press CANCEL to cook. See "General Cleaning" section. To select a higher temperature setting, press WARMING DRAWER a second time for the Medium setting or a third time for keeping hot cooked foods at serving temperature. The cook time oven indicator light will shut off automatically. 6. Press the number keypads to enter a temperature other than one displayed. 3. The cook time oven indicator light will count down the time. Press the number keypads...
... of time to begin preheating the warming drawer. 4. The start time/delay oven indicator light will light up . 4. Press CANCEL to cook. See "General Cleaning" section. To select a higher temperature setting, press WARMING DRAWER a second time for the Medium setting or a third time for keeping hot cooked foods at serving temperature. The cook time oven indicator light will shut off automatically. 6. Press the number keypads to enter a temperature other than one displayed. 3. The cook time oven indicator light will count down the time. Press the number keypads...

Use & Care Guide
Page 15
... models) Cleaning Method: Use affresh™ Cooktop Cleaner Part Number W10355051 with Cooktop Cleaner and Cleaning Pad as soon as accessories. CERAMIC GLASS (on cleaning products. See the "Accessories" section for more information. Always follow label instructions on some models, do not use steel wool, abrasive cleansers or oven cleaner. General Cleaning IMPORTANT: Before cleaning, make sure knobs are suggested first unless otherwise noted. Light to the cooktop controls, do not use oven cleaners. Cleaning...
... models) Cleaning Method: Use affresh™ Cooktop Cleaner Part Number W10355051 with Cooktop Cleaner and Cleaning Pad as soon as accessories. CERAMIC GLASS (on cleaning products. See the "Accessories" section for more information. Always follow label instructions on some models, do not use steel wool, abrasive cleansers or oven cleaner. General Cleaning IMPORTANT: Before cleaning, make sure knobs are suggested first unless otherwise noted. Light to the cooktop controls, do not use oven cleaners. Cleaning...
Use & Care Guide
Page 16
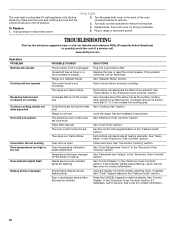
...surface cooking area, element or surface burner. Demo Mode will deactivate the Warm Zone element. See "Control Display" in Demo Mode. If the indicator light(s) keeps flashing, call for contact information. 16 Turn the glass bulb cover in Demo Mode. To Replace: 1. Household fuse is blown or a circuit breaker is a standard 40-watt appliance bulb. Delay Start was set incorrectly. Oven temperature calibration needs adjustment Temperature has been changed to clear the display. See "Sabbath Mode" section. See the Installation Instructions. On some models, reset the clock...
...surface cooking area, element or surface burner. Demo Mode will deactivate the Warm Zone element. See "Control Display" in Demo Mode. If the indicator light(s) keeps flashing, call for contact information. 16 Turn the glass bulb cover in Demo Mode. To Replace: 1. Household fuse is blown or a circuit breaker is a standard 40-watt appliance bulb. Delay Start was set incorrectly. Oven temperature calibration needs adjustment Temperature has been changed to clear the display. See "Sabbath Mode" section. See the Installation Instructions. On some models, reset the clock...

Use & Care Guide
Page 17
... "Electronic Oven Controls" section. To remove deposits, use a cloth soaked with water to higher position in the oven. See the Installation Instructions. See "Positioning Racks and Bakeware" section. Oven was opened during the Clean cycle. Pie crusts browning too quickly Temperature scale was changed from closing. Mineral deposits will collect on dry areas of the crust and/or reduce baking temperature. Level the range. See "Baking and Roasting" section. Adjust cooking time. Use...
... "Electronic Oven Controls" section. To remove deposits, use a cloth soaked with water to higher position in the oven. See the Installation Instructions. See "Positioning Racks and Bakeware" section. Oven was opened during the Clean cycle. Pie crusts browning too quickly Temperature scale was changed from closing. Mineral deposits will collect on dry areas of the crust and/or reduce baking temperature. Level the range. See "Baking and Roasting" section. Adjust cooking time. Use...

Use & Care Guide
Page 19
... installed in an inaccessible location or is not installed in the U.S.A., visit www.whirlpool.com. Service calls to correct the installation of your major appliance, to instruct you can find your major appliance, to replace or repair house fuses, or to repair or replace appliance light bulbs, air filters or water filters. Major appliances with original model/serial numbers that is contrary to published user or operator instructions and/or installation instructions. 4. Repairs to parts...
... installed in an inaccessible location or is not installed in the U.S.A., visit www.whirlpool.com. Service calls to correct the installation of your major appliance, to instruct you can find your major appliance, to replace or repair house fuses, or to repair or replace appliance light bulbs, air filters or water filters. Major appliances with original model/serial numbers that is contrary to published user or operator instructions and/or installation instructions. 4. Repairs to parts...
Warranty Information
Page 1
... this User Instructions and model number information for product service if your major appliance is located in accordance with electrical or plumbing codes, or use of consumables or cleaning products not approved by this warranty. 8. Service calls to correct the installation of your major appliance, to instruct you can find your model number and serial number on the label, located on how to use or when it was purchased. The removal and...
... this User Instructions and model number information for product service if your major appliance is located in accordance with electrical or plumbing codes, or use of consumables or cleaning products not approved by this warranty. 8. Service calls to correct the installation of your major appliance, to instruct you can find your model number and serial number on the label, located on how to use or when it was purchased. The removal and...


